Table of Contents >> Show >> Hide
- The 3 Rules of Jewelry Storage (So You Don’t Cry at 7:42 AM)
- 1) Framed Corkboard Organizer (Pins, Hooks, and Instant Satisfaction)
- 2) Picture Frame + Wire Mesh (The Earring Display That Feels Like Art)
- 3) Pegboard Jewelry Wall (Adjustable, Expandable, Unreasonably Fun)
- 4) Inside-the-Closet-Door Hook Grid (Hidden Storage That’s Still Easy)
- 5) Over-the-Door Mirror Cabinet (A Secret Jewelry Lair, Minus the Villain Monologue)
- 6) Ice Cube Tray Drawer Sorter (Tiny Compartments, Big Peace)
- 7) Muffin Tin Organizer (Because Your Earrings Deserve Their Own Cupcakes)
- 8) Pretty Plates and Teacups (Thrifted Storage That Looks Like Décor)
- 9) Tension Rod Necklace Bar (Vertical Storage in a Drawer or Cabinet)
- 10) Paper Towel Holder Bangle Stand (A Countertop Classic)
- 11) Knob-and-Pull Necklace Board (Hardware That Finally Gets to Be the Star)
- 12) Upcycled Cigar Box or Decorative Box with Dividers (Small, Portable, Charming)
- 13) Wine Crate Display Box (Rustic Storage with Built-In Sections)
- 14) Jewelry “Gallery Wall” (Make Your Accessories Part of the Room)
- Jewelry Care Mini-Guide (So Storage Doesn’t Accidentally Wreck Your Stuff)
- Extra Experiences: What It’s Really Like to Organize Jewelry (And Keep It Organized)
- Wrap-Up
If your necklaces are currently reenacting a spaghetti western in your drawer (tangles, drama, and an unexpected villain),
you’re in the right place. Jewelry is small, slippery, and suspiciously talented at disappearingespecially the one earring
you actually like.
The good news: you don’t need a fancy armoire or a professional label maker (although… respect). With a few smart DIY
organizers and some strategic “put-a-hook-on-it” energy, you can store your jewelry so it stays visible, protected, and
ready to wearwithout turning mornings into a scavenger hunt.
The 3 Rules of Jewelry Storage (So You Don’t Cry at 7:42 AM)
- Separate: Prevent tangles and scratches by giving items their own zones.
- See it: The jewelry you can see is the jewelry you’ll actually wear.
- Shield it: Keep pieces away from humidity, direct sunlight, and “mystery drawer crumbs.”
1) Framed Corkboard Organizer (Pins, Hooks, and Instant Satisfaction)
Why it works
A corkboard organizer is like a mini command center for necklaces, bracelets, and lightweight hoops. It keeps pieces
visible and prevents chains from turning into a knot that requires a PhD and a cup of tea.
DIY steps
- Buy a corkboard sheet and cut it to fit a thrifted or unused picture frame.
- Optional but cute: wrap the cork in fabric (pull it tight and staple on the back).
- Screw small cup hooks into the bottom of the frame for necklaces.
- Use pushpins or decorative pins for lightweight chains and earrings.
- Mount into studs or use drywall anchors (jewelry is light, but gravity is undefeated).
Pro tip: Group by “daily wear” vs. “special occasion” so you’re not digging for your go-to studs.
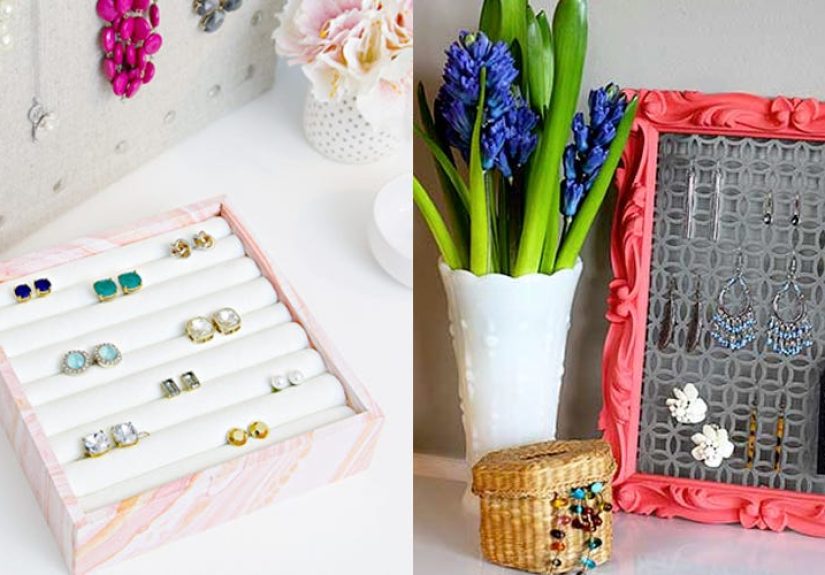
2) Picture Frame + Wire Mesh (The Earring Display That Feels Like Art)
Why it works
Metal mesh (or chicken wire) inside a frame makes it easy to hang earringsespecially hooks and dangly styleswithout
losing backs or pairs. It also doubles as wall décor, which is basically storage’s glow-up.
DIY steps
- Thrift a frame (bonus points if it’s slightly dramatic).
- Cut wire mesh to size and staple it to the back of the frame.
- Sand and paint the frame if needed, then let it dry fully.
- Hang earrings through the openings; use the bottom edge for bracelets on small S-hooks.
Pro tip: Add a ribbon strip across the top for stud earringspoke posts through the ribbon.
3) Pegboard Jewelry Wall (Adjustable, Expandable, Unreasonably Fun)
Why it works
Pegboard is the ultimate “I can change my mind later” storage. Add hooks, cups, shelves, and basketsthen rearrange
whenever your collection grows or your mood changes.
DIY steps
- Cut pegboard to size (hardware stores can often cut it for you).
- Paint it for a finished look and seal it if desired.
- Mount with furring strips so there’s space behind for peg hooks to lock in.
- Add peg hooks for necklaces, small bins for rings, and cups for hair accessories.
Pro tip: Place your longest necklaces on the outer edges so they hang freely.
4) Inside-the-Closet-Door Hook Grid (Hidden Storage That’s Still Easy)
Why it works
Using the inside of a closet door keeps jewelry accessible without turning your bedroom into a boutique display (unless
that’s your vibeno judgment).
DIY steps
- Measure the door clearance so hooks won’t smash into shelves.
- Add adhesive hooks in vertical rows for necklaces and bracelets.
- Use a small over-door rack or mounted strip for extra hanging space.
Pro tip: Assign one row per category: short chains, long chains, bracelets, “statement chaos.”
5) Over-the-Door Mirror Cabinet (A Secret Jewelry Lair, Minus the Villain Monologue)
Why it works
Mirror cabinets hide jewelry behind a full-length mirrorgreat for small spaces and for anyone who wants storage that
doesn’t look like storage.
DIY-friendly upgrade
- If you already own a plain mirror, add small hooks to the back or side edge for necklaces.
- Add adhesive foam strips inside to prevent pieces from rattling.
- Stick a small felt-lined tray inside (or nearby) for rings you wear daily.
Pro tip: If you store fine jewelry, choose a cabinet that can lock and keep it out of humid rooms.
6) Ice Cube Tray Drawer Sorter (Tiny Compartments, Big Peace)
Why it works
An ice cube tray is basically a ready-made organizer for studs, small hoops, earring backs, and rings. It’s cheap, easy,
and suspiciously effective.
DIY steps
- Pick a tray that fits your drawer depth (silicone trays are quieter).
- Dedicate sections: pairs together, backs together, “spares” together.
- Optional: line each pocket with felt for extra protection.
Pro tip: Use one tray for “daily” and one for “occasion” so you don’t mix the basics with the bling.
7) Muffin Tin Organizer (Because Your Earrings Deserve Their Own Cupcakes)
Why it works
A muffin tin holds bigger piecesbracelets, chunkier rings, brooches, and those earrings that could double as wind
chimes.
DIY steps
- Choose a standard or mini muffin tin depending on your jewelry size.
- Place it inside a drawer or on a shelf.
- Line cups with felt circles if you want to avoid scratches and clanking.
8) Pretty Plates and Teacups (Thrifted Storage That Looks Like Décor)
Why it works
Small dishes keep rings and studs corralled on a vanity or dresser. It’s also the easiest DIY on this list, because it
involves absolutely no tools and still makes you feel accomplished.
DIY steps
- Thrift small plates, butter pats, teacups, or tiny bowls.
- Use one for rings, one for studs, one for “things I took off and forgot about.”
- Keep it away from the edge of the countergravity loves a dramatic exit.
9) Tension Rod Necklace Bar (Vertical Storage in a Drawer or Cabinet)
Why it works
A tension rod creates a simple hanging barperfect inside a cabinet, closet nook, or even a deep drawer. It’s great for
bracelets and shorter chains.
DIY steps
- Measure the interior width where you’ll place the rod.
- Install a small tension rod (no drilling required).
- Hang bracelets directly or use S-hooks for necklaces.
Pro tip: Add a second rod lower down for layering (and for avoiding tangles).
10) Paper Towel Holder Bangle Stand (A Countertop Classic)
Why it works
Bangles and chunky bracelets don’t play nicely in small compartments. A vertical stand keeps them visible and easy to
grabplus it looks surprisingly elegant.
DIY steps
- Use a paper towel holder, a standalone towel bar, or a small dowel stand.
- Add rubber feet or a non-slip pad underneath if it slides.
- Stack bracelets by type: everyday, statement, sentimental.
11) Knob-and-Pull Necklace Board (Hardware That Finally Gets to Be the Star)
Why it works
Drawer pulls and knobs make sturdy, spaced-out hanging points that keep necklaces from overlapping too much. It’s also a
fun way to mix vintage and modern hardware for a custom look.
DIY steps
- Cut and sand a wood board (or repurpose a scrap piece).
- Mark evenly spaced holes and attach knobs/pulls with screws.
- Paint or stain the board, then mount it securely to the wall.
Pro tip: Stagger knob heights so longer pieces don’t tangle with shorter ones.
12) Upcycled Cigar Box or Decorative Box with Dividers (Small, Portable, Charming)
Why it works
A compact box is great for keeping jewelry dust-free, especially delicate pieces. Add dividers and it becomes a tiny,
organized treasure chest instead of a “mystery pile.”
DIY steps
- Choose a sturdy box (cigar box, gift box, or decorative storage box).
- Line it with fabric or felt using glue.
- Create dividers from foam board or thin cardboard strips.
- Add a small ring roll made from felt wrapped around a piece of foam.
13) Wine Crate Display Box (Rustic Storage with Built-In Sections)
Why it works
Wine crates naturally create compartmentsperfect for sorting by category. They look great on shelves and can store
bigger pieces like watches, sunglasses, and statement jewelry.
DIY steps
- Sand the crate and wipe off dust.
- Stain or paint if you want a cleaner look.
- Add felt squares to the bottom of each compartment.
- Use one row for earrings (in small dishes), one for bracelets, one for “occasion pieces.”
14) Jewelry “Gallery Wall” (Make Your Accessories Part of the Room)
Why it works
If you love statement necklaces, bold pieces, or seasonal rotations, displaying jewelry as décor makes it easier to wear
and easier to store. You’re basically curating your own tiny museumadmission is free, and the gift shop is your closet.
DIY steps
- Choose 2–4 display pieces: a mesh frame, a corkboard frame, a small pegboard, and a hook strip.
- Lay it out on the floor first to find a balanced arrangement.
- Mount securely and keep the “daily wear” pieces at eye level.
- Rotate by season so you don’t overload the display.
Pro tip: Add a small dish under the gallery wall for rings you remove before bed.
Jewelry Care Mini-Guide (So Storage Doesn’t Accidentally Wreck Your Stuff)
- Avoid humidity: Bathrooms are rough on metalsstore jewelry in a drier spot if you can.
- Prevent scratches: Separate delicate pieces and line trays with felt or soft fabric.
- Reduce tarnish: Keep silver in closed containers or anti-tarnish pouches if possible.
- Stop tangles: Hang necklaces vertically or store each chain in its own small bag.
Extra Experiences: What It’s Really Like to Organize Jewelry (And Keep It Organized)
The organizing part is fun. The staying organized part is where real character development happens.
Most people don’t struggle because they lack storagethey struggle because their storage doesn’t match their habits.
If you toss jewelry onto the dresser at night like it’s a mic drop, you need a landing zone that welcomes the chaos:
a dish, a tray, a tiny box. If you love seeing everything at once, a drawer organizer will feel like you’re hiding your
favorites from yourself (and you’ll stop using it). That’s why the best systems usually combine two ideas: one “display”
method for the pieces you wear weekly, and one “protected” method for the pieces you wear occasionally.
Another common experience: necklaces are the troublemakers of the jewelry world. A necklace can look perfectly innocent
when you place it in a drawer… and then somehow braid itself into a knot with two other chains while you sleep. Hanging
solutionshooks, knobs, rodschange the game because gravity keeps the chain straight instead of letting it mingle with
other chains like it’s networking at a conference. If you do prefer drawer storage, the trick is creating “lanes” for each
necklace. Small pouches, separate compartments, or even sliding each chain into a tiny zip bag (with the clasp sticking
out) prevents that classic tangle spiral.
Earrings have their own special talent: splitting up. The easiest way to keep pairs together is to store them together
immediatelynot later, not “after I wash my face,” not “once I find the other back.” A mesh frame or stud ribbon
display makes it natural to hang both earrings at once. If you’re a drawer person, trays (ice cube trays, bead organizers,
or small divided bins) work best when each compartment is sized for a pair. The moment you store earrings in one big bowl,
you’ve basically opened a tiny thrift store where every purchase is “one random earring.”
Rings are often the easiest to organize… until they aren’t. People tend to remove rings near sinks, bedside tables, and
kitchensplaces where they can roll, fall, or go on an adventure behind appliances. A small ring dish in the spots where you
naturally remove rings saves you from playing “find the sparkle” later. If you own a lot of rings, a DIY ring roll inside a
box or drawer is both satisfying and practical, because it keeps them upright and easy to scan. It also creates a strong
sense of “I have my life together,” even if the rest of the drawer says otherwise.
One of the most helpful “real life” tricks is the seasonal rotation. If you live in hoops all summer and switch to
statement pieces for winter parties, store the off-season jewelry slightly out of reach: top shelf box, back of a drawer,
or the protected compartment of your organizer. This reduces clutter where you actually get ready. It also makes you fall
in love with your collection again when you bring pieces back into rotationlike shopping your own stash, except you don’t
have to explain the purchase to your budget.
Finally: don’t underestimate the power of a 90-second reset. Once a week (or whenever you notice “the pile” returning),
take a tiny lap around your jewelry area: hang stray necklaces, put rings back in their dish, return earrings to the tray.
That short reset keeps your system from collapsing into a glittery junk drawer situation. The goal isn’t perfection. The
goal is waking up, grabbing the jewelry you actually want to wear, and leaving the house without wrestling a chain knot
that looks like it was tied by a mischievous ghost.
Wrap-Up
The best jewelry storage idea is the one you’ll actually use. Pick one “daily-access” solution (like a dish, a mesh frame,
or a hook strip), add one “protected storage” option (like a lined box or drawer organizer), and your mornings get easier
fast. Less tangling, fewer missing pieces, and more wearing what you already ownwithout the dramatic soundtrack.


