Table of Contents >> Show >> Hide
- Why the Fishtail Bracelet Is Such a Favorite
- What You Need Before You Start
- Method 1: How to Make a Fishtail Bracelet on a Rainbow Loom
- Method 2: How to Make a Fishtail Bracelet with Your Fingers
- Tips to Make Your Fishtail Bracelet Look Better
- Common Mistakes and How to Fix Them
- Fun Variations to Try After You Master the Basics
- Which Method Should You Choose?
- Extra Experience and Creative Inspiration
- Conclusion
- SEO Tags
Note: This article is written in clean, web-ready HTML and is based on a synthesis of real U.S.-based craft references and Rainbow Loom guidance, without source links for easier publishing.
If you have a pile of colorful rubber bands, a hook, and the sudden urge to make something adorable before your coffee gets cold, a fishtail bracelet is the perfect place to start. It is one of the easiest and most recognizable Rainbow Loom designs, and it somehow manages to look fancy even though the technique is wonderfully simple. That is the bracelet equivalent of showing up to dinner in jeans and still looking like you planned your outfit.
In this guide, you will learn two easy ways to make a fishtail bracelet with a Rainbow Loom: one using a loom or mini loom, and one using your fingers. Both methods are beginner-friendly, fast, and surprisingly addictive. You make one bracelet, then another, then one “just to test a color combo,” and suddenly you are running a tiny bracelet factory from the kitchen table.
Whether you are crafting with kids, making friendship bracelets, or revisiting your loom-band era with zero shame, this tutorial walks you through the process step by step. Along the way, you will also get design tips, common mistakes to avoid, and ideas for making your fishtail bracelets look more polished and personal.
Why the Fishtail Bracelet Is Such a Favorite
The fishtail bracelet has stayed popular for years because it checks all the right boxes. It is easy enough for beginners, quick enough to finish in one sitting, and stylish enough to wear every day. The pattern creates a neat braided effect that looks more complicated than it really is, which is always a win in the crafting world.
Another reason people love it is flexibility. You can make a classic rainbow version, use two alternating colors, create pastel combinations, or go bold with neon bands. You can keep it simple or add charms, beads, or themed color palettes. In short, the fishtail bracelet is the little black dress of Rainbow Loom projects, only stretchier.
What You Need Before You Start
Basic Supplies
- Rubber bands in your chosen colors
- A Rainbow Loom, mini loom, or two fingers
- A loom hook or small crochet hook
- C-clip or S-clip to close the bracelet
- A flat surface and a little patience
If you are using a full Rainbow Loom, you only need two pegs for a basic fishtail bracelet. That is right, the rest of the loom can sit there looking decorative while you do all the actual work on two pegs like the minimalist crafting icon you are.
Best Band Choices for Beginners
If you are new to loom bracelets, use standard-size rubber bands with a little stretch and consistent thickness. Very old bands can snap, and ultra-thin ones can make the bracelet look uneven. For your first project, pick two or three colors with good contrast so the fishtail pattern is easier to see.
Great starter combinations include:
- Pink and teal
- Purple and white
- Blue, green, and yellow
- Black and neon green
- Classic rainbow order
Method 1: How to Make a Fishtail Bracelet on a Rainbow Loom
This is the most traditional method and a great choice if you have a Rainbow Loom or mini loom available. The steps are easy to repeat, and the pegs help keep your bands in place.
Step 1: Set Up Two Pegs
Choose two pegs next to each other on your loom. If you are using a mini loom, you are already set. If you are using the full Rainbow Loom, ignore the rest of the pegs and focus on just two. This bracelet is not here to waste your energy.
Step 2: Place the First Three Bands
Take your first band and twist it into a figure eight before placing it over the two pegs. This twisted band forms the base. Then place a second band on top without twisting it. Add a third band on top, also without twisting.
At this point, you should have three bands on the pegs, with only the bottom one twisted. This setup is the secret sauce of the fishtail pattern.
Step 3: Lift the Bottom Band Over
Using your hook, grab the bottom band on one side and pull it up and over the peg so it drops into the center. Repeat on the other side. The twisted band will now sit in the middle, and the top two bands will remain on the pegs.
This is the core move you will repeat again and again: lift the bottom band over and into the center.
Step 4: Add One New Band
Place one new band across the two pegs without twisting it. Now you are back to having three bands on the pegs.
Step 5: Repeat the Pattern
Lift the bottom band up and over on both sides. Add a new band. Lift the bottom band again. Keep repeating until the bracelet reaches your desired length.
If you are following a color pattern, stay consistent as you add each new band. This helps the fishtail design look intentional instead of “I grabbed whatever was nearest while watching television.”
Step 6: Finish the Bracelet
When the bracelet is long enough to fit around your wrist, stop adding new bands. You should still have two bands left on the pegs. Move the bottom remaining band over the top one on each side so only one band is left looped across both pegs.
Attach one side of your C-clip or S-clip to the loops still on the pegs. Then remove the bracelet from the loom and connect the other end of the clip to the loops at the beginning of the bracelet. Give it a gentle tug to make sure everything is secure.
Why This Method Works So Well
Using a loom keeps your bracelet structure neat and makes the process easier to control, especially for beginners. It is also ideal if you are making several bracelets in a row and want consistent results. The loom method tends to produce a bracelet that looks a little cleaner and more uniform, which is nice when you are making gifts or matching bracelets for friends.
Method 2: How to Make a Fishtail Bracelet with Your Fingers
No loom? No problem. You can make a fishtail bracelet with just two fingers, and the method is almost identical. This is great for travel, sleepovers, classrooms, or any moment when your loom has mysteriously vanished into the same dimension as missing socks.
Step 1: Use Two Fingers as Your Pegs
Hold out your index and middle finger. These will replace the two pegs of a loom. Make sure your hands are clean and dry so the bands do not slip around more than necessary.
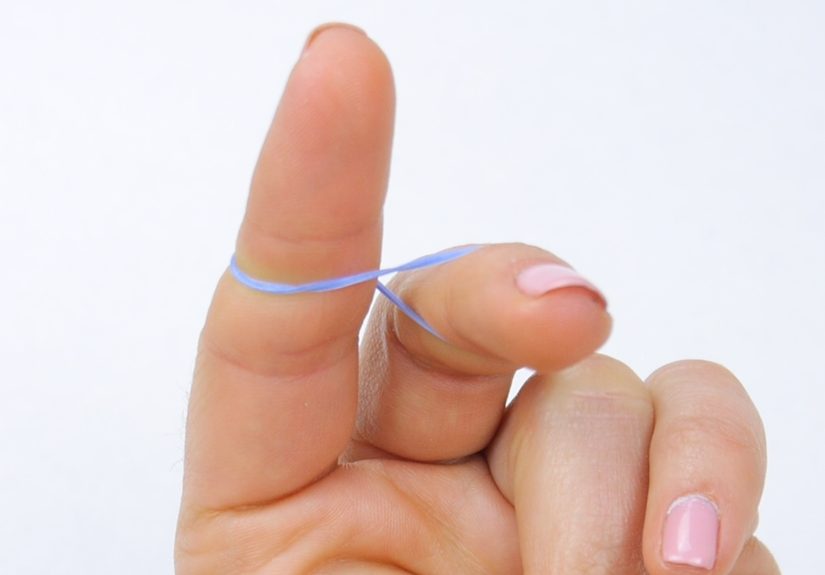
Step 2: Add the First Three Bands
Take your first band and twist it into a figure eight over your two fingers. Add a second band without twisting it, then a third band the same way. Just like the loom method, only the first band gets twisted.
Step 3: Bring the Bottom Band Over
Lift the bottom band over one finger and into the center, then repeat on the other finger. You now have two bands left on your fingers.
Step 4: Add Another Band
Place a new band across both fingers without twisting it. You are back to three bands again.
Step 5: Keep Repeating
Lift the bottom band over both fingers. Add a new band. Repeat. That is the whole pattern. It is simple, rhythmic, and weirdly soothing, like crafting meditation with better accessories at the end.
Step 6: Clip the Ends Together
Once the bracelet is long enough, stop adding new bands. Lift the bottom band over so only one loop remains on your fingers. Attach the clip to that loop, remove the bracelet from your fingers, and connect the clip to the starting end.
When the Finger Method Is Best
This method is perfect when you want a quick bracelet without setting up supplies. It is also a fun way to teach beginners because it strips the process down to the basics. The only downside is that your fingers can get a little tired if you make several bracelets in one session. That said, it is still impressively convenient for such a tiny, portable craft.
Tips to Make Your Fishtail Bracelet Look Better
Keep Even Tension
Try not to pull some bands super tight while leaving others loose. Even tension makes the bracelet look smooth and balanced.
Stretch Gently as You Go
Every few rows, gently tug the bracelet downward. This helps the fishtail pattern settle into place and makes it easier to see what you are doing.
Plan Your Colors
Color order matters more than you might think. A two-color bracelet gives you a crisp, high-contrast braid. A three-color bracelet looks playful. A rainbow sequence creates a cheerful gradient effect that feels classic and nostalgic.
Use a Clip That Fits Securely
A bracelet can look perfect and still fail dramatically if the clip is not attached properly. Make sure both ends are fully hooked before wearing it.
Common Mistakes and How to Fix Them
The Bracelet Looks Too Loose
You may be stretching the bands too much or not keeping consistent tension. Slow down, keep your movements small, and use bands of similar size and quality.
The Pattern Looks Messy
This usually happens when the bottom band is not lifted correctly on both sides. Check that each band lands in the center before you add the next one.
The Bracelet Is Too Short
It happens to the best of us. Just keep looming until it wraps comfortably around your wrist with a little flexibility. Better slightly longer than bracelet-sized regret.
A Band Snaps Mid-Project
Carefully remove the broken band and replace it if possible. If several bands are weak, switch to a fresher batch. Old rubber bands have a dramatic streak.
Fun Variations to Try After You Master the Basics
Once you have the standard fishtail down, you can start experimenting. This is where the craft really gets fun.
- Rainbow fishtail: Use a full spectrum of colors in repeating order.
- Ombre fishtail: Blend shades from light to dark.
- Holiday fishtail: Pick seasonal colors like red and green, orange and black, or red, white, and blue.
- Charm bracelet version: Add a small charm near the clip for extra personality.
- Beaded fishtail: Slide lightweight beads onto selected bands for sparkle and texture.
You can also make matching bracelets for friends, party favors, classroom crafts, or simple handmade gifts. A fishtail bracelet is small, affordable, and personal, which is a pretty excellent combination.
Which Method Should You Choose?
If you want the neatest finish and easiest control, use the loom method. If you want speed, portability, or bragging rights for making a bracelet with nothing but your hands, go with the finger method.
Honestly, the best choice depends on your mood. Some days you want the structure of a loom. Other days you are on the couch with a bag of bands and a can-do attitude. Both methods create the same classic fishtail look, and both are easy enough for beginners to enjoy.
Extra Experience and Creative Inspiration
One of the most charming things about making a fishtail bracelet with a Rainbow Loom is how quickly it turns into more than just a craft project. At first, it feels like a simple way to pass the time. You line up your bands, twist the first one, hook the bottom band over the top, and think, “Well, this is easy.” Then ten minutes later, you are sorting colors like a tiny fashion editor and naming combinations as if you are launching your own bracelet collection. Suddenly “pink and clear” is not just a color choice. It is “Strawberry Ice.” “Blue, white, and silver” becomes “Winter Sky.” And yes, this is a completely reasonable way to spend an afternoon.
For many people, fishtail bracelets also come with a dose of nostalgia. They bring back memories of trading handmade bracelets with friends, making stacks of them during summer break, or carrying little plastic bags full of rubber bands everywhere like they were treasure. The craft is simple, but the experience is surprisingly memorable. There is something satisfying about turning a handful of small stretchy bands into something wearable in less than half an hour. It feels creative without being complicated, which is a rare and beautiful thing.
Another great part of the experience is how social it can be. Fishtail bracelets are perfect for group crafting because the technique is easy to teach and fun to repeat. One person starts on the loom, another uses fingers, someone else experiments with a pattern that may or may not work, and before long the table is covered in colorful little braided bracelets. Even people who claim they are “not crafty” often get hooked after making just one. The project has a low-pressure, high-reward kind of charm.
It is also a wonderful activity for kids and adults to do together. Younger crafters can practice fine motor skills, pattern recognition, and patience, while older crafters get the relaxing joy of repetitive handwork. And because the supplies are compact and relatively simple, it is easy to bring the project to birthday parties, rainy-day playdates, road trips, classrooms, or family gatherings. It takes up far less space than many other crafts, which means fewer supplies to manage and fewer moments of stepping on mysterious glitter three weeks later.
As you make more fishtail bracelets, you start to notice the little choices that change the result. Tighter tension gives you a more compact braid. Softer tension creates a looser, stretchier bracelet. Contrasting colors make the fishtail pattern pop, while similar shades create a subtler look. You begin to understand why some bracelets feel playful, some look polished, and some practically scream “I was made during a sugar rush.” That trial-and-error experience is part of the fun. Every bracelet teaches you something new, even if that lesson is simply “neon yellow and camouflage green were not soulmates.”
There is also a quiet pride that comes from finishing a bracelet and clipping it closed. It is a small project, sure, but it is still something you made with your own hands. That matters. In a world full of fast purchases and endless scrolling, making even a tiny handmade bracelet can feel refreshingly tangible. You can wear it, gift it, trade it, or tuck it into a memory box. It is quick to create but oddly meaningful, and that is probably why the fishtail bracelet has remained such a favorite for so long.
If you are just starting, do not worry about perfection. Your first bracelet does not need to look like it belongs in a craft museum. It just needs to hold together and make you smile. The beauty of the fishtail design is that it is forgiving, repeatable, and easy to improve with practice. So pick your colors, choose your method, and make one. Then probably make five more, because that is usually how this goes.
Conclusion
Learning two easy ways to make a fishtail bracelet with a Rainbow Loom gives you a simple, fun craft you can enjoy almost anywhere. The loom method is tidy and beginner-friendly, while the finger method is wonderfully portable and just as effective. Both use the same basic pattern, both can be customized with endless color combinations, and both are perfect for friendship bracelets, party crafts, or a relaxing creative break.
If you want a project that is easy to learn, fun to repeat, and actually cute enough to wear, the fishtail bracelet delivers. It is one of those crafts that proves you do not need a giant budget or a complicated pattern to make something satisfying. Sometimes all you need is a hook, a few bands, and the willingness to say, “I’ll just make one more.”


