Table of Contents >> Show >> Hide
- What Most “After” Kitchens Have in Common
- Quick Reality Check Before You Demo Anything
- 33 Before-and-After Kitchen Makeovers
- A. Layout & Flow Makeovers (Big Impact)
- 1) Closed-Off Kitchen → Open Gathering Hub
- 2) Awkward Doorway Traffic → Clear Work Zone
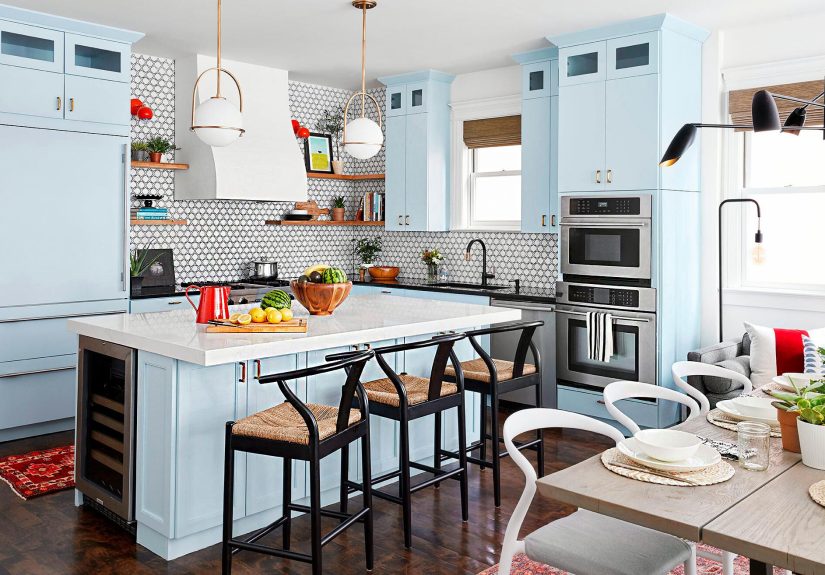
- 3) Tiny Island That Did Nothing → Proper Island With Purpose
- 4) Island Bottleneck → Peninsula That Frees the Path
- 5) Dishwasher Far From Sink → Cleanup That Doesn’t Splash the Floor
- 6) Galley Kitchen With a Wall → Galley That Breathes
- 7) No Dining Spot → Banquette Nook That Saves Space
- 8) Too-Small Kitchen → Addition That Adds Function (Not Just Square Feet)
- B. Cabinet Transformations (Because Cabinets Are the Main Character)
- 9) Dated Wood Cabinets → Painted Cabinets With Modern Hardware
- 10) Builder-Grade Doors → Semi-Custom Upgrade Where It Counts
- 11) Mismatched Finishes → Cohesive Two-Tone Cabinets
- 12) “Too Much Wood” → Paint + Warm Wood Balance
- 13) Dark, Heavy Cabinets → Lightened Space With Bright Uppers
- 14) Plain Cabinet Faces → Texture With Reeding, Glass, or Detail Panels
- 15) Upper Cabinets Everywhere → Open Shelving Where It Makes Sense
- 16) Wasted Corners → Corner Storage That Actually Works
- C. Countertops & Backsplashes (The “Wow” Factor Zone)
- 17) Busy Counter + Busy Tile → Clean Stone-Look Simplicity
- 18) Basic Subway Tile → Herringbone or Vertical Stack Upgrade
- 19) No Backsplash Personality → Statement Tile Moment
- 20) Grout Grid Everywhere → Larger Format Tile (Less Visual Noise)
- 21) Plain White Countertops → Warm Butcher Block Accent
- 22) Builder-Grade Laminate → Durable, Low-Stress Surfaces
- D. Lighting & “It Feels New” Upgrades
- E. Storage & Organization Makeovers (Small Changes, Big Sanity)
- F. Budget & Rental-Friendly Transformations
- How to Choose Your “Best Before-and-After” Strategy
- Conclusion
- Extra: Real-World Experiences That Make (or Break) a Kitchen Renovation
If your kitchen currently gives off “historic artifact” energy (sticky drawers, mystery fluorescent lighting, and
cabinets that have seen things), you’re in the right place. Before-and-after kitchen makeovers are like makeover
shows for rooms: dramatic reveals, big personality shifts, and the occasional plot twist where moving a wall
saves the day.
This guide pulls together the most repeatable lessons designers, remodel pros, and real homeowners keep coming
back toso you can steal the good ideas, skip the expensive regrets, and plan a renovation that fits your life.
You’ll get 33 makeover “stories” (quick, specific, and packed with takeaways), plus practical planning rules
around layout, storage, lighting, finishes, and those little details that make a kitchen feel brand-new.
What Most “After” Kitchens Have in Common
The best transformations aren’t just prettierthey work better. Across many successful remodels, the same few
upgrades show up again and again:
- Smarter flow: fewer bottlenecks, better spacing, and clear paths where people actually walk.
- Updated surfaces: cabinets, counters, backsplash, and floors that look intentional (not “I guess that was on sale”).
- Layered lighting: a mix of ambient + task + accent so you can chop onions without living in a cave.
- Storage that earns its keep: pull-outs, pantry zones, deep drawers, and “hidden” space you didn’t know you had.
- A focal point: a statement hood, bold tile, standout island color, or lighting that says “adult lives here.”
Quick Reality Check Before You Demo Anything
1) Decide your remodel level
- Refresh: paint, hardware, lighting, backsplash, faucets, styling.
- Upgrade: new counters, partial cabinet changes, improved storage, better appliances.
- Rebuild: layout changes, new cabinetry, electrical/plumbing moves, bigger structural work.
2) Use spacing rules that prevent daily annoyance
Kitchens feel “tight” when aisles are too narrow or traffic cuts through prep zones. A simple guideline many
planners use: keep work aisles wide enough for one cook (and wider if multiple people cook), and keep walkways
comfortable so people can pass without bumping into open dishwasher doors or each other.
3) Plan ventilation like it matters (because it does)
A gorgeous kitchen that traps smoke and odors is basically a fancy campfire. If you cook often, prioritize
a vent hood that fits your setup and habits, and make sure it actually vents effectively for your space.
33 Before-and-After Kitchen Makeovers
Each makeover below is written like a mini case study: what was “before,” what changed “after,” and the
renovation idea you can borrow.
A. Layout & Flow Makeovers (Big Impact)
1) Closed-Off Kitchen → Open Gathering Hub
Before: walls boxed the kitchen in, and the cook was basically exiled. After: a wall came down, sightlines opened,
and an island created a natural “hang out here” zone. Steal this: open the kitchen to one adjacent space, not necessarily all of them.
2) Awkward Doorway Traffic → Clear Work Zone
Before: door swings and walk-through paths cut straight across prep space. After: a doorway shifted a few feet and the work core
finally made sense. Steal this: fix circulation first; décor can’t out-cute bad traffic patterns.
3) Tiny Island That Did Nothing → Proper Island With Purpose
Before: a “decorative” island that offered little prep room. After: a larger island with storage and seating became the new command
center. Steal this: if an island is too small to prep, seat, or store, it’s basically a large coffee table.
4) Island Bottleneck → Peninsula That Frees the Path
Before: an island created tight walkways and awkward passing. After: swapping to a peninsula opened traffic and added casual seating.
Steal this: peninsulas are underratedespecially in smaller kitchens that need boundaries without gridlock.
5) Dishwasher Far From Sink → Cleanup That Doesn’t Splash the Floor
Before: loading the dishwasher required a wet parade across the kitchen. After: the layout was reworked so sink and dishwasher actually
behave like friends. Steal this: place cleanup tools togethersink, dishwasher, trash/recyclingso chores shrink.
6) Galley Kitchen With a Wall → Galley That Breathes
Before: a narrow galley felt dark and separate. After: opening a wall to dining space kept the efficient galley footprint but made it feel larger.
Steal this: keep the galley layout if it worksjust “borrow” light and openness from the next room.
7) No Dining Spot → Banquette Nook That Saves Space
Before: nowhere to eat that didn’t block movement. After: a banquette created a cozy dining zone with storage underneath.
Steal this: banquettes are space-efficient and visually soften a room full of rectangles.
8) Too-Small Kitchen → Addition That Adds Function (Not Just Square Feet)
Before: the kitchen couldn’t support daily life. After: an addition created room for a better layout and modern work zones.
Steal this: if you expand, expand for functionpantry, landing space, better work trianglenot just “more air.”
B. Cabinet Transformations (Because Cabinets Are the Main Character)
9) Dated Wood Cabinets → Painted Cabinets With Modern Hardware
Before: heavy wood tones and tired pulls. After: fresh paint plus updated hardware made everything feel intentional.
Steal this: hardware is “jewelry”small change, surprisingly powerful.
10) Builder-Grade Doors → Semi-Custom Upgrade Where It Counts
Before: basic boxes that looked flat. After: better doors (and a few thoughtful details like panels or trim) created a custom vibe.
Steal this: invest in visible itemsdoor style, crown, end panelsbefore splurging on hidden extras.
11) Mismatched Finishes → Cohesive Two-Tone Cabinets
Before: everything blended into one beige-ish blur. After: two-tone cabinetry added depth (often darker lowers, lighter uppers).
Steal this: if you’re nervous about bold color, start with the island or lower cabinets.
12) “Too Much Wood” → Paint + Warm Wood Balance
Before: wood cabinets + wood floor + wood vibes everywhere. After: a painted cabinet color kept warmth but added contrast.
Steal this: the goal isn’t “no wood”it’s “wood, but make it curated.”
13) Dark, Heavy Cabinets → Lightened Space With Bright Uppers
Before: the kitchen felt smaller because everything was dark. After: brighter uppers (or open shelving) lifted the room visually.
Steal this: if you can’t add windows, fake it with lighter vertical surfaces and better lighting.
14) Plain Cabinet Faces → Texture With Reeding, Glass, or Detail Panels
Before: flat doors that felt forgettable. After: one or two textured moments (glass-fronts, reeding, or panel detail) added personality.
Steal this: do accents, not chaospick one “special” cabinet zone.
15) Upper Cabinets Everywhere → Open Shelving Where It Makes Sense
Before: a wall of uppers made the kitchen feel crowded. After: selective open shelving created breathing room and display space.
Steal this: keep open shelves for things you use often (and can keep tidy), not your entire mug collection from 2013.
16) Wasted Corners → Corner Storage That Actually Works
Before: corner cabinets became black holes. After: upgraded corner solutions (like pull-outs or lazy Susans) made storage usable.
Steal this: corners are where good storage systems earn their paycheck.
C. Countertops & Backsplashes (The “Wow” Factor Zone)
17) Busy Counter + Busy Tile → Clean Stone-Look Simplicity
Before: patterns competed for attention. After: simpler surfaces let the room feel calmer and more modern.
Steal this: if your cabinets are bold, keep counters/backsplash quieter (and vice versa).
18) Basic Subway Tile → Herringbone or Vertical Stack Upgrade
Before: standard layout felt generic. After: same tile category, better patternsuddenly it’s a “designer” kitchen.
Steal this: changing tile orientation is cheaper than changing tile material.
19) No Backsplash Personality → Statement Tile Moment
Before: the wall behind the range was… a wall. After: bold tile created a focal point (and a reason to take kitchen photos).
Steal this: go dramatic in one zone: behind the range, sink, or coffee bar.
20) Grout Grid Everywhere → Larger Format Tile (Less Visual Noise)
Before: too many grout lines made the kitchen look busy. After: larger-format tile gave a smoother, calmer backdrop.
Steal this: fewer grout lines often reads “more expensive,” even if the tile cost is similar.
21) Plain White Countertops → Warm Butcher Block Accent
Before: the kitchen felt cold and flat. After: butcher block on an island or coffee nook added warmth and contrast.
Steal this: mix materials strategicallyone warm element can balance a whole room.
22) Builder-Grade Laminate → Durable, Low-Stress Surfaces
Before: counters scratched, stained, and looked tired. After: upgraded surfaces improved daily use and made the kitchen feel new.
Steal this: choose counters based on your habits (hot pans? messy cooks? kids?) not just the mood board.
D. Lighting & “It Feels New” Upgrades
23) One Sad Ceiling Light → Layered Lighting Plan
Before: shadows everywhere, especially at the counters. After: recessed or ceiling lighting + under-cabinet lights + pendants over the island.
Steal this: task lighting is not optionalit’s the difference between “cozy” and “I can’t see the knife.”
24) Dated Track Lighting → Modern Fixtures With Better Scale
Before: fixtures screamed “installed during a previous millennium.” After: a few well-scaled fixtures made the kitchen feel current.
Steal this: pick lighting that matches the room’s sizetiny pendants over a big island look like earrings on a refrigerator.
25) Weak Venting → Hood That’s Functional and Stylish
Before: cooking smells lingered like uninvited guests. After: a better hood improved air quality and became a design feature.
Steal this: a statement hood is one of the best “centerpieces” that also does real work.
26) Old Faucet + Sink → New Plumbing Fixtures That Modernize Instantly
Before: an outdated faucet dragged the whole room down. After: a new faucet (and sometimes a deeper sink) made the workspace feel upgraded.
Steal this: high-touch itemsfaucet, pulls, switchesdeliver daily satisfaction for relatively low effort.
E. Storage & Organization Makeovers (Small Changes, Big Sanity)
27) Cluttered Counters → “Appliance Garage” or Dedicated Zones
Before: toaster, blender, coffee gear lived on every surface. After: a dedicated zone tucked clutter away and made counters usable.
Steal this: assign a home to the daily stuff (coffee, snacks, lunch packing) and your kitchen will feel twice as big.
28) Deep Base Cabinets → Deep Drawers for Pots and Pans
Before: crawling into cabinets like an archaeologist. After: deep drawers made heavy cookware accessible.
Steal this: drawers are the cheat code of kitchen storage.
29) Pantry Chaos → Pull-Out Pantry or Tall Cabinet Storage
Before: canned goods played hide-and-seek. After: pull-outs or a tall pantry cabinet created visibility and order.
Steal this: if you can’t see it, you’ll buy it again. (Hello, third paprika.)
30) Dead Toe-Kick Space → Hidden Toe-Kick Drawers
Before: empty space under cabinets. After: toe-kick drawers stored flat items like trays, linens, or baking sheets.
Steal this: use “invisible” space for things you don’t need dailybut want within reach.
F. Budget & Rental-Friendly Transformations
31) Rental Kitchen Blah → Peel-and-Stick Backsplash + Hardware Swap
Before: boring backsplash and tired cabinet pulls. After: peel-and-stick tile added color, and new hardware made cabinets feel updated.
Steal this: renters: focus on reversible winsbacksplash, lighting (where allowed), hardware, and styling.
32) “Looks Expensive” Without Expensive → Lighting + Trim + Styling
Before: everything felt builder-basic. After: under-cabinet lighting, upgraded fixtures, and a few thoughtful details made it feel custom.
Steal this: sometimes “high-end” is just good lighting and fewer random items on the counter.
33) Full Remodel Not Possible → Renovation in Stages
Before: the kitchen needed everything, but the budget said “nice try.” After: staged upgrades tackled the biggest pain points first.
Steal this: plan the end game now, then do projects in the right order so you don’t redo work later.
How to Choose Your “Best Before-and-After” Strategy
Start with a 15-minute kitchen audit
- List your daily annoyances: poor lighting, not enough prep space, clutter, awkward traffic, storage black holes.
- Mark what can’t move easily: plumbing stacks, windows, exterior walls, ventilation routes.
- Pick one hero goal: “more prep space,” “better storage,” “open it up,” or “make it brighter.”
- Choose 1–2 splurges and keep the rest sensible: great hood, durable counters, or better storage systems.
Don’t skip lighting (seriously)
A kitchen can have gorgeous cabinets and still feel “off” if the lighting is wrong. Good plans combine ceiling
lighting with task lighting, and place lights so you’re not casting shadows onto your work surface. If you only
fix one thing in a kitchen refresh, lighting is a top contender for “most dramatic improvement per dollar.”
Pick finishes that match your lifestyle
Love to cook? Prioritize ventilation, landing space, and easy-clean surfaces. Have kids? Durable finishes and
deep drawers win. Host often? Put seating and serving flow first. The best “after” kitchens aren’t trend trophies;
they’re rooms that make everyday life easier.
Conclusion
Before-and-after kitchen makeovers prove one thing: you don’t need the biggest budget to get the biggest impact
you need the right plan. Fix flow, layer lighting, choose surfaces you can live with, and build storage around
how you actually use the room (not how a catalog says you should). Whether you’re doing a full renovation or a
smart refresh, your “after” kitchen should feel like a better version of your lifejust with nicer hardware.
Extra: Real-World Experiences That Make (or Break) a Kitchen Renovation
A kitchen makeover looks glamorous in photos, but the lived experience matters just as much as the “after” shot.
Here are common, real-world lessons homeowners and remodel pros talk aboutaka the stuff nobody puts on a mood
board, but everyone remembers.
1) The “temporary kitchen” phase is a personality test. Even a small renovation can disrupt routines.
People often discover they miss simple things: making coffee without stepping over tools, washing dishes in a sink
that isn’t in the bathtub, or finding snacks without opening five boxes labeled “MISC.” A practical tip: set up a
mini station before work beginscoffee maker, microwave, a dish tub, paper towels, and a bin for daily essentials.
It won’t feel like a full kitchen, but it will feel like civilization.
2) Decision fatigue is real. Renovations come with a parade of choices: cabinet color, door style,
countertop edge, grout color, hardware finish, faucet shape, lighting temperature. Many homeowners say the most
stressful part isn’t demolitionit’s picking between “Warm White #3” and “Warm White #4” when both look identical
at 11:47 p.m. under a single lamp. A proven strategy is to decide your “anchors” first (cabinet color, counters,
flooring), then choose everything else to support those anchors.
3) The layout either saves you every dayor quietly annoys you every day. People who remodel without
addressing traffic and landing space often regret it, even if the kitchen is beautiful. Common “why didn’t we”
moments include: no landing zone near the fridge, not enough space next to the range, and a dishwasher that blocks
a key walkway. Before committing, homeowners often find it helpful to mark proposed cabinet lines and island size
with painter’s tape on the floor, then walk through real routines: unloading groceries, making breakfast, loading
the dishwasher, and hosting friends.
4) Cabinets and storage should reflect your habits, not fantasy. In many before-and-after stories,
the real hero is storage: deep drawers, pull-outs, pantry organization, and zones for coffee, baking, or kid snacks.
The most satisfying kitchens tend to have “homes” for the daily chaosso counters stay clear without constant effort.
A good rule is to place items where you use them: cooking tools near the range, prep tools near the main counter,
dishes near the dishwasher for easy unloading, and trash/recycling near the sink.
5) The little upgrades feel surprisingly huge. Homeowners often say their favorite changes aren’t
always the big-ticket items. New hardware can make old cabinets feel current. Under-cabinet lighting can make the
whole room feel more expensive. A better faucet can improve daily life immediately. These “small” choices are also
the ones you touch and see every dayso they tend to deliver a lot of satisfaction for the effort.
6) Patience pays offespecially with timelines and backorders. Renovations rarely move in a perfectly
straight line. A missing part, a delayed appliance, or one extra day of electrical work can ripple through the schedule.
Many people say the most helpful mindset is planning for flexibility: keep a buffer in your timeline, avoid stacking
too many custom items with long lead times, and choose alternates early so you’re not scrambling mid-project.
In short: the best kitchen renovation experience is one where the plan matches real life. The “after” should be
more than prettyit should be calmer, easier, and more functional than what you had before. That’s the makeover
that actually lasts.


