Table of Contents >> Show >> Hide
- The 60-Second Jam Sandwich Checklist
- Way 1: The Classic Peanut Butter & Jam Sandwich (PB&J, but with jam)
- Way 2: The Butter & Jam Sandwich (Simple, glossy, nostalgic)
- Way 3: The Grilled Jam Sandwich (Crispy outside, warm inside)
- Way 4: The PB&J French Toast Sandwich (Breakfast mode)
- How to Keep a Jam Sandwich from Getting Soggy
- FAQ: Jam Sandwich Questions People Actually Ask
- of Real-World Jam Sandwich Experiences
- Conclusion
A jam sandwich looks innocent. Two slices of bread. Some fruit spread. Done.
And yet, in the wild, jam sandwiches routinely turn into sticky pocket disasters, soggy lunchbox regrets,
or a “why is this tearing my mouth apart?” situation.
Let’s fix that. Below are four genuinely different ways to make a jam sandwichfrom the classic
peanut-butter-and-jam situation to a grilled, crispy version and a breakfast-worthy French toast upgrade.
You’ll also get quick tips on bread, jam, assembly, and how to keep everything from turning into fruit-flavored drywall paste.
The 60-Second Jam Sandwich Checklist
Before the four methods, here’s the cheat code: most “bad” jam sandwiches aren’t ruined by jam.
They’re ruined by texture, temperature, and physics.
Bread: pick your mission
- Soft sandwich bread for classic lunchbox comfort and clean bites.
- Whole wheat for more structure and a nutty background note.
- Brioche or challah for dessert vibes and French toast upgrades.
- Gluten-free bread works best lightly toasted first (more on that later).
Jam vs. jelly vs. preserves (quickly, without a lecture)
If you’re using “jam” as a blanket term, you’re not alone. But these spreads behave differently:
jam tends to include crushed fruit, jelly is usually made from juice and is smoother,
and preserves often have larger fruit pieces. Translation: jelly spreads easily, jam tastes fruitier,
and preserves can be a little chunky (in a good way) but need a gentle hand to avoid bread shredding.
Temperature matters more than you think
- Cold butter or cold cream cheese tears bread. Let it soften for 5–10 minutes.
- If your jam is straight from the fridge, stir it once in the jar. It spreads easier and rips less bread.
- Room-temp peanut butter is friendlier than “stored upside down in an arctic bunker” peanut butter.
Flavor tip: A tiny pinch of salt (especially with strawberry or raspberry jam)
makes fruit taste louder. Not “salty.” Just… more.
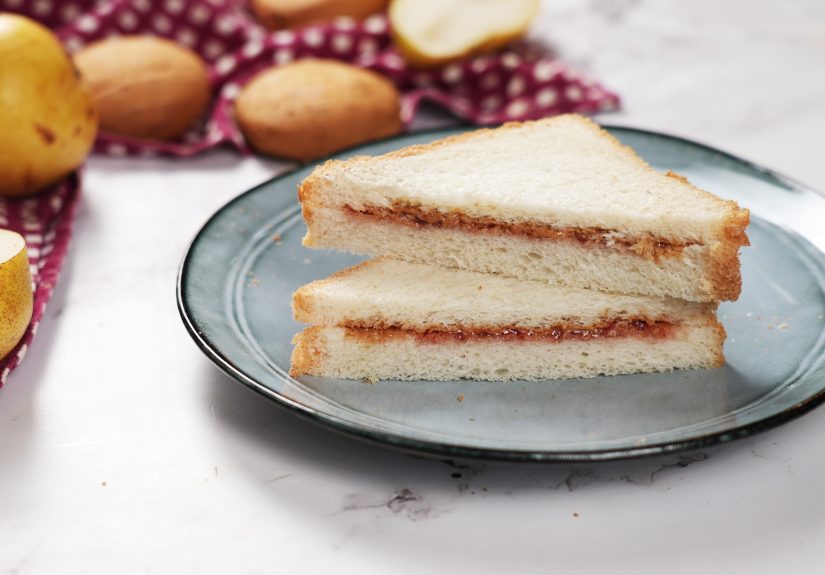
Way 1: The Classic Peanut Butter & Jam Sandwich (PB&J, but with jam)
This is the version most Americans secretly mean when they say “jam sandwich.”
The goal is a sandwich that’s sweet, nutty, and satisfyingwithout turning into a mouth-gluing,
roof-of-mouth workout.
Ingredients
- 2 slices sandwich bread (white, wheat, or your favorite)
- Peanut butter (creamy or crunchy)
- Jam (strawberry, grape, raspberry, apricotchoose your hero)
- Optional: pinch of salt, sliced banana, or a drizzle of honey
Step-by-step (the “no regrets” method)
- Spread peanut butter on both slices. Yes, both. This is your moisture barrier.
-
Add jam to one sliceon top of the peanut butterthen close the sandwich.
Putting jam in the middle reduces sogginess and keeps the bread from absorbing fruit moisture. -
Press lightly, then slice. Triangles are childhood. Rectangles are efficiency.
Tiny squares are “I’m hosting a fancy picnic and pretending I’m calm.”
How much filling is “right”?
The “perfect ratio” is personal. A practical starting point is about 1 to 2 tablespoons of peanut butter
and about 1 to 2 tablespoons of jam, depending on your bread size and how sweet you like it.
The real rule: enough to taste in every bite, not so much that it squirts out the sides like fruit toothpaste.
Easy upgrades (still lunchbox-friendly)
- Texture upgrade: crunchy peanut butter + smooth jam, or smooth peanut butter + seedy jam.
- Banana upgrade: add thin banana slices (pat dry if they’re very ripe).
- “Adult” upgrade: swap peanut butter for almond butter or sunflower seed butter.
- Flavor upgrade: a whisper of cinnamon or a dab of vanilla bean paste in the peanut butter.
Way 2: The Butter & Jam Sandwich (Simple, glossy, nostalgic)
If PB&J is the rock concert, butter & jam is the cozy acoustic set.
It’s sweet, creamy, and shockingly satisfyingespecially with salted butter.
Also: it takes about 45 seconds to make, which is excellent news for everyone who owns a morning.
Ingredients
- 2 slices soft bread (white, milk bread, or whole wheat)
- Softened salted butter (or unsalted + pinch of salt)
- Jam or fruit preserves
- Optional: lemon zest, flaky salt, or a smear of ricotta
Step-by-step
- Butter both slices edge-to-edge. This creates a delicious seal and helps prevent sogginess.
- Add jam to one side (on top of the butter), then close the sandwich.
- Slice and serve. If you’re packing it, wrap it snugly (paper works better than plastic for texture).
Why this works
Butter is fat, and fat is a natural moisture-blocker. In sandwich terms, it’s basically a tiny raincoat for your bread.
This is why butter & jam sandwiches stay pleasant longer than you’d expect, even when the jam is generous.
Fun variations (pick one, don’t start a jam bar unless you want to)
- Strawberry jam + salted butter + pinch of flaky salt = sweet-salty magic.
- Apricot jam + lemon zest = bright and sunny.
- Raspberry jam + a thin layer of ricotta = “dessert but pretending it’s breakfast.”
Way 3: The Grilled Jam Sandwich (Crispy outside, warm inside)
This is the method for when you want a jam sandwich to feel like an event.
Grilling gives you a crisp, buttery crust and warms the filling just enough to turn it luxurious.
It’s basically the “I put on real pants today” version of a jam sandwich.
Two paths: choose your grilled destiny
Option A: Grilled Peanut Butter & Jam
- 2 slices bread
- Peanut butter
- Jam
- Soft butter (for the outside of the bread)
Option B: Grilled Jam & Cheese (sweet-salty, grown-up, dangerously snackable)
- 2 slices bread
- Jam (fig, raspberry, or strawberry are great here)
- Cheese (cheddar, brie, provolone, Swiss, or a nutty aged cheese)
- Soft butter (for grilling)
- Optional: thinly sliced onion, crispy bacon, or a swipe of Dijon
Grilling method (works for both options)
- Build the sandwich inside. Spread peanut butter (or add cheese) and jam.
- Butter the outside of each bread slice. This is how you get that golden crust.
-
Cook in a skillet over medium heat until golden, 2–4 minutes per side.
Press gently with a spatula so it heats evenly (don’t smash it into a pancake). - Rest 1 minute, then slice. The filling will be hot and a little molten. Respect the jam lava.
Pro tips for grilled success
- Keep the heat medium. Too high and you’ll burn bread before the middle warms.
- Use sturdy bread if you’re adding cheese or extra fillings.
- Balance sweet and salty. Jam + sharp cheddar is a classic move for a reason.
Snack logic: If someone claims jam and cheese “sounds weird,”
they have simply not met the right combination of fruit preserves and melted dairy.
Introduce them. Kindly. With napkins.
Way 4: The PB&J French Toast Sandwich (Breakfast mode)
This one is for mornings, brunch, or any day you want your jam sandwich to wear a tuxedo.
You take a peanut butter and jam sandwich, dip it in French toast custard, and pan-fry it.
The result is crisp outside, warm inside, and extremely hard to eat “politely.”
Ingredients
- 2 slices bread (thicker is better here)
- Peanut butter
- Jam (strawberry is a crowd-pleaser)
- 1 egg
- 2–3 tablespoons milk
- Splash of vanilla (optional but wonderful)
- Butter for the pan
- Optional toppings: powdered sugar, fresh fruit, maple syrup
Step-by-step
- Make a PB&J sandwich (peanut butter + jam inside).
- Whisk egg, milk, and vanilla in a shallow bowl.
-
Dip the sandwich quicklyjust a few seconds per side.
You want coating, not sponge behavior. -
Pan-fry in butter over medium heat, about 2–3 minutes per side,
until golden and warmed through. - Serve immediately. Add fruit, dust with powdered sugar, or drizzle syrup.
Why it’s worth the extra dish
The custard-toasted exterior adds crunch and richness, while the warm jam turns glossy and fragrant.
It’s the same comforting flavors, just dressed up enough to justify calling it “brunch.”
How to Keep a Jam Sandwich from Getting Soggy
If you’re eating immediately, congratulations: you have escaped the lunchbox timeline.
If you’re packing it for later, use these tricks to keep the bread from turning into a sad sponge.
1) Use a fat barrier
- Peanut butter on both slices (jam in the middle)
- Butter on both slices (jam on top)
- Cream cheese or a thin layer of mayo for savory jam-and-cheese variations
2) Toast strategically
Lightly toasting the bread can slow down moisture absorption. For grilled versions, you’re already doing it.
For packed lunches, a quick toast (then fully cooling the bread) helps, especially with softer loaves.
3) Pack like a sandwich grown-up
- Let warm ingredients cool before assembling (steam = sogginess).
- Wrap in parchment or sandwich paper for better texture than plastic.
- If it’s very hot outside, consider an insulated bag with a cold packespecially if you add dairy.
FAQ: Jam Sandwich Questions People Actually Ask
What’s the best jam for a sandwich?
For classic sweetness, grape is nostalgic; strawberry is universally friendly;
raspberry adds a tart edge; apricot is bright and floral.
If your peanut butter is very sweet, a slightly tart jam balances it nicely.
Jam or jellywhich is better?
Jelly spreads smoothly and neatly. Jam often tastes more fruit-forward.
Preserves bring texture but can be chunkiergreat if you like fruit pieces and don’t mind a slightly messier sandwich.
Can I make jam sandwiches ahead of time?
Yes, especially the classic PB&J with peanut butter on both sides or a butter-and-jam sandwich.
If you’re adding cream cheese, keep it cold and follow safe lunch-packing habits.
What are nut-free options?
Use sunflower seed butter or soy nut butter as the “fatty” component,
or go butter & jam. For schools with allergy rules, always follow your school’s guidance.
How do I make a jam sandwich feel more filling?
- Add a protein: nut/seed butter, Greek-yogurt spread, or a side of hard cheese
- Choose sturdier bread: whole wheat or a thicker slice
- Add fruit: banana slices or berries on the side
of Real-World Jam Sandwich Experiences
Jam sandwiches are less of a recipe and more of a life skilllike tying your shoes,
except tastier and slightly more dangerous to wear on a white shirt.
Once you start making them on purpose (instead of in a panic), you begin to notice patterns.
There’s the “late morning” jam sandwich: you open the kitchen cabinet, discover one slice of bread left,
and immediately realize you have entered a survival game. This is where the butter-and-jam method shines.
Softened butter spreads like a dream, jam follows, and suddenly your breakfast feels intentionallike you planned
to be out of bread all along. If you add a pinch of salt, it tastes like you paid attention in culinary school.
You did not. You simply added salt. It’s a beautiful hack.
Then there’s the lunchbox jam sandwich, which lives in a parallel universe where time moves slower
and moisture travels faster. You make a perfect sandwich at 7:10 a.m., and by noon it has mysteriously become a
soft, sticky rectangle with the structural integrity of a wet napkin. That’s why the “fat barrier” trick feels like magic:
peanut butter on both sides or butter on both sides gives the jam fewer opportunities to seep into the bread.
It’s not fussyit’s just smart sandwich engineering. (Yes, that is a real phrase now.)
Grilled jam sandwiches have their own personality. They’re the snack you make “just once”
and then you keep making because the skillet is already out and you’re already standing there.
The first bite is always a little dramatic: crispy edges, warm filling, and that moment where you realize jam can be
both comforting and slightly molten. Add cheese and it becomes a whole new food category:
sweet meets salty, and suddenly everyone who said “jam doesn’t belong with cheese” is asking for a second half.
And the French toast PB&J? That’s the weekend versionthe one you make when you have five extra minutes
and you want your kitchen to smell like buttery toast and fruit. It’s also the version that turns a regular morning into
“brunch energy” without requiring reservations, a dress code, or the emotional stamina to decide between 12 kinds of eggs.
It’s warm, crisp, and a little messy in the best way, like a dessert pretending to be breakfast and getting away with it.
Over time, you’ll discover your own jam-sandwich signature: maybe you’re a crunchy peanut butter person,
maybe you like raspberry preserves with visible seeds, maybe you’re loyal to grape jelly because it tastes like childhood
and that’s reason enough. The point is: once you know the four methods, you can match the sandwich to the moment.
Comfort. Convenience. Crispy indulgence. Breakfast-level drama. Same ideafour different moods.
Conclusion
A jam sandwich can be a quick snack, a reliable lunch, or a full-on skillet-toasted treatit just depends on how you build it.
Use a fat barrier to prevent soggy bread, choose a jam you genuinely like, and don’t be afraid to grill it when you want something extra.
Your future self (and your napkins) will thank you.


