Table of Contents >> Show >> Hide
- What does “played back via an aircraft altitude indicator” actually mean?
- A quick guide to aircraft altimeters and altitude indicators
- How bikes record elevation (and why the numbers sometimes look like they had coffee)
- The real-world inspiration: turning GPX ride files into moving needles
- How the translation works: from elevation numbers to aircraft-style signals
- A concrete example: replaying a climb and descent like a cockpit “black box”
- If you want to build something similar: a high-level roadmap
- Data quality tips so your needle doesn’t lie (too loudly)
- Why this concept is weirdly powerful for cyclists
- Conclusion
- Extra Add-On: of Real-World “Playback” Experiences
If you’ve ever finished a ride, stared at your elevation chart, and thought, “Cool… now how do I make this feel like I just landed a Cessna?” congratulations: you are exactly the kind of wonderful nerd this article is for.
“Bike Rides Played Back Via Aircraft Altitude Indicator” sounds like a sentence you’d hear in a museum gift shop right before you accidentally adopt a 12-pound brass gauge and name it “Captain Needle.” But it’s also a real, wildly clever idea: take the elevation data from a recorded bike ride and “replay” it on a vintage aircraft altitude indicator (often called an altimeter) so the needle climbs and drops exactly like your ride did.
The result is part data visualization, part mechanical theater, and part “why do I suddenly want to wear aviator sunglasses in my garage?” It’s also a surprisingly useful way to relive a climb, evaluate pacing, or just watch your best descent againwithout having to explain to your family why you’re watching your own helmet-cam footage for the eighth time.
What does “played back via an aircraft altitude indicator” actually mean?
In plain English: you record a bike ride using a device that logs GPS (and usually elevation). That data can be exported as a file (commonly GPX). Then, instead of showing the elevation profile as a line graph on a phone or website, you feed the elevation points to a controller that drives an aircraft-style altitude indicator. The indicator’s needle moves up and down as if it were “reading altitude,” but it’s really reenacting your ride’s elevation over time.
Think of it like turning your ride into a physical “instrument playback.” A screen says, “Here’s a chart.” A gauge says, “Here’s a story… with a needle.” And honestly, needles are dramatic. They point at things. They swoop. They judge.
Why this is more than a gimmick
- It’s instantly readable: Even non-cyclists understand “needle went up = climb” and “needle dropped = wheeeee.”
- It’s satisfying: Mechanical movement turns your digital workout into something you can hear, see, and feel.
- It’s motivating: Watching a big climb replay can remind you, “Oh yeahI did that.”
- It’s art: A vintage cockpit instrument animating your trail ride is basically kinetic sculpture with dirt under its nails.
A quick guide to aircraft altimeters and altitude indicators
To appreciate the hack, it helps to know what these instruments do in their original habitat: airplanes. In aviation, an altimeter (or altitude indicator) shows altitude based on air pressure. Air pressure decreases as you go higher, so the instrument converts pressure changes into an altitude reading.
The classic pressure altimeter (the “sealed wafers” kind)
Traditional mechanical altimeters contain aneroid elementssealed “wafers” that expand and contract as pressure changes. Linkages translate that motion into needle movement. In most aircraft setups, the altimeter senses static air pressure from the aircraft’s static port and uses a barometric setting (often shown in a small window) so the reading can be adjusted to local conditions.
Practical takeaway: altimeters are pressure-measuring devices pretending to be altitude-measuring devices. When pressure changes due to weather, the same physical altitude can “look” different unless the instrument is set correctly.
Remote/servo-driven indicators (the “electromechanical” kind)
Many aircraft panels also use remote indicators driven by signals from other systems. Instead of the instrument directly sensing pressure, it may be controlled by a servo loop and specialized signals (including synchro signals, a classic way to represent angles electrically). That matters because the bike-ride playback concept often relies on driving a vintage indicator electronicallymaking it “think” it’s receiving legitimate aircraft-style inputs.
In other words: we’re not stuffing trail air into a cockpit gauge. We’re translating ride data into the language the instrument expects.
How bikes record elevation (and why the numbers sometimes look like they had coffee)
On a bike ride, elevation data usually comes from one of two sources:
- GPS-based elevation: Uses satellite geometry. It can work, but it’s often noisier vertically than horizontally.
- Barometric elevation: Uses air pressure (like an altimeter). Usually smoother and better for climb totals, but it can drift with weather.
Why your “elevation gain” changes between apps
You can ride the same loop and end up with different climb totals depending on the device and platform. Some systems smooth the data aggressively, some discard “spikes,” and some use elevation databases to correct GPS-based recordings. That’s why one platform may show 1,850 feet of climbing while another swears it was 2,200 and is weirdly confident about it.
For a playback project, this is actually a feature, not a bug: you can choose which “version” of your ride you want to replayraw device data, corrected data, or a smoothed, cinematic cut that doesn’t make the needle vibrate like it’s auditioning for a role as a hummingbird.
The real-world inspiration: turning GPX ride files into moving needles
The idea gained attention through a maker project that repurposed a vintage aircraft altitude indicator to replay recorded mountain bike climbs and descents. The high-level flow looks like this:
- Record a ride on a watch, bike computer, or phone.
- Export a GPX file containing time-stamped track points, including elevation.
- Parse the elevation data with a script (often Python), optionally speeding it up for quick playback.
- Send elevation points to a microcontroller (for example, a Raspberry Pi Pico-class board).
- Convert elevation into control signals (synchro-style signals and power waveforms) that drive the indicator.
- Watch the needle reenact your climb and descent like it’s narrating an action movie.
What’s a GPX file, and why does everyone use it?
GPX (GPS Exchange Format) is a lightweight XML format designed for swapping GPS datatracks, routes, waypointsbetween devices and services. It’s popular because it’s open, widely supported, and structured in a way that’s friendly to scripts and data processing.
For ride playback, the key GPX ingredients are: timestamps, track points, and elevation values. That’s enough to reconstruct an elevation profile and “play” it back at real speed or fast-forward (because watching a three-hour ride in real time is only fun if you also want to recreate the soreness in real time).
How the translation works: from elevation numbers to aircraft-style signals
This is where the project shifts from “cycling data” to “vintage instrumentation.” Many classic aircraft indicators are designed around 400 Hz electrical systems and may use synchrosdevices that represent shaft angles electrically using AC signals. Synchros were a big deal long before everything became digital, and they remain a wonderfully robust way to transmit “turn this dial to this position” across a system.
Synchros in one friendly mental picture
Imagine you want a needle to point to the right angle. Instead of sending “angle = 37 degrees” as a digital number, you send AC waveforms whose relationships encode that angle. The receiving hardware interprets those waveforms and physically moves the needle into place.
For a bike ride playback build, you take your elevation (say, 1,240 feet), map it to where the needle should be, compute the required control angle, then generate the waveforms that represent that angle. A converter board can use digital-to-analog converters (DACs) and power amplifiers to create the higher-power AC signals a vintage instrument expects.
Why 400 Hz shows up in aircraft instruments
Aircraft electrical systems commonly use 400 Hz AC because higher frequency allows motors and transformers to be smaller and lighteran advantage when “excess weight” is another way to say “less fuel and more sadness.” When you repurpose older avionics or indicators, you may need to recreate that 400 Hz world so the instrument behaves normally.
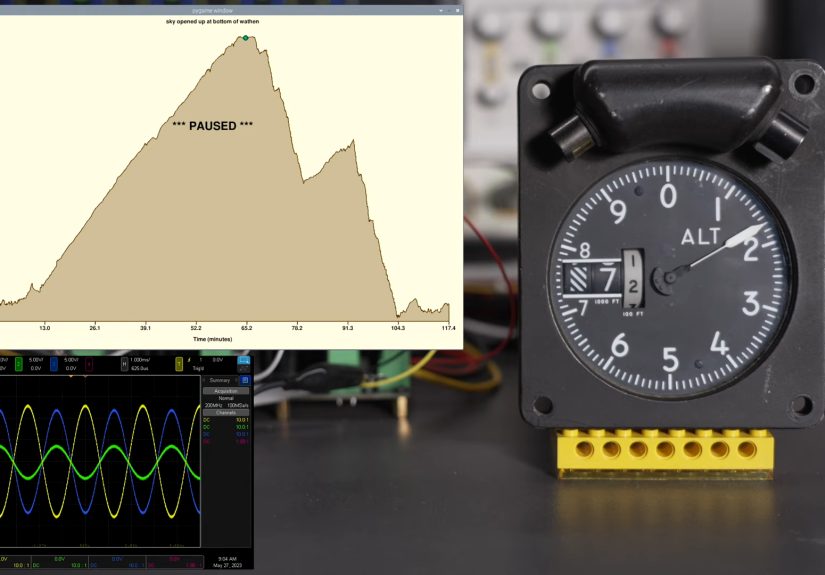
A concrete example: replaying a climb and descent like a cockpit “black box”
Let’s say your mountain bike ride includes:
- Start: 820 ft
- Peak climb: 2,140 ft
- Finish: 900 ft
- Total ride time: 1 hour 45 minutes
In a playback setup, you might speed the time up 60× so the whole ride replays in about 1 minute 45 seconds. That means the altitude indicator needle climbs briskly from 820 to 2,140, pauses if your data shows you stopped at the top (you know, “snack-based navigation”), and then drops fast during the descent.
Suddenly, the ride becomes a little performance: the needle surges during steep sections, eases during rollers, and dives on descents. If your elevation data includes small bumps, you’ll see micro-motions that match trail texture. It’s a physical reminder that climbs aren’t just “up,” they’re “up, up, waitdown a bitup again why is this trail shaped like a heartbeat?”
If you want to build something similar: a high-level roadmap
This isn’t a solder-by-solder tutorial (because every vintage instrument is its own spicy mystery), but here’s a practical, safe framework to think about it:
1) Decide what story you’re replaying
- Elevation profile only: simplest, most visually clear.
- Climb rate (vertical speed) style: more dynamic, but requires derivative calculations.
- Multiple instruments: altitude + speed + heading = instant “bike cockpit” (and instant project creep).
2) Choose your data source
- Bike computer/watch GPX export: usually best quality, especially with a barometric altimeter.
- Phone recording: workable, but can be noisier depending on sensor quality and terrain.
- Platform-corrected elevation: good for smoothing GPS errors; just be consistent.
3) Pick an indicator and learn its “language”
Not all “altimeters” are equal. Some are pressure-sensing mechanical instruments. Others are remote indicators designed to be driven electronically. Before you buy anything vintage, research the part, find documentation if possible, and confirm whether it expects synchro signals, servo control voltages, or something else.
4) Translate elevation into motion
The core software steps typically look like this:
- Parse GPX track points and extract elevation + timestamps.
- Resample/smooth the data to reduce jitter (optional but often wise).
- Scale time for playback speed (real time, 10×, 60×, etc.).
- Map elevation to the gauge’s display range.
- Generate the electrical outputs needed to drive the indicator.
The fun part is deciding how “literal” you want to be. Some people replay every point. Others smooth the profile so the needle moves like a well-directed movie rather than a shaky handheld documentary.
Data quality tips so your needle doesn’t lie (too loudly)
Use barometric data when possible
Devices with barometric altimeters generally produce more consistent climbing totals, especially under tree cover or in terrain where GPS signals get messy. But barometric sensors can drift with weather and temperature changes, so the best results come from good calibration and stable conditions.
Keep your sensors clean
Many cycling computers have tiny barometric ports/vents. If they clog with sweat, dust, or trail grit, your elevation can skew. Cleaning those ports and starting the ride with a solid GPS lock can improve data quality significantly.
Expect some “platform personality”
Some platforms smooth more, some less. Some correct GPS elevation by looking up a baseline elevation map. Some trust barometric data and only apply certain filters. None of them are “perfect,” but they can be consistentand consistency is what makes playback feel honest.
Why this concept is weirdly powerful for cyclists
Cyclists already live in a world of numbers: watts, heart rate, cadence, speed, elevation gain. The problem is that numbers on a screen can feel like paperwork. A physical aircraft-style altitude indicator makes the data feel alive.
You’re no longer looking at an abstract chart. You’re watching your ride unfold. You can see where the climb got steep because the needle slows and strains. You can see where you paused at the top because the needle rests like it’s catching its breath. And the descent? The needle drops with the kind of confidence you wish your knees had.
Conclusion
“Bike Rides Played Back Via Aircraft Altitude Indicator” is the rare idea that’s simultaneously practical, ridiculous, and deeply satisfying. It combines three worldscycling, data, and aviation instrumentationinto one moving needle that tells the truth about your ride in a way that feels human.
If you’re a rider who loves elevation profiles, this is a new way to relive your climbs and descents. If you’re a maker who loves vintage instruments, it’s a perfect excuse to rescue a cockpit gauge from obscurity. And if you’re both… well, welcome to the club. Please keep your hands and snacks inside the cockpit at all times.
Extra Add-On: of Real-World “Playback” Experiences
The first time you watch a bike ride replay on an aircraft altitude indicator, you’ll probably laughbecause it’s objectively funny to see a serious aviation instrument spend its retirement reenacting your weekend hobby. The needle rises like it’s climbing toward flight level whatever, while you stand there in a hoodie, holding a water bottle, thinking, “Yes. This is exactly what I meant to do with my life.”
Experience #1: The “Oh, that climb was longer than I remember” moment. On a screen, you can zoom in and out, but it’s still a chart. On a gauge, you feel duration differently. When the needle crawls upward for what feels like forever, you realize your memory edited the climb down to a highlight reel. The instrument does not care about your ego. It keeps climbing.
Experience #2: The “why is it vibrating?” debugging spiral. You’ll notice tiny needle jitters that match noisy dataespecially if your elevation came from GPS-only recording or if the weather was changing. That’s when you start learning about smoothing filters, resampling, and why barometric sensors are beloved and cursed at the same time. You’ll experiment with different playback profiles until the needle moves like a confident narrator instead of a caffeinated squirrel.
Experience #3: The top-of-climb pause becomes a character beat. If your data shows a stop at the summitmaybe you took a photo, maybe you questioned your choices, maybe you inhaled a granola bar like it was life supportthe needle rests there. And it’s surprisingly emotional. That little pause becomes a tiny memorial to “the moment before the descent,” when you’re sweaty, proud, and slightly afraid of what your front tire is about to do.
Experience #4: The descent replay is pure joy. Watching the needle drop quickly is basically the mechanical version of shouting “WHEEEE” without frightening the neighbors. It’s also a neat way to compare descents: one trail might produce a clean, steep drop; another might show stair-step patterns that match switchbacks and rolling sections.
Experience #5: It becomes a ritual, not just a gadget. After a tough week, you can replay a favorite ride in under two minutes, and it’s like a tiny, tactile reminder that you still do hard things on purpose. Riders love metrics because they’re proof. This kind of playback is proof with a heartbeatone needle, one story, one climb at a time.


