Table of Contents >> Show >> Hide
- Why Choose Brick Wall Stamping Over Real Brick?
- Tools and Materials You’ll Need
- Step-by-Step: Brick Wall Stamping in Under 30 Minutes (For the Fun Part)
- Optional: Add Whitewash or “Aged” Effects
- Where Brick Wall Stamping Looks Best
- Common Mistakes (and How to Fix Them)
- How Durable Is a Faux Brick Stamped Wall?
- Real-World Experiences with Brick Wall Stamping
- Final Thoughts: A High-Impact DIY with Low Commitment
Have a boring little wall that stares at you every time you walk by? The kind of “blah” space
that makes your entryway feel more like a rental office than a cozy home? That’s exactly the
kind of wall the famous “Brick Wall STAMPING and This One in Under 30 Minutes!” project
on Hometalk set out to fix and it did it with a simple brick stamp, some paint, and a bit
of bravery.
The idea is genius: instead of installing real brick (heavy, dusty, expensive, and not very
renter-friendly), you create a DIY faux brick wall using a flexible stamp and layered paint
to mimic the texture and color of real brick. The stamping portion can be done in about half an
hour on a small wall, once your prep work is finished. That makes it one of the fastest ways to
add character, charm, and a little “wow, you did that?!” to your home.
In this guide, we’ll walk through:
- Why brick wall stamping is such a smart alternative to real brick
- Exactly what tools and materials you need
- Step-by-step instructions to recreate the Hometalk-inspired look
- Pro tips for realistic color, aging, and layout
- Common mistakes and how to fix them
- Real-world experiences and lessons from multiple DIY projects
By the end, you’ll know how to turn a plain wall into a faux-exposed-brick masterpiece without
masonry dust, mortar joints, or a contractor in sight.
Why Choose Brick Wall Stamping Over Real Brick?
Real brick walls are beautiful, but they come with a few “fun” extras: cost, weight, mess, and
the potential need to rebuild half your house. Faux brick stamping gives you the look and feel
of brick without any of the structural drama.
It’s Budget-Friendly
A real brick veneer accent wall can easily run hundreds of dollars in materials alone, not to
mention installation if you’re not doing it yourself. In contrast, a stamped faux brick wall
uses:
- Interior wall paint (which you may already have on hand)
- A reusable brick stamp or sponge system
- Basic painting tools you probably own
For many DIYers, the total cost for a small entry wall is closer to the price of a nice dinner
out than a major renovation.
It’s Lightweight and Renter-Friendly
Real brick adds weight to your walls and may require reinforcement. A stamped faux brick finish
adds zero structural load. It’s just paint. That means:
- You can do it on drywall, plaster, or even previously painted walls.
- It’s ideal for upper stories or condo walls where added weight is an issue.
- Renters can paint over it later if they need to return the wall to a neutral color.
It’s Fast
Once your base coat is dry, the stamping itself can go quickly. For a small wall, you can
literally stamp out a full faux brick pattern in about 30 minutes of active work. You’ll still
need some time for prep and paint drying, but compared to installing real brick, this is
lightning fast.
It’s Surprisingly Realistic
When you use layered paint colors and a slightly imperfect stamping technique (we’ll talk about
that in a minute), you can create the subtle variations, soft edges, and irregularities that
mimic real brick. Add a little aging or a light whitewash, and most people won’t realize it’s
not the real thing until they touch it.
Tools and Materials You’ll Need
Exact brands vary from project to project, but most brick wall stamping tutorials use the same
basic supply list. Here’s what you’ll want on hand:
Core Supplies
- Brick wall stamp or brick sponge stamp (flexible enough to wrap slightly over texture)
- Interior latex paint in a “mortar” color (light gray, warm greige, or off-white)
- Brick color paints – usually 2–3 shades (classic red brick, deeper brown, and maybe a rusty or warm tone)
- Paint tray and liners
- Small roller or wide brush for base coat
- Artist brushes or small angled brushes for touch-ups
- Painter’s tape to protect trim and adjoining walls
- Drop cloths for floors and furniture
- Level or laser level to keep your first row straight
- Pencil or chalk line to mark guidelines
Prep and Safety Items
- Mild cleaner or degreaser to wipe down the wall
- Spackle and sanding block (for patching holes and smoothing rough spots)
- Primer (especially if the wall is glossy or stained)
- Step stool or ladder for taller walls
- Gloves and old clothes you don’t mind getting paint on
If you’re working on a textured wall, don’t panic. Many DIYers have successfully stamped over
light to medium texture. The flexible stamp (or a roughed-up sponge) can bridge some of that
unevenness. Just know that texture will slightly change the final look, often in a good way,
making it more rustic and bricklike.
Step-by-Step: Brick Wall Stamping in Under 30 Minutes (For the Fun Part)
The original Hometalk project focused on a small entry wall, which is ideal for this technique:
easy to reach, high visual impact, and low risk. Here’s how to recreate the look.
Step 1: Prep the Wall
-
Clean the surface. Wipe down the wall with a mild cleaner to remove dust, oils, and
stray fingerprints. Let it dry completely. - Patch holes. Fill nail holes and small dents with spackle. Sand smooth once dry.
-
Prime if needed. If your wall is very dark, glossy, or stained, use a good
quality primer so your “mortar” color goes on evenly. -
Tape off edges. Use painter’s tape along baseboards, trim, adjoining walls, and
ceilings to keep things neat.
This isn’t the glamorous part, but it’s what makes the final result look intentional instead of
“I got carried away with paint on a Sunday.”
Step 2: Paint the Mortar Background
Roll or brush on your mortar-colored paint over the entire wall. This is the color that will
peek through between the bricks and around the edges, so:
- Choose a neutral light gray, beige, or off-white.
- A matte or eggshell finish usually looks most like real masonry.
- Apply one to two coats, depending on coverage.
Allow the base coat to dry fully before stamping. If the wall is tacky, your stamp can pull
paint off instead of laying color on.
Step 3: Mix Your Brick Colors
Real bricks are never a single flat color, so you don’t want all your “bricks” to be identical.
A simple approach:
- Start with a classic brick red or warm terracotta as your main color.
- Add a deeper brown or umber for shadows and darker bricks.
- Keep a lighter, more orange or rosy tone nearby for variation.
Many DIYers simply pour multiple colors into one tray and lightly swirl them together so the
stamp picks up mixed tones. The key is not to overmix; you want streaks and swirls, not a
perfectly blended new color.
Step 4: Practice on Scrap First
Before committing to the wall, practice stamping on a piece of cardboard or scrap board:
- Load the stamp lightly – you shouldn’t see drips.
- Press the stamp down firmly and evenly, then lift straight off.
- Check the pattern. Are you getting clear edges? Too much paint? Not enough?
Adjust your paint load and pressure until you like the look. This five-minute test run can save
you from a lot of touch-up later.
Step 5: Mark a Level Starting Line
Use a level or laser level to mark a straight horizontal line where your first row of bricks
will sit. If your first row is crooked, everything above it will look just a little “off,” and
your brain will notice even if you don’t know why.
Step 6: Start Stamping Your First Row
Now the fun part: stamping!
- Load your stamp in the paint tray, then offload any excess on a scrap surface.
- Line the bottom of the stamp up with your level line.
- Press the stamp firmly onto the wall, making sure all parts make contact.
- Lift straight off to avoid smearing.
Work your way across the wall, brick by brick, keeping a consistent small gap (your “mortar
line”) between impressions. It doesn’t need to be perfect real brick isn’t.
Step 7: Stagger the Next Row
For the second row, shift the stamp left or right by half a brick so the joints are staggered.
This is what makes it look like traditional running-bond brickwork instead of a grid. Continue:
- Row by row, stamp across, then move down.
- Occasionally rotate or slightly tilt the stamp to vary the pattern.
- Reload paint as needed, but keep it light and controlled.
On a small wall, you’ll be amazed at how quickly it fills in. This is where that “under 30
minutes” stamping time feels very real once your rhythm kicks in, you’re just brick, brick,
brick, done.
Step 8: Touch Up and Add Dimension
After you’ve stamped the entire wall:
-
Use a small brush to fix any obvious gaps along the edges of bricks, especially near corners
or trim. -
If some bricks look too flat, dab a bit of darker color on one side or a lighter color along
the top edge to mimic natural shading. -
For a more aged look, lightly dry-brush a soft gray or off-white over a few bricks to break
up the color.
Imperfection is your friend here. The subtle variations are what trick the eye into reading this
as “real” brick, not a painted pattern.
Optional: Add Whitewash or “Aged” Effects
If you love the look of slightly chalky, time-worn brick, you can add a quick whitewash on top
of your stamped pattern:
- Mix white paint with water (about 1:1 or 1:2, depending on how sheer you want it).
- Lightly brush it over sections of the brick, then wipe back with a rag.
- Focus more on random patches rather than coating everything evenly.
This softens the reds and browns, gives a more modern farmhouse feel, and hides minor stamping
imperfections at the same time.
Where Brick Wall Stamping Looks Best
You can technically stamp any wall, but there are some spaces where a faux brick wall really
shines:
-
Entryway or foyer: Just like the original Hometalk project, a small entry wall is
the perfect place to add character. -
Behind a console or sofa: A brick accent wall makes simple furniture pieces look
styled and intentional. -
Around a faux fireplace: If you have a decorative (non-wood-burning) mantel, a
stamped brick surround completes the look. - Dining nook or breakfast area: A brick feature here feels cozy and café-like.
- Bedroom headboard wall: Brick behind the bed adds texture without clutter.
For high-moisture areas like bathrooms or backsplashes, just be sure to use appropriate paint
and consider a clear protective topcoat for easier cleaning.
Common Mistakes (and How to Fix Them)
Problem: Crooked Rows
If you skip the level step, you might end up with a wall that looks like the bricks are slowly
sliding off. To fix:
- Use your base color to “erase” a portion of the crooked row.
- Re-mark a level line and re-stamp that section.
Problem: Blobby Edges
Too much paint on the stamp can cause the bricks to look like rectangles of pudding instead of
crisp shapes.
- Blot the stamp more thoroughly before stamping.
- Use a small brush and your mortar color to clean up the edges and redefine joints.
Problem: Pattern Looks Too Repetitive
Real brick walls never repeat perfectly like wallpaper, so if yours looks too uniform:
- Add a few “broken” or partial bricks at the edges.
- Glaze a small area with a slightly different tone.
- Randomly soften a few joints with a damp cloth while the paint is still fresh.
Problem: Colors Look Flat
If your bricks feel too one-note, layer:
- Dry-brush a slightly darker color on the bottom or one side of certain bricks.
- Add a warm or cool tone selectively to mimic the variety found in real clay bricks.
How Durable Is a Faux Brick Stamped Wall?
Because this is ultimately a painted finish, durability comes down to:
- The quality of your paint and primer
- Proper surface prep (clean, dry, and patched)
- Whether the wall gets bumped, scuffed, or washed regularly
In most low-traffic areas like entryways or dining rooms, a stamped brick wall holds up just
like any other painted wall. For extra protection, especially in hallways or kids’ rooms, you
can add a matte clear sealer once everything is fully dry.
Real-World Experiences with Brick Wall Stamping
After looking at a variety of brick stamping projects shared by DIYers, a few patterns emerge
pun fully intended.
Smaller Walls Are the Perfect Starter Project
The original Hometalk project focused on a narrow entry wall, which turned out to be the ideal
test space. Many DIYers report the same thing: starting small reduces pressure, lets you learn
the technique, and still creates a big visual payoff. If you fall in love with the look (you
probably will), you can always repeat the project on a larger wall later.
Practice Rows Are Worth Their Weight in Paint
People who took five to ten minutes to practice on cardboard almost always report smoother
results and fewer “oops” moments. Those who skipped this step often ended up having to repaint
and start over in at least one section. A little warm-up stamping lets you:
- Dial in the right amount of paint on the stamp
- Figure out how hard to press on your specific wall texture
- See how your chosen brick colors look together in real life
Texture Changes the Personality (But Not the Success)
One of the most interesting things you see across different projects is how wall texture affects
the final look. On a perfectly smooth wall, bricks look crisp and a little more modern. On a
lightly textured surface, the edges soften and the pattern feels a bit more rustic or aged
which many people actually prefer. The key is adjusting your pressure and paint load to suit
your wall.
Color Choices Can Completely Shift the Style
Even with the same stamp, the vibe can change dramatically based on color:
-
Classic red and brown tones give a traditional loft or row-house feel, great for entryways
and living rooms. -
Softer grays and taupes feel more modern and pair well with minimalist furniture and black
accents. -
Heavily whitewashed bricks lean cottage, farmhouse, or coastal, especially when paired with
wood tones and greenery.
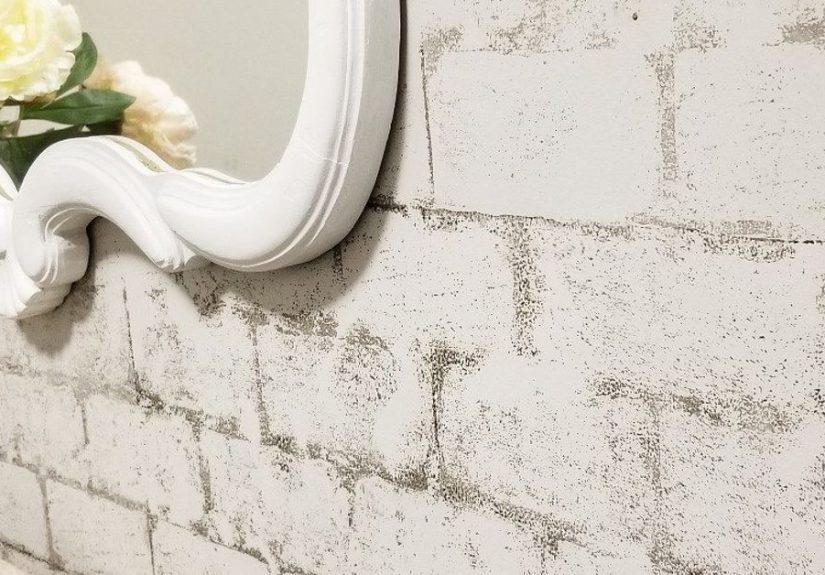
The original Hometalk-style wall leans into that bright, airy, slightly whitewashed look, which
is part of why it works so well in a small entry. It adds texture without making the space feel
darker.
“Under 30 Minutes” Is Realistic for the Stamping Phase
Most people who say they finished in about half an hour are talking about the stamping
portion alone, on a small wall. Realistically, you’ll spend additional time on:
- Prepping and priming the wall
- Letting the mortar-colored base coat dry
- Cleaning up and removing tape
Even with that, this still qualifies as a “weekend afternoon” project, not a full-blown
renovation. For a lot of DIYers, that balance of quick transformation and relatively low
effort is exactly what makes brick wall stamping addictive.
Confidence Grows Fast
One of the best parts of this type of project is how quickly your confidence builds. The first
few stamps might feel nerve-racking (“What if I ruin the wall?”), but by the third or fourth
row, most people are moving at a comfortable pace, improvising small variations, and already
thinking about what wall they’ll do next. The learning curve is short, and the payoff is big.
Final Thoughts: A High-Impact DIY with Low Commitment
Brick wall stamping proves you don’t need power tools, stacks of heavy materials, or a
contractor to completely change the feel of a room. With a smart brick stamp, a few cans of
paint, and an hour or two of focused effort, you can transform a “nothing” wall into a
textural, photo-worthy feature that looks shockingly like real brick.
If your entryway, hallway, or awkward little wall niche has been begging for personality, this
Hometalk-inspired DIY faux brick wall is a perfect place to start. Begin with a small
space, embrace a bit of imperfection, and watch your home’s character multiply one stamped
brick at a time.
SEO JSON TAGS


