Table of Contents >> Show >> Hide
- What a Home Barre Studio Needs (and What It Doesn’t)
- Step 1: Pick the Right Spot (Layout Beats Square Footage)
- Step 2: Choose Your Barre (Wall-Mounted vs. Freestanding vs. DIY)
- Step 3: Get Flooring Right (Your Joints Will File a Complaint If You Don’t)
- Step 4: Mirrors, Lighting, and Camera Angles (Alignment Is the Whole Point)
- Step 5: Sound, Storage, and The “Studio Vibe” (Motivation Is a Design Feature)
- Step 6: Stock the Right Barre Props (Simple, Effective, Not a Shopping Spiral)
- Step 7: Safety and Setup Rules That Keep You Training (Instead of Icing)
- Budgeting: Three Home Barre Studio Builds
- How to Make It Stick: Turn Your Barre Studio Into a Habit Machine
- of Real-World Barre Studio Experience (The Stuff No One Mentions)
- Conclusion
If you’ve ever left a barre class thinking, “I need this… but also I need to not pay boutique-studio prices forever,” welcome.
Building your own barre studio at home is one of the rare fitness upgrades that’s equal parts practical, motivating, and oddly satisfying.
It’s like giving your living room a job: support your pliés, please.
The good news: a “barre studio” doesn’t require a spare wing of your house or a chandelier made of resistance bands.
With the right setupbarre, floor, mirror, sound, and a little safety common senseyou can create a space that feels legit,
looks great on video, and makes you want to show up even when your motivation is taking a nap.
What a Home Barre Studio Needs (and What It Doesn’t)
Let’s define the minimum effective “studio.” You need a stable surface to hold (a barre), enough room to move safely,
and a way to check alignment (usually a mirror, sometimes a camera). Everything elseLED lights, fancy storage,
curated playlists that scream “French café in Pilates form”is optional (but fun).
The “must-haves” checklist
- Space: A clear rectangle where you can step side-to-side, hinge, and extend arms without hitting furniture.
- Barre or sturdy substitute: Wall-mounted, freestanding, or a safe DIY option.
- Flooring with grip + comfort: Support joints, avoid slips, reduce noise.
- Mirror or camera setup: For form checks (and keeping shoulders from creeping up to your ears).
- Ventilation and lighting: Because nobody wants to sweat in a cave.
- Small props (optional but common): Light dumbbells, mini band, Pilates ball, slider discs, mat.
What you don’t need
- A huge room. Many great studios start as a “corner with boundaries.”
- Expensive machines. Barre is bodyweight-focused by design.
- Perfect aesthetics on day one. Build function first; decorate later.
Step 1: Pick the Right Spot (Layout Beats Square Footage)
Think like a studio designer: you want clear lines, predictable footing, and minimal distractions.
The best locations are usually spare bedrooms, basements, garages (with climate considerations), or an open living-room wall.
How much space do you really need?
As a practical rule, aim for enough room to:
- Stand at the barre with arms extended to the sides without touching walls.
- Step out into a wide second position comfortably.
- Move to the floor for core work and stretching (a standard exercise mat footprint, plus a little elbow room).
Three layout examples that actually work
-
Apartment Corner Studio: A 6–8 foot stretch of wall, a compact freestanding barre, one tall mirror panel,
and a storage ottoman for props. -
Spare Room Studio: Wall-mounted barre, mirror wall, rubber or vinyl plank flooring, small speaker shelf,
and a yoga mat “parking spot.” -
Garage/Bonus Room Studio: Extra cushioning flooring, a portable barre (for flexibility), a dehumidifier if needed,
and brighter lighting to fight the “parking-lot vibe.”
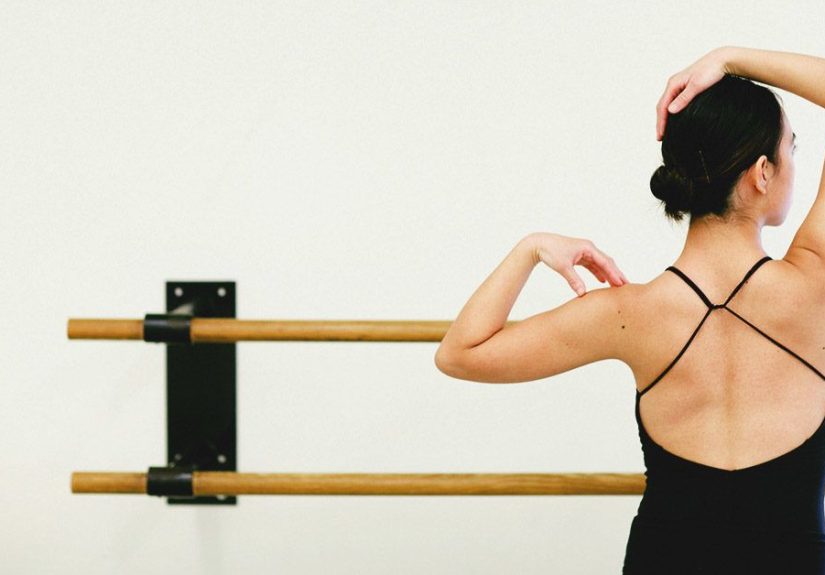
Step 2: Choose Your Barre (Wall-Mounted vs. Freestanding vs. DIY)
The barre is the heart of the room. It should feel stable, comfortable to grip, and positioned so you can maintain neutral posture.
In most barre workouts, you’re not yanking on it like a pull-up baryou’re using it for balance and light support.
Still, stability matters because wobbling barres steal focus (and occasionally dignity).
Option A: Wall-mounted barre (most studio-like)
Wall-mounted barres are clean, sturdy, and space-efficient. They’re ideal if you have a solid wall and you’re comfortable
installing into studs (or hiring someone who is).
- Pros: Very stable, saves floor space, feels professional.
- Cons: Installation takes planning; you’re committing to that wall.
Option B: Freestanding barre (renter-friendly and flexible)
Freestanding barres are great for rentals, multi-use rooms, and anyone who wants “studio now, living room later.”
Look for a wide base, non-slip feet, and a height that matches your body.
- Pros: No drilling, portable, easy setup.
- Cons: Some models can slide or wobble on slick floorsuse a grippy mat or rubber tiles underneath.
Option C: DIY barre (budget-friendly, but be picky)
DIY can work if you build safely. A common approach is using a smooth wooden rail (like a round handrail) with sturdy brackets
mounted into studs or a properly anchored backboard. Avoid flimsy towel bars, unstable chairs, or anything that could tip.
Your wrists and your future self will thank you.
Barre height and placement (the “don’t overthink it” method)
A common starting point is around elbow height when you’re standing tall with relaxed shoulders.
If multiple people will use the barre, consider adjustable hardware or choose a happy-medium height.
The goal is neutral posturenot shrugging up or leaning down.
Step 3: Get Flooring Right (Your Joints Will File a Complaint If You Don’t)
Barre mixes small pulsing movements, balance work, and occasional light impact (like cardio bursts in some classes).
Flooring should offer grip, comfort, and noise control.
If your downstairs neighbor can identify your plié tempo, we need to talk.
Flooring options for a barre studio
-
Rubber tiles or rolls: Great shock absorption, grippy, durable, and excellent for multi-purpose spaces.
If you’ll also do strength training, rubber is a safe bet. -
Vinyl plank: Easy to clean, looks sharp, and works well with a mat for floor exercises.
Choose a finish with traction (not “ice rink chic”). -
Dance/Marley-style surface: Ideal for dance-forward practice and smooth turns, but you’ll want the correct
underlayer for cushioning and stability. -
Foam tiles: Comfortable and budget-friendly, but can compress, shift, or feel unstable during balance work.
Best for light use or temporary setups.
A simple flooring strategy that works in most homes
If you want a reliable, low-drama setup: use rubber flooring (or rubber mats) in the main standing area, and keep a mat nearby
for core work and stretching. This combo tends to handle sweat, noise, and repeated use without turning into a maintenance hobby.
Step 4: Mirrors, Lighting, and Camera Angles (Alignment Is the Whole Point)
Mirrors help you catch the sneaky form changes that happen when you get tiredknees caving in, ribs flaring, shoulders rising.
If you don’t want a big wall mirror, a phone tripod and a front-facing camera can do a surprisingly good job.
Mirror tips for a home barre studio
- Place the mirror where you face the barre most often (usually the wall in front of you).
- Choose safe mounting appropriate for the weight and wall type; heavy mirrors deserve serious hardware.
- Avoid glare traps: If a window turns your mirror into a spotlight weapon, reposition or add curtains.
Lighting that makes you want to show up
Bright, even lighting helps with form checks and keeps the room feeling energizing. Aim for layered light:
overhead + a lamp or wall light that reduces shadows. If you film workouts, test lighting at the times you actually exercise.
“Morning light” is gorgeousunless it’s directly behind you, turning you into a mysterious fitness silhouette.
Step 5: Sound, Storage, and The “Studio Vibe” (Motivation Is a Design Feature)
People underestimate how much environment affects consistency. The more your space feels ready, the less you have to negotiate
with yourself to start.
Sound setup
- Speaker: A small Bluetooth speaker works fine. Place it where it won’t get kicked during floor work.
- Headphones: Great for apartments or early mornings; bonus points for noise-canceling.
Storage that doesn’t ruin the mood
Keep props visible but tidy. A basket, floating shelf, slim cabinet, or bench with storage can hold bands, a ball, weights,
and sliders. If your props live in three different closets, you’ll spend half your workout “warming up” by searching.
Small touches that make it feel real
- A hook for grip socks (because barefoot-on-rubber is a personality test).
- A towel station and water bottle spot.
- A simple wall clock or timer (so you don’t stare at your phone between sets).
- A plant (optional, but plants make every room feel like it has goals).
Step 6: Stock the Right Barre Props (Simple, Effective, Not a Shopping Spiral)
Barre props are designed to add light resistance and challenge stabilitywithout turning your workout into a powerlifting meet.
Start small. You can always add more later once you know what you actually use.
A smart starter kit
- Exercise mat: For core, stretching, and kneeling work.
- Light dumbbells: Often 1–5 lbs, depending on your level and programming.
- Mini loop band: Great for glutes and lateral work.
- Small Pilates ball: Adds challenge to inner-thigh and core sequences.
- Slider discs: Excellent for hamstrings and core control.
- Grip socks: Helpful on smoother floors or when you want more traction.
Want to level up later?
- Adjustable ankle weights
- A longer resistance band for rows and mobility
- A foam roller or massage ball for recovery
Step 7: Safety and Setup Rules That Keep You Training (Instead of Icing)
A barre studio should make your body feel better, not turn your home into a slapstick training montage.
A few safety checks go a long way.
Quick safety checklist
- Clear the area: No rugs that slide, no coffee tables in the “kick zone.”
- Stability test: The barre should not wobble or shift under light pressure.
- Footing test: Do a few controlled lunges and balance holds to confirm traction.
- Ventilation: If the room gets stuffy fast, add a fan or adjust airflow.
- Volume awareness: If you live with others, consider noise-reducing flooring and a lower bass setting.
If you have any injuries, medical conditions, or you’re returning from time off, consider starting with lower intensity
and checking in with a qualified professional. Barre looks gentle; then it humbly destroys your glutes. Respect it.
Budgeting: Three Home Barre Studio Builds
You can build a barre studio on a lean budget or go full boutique.
The trick is spending where it matters: stability, flooring comfort, and a setup you’ll actually use.
1) The “Starter Corner” (budget-friendly)
- Freestanding barre (or safe DIY solution)
- One quality mat
- Mini band + light weights
- Phone tripod or one mirror panel
Best for: apartments, beginners, anyone testing consistency before upgrading.
2) The “Real Studio Feel” (mid-range)
- Wall-mounted or premium freestanding barre
- Rubber flooring in the main area
- Larger mirror setup
- Dedicated storage basket/shelf
- Speaker + good lighting
Best for: regular barre fans who want less setup friction and better alignment feedback.
3) The “Boutique at Home” (high-end)
- Professional-grade barre
- Upgraded flooring (rubber + dance surface strategy)
- Mirror wall
- Acoustic considerations
- Curated lighting + decor + storage system
Best for: frequent training, filming content, or multi-user households.
How to Make It Stick: Turn Your Barre Studio Into a Habit Machine
The real ROI is consistency. Here’s how to make your home barre studio feel like an invitation, not a guilt display.
Make “starting” ridiculously easy
- Keep props out and ready (but tidy).
- Have a default routine (even 15 minutes) for low-energy days.
- Use a timer so you don’t bargain with yourself between exercises.
Program variety without chaos
A balanced barre week might include:
- 2–3 barre strength days (lower body + core focus)
- 1 mobility/stretch day (hips, calves, spine)
- 1 cardio add-on (optional: short intervals, dance cardio, brisk walk)
You don’t need a 90-minute schedule. You need a repeatable plan you can do even on a busy Tuesday.
of Real-World Barre Studio Experience (The Stuff No One Mentions)
The first time you “build” your home barre studio, it’s tempting to chase perfection. Perfect mirror. Perfect flooring.
Perfect aesthetic. But here’s what actually happens in real life: you build a good-enough setup, use it for a week,
and then your studio starts teaching you what it needs.
For example, many people discover the mirror is less about looking “good” and more about catching tiny alignment issues.
You think you’re keeping hips square in a standing glute seriesthen the mirror gently (rudely) informs you that one hip
has wandered off to start a new life. That feedback loop becomes addictive in a good way. You start noticing progress
that isn’t just “I’m sore,” but “my posture looks different,” “my balance is steadier,” and “my shoulders aren’t
auditioning to become earrings.”
Another surprise: the best upgrade often isn’t expensive equipmentit’s reducing friction. If your bands are buried in a drawer,
you’ll skip them. If your mat is rolled up behind a couch, you’ll “forget.” If your space requires moving three pieces of furniture,
your brain will negotiate you out of training. The moment you create a simple flowbarre area stays clear, props live in one spot,
music is one button awayyour studio becomes a habit machine.
People also learn quickly that flooring changes everything. On a surface that’s too slippery, you tense up and your form suffers.
On something too soft or unstable, balance work gets frustrating. Once the footing feels reliable, your workouts feel safer,
smoother, and more enjoyable. That’s when you stop thinking of your studio as “a corner of the house” and start thinking,
“This is my practice space.”
There’s also a mindset shift that comes with having a dedicated barre studio at home: you stop waiting for the “right time.”
Ten minutes suddenly matters. A quick glute and core sequence before dinner counts. A stretch session after a long day becomes
normal. And on the days you don’t feel like doing anything, you’re more likely to show up anywaybecause your studio is already
set up, quietly reminding you, “Hey, we could just do a warm-up and see what happens.”
Finally, the vibe becomes personal. In a public class, you match someone else’s music, pace, and mood. At home, you learn what
actually motivates you. Some people love bright lights and loud playlists. Others want calm lighting, a fan, and a “no talking,
just training” energy. When you design around your preferences, you train more consistentlyand you enjoy it more. That’s the
real win: a studio that fits your life, not the other way around.
Conclusion
Building your own barre studio is about creating a space that makes movement easy, safe, and genuinely enjoyable.
Start with the essentialsstable barre, smart flooring, alignment feedback, and a layout that stays uncluttered.
Then add the extras that make you want to come back: better lighting, organized props, music you love, and a vibe that feels like you.
Your future legs will shake in gratitude.


