Table of Contents >> Show >> Hide
- What Makes These “Edible” Cookie Dough Truffles?
- Chocolate Chip Cookie Dough Truffles Ingredients
- Equipment You’ll Want
- How to Heat-Treat Flour (Oven or Microwave)
- Chocolate Chip Cookie Dough Truffles: Step-by-Step Recipe
- Pro Tips for Truffles That Look (and Taste) Like You Meant It
- Flavor Variations (Because Chocolate Chip Has Friends)
- Make-Ahead, Storage, and Freezing
- How to Serve Cookie Dough Truffles
- Chocolate Chip Cookie Dough Truffles Experiences: What Usually Happens (and How to Win)
If a chocolate chip cookie and a fancy truffle had a delicious, no-bake baby, this would be it.
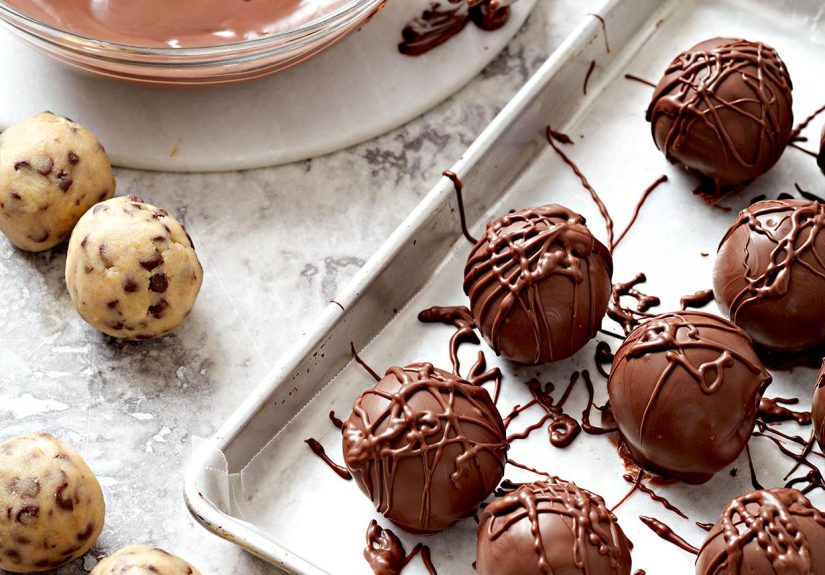
Chocolate chip cookie dough truffles are bite-size cookie dough balls (made safe-to-eat) dipped in chocolate and chilled until snappy on the outside and soft in the middle.
They’re the kind of dessert that disappears at partiesmostly because “I’ll just have one” is a lie we tell ourselves to feel morally superior.
This recipe leans into what the best versions all have in common: a rich brown-sugar cookie dough flavor, a dough that actually holds its shape, and a smooth chocolate coating that doesn’t crack like thin ice.
Along the way, you’ll get smart options for heat-treating flour, troubleshooting sticky dough, and fun variations for holidays, gift boxes, and snack emergencies.
What Makes These “Edible” Cookie Dough Truffles?
Traditional cookie dough isn’t meant to be eaten rawmostly because of the flour (yes, flour) and sometimes raw egg.
For truffles, we solve both issues: we skip eggs entirely and heat-treat the flour so the dough is safer for no-bake recipes.
That one step keeps the classic cookie dough vibe while avoiding the “maybe don’t eat that” part.
Quick food-safety note (without killing the fun)
- Heat-treat the flour (oven or microwave) and let it cool completely before mixing.
- Keep the truffles chilledthey’re a dairy-and-butter situation, not a “leave on the counter all afternoon” situation.
- Use clean hands/tools and store properly (you’ll get exact storage tips below).
Chocolate Chip Cookie Dough Truffles Ingredients
This ingredient list is intentionally simple and pantry-friendly. The “secret” ingredient that shows up again and again in great cookie dough truffles is
sweetened condensed milk: it adds sweetness, helps bind the dough, and gives you that creamy cookie dough texture without eggs.
For the cookie dough center
- 1 cup all-purpose flour (heat-treated; see instructions below)
- 6 tablespoons unsalted butter, softened (or 1/3 cup)
- 1/2 cup packed light brown sugar
- 2 teaspoons vanilla extract
- 1/4 teaspoon fine salt
- 1/3 cup sweetened condensed milk (add gradually)
- 3/4 cup mini chocolate chips (mini = better distribution in small bites)
For the chocolate coating
- 10–12 ounces semi-sweet chocolate (chips or chopped bar), or chocolate candy coating/almond bark
- 1–2 teaspoons neutral oil or shortening (optional, helps the coating melt smoother)
Optional toppings (highly recommended for personality)
- Flaky sea salt
- Chocolate sprinkles
- Crushed cookies
- Chopped toasted nuts
- White chocolate drizzle
Equipment You’ll Want
- Mixing bowl + hand mixer (or stand mixer)
- Measuring cups/spoons
- Baking sheet
- Parchment or wax paper
- Small cookie scoop (optional, but makes uniform truffles easy)
- Microwave-safe bowl (or double boiler) for melting chocolate
- Forks or dipping tools
How to Heat-Treat Flour (Oven or Microwave)
Heat-treating flour is the unglamorous hero of edible cookie dough.
Do this first so the flour has time to coolwarm flour can melt butter and turn your dough into a sad, sticky paste.
Option A: Oven method (best for larger batches)
- Preheat oven to 350°F.
- Spread flour in an even layer on a parchment-lined baking sheet.
- Bake for 5–7 minutes, stirring once or twice for even heating.
- For best safety practice, check that flour reaches about 160–165°F in the center.
- Cool completely before using.
Option B: Microwave method (fast and convenient)
- Place flour in a microwave-safe bowl.
- Microwave in short bursts (e.g., 15–30 seconds at a time), stirring between bursts.
- Continue until the flour is hot throughout (again, aiming around 160–165°F if you’re checking).
- Cool completely before mixing.
Chocolate Chip Cookie Dough Truffles: Step-by-Step Recipe
Recipe snapshot
- Prep time: ~25 minutes
- Chill time: ~45–60 minutes (includes firming for dipping)
- Yield: about 24–30 truffles (depending on scoop size)
Step 1: Make the cookie dough base
- In a mixing bowl, beat butter and brown sugar until creamy and smooth, about 1–2 minutes.
- Mix in vanilla and salt.
- Add the cooled, heat-treated flour and mix on low until the dough looks sandy and starts to clump.
- Pour in sweetened condensed milk a little at a time, mixing after each addition, until the dough is soft but scoopablelike Play-Doh, but emotionally supportive.
- Fold in mini chocolate chips.
Step 2: Chill to firm
- Cover the bowl and chill for 15–20 minutes, or pop it in the freezer for 5–10 minutes.
- You’re looking for dough that’s firm enough to roll without sticking to your hands like a clingy toddler.
Step 3: Scoop and roll
- Line a baking sheet with parchment or wax paper.
- Scoop dough into small portions (about 1 tablespoon each for truffle-size).
- Roll into smooth balls and place on the lined sheet.
- Freeze the dough balls for 15–30 minutes so they’re extra firm for dipping.
Step 4: Melt the chocolate coating
- Melt chocolate (or candy coating) in a microwave-safe bowl in 20–30 second bursts, stirring between each, until smooth.
- If using regular chocolate, stir in a small amount of oil or shortening if needed for a thinner, easier dipping consistency.
- Let the chocolate cool for a minute or twovery hot chocolate can melt the truffle centers.
Step 5: Dip, decorate, and set
- Working in small batches (keep the rest cold), drop a dough ball into melted chocolate.
- Use a fork to lift it out, tap gently to remove excess chocolate, and slide it back onto the lined sheet.
- Add sprinkles or a pinch of flaky salt right away, before the coating sets.
- Chill until firm, about 20–30 minutes.
Pro Tips for Truffles That Look (and Taste) Like You Meant It
Get the dough texture right
- Too dry/crumbly? Add a teaspoon more condensed milk and mix again.
- Too soft/sticky? Chill longer, or mix in 1–2 tablespoons extra heat-treated flour.
- Grainy sugar vibe? Beat butter and brown sugar a bit longer to help dissolve and smooth.
A smoother chocolate shell
- Candy coating/almond bark is easiest for a clean finish and sets firmly.
- For regular chocolate, a tiny bit of neutral oil/shortening can help it dip more smoothly.
- Dip cold dough balls into slightly cooled chocolatethis reduces cracking and melting.
Prevent chocolate puddles (“truffle feet”)
- Tap off excess coating before placing truffles down.
- If puddles still happen, let the coating thicken slightly before dipping the next batch.
Flavor Variations (Because Chocolate Chip Has Friends)
1) Holiday sparkle
Add festive sprinkles, drizzle with white chocolate, or finish with a pinch of flaky salt for that sweet-salty “wow.”
2) Peanut butter cookie dough truffles
Replace 2 tablespoons of butter with peanut butter and use mini chocolate chips. Dip in dark chocolate and pretend you’re a confectionery genius.
3) Cookies-and-cream version
Swap some chocolate chips for crushed chocolate sandwich cookies. Dip in white chocolate for maximum bakery-case energy.
4) Gluten-free option
Use a heat-treated, measure-for-measure gluten-free flour blend. The dough may need slightly different liquid amounts, so add condensed milk gradually.
5) “Birthday cake” cookie dough truffles
Add rainbow sprinkles inside the dough plus a touch of almond extract (optional). Coat in white chocolate and top with more sprinkles.
Make-Ahead, Storage, and Freezing
Refrigerator
Store truffles in an airtight container in the fridge. They stay firm, safe, and snackable for about up to a week.
If you’re stacking them, separate layers with parchment so the tops don’t get scuffed (your truffles deserve dignity).
Freezer
Freeze in a sealed container for longer storage. For best texture, thaw overnight in the fridge.
If serving from frozen, give them a few minutes at room temp so the centers aren’t rock-hard.
Serving temperature
These are best slightly chilled: the coating stays crisp while the cookie dough center stays creamy.
If they sit out for a bit at a party, that’s finejust don’t let them lounge at room temperature all day like they’re on vacation.
How to Serve Cookie Dough Truffles
- Dessert boards: Pair with berries, pretzels, and salty nuts for contrast.
- Gifting: Pop them into mini paper cups and box them like chocolates.
- Ice cream topper: Chop and sprinkle over vanilla or coffee ice cream.
- Party trick: Put truffles on lollipop sticks for “truffle pops.”
Chocolate Chip Cookie Dough Truffles Experiences: What Usually Happens (and How to Win)
If you’ve never made cookie dough truffles before, the first experience is usually a mix of excitement and mild disbelief that something this tasty requires zero baking.
Then you hit the classic moment: you taste the dough “just to check.” Five minutes later, you realize your batch is mysteriously smaller.
This is normal. This is science. This is why the recipe makes 24–30 and not “exactly enough for your event.”
The most common “aha” moment comes from the dough texture. People expect cookie dough to behave like raw cookie dough for bakingsoft, sticky, and a bit messy.
Truffle dough needs to be more cooperative: it should roll cleanly, hold its shape, and stay firm enough to survive a chocolate dip.
That’s where chilling changes everything. A short chill turns sticky dough into a rollable, smooth ball that doesn’t cling to your hands.
If you’ve ever tried to roll warm dough and ended up wearing it like hand lotion, you’ll appreciate how fast a 15-minute chill fixes the mood.
The second big experience is learning your chocolate. If you use candy coating or almond bark, dipping feels almost unfairly easy:
it melts smooth, coats quickly, and sets like a champ. If you use regular chocolate chips, the flavor is incredible, but the coating can be thicker and trickier.
That’s when the “tiny spoonful of oil/shortening” trick feels like a superpowersuddenly the chocolate flows, coats evenly, and doesn’t seize up on you.
Another pro move: let the melted chocolate cool slightly before dipping. Very hot chocolate plus very cold dough can cause cracking,
while very hot chocolate plus less-cold dough can cause melting. The sweet spot is “melted and smooth,” not “lava.”
Expect a little chaos the first time you dip. You’ll probably create at least one truffle with a chocolate tail, a small puddle, or an accidental “double-dip deluxe.”
Instead of fighting it, lean in: call them “artisan.” If you want cleaner results, dip only a few balls at a time while the rest stay in the freezer.
This keeps the centers firm and makes the dipping process calmer. Tapping the fork gently on the bowl edge to shake off excess coating also helps a lot.
You’ll notice that as the chocolate cools, it thickensso your first few might be sleek and your last few might look like they’re wearing winter coats.
That’s not failure; that’s just physics with dessert benefits.
One of the most satisfying experiences is customizing them for an occasion. For holidays, you can do dark chocolate with a pinch of sea salt and suddenly they taste “grown-up.”
For birthdays, white chocolate plus sprinkles makes them look like a party favor.
For cookie lovers, adding mini chocolate chips to the coating or rolling dipped truffles in crushed cookies creates a texture contrast that feels fancy without extra effort.
And if you’re bringing them to a gathering, you’ll quickly learn the social side of truffles:
people eat one, then hover near the tray pretending they’re just “talking” while strategically staying within arm’s reach.
Finally, the most underrated experience: the make-ahead win. Cookie dough truffles are a dream for busy weeks because they store well and feel special every time you pull them out.
You can freeze a batch, then serve them as last-minute guests arriveinstant dessert, zero stress, maximum compliments.
If you’ve ever wanted a treat that’s equal parts comforting and impressive, this is it.
And yes, you’ll still “test” one every time you open the container. Quality control is a responsibility.


