Table of Contents >> Show >> Hide
- What Are Chocolate Revel Bars?
- Why This Chocolate Revel Bars Recipe Works
- Ingredients for Chocolate Revel Bars
- How to Make Chocolate Revel Bars
- Pro Tips for Perfect Chocolate Revel Bars
- Chocolate Revel Bars Variations
- How to Store Chocolate Revel Bars
- Serving Ideas for Chocolate Revel Bars
- Common Mistakes to Avoid
- Frequently Asked Questions About Chocolate Revel Bars
- Final Thoughts: Why Chocolate Revel Bars Never Go Out of Style
- Personal Baking Experience With Chocolate Revel Bars
Chocolate Revel Bars are the dessert equivalent of finding a twenty-dollar bill in your winter coat: nostalgic, wildly satisfying, and almost too good to share. These chewy oatmeal cookie bars have a thick ribbon of fudgy chocolate tucked in the middle, creating that magical bite where buttery oats, brown sugar, vanilla, and melted chocolate all show up like they were invited to the same delicious party.
If you love oatmeal cookies, brownies, fudge, or classic bake-sale bars, Chocolate Revel Bars deserve a permanent spot in your recipe rotation. They are easy enough for a weekday baking project but impressive enough for holidays, potlucks, cookie exchanges, family gatherings, and “I simply require chocolate” emergencies. The best part? You do not need fancy equipment, pastry-school confidence, or a kitchen that looks like a cooking show set. A mixing bowl, saucepan, 9-by-13-inch pan, and a healthy respect for chocolate will do.
What Are Chocolate Revel Bars?
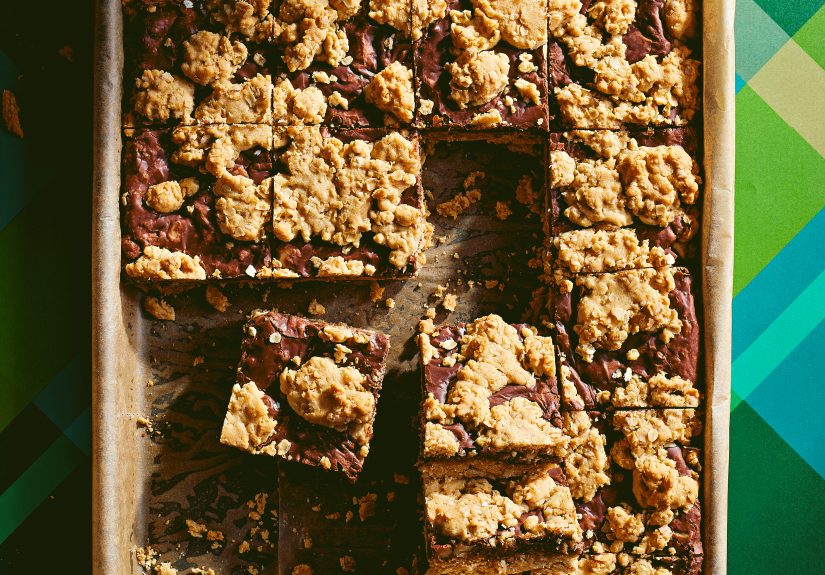
Chocolate Revel Bars are layered dessert bars made with an oatmeal cookie dough base, a rich chocolate filling, and a crumbled oat topping. The classic version usually includes butter, brown sugar, eggs, vanilla, flour, baking soda, oats, chocolate chips, sweetened condensed milk, and sometimes nuts. When baked, the bottom layer turns soft and chewy, the center becomes fudgy and smooth, and the top bakes into golden oat crumbles.
The word “revel” feels exactly right. These bars are not quiet little cookies sitting politely on a plate. They are bold, thick, chewy, chocolatey squares that make people ask, “Who made these?” before they have even finished chewing. They taste like an oatmeal cookie and a fudge brownie decided to stop competing and become best friends.
Why This Chocolate Revel Bars Recipe Works
A great Chocolate Revel Bars recipe depends on balance. Too much flour and the bars become dry. Too much chocolate filling and they refuse to slice neatly. Too little salt and the sweetness takes over like an overexcited karaoke singer. This version keeps everything in harmony: chewy oats, deep chocolate flavor, enough butter for richness, and just enough structure to hold each square together.
The Oatmeal Cookie Layer Adds Chew
The oatmeal dough is the backbone of the recipe. Brown sugar gives it a caramel-like sweetness, butter makes it tender, and oats create that hearty chew that keeps the bars from tasting flat. Quick oats create a softer, more uniform texture, while old-fashioned oats give a little more rustic bite. Either can work, but quick oats usually produce the classic Chocolate Revel Bars texture most people remember from family recipe boxes.
The Fudge Filling Makes the Bars Irresistible
The chocolate layer is made by melting chocolate chips with sweetened condensed milk and butter. Sweetened condensed milk is the secret weapon because it creates a smooth, thick filling without needing candy thermometers or complicated fudge-making steps. Once it cools, the filling sets into a creamy chocolate ribbon that slices beautifully and tastes wonderfully rich.
The Crumb Topping Adds Texture
Instead of making a separate topping, you simply reserve part of the oatmeal dough and scatter it over the chocolate layer. It bakes into little golden islands of cookie goodness. This is efficient, pretty, and deeply convenientthree qualities every dessert should bring to the table.
Ingredients for Chocolate Revel Bars
Before you preheat the oven, gather your ingredients. This recipe uses familiar pantry staples, which is one reason Chocolate Revel Bars have stayed popular for generations.
For the Oatmeal Cookie Dough
- 1 cup unsalted butter, softened
- 2 cups packed light brown sugar
- 2 large eggs, room temperature
- 2 teaspoons vanilla extract
- 2 1/2 cups all-purpose flour
- 1 teaspoon baking soda
- 1 teaspoon fine salt
- 3 cups quick-cooking oats or old-fashioned oats
For the Chocolate Filling
- 1 can sweetened condensed milk, 14 ounces
- 2 cups semisweet chocolate chips
- 2 tablespoons unsalted butter
- 1 teaspoon vanilla extract
- 1/2 cup chopped walnuts or pecans, optional
How to Make Chocolate Revel Bars
This recipe is simple, but the order matters. Prepare the dough first, melt the chocolate filling gently, then layer everything like you are building a dessert masterpiecebecause you are.
Step 1: Prepare the Pan
Preheat your oven to 350°F. Grease a 9-by-13-inch baking pan or line it with parchment paper, leaving a little overhang on the sides. The parchment overhang works like handles, making it easier to lift the cooled bars out of the pan. Future you will be grateful.
Step 2: Make the Oatmeal Dough
In a large mixing bowl, beat the softened butter and brown sugar until creamy and fluffy. Add the eggs one at a time, mixing well after each addition. Stir in the vanilla extract. In a separate bowl, whisk together the flour, baking soda, and salt. Gradually add the dry ingredients to the butter mixture, mixing just until combined. Stir in the oats until the dough looks thick and evenly mixed.
Step 3: Press the Bottom Layer
Set aside about one-third of the oatmeal dough for the topping. Press the remaining dough evenly into the prepared pan. Use lightly floured fingers or the bottom of a measuring cup to spread it into an even layer. Do not pack it down like you are laying bricks for a fortress; a gentle, even press is enough.
Step 4: Make the Chocolate Filling
In a medium saucepan over low heat, combine the sweetened condensed milk, chocolate chips, and butter. Stir frequently until the chocolate melts and the mixture becomes smooth and glossy. Remove the pan from the heat and stir in the vanilla extract. If you are using chopped nuts, stir them in now.
Step 5: Add the Chocolate Layer
Pour the warm chocolate filling over the oatmeal base and spread it evenly with an offset spatula or the back of a spoon. Work gently so you do not pull up the dough underneath. This is the moment when the recipe starts looking dangerously snackable, but please resist grabbing a spoon. Mostly.
Step 6: Add the Topping
Crumble the reserved oatmeal dough over the chocolate layer. It does not need to cover every inch. In fact, little windows of chocolate peeking through are part of the charm. The topping should look casual and homemade, not like it was measured by an architect.
Step 7: Bake and Cool
Bake for 25 to 35 minutes, or until the top is lightly golden and the edges are set. The center may still look slightly soft, but it will firm up as the bars cool. Place the pan on a wire rack and let the bars cool completely before slicing. This is the hardest step, because warm Chocolate Revel Bars smell like a bakery moved into your house.
Pro Tips for Perfect Chocolate Revel Bars
Use Low Heat for the Filling
Chocolate can be dramatic. Melt it over low heat and stir often to prevent scorching. If the filling gets too hot, it may become grainy or thick in a less-than-charming way. Slow and gentle is the move.
Do Not Overbake
Overbaked revel bars lose their soft, chewy texture. Pull them from the oven when the top is golden and the edges look set. The bars continue to firm up as they cool, so do not wait for the center to look completely dry.
Cool Completely Before Cutting
Warm bars may taste amazing, but they are messy to slice. For clean squares, cool the pan fully at room temperature. If you want extra neat cuts, chill the bars for 30 to 60 minutes before slicing, then let them come back closer to room temperature before serving.
Add Salt for Better Flavor
A teaspoon of salt in the dough helps balance the sweetness of the brown sugar and condensed milk. You can also sprinkle a tiny pinch of flaky sea salt over the chocolate layer before adding the topping if you enjoy a sweet-and-salty dessert.
Chocolate Revel Bars Variations
The classic recipe is wonderful, but Chocolate Revel Bars are also flexible. Once you understand the basic formula, you can customize them for holidays, preferences, or whatever ingredients are hiding in your pantry.
Peanut Butter Chocolate Revel Bars
Stir 1/3 cup creamy peanut butter into the warm chocolate filling. The result tastes like an oatmeal cookie crossed with a peanut butter cup. This variation is especially good with chopped peanuts sprinkled into the topping.
Dark Chocolate Revel Bars
Use dark chocolate chips instead of semisweet for a richer, less-sweet filling. Dark chocolate also pairs beautifully with toasted walnuts or pecans.
Caramel Chocolate Revel Bars
Add a handful of soft caramel bits to the oatmeal dough or drizzle caramel sauce lightly over the chocolate layer before adding the topping. Keep the amount modest so the bars still slice cleanly.
Holiday Revel Bars
Add red and green candy-coated chocolates, peppermint chips, or toasted pecans for a festive version. For Thanksgiving or Christmas dessert trays, cut the bars into small squares because they are rich enough to make tiny portions feel generous.
How to Store Chocolate Revel Bars
Store Chocolate Revel Bars in an airtight container at room temperature for up to 4 days. Place parchment paper between layers to keep the tops neat. If your kitchen is warm, refrigerate them so the chocolate layer stays firm.
For longer storage, freeze the bars. Wrap individual squares tightly in plastic wrap, place them in a freezer-safe container, and freeze for up to 3 months. Thaw at room temperature before serving. Frozen Chocolate Revel Bars are also strangely delightful eaten slightly chilled, though no one officially said you should sneak one from the freezer at midnight.
Serving Ideas for Chocolate Revel Bars
These bars are excellent on their own, but they can also dress up nicely. Serve them with cold milk for a classic snack, coffee for an afternoon treat, or vanilla ice cream for dessert. If you are making a party platter, cut them into smaller squares and pair them with lighter cookies, lemon bars, or fruit so guests can build a balanced dessert plate.
Chocolate Revel Bars are also perfect for bake sales because they hold their shape, travel well, and look appealing without frosting. Wrap individual squares in parchment or clear treat bags, and you have a dessert that looks charming with minimal effort. That is the kind of kitchen math we can all support.
Common Mistakes to Avoid
Using Melted Butter Instead of Softened Butter
Softened butter creams with brown sugar and creates a better dough texture. Melted butter can make the dough greasy and harder to press evenly into the pan.
Skipping the Parchment Paper
You can make these bars without parchment, but parchment makes slicing and serving much easier. It also helps prevent the edges from sticking.
Cutting Too Soon
Chocolate filling needs time to set. If you cut the bars while they are hot, the filling may ooze out. Delicious? Yes. Pretty? Not especially.
Forgetting to Reserve Dough for the Topping
It happens. You get excited, press all the dough into the pan, and suddenly realize the top layer has left the building. Set aside the topping portion before pressing the base into the pan to avoid this classic baker’s facepalm.
Frequently Asked Questions About Chocolate Revel Bars
Can I use old-fashioned oats instead of quick oats?
Yes. Quick oats create a softer texture, while old-fashioned oats make the bars a little chewier and more textured. Both work well.
Can I make Chocolate Revel Bars without nuts?
Absolutely. Nuts are optional. The bars still have plenty of texture from the oatmeal dough and plenty of richness from the chocolate filling.
Can I use milk chocolate chips?
Yes, but the bars will taste sweeter. Semisweet chocolate is the best all-purpose choice because it balances the sweetened condensed milk.
Can I double the recipe?
This recipe already fills a 9-by-13-inch pan, so doubling is best done in two separate pans. That also helps the bars bake evenly.
Why are my bars crumbly?
Crumbly bars may be overbaked, measured with too much flour, or cut before they fully cooled. Spoon and level the flour rather than scooping it tightly from the bag.
Final Thoughts: Why Chocolate Revel Bars Never Go Out of Style
Chocolate Revel Bars are the kind of dessert that feels homemade in the best possible way. They do not need glossy frosting, complicated decoration, or a dramatic social media close-up to win people over. Their charm is simple: chewy oatmeal cookie layers, rich chocolate filling, buttery crumbs, and that familiar brown sugar aroma that makes everyone wander into the kitchen asking, “Is something baking?”
They are practical, nostalgic, and deeply satisfying. You can bake them for a school event, a weekend treat, a holiday tray, or a neighbor who deserves something better than another scented candle. They slice neatly, freeze well, and taste even better the next day. In a world full of trendy desserts, Chocolate Revel Bars remain a dependable classicand honestly, classics become classics for a reason.
Personal Baking Experience With Chocolate Revel Bars
The first time you make Chocolate Revel Bars, the recipe may look almost too simple. Oats, brown sugar, butter, chocolate chips, condensed milknothing flashy, nothing intimidating. But once the pan goes into the oven, the kitchen starts smelling like an old-fashioned bakery that also happens to have excellent judgment. The buttery oat base gives off a warm cookie aroma, while the chocolate filling quietly bubbles beneath the crumb topping like it knows it is about to steal the show.
One of the best things about baking Chocolate Revel Bars is how forgiving they are. Some desserts require delicate timing and perfect technique. These bars are more relaxed. If the topping is uneven, it looks rustic. If the chocolate peeks through, it looks tempting. If the edges get a little extra golden, someone in the house will claim those corner pieces immediately. This is not a fussy dessert. It is a reliable, friendly, “come as you are” dessert.
In real-life baking, the cooling step is where discipline gets tested. The bars come out of the oven smelling incredible, and the chocolate layer looks glossy and soft. Cutting them right away is tempting, but patience makes a huge difference. When they cool completely, the filling firms into a smooth fudge layer, and the oatmeal cookie base holds together beautifully. The first clean slice feels like a small kitchen victory.
Chocolate Revel Bars are also excellent for sharing because they travel well. They do not slide around like frosted cake, they do not crumble like delicate cookies, and they do not require refrigeration during a short trip. Bring them to a potluck, and they will sit quietly on the dessert table for approximately three minutes before people start asking what they are. The name alone usually gets attention. “Revel bars?” someone will ask. Yes, revelas in celebrate, enjoy, and possibly go back for a second piece.
Another useful experience: these bars taste slightly different depending on how you cut them. Large squares feel like a full dessert, especially with coffee or milk. Smaller rectangles feel like cookie tray treats. Tiny bite-size pieces are dangerous because they convince everyone that eating four is completely reasonable. For holiday platters, smaller cuts are usually best because the bars are rich and sweet.
After making Chocolate Revel Bars a few times, you may start adjusting them to fit your own taste. A little espresso powder deepens the chocolate flavor. Toasted pecans add crunch. Dark chocolate makes the filling more grown-up. A pinch of flaky salt makes the whole pan taste more balanced. The original version is wonderful, but the recipe leaves room for personality, which is probably why so many families have their own version tucked into a notebook, recipe card, or well-loved cookbook.
Note: For the best results, let Chocolate Revel Bars cool completely before slicing, and store them in an airtight container so the oatmeal layers stay soft and chewy.


