Table of Contents >> Show >> Hide
- What Makes a Touchscreen Knob So Appealing?
- How the 3D-Printed Knob Over Display Works
- Designing the Knob: Smooth, Safe, and Screen-Friendly
- Touchscreen Flair: Where the Display Becomes the Personality
- Firmware: The Brain Behind the Spin
- What Builders Should Watch Out For
- Why This Project Feels Bigger Than a Knob
- Experience Notes: Building and Using a Touchscreen Knob in the Real World
- Conclusion
There is something deeply satisfying about a good knob. A touchscreen can swipe, tap, pinch, and occasionally collect enough fingerprints to qualify as forensic evidence, but a knob gives you a tiny handshake with the machine. Turn left, turn right, press, fine-tune, repeat. Now imagine that familiar physical control sitting directly over a bright touchscreen, blending the smooth magic of digital graphics with the clicky, spinny joy of a real-world dial. That is the charm behind a 3D-printed knob with touchscreen flair: it feels futuristic without forgetting that human fingers still enjoy turning things.
This kind of project sits at the sweet spot between maker culture, human-machine interface design, 3D printing, and embedded electronics. It borrows ideas from professional control panels, smart home devices, audio gear, car dashboards, and creative tools like Microsoft Surface Dial-style radial interfaces. But instead of requiring a premium accessory or factory-molded enclosure, it invites builders to experiment with printable parts, magnetic sensing, microcontrollers, compact displays, and clever mechanical design.
At its core, the concept is simple: place a rotating knob over or around a display, track its position without a bulky shaft blocking the screen, and let the screen change as the knob moves. In practice, it is a small engineering puzzle disguised as a delightful desk toy. The puzzle includes magnets, bearings, printed tolerances, sensor placement, screen protection, firmware, interface graphics, and the eternal maker question: “Why buy one when I can spend three weekends building it?”
What Makes a Touchscreen Knob So Appealing?
A 3D-printed touchscreen knob is not just a gadget looking for an excuse to exist. It solves a real interface problem: touchscreens are flexible, but they are not always precise. A volume slider on glass works fine until you need tiny adjustments. A thermostat screen looks elegant until your wet finger, dry finger, gloved finger, or “I just ate potato chips” finger decides to sabotage the interaction. A physical dial gives immediate control, while the display provides context.
That combination is powerful. A knob can control temperature, brightness, audio gain, fan speed, menu selection, zoom level, MIDI parameters, camera focus, 3D printer settings, or smart home scenes. The touchscreen or display can show the current value, mode, color ring, icon, gauge, waveform, or warning. Instead of one fixed knob doing one fixed task, the same physical control can become many controls depending on the software.
The Best of Both Worlds
Traditional knobs are excellent at one thing: rotation. Touchscreens are excellent at changing layouts. Put them together and you get an interface that can be both tactile and adaptable. For example, a single knob could act as a thermostat in the morning, a music controller in the afternoon, and an RGB lighting selector at night. The knob gives the hand something reliable to do; the display tells the brain what is happening.
This is why rotary controls remain popular in professional environments. Audio engineers still love large jog wheels. Industrial machines use dials because they can be operated without staring at a menu. Cars keep certain knobs because drivers should not have to perform a glass-screen treasure hunt just to turn down the fan. The 3D-printed touchscreen knob brings that same logic into DIY electronics, but with more personality and fewer corporate meetings.
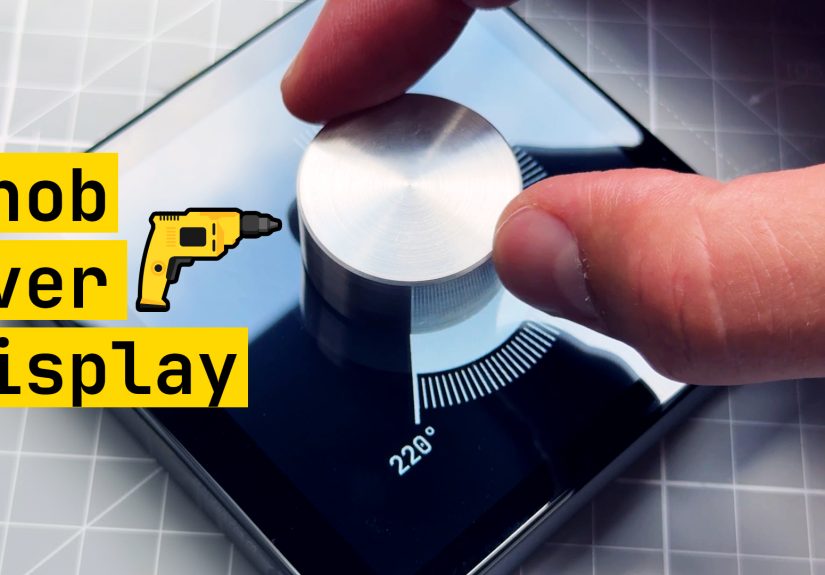
How the 3D-Printed Knob Over Display Works
The clever part of a knob-over-display design is that the rotation can be detected without a traditional mechanical shaft passing through the screen. Instead, many builds use a magnetic encoder. A small magnet is placed inside the knob, and a magnetic sensor sits behind or near the display. As the knob turns, the magnetic field changes. The sensor reads that change and converts it into an angle.
This is where parts such as the MT6701 or AS5600 become popular. These magnetic angle sensors are designed to measure rotation without physical contact between the sensor and the moving part. That means less wear, smoother motion, and fewer crunchy mechanical surprises. A diametrically magnetized magnet is especially useful because its magnetic poles sit on opposite sides of the magnet’s diameter, allowing the sensor to interpret rotation more accurately when aligned correctly.
The Role of the Magnetic Encoder
A magnetic encoder is the invisible translator in the project. Your hand says, “I turned the knob a little.” The magnet says, “The field moved.” The encoder says, “That is about 12 degrees clockwise.” The microcontroller then updates the display or sends a command to another system. It is a tiny conversation happening very quickly, and thankfully none of the components complain about being underappreciated.
Compared with a standard mechanical rotary encoder, a magnetic encoder can feel smoother because there are no internal contacts clicking through steps. Mechanical encoders are still useful, inexpensive, and wonderfully simple, but magnetic sensing opens the door to cleaner industrial-feeling interfaces. It also works well when the designer wants the knob to float visually above the screen or avoid punching a hole through the display area.
Why the 3D-Printed Jig Matters
The sensor does not work by vibes alone. It needs careful alignment. A 3D-printed jig or bracket can hold the encoder in the right position behind the screen, keeping it centered relative to the rotating magnet. If the magnet is too far away, too close, tilted, or poorly centered, the readings can become jumpy or inaccurate. The jig may look like a humble plastic part, but it is doing the quiet work of a stage manager: keeping the stars where they belong.
For a maker, this is one of the most satisfying uses of 3D printing. The printed part is not decorative fluff; it is a custom mechanical solution. It can be revised quickly, adjusted by fractions of a millimeter, and reprinted until the alignment behaves. This is exactly where desktop fabrication shines. Need the encoder 0.5 mm higher? Edit the CAD file. Need a bearing pocket slightly looser? Change the tolerance. Need a cable channel because your first version looked like spaghetti had an argument with a USB port? Print version two.
Designing the Knob: Smooth, Safe, and Screen-Friendly
A knob that sits over a touchscreen has one job beyond rotation: do not scratch the display. That sounds obvious, but any design that spins near glass must take friction seriously. The printed knob can hold the magnet slightly above the screen while a bearing or low-friction contact point stabilizes movement. Some designs use a central bearing, while others use carefully shaped contact surfaces, soft pads, or spacing features that prevent the magnet holder from grinding into the display.
Material choice matters, too. PLA is easy to print and great for prototypes, but PETG, nylon, or resin may offer better durability depending on the design. A knob that will be touched daily should feel good, resist warping, and avoid sharp edges. Layer lines can add grip, but they can also feel rough if printed poorly. Sanding, vapor smoothing for compatible materials, textured surfaces, or rubberized inserts can improve the final experience.
Grip and Ergonomics
A great knob has a personality. A smooth aluminum knob feels premium. A ridged 3D-printed knob feels practical. A chunky dial says, “I control something important.” A tiny dial says, “Please use tweezers, apparently.” For a touchscreen knob, the best design often balances grip with visibility. If the knob covers too much of the display, the screen becomes a very expensive coaster. If it is too small, it loses the satisfying control that made the project worthwhile.
Good ergonomics also include height. A dial that is too low can be hard to grip, while a dial that is too tall may wobble. Rounded edges make the knob more comfortable. A slightly concave top can invite the finger to press or steer. A knurled outer edge can make fine adjustments easier. These small details turn a technical prototype into something people actually want to use.
Touchscreen Flair: Where the Display Becomes the Personality
The display is what transforms the knob from “rotating plastic circle” into an interface. It can show a circular gauge, animated ticks, color gradients, icons, numerical values, progress rings, or mode labels. The screen gives immediate feedback, which is especially useful when the same knob controls multiple functions.
Imagine a smart home controller mounted on a wall. Turn the knob and the display shows room temperature. Press the knob and it switches to lighting. Turn again and a color wheel appears. Press once more and it becomes a music volume control. The physical movement stays consistent, but the screen changes the meaning. That is the secret sauce.
Real-World Uses for a 3D-Printed Touchscreen Knob
For audio projects, the knob can adjust volume, balance, equalizer bands, or input selection while the display shows decibel levels or frequency curves. For a 3D printer enclosure, it can control fan speed, chamber temperature, print progress views, or filament settings. For a PC desk setup, it can become a macro controller for editing timelines, scrolling documents, switching desktops, or adjusting microphone gain.
In a car-inspired dashboard project, the display can mimic analog gauges while the knob changes modes. In a kitchen timer, it can show countdown arcs and press-to-start controls. In a home automation panel, it can work as a thermostat, dimmer, scene selector, and security status display. The beauty is not that the knob does one amazing thing. It is that the knob can become the one control people naturally reach for.
Firmware: The Brain Behind the Spin
The hardware is only half the story. Firmware decides how rotation becomes action. A microcontroller reads the encoder, filters noise, tracks position, handles wraparound from 359 degrees back to 0, and updates the display. It may also detect touch input, button presses, long presses, acceleration, or mode changes.
For a simple build, an Arduino-compatible board can read the magnetic encoder and send values to a display module. More advanced projects may use ESP32-based boards because they offer Wi-Fi, Bluetooth, strong community support, and enough performance for colorful graphical interfaces. Libraries for displays, encoders, and user interface frameworks can reduce the workload, but the builder still needs to think carefully about responsiveness.
Responsiveness Is Everything
A knob that lags is like a joke with a delayed punchline: technically present, emotionally suspicious. The display should update quickly enough that the user feels connected to the movement. If the knob turns and the value changes half a second later, the magic disappears. Smooth firmware should debounce or filter input without making the system feel sluggish.
Acceleration can also improve usability. Turn slowly and the value changes one step at a time. Spin quickly and it jumps by larger increments. This is useful for settings with wide ranges, such as screen brightness from 0 to 100 percent or radio frequency tuning across many values. A well-designed knob lets users move fast when they want speed and slow down when they need precision.
What Builders Should Watch Out For
This project looks clean when finished, but the path to that clean result may include a few educational headaches. Magnet alignment is one. If the encoder readings jump, drift, or reverse unexpectedly, the magnet orientation may be wrong. Many common round magnets are axially magnetized, which may not behave the way a rotation-sensing design needs. A diametrically magnetized magnet is usually the correct choice for this style of angular sensing.
Screen clearance is another challenge. A knob that presses too firmly against the display may scratch it or create inconsistent friction. A knob that floats too high may wobble or weaken the magnetic reading. The sweet spot depends on the magnet, sensor, display thickness, printed geometry, and bearing arrangement. In other words, this is a project that rewards patience and punishes the phrase “close enough” with tiny mechanical gremlins.
3D Printing Tolerances
Printed parts rarely come out exactly as modeled. Holes may print slightly small. Pegs may print slightly large. Bearings may either fall out like they are leaving a bad relationship or refuse to fit without dramatic persuasion. For functional parts, it is smart to print small test pieces before committing to the full enclosure. Test the bearing pocket, magnet slot, and sensor bracket separately.
Layer height, nozzle size, filament type, printer calibration, and print orientation all affect the result. A vertical cylindrical knob may look clean, but the layer lines and seam placement can influence feel. A bearing seat may need a small chamfer. A magnet pocket may need a dab of adhesive. A screen-facing surface may need smoothing to avoid rubbing. None of these are glamorous details, but they are the difference between “prototype” and “I would actually put this on my desk.”
Why This Project Feels Bigger Than a Knob
The excitement around a 3D-printed knob with touchscreen flair is not only about the object itself. It represents a shift in how makers can build polished interfaces at home. A decade ago, creating a custom physical control with a display might have required expensive machining, custom PCBs, and a heroic tolerance for pain. Today, a builder can combine open-source files, affordable sensors, low-cost displays, microcontrollers, and desktop 3D printing to create something that looks surprisingly close to a commercial product.
It also hints at a future where interfaces become more modular. Instead of choosing between all-glass touchscreens and old-school knobs, designers can combine both. Physical controls do not have to be static. Digital controls do not have to be flat. A printed knob over a screen is a small rebellion against boring interfaces, and frankly, boring interfaces had it coming.
Experience Notes: Building and Using a Touchscreen Knob in the Real World
The first experience most builders have with this type of project is optimism. The second is calibration. The third is realizing that magnets have opinions. On paper, a magnetic encoder setup seems beautifully straightforward: place magnet over sensor, read angle, celebrate. In real life, the readings may look perfect at one distance and chaotic at another. The best approach is to treat the first version as a measuring tool, not the final design.
Start by building a simple test rig. Print a basic holder for the magnetic encoder and a rough knob that holds the magnet. Connect the sensor to the microcontroller and display raw angle values over serial output. Before worrying about graphics or animations, slowly rotate the knob and watch the data. Does it move smoothly? Does it jump near one position? Does clockwise rotation increase or decrease the value? Does the reading remain stable when the knob is not moving? These answers will save hours later.
One practical lesson is that the display should not be installed too early in the testing process. Screens are fragile, and prototypes have a talent for finding new ways to become expensive. Use a spacer or dummy panel at first to simulate display thickness. Once the knob rotates smoothly and the encoder readings are reliable, introduce the real touchscreen with protective film or glass. The goal is to avoid turning your beautiful display into a circular scratch diary.
Another useful habit is printing multiple knob textures. A smooth knob may look elegant in photos, but it can feel slippery during quick adjustments. A ridged edge adds control, especially for fine tuning. A shallow groove near the top can make the knob easier to pinch. If the knob will be used for long sessions, comfort matters more than visual drama. The best design is often the one your fingers understand instantly.
For software, keep the first interface boring on purpose. Display a number, a ring, and perhaps a simple label. Once the input feels responsive, then add animation, icons, color themes, and mode switching. Many projects become frustrating because the builder tries to debug sensor noise, display refresh issues, touch input, and fancy graphics at the same time. That is not development; that is juggling flaming squirrels.
A well-tuned touchscreen knob feels surprisingly natural. You rotate it and the display responds as though the graphics are attached to your hand. That illusion is the prize. When the physical motion, sensor reading, and visual feedback all line up, the device stops feeling like a homemade experiment and starts feeling like a real product. It becomes the kind of object people notice, touch, and immediately ask, “Wait, did you make this?”
The best part is that the design invites customization. A photographer might use it for Lightroom sliders. A musician might map it to MIDI controls. A streamer might use it for audio levels and scene switching. A smart home enthusiast might mount it near the door as a lighting and thermostat controller. A 3D printing fan might use it as a printer control panel because apparently one printer is never enough, and every printer deserves accessories.
In the end, the experience is less about replacing every touchscreen or every knob. It is about combining them thoughtfully. A 3D-printed knob with touchscreen flair proves that tactile controls still have a place in modern design. The future may be digital, but it still feels better when you can grab it, turn it, and dial it in.
Conclusion
A 3D-printed knob with touchscreen flair is a small device with a big design lesson: the best interfaces do not force a choice between physical and digital. They combine the precision of a real dial with the flexibility of a screen. With a magnetic encoder, a carefully aligned magnet, a protective mechanical design, and responsive firmware, makers can create a control that feels smooth, looks futuristic, and adapts to countless uses.
Whether it becomes a smart home controller, an audio dial, a PC macro tool, a 3D printer interface, or simply the coolest thing on your workbench, this project shows why tactile interaction still matters. Touchscreens are powerful, but sometimes the perfect interface is the one you can actually turn.
Note: This publication-ready article is written as original HTML body content based on real maker hardware concepts, including magnetic encoders, 3D-printed mechanical assemblies, touchscreen interfaces, and rotary control design. Source links are intentionally omitted from the article body as requested.


