Table of Contents >> Show >> Hide
- Why Make a Chicken Wire Flower Basket?
- What You Need
- How to Make a DIY Chicken Wire Flower Basket
- Best Flowers for a Chicken Wire Hanging Basket
- How to Keep Your Basket Looking Good All Season
- Common Mistakes to Avoid
- Design Ideas for Different Styles
- Real-World Experiences and Lessons from Making a DIY Chicken Wire Flower Basket
- Conclusion
If you have ever looked at a hanging flower basket and thought, “Cute, but why does it cost the same as a small moon mission?” this project is for you. A DIY chicken wire flower basket gives you that charming, cottage-garden look without forcing your wallet to file a formal complaint. It is practical, customizable, and just rustic enough to make your patio feel like it belongs in a magazine spread instead of next to a garden hose and one lonely flip-flop.
Better yet, this is not one of those crafts that looks adorable for six minutes and then collapses into a tragic metal tumbleweed. When built correctly, a chicken wire basket can support a lush arrangement of trailing blooms, herbs, or mixed annuals all season long. The trick is combining smart construction with real container-gardening basics: good drainage, a lightweight potting mix, a proper liner, and plants that actually want to live together.
Why Make a Chicken Wire Flower Basket?
A chicken wire flower basket has a lot going for it. First, it is flexible. You can make it round, oval, cone-shaped, or slightly wonky in an artsy way that tells guests, “Yes, I meant to do that.” Second, it is budget-friendly. A roll of galvanized chicken wire goes a long way, especially if you make more than one basket. Third, it gives you a handmade look that store-bought plastic planters simply cannot fake, no matter how much faux-distressing they slap on the label.
From an SEO standpoint and a gardening standpoint, people love this project because it combines several popular interests in one: DIY garden decor, hanging basket ideas, container gardening, rustic outdoor planters, and creative flower arrangements. In plain English, it is the kind of project that looks good, works hard, and earns compliments.
What You Need
Materials
- Galvanized chicken wire
- Coco liner, sheet moss, burlap, or landscape fabric for lining
- Floral wire or zip ties
- Chain, rope, or sturdy hanging wire
- Potting mix made for containers
- Slow-release fertilizer
- Plants or flower starts
Tools
- Heavy work gloves
- Wire cutters or tin snips
- Pliers
- Scissors
- Trowel or scoop
One important note: chicken wire is not emotionally supportive. It is poky, sharp, and fully prepared to scratch your hands if you get cocky. Wear gloves from the start. Your future self will be grateful and less likely to mutter at the project.
How to Make a DIY Chicken Wire Flower Basket
Step 1: Decide on the Shape and Size
Before cutting anything, figure out what kind of basket you want. A classic round hanging basket is the easiest option for beginners. A wider bowl shape works well for front porches, while a deeper cone or teardrop form is great for dramatic trailing flowers. Keep size realistic. A giant basket packed with wet soil is beautiful, but it also weighs roughly the same as your confidence after a failed IKEA assembly.
For a standard hanging basket, aim for a finished diameter of about 12 to 16 inches. That gives you enough room for a full planting without making the structure too heavy to hang safely.
Step 2: Cut the Chicken Wire
Cut a rectangular section of chicken wire large enough to form your basket. You can also cut a circle for the base and a longer strip for the sides if you prefer more control. Use wire cutters and move slowly. Clean cuts make shaping easier and reduce the number of rogue wire ends trying to start a fight.
If you are making a bowl-style basket, shape the wire by gently curving it inward with your hands and pliers. Overlap the edges and twist the cut wire ends together firmly. You do not need perfection here. The liner and plants will cover a lot, and flowers are famously generous about hiding minor engineering drama.
Step 3: Reinforce the Frame
Once the basic shape is formed, reinforce weak spots. Twist floral wire around the seams, especially where the base meets the sides. If the basket flexes too much, add an extra band of wire around the top edge. This creates a sturdier rim and makes the whole thing look more finished.
At this stage, attach three evenly spaced hanging points around the rim. These can be secured with floral wire loops, chain hooks, or sturdy wire twisted tightly into place. Join them at the top with an S-hook or hanging ring.
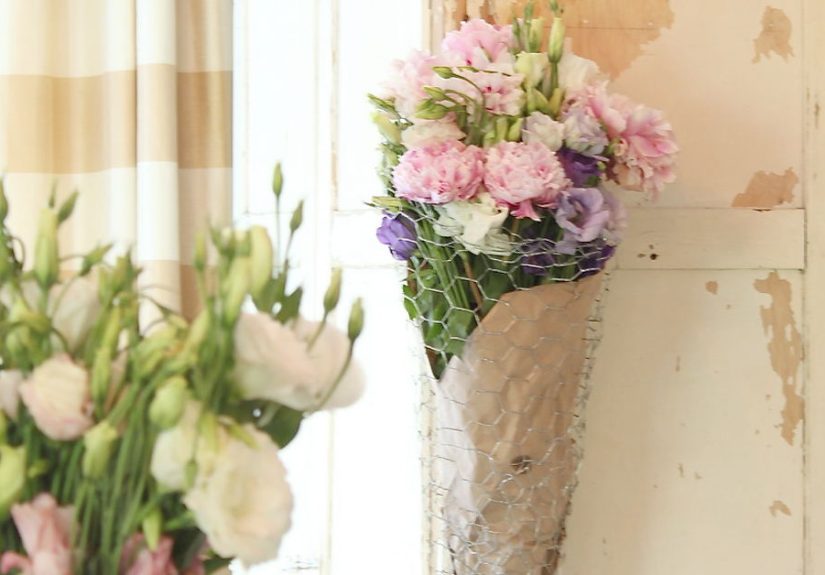
Step 4: Add the Liner
The liner is what turns a wire frame into an actual planter instead of a very decorative trap for loose potting soil. Coco liners are the easiest choice because they are shaped, breathable, and easy to trim. Sheet moss creates a classic, natural look. Burlap works well for a softer rustic style, and landscape fabric is useful if you want more moisture retention and less shedding.
Fit the liner snugly inside the wire frame. If you are using sheet moss or burlap, overlap pieces so there are no obvious gaps. Keep the liner thick enough to hold soil but not so dense that water has nowhere to go. This is a flower basket, not a bog experiment.
Step 5: Fill with the Right Potting Mix
Use a lightweight potting mix made for containers. Do not dig up garden soil and stuff it in there unless you enjoy poor drainage, compacted roots, and disappointment. Container mixes are designed to drain well while still holding moisture and nutrients. Many include ingredients such as peat moss or coconut coir, bark, perlite, and a starter fertilizer.
Mix in a slow-release fertilizer before planting. This gives your flowers a steady nutrient supply and reduces the need for constant feeding. Also, resist the old myth of putting rocks in the bottom for drainage. It sounds clever, but it does not improve drainage in containers and can actually make the root zone stay wetter.
Step 6: Plant Your Flowers
Now for the fun part. Add potting mix until the basket is about halfway full, then begin placing plants. If you want a lush, professional-looking basket, think in layers:
- Thrillers: Upright focal plants like geraniums, upright fuchsia, or compact dracaena
- Fillers: Mounding plants like petunias, begonias, or calibrachoa
- Spillers: Trailing plants like ivy geranium, bacopa, lobelia, or sweet alyssum
If your liner allows side planting, you can cut small slits and tuck trailing plants into the sides for a fuller effect. Space plants close enough to look abundant, but not so tight that they immediately begin a root-based turf war. They still need room to grow.
Step 7: Water Thoroughly and Hang Safely
Once planted, water the basket slowly until moisture runs out the bottom. This settles the soil and helps eliminate air pockets around the roots. Then hang the basket where it gets the right amount of light for your chosen plants. Full-sun baskets are great in bright locations, while shade-loving combinations work best on covered porches or spots with morning sun and afternoon relief.
Always check that the hook, bracket, and support surface can handle the weight of wet soil. A flower basket should be eye-catching, not headline-making.
Best Flowers for a Chicken Wire Hanging Basket
The best plants depend on sun exposure, heat, and how much daily care you are willing to provide. In general, choose plants with similar moisture and light needs. This is not the time for one diva that wants dry roots and one drama queen that wilts if you blink too slowly.
Great Choices for Full Sun
- Petunias
- Calibrachoa (million bells)
- Verbena
- Lantana
- Geraniums
- Scaevola (fan flower)
- Succulents for low-water baskets
Great Choices for Part Shade or Shade
- Begonias
- Fuchsia
- Bacopa
- Lobelia
- Torenia (wishbone flower)
- Ivy geranium in milder light
- Trailing ivy or small ferns for texture
One smart strategy is to combine flowering plants with foliage plants. Flowers bring color, while foliage keeps the basket looking full even when blooms take a short break. That is a good life lesson, honestly.
How to Keep Your Basket Looking Good All Season
Watering
Hanging baskets dry out fast, especially wire baskets lined with coco fiber or moss. In warm weather, you may need to water daily. In extreme summer heat, some baskets need water twice a day. The goal is consistent moisture, not soggy roots. Water deeply until liquid drains out the bottom, then let excess drain away. If the top looks wet but the root ball is still dry inside, soak the basket more slowly.
Fertilizing
Frequent watering washes nutrients out of containers, so feeding matters. If you mixed slow-release fertilizer into the potting mix, you are off to a good start. Still, most blooming baskets benefit from a diluted liquid fertilizer every couple of weeks. Avoid formulas that are too high in nitrogen, or you may end up with gorgeous leaves and very few flowers. Beautiful foliage is nice, but most people did not make a flower basket for a leafy plot twist.
Deadheading and Pruning
Remove spent flowers regularly to encourage continued blooming. Some plants, like many calibrachoa varieties, are self-cleaning and do not need much deadheading. Others, especially geraniums and certain petunias, look and perform better when old blooms are pinched off. If the basket starts getting leggy, trim stems back lightly. A quick haircut often leads to fuller growth and a fresh wave of flowers.
Location and Wind
Wind dries baskets faster and can stress delicate blooms. If your porch turns into a mini weather station every afternoon, hang the basket where it gets airflow without constant battering. Grouping containers nearby can also make the area feel more humid and reduce stress on plants.
Common Mistakes to Avoid
- Using garden soil: It is too dense for baskets and drains poorly.
- Skipping the liner: Soil will spill, dry out too fast, or both.
- Forgetting drainage: Your basket needs a liner that holds soil but still lets water escape.
- Adding rocks at the bottom: This sounds helpful but does not improve drainage in containers.
- Overcrowding plants: Full is good; root traffic jams are not.
- Choosing plants with different needs: One basket should not be both desert and rainforest.
- Ignoring maintenance: Hanging baskets are not “set it and forget it” decor.
Design Ideas for Different Styles
Classic Cottage Basket
Use moss or coco liner and plant geraniums, lobelia, ivy, and sweet alyssum. This gives you a soft, overflowing look with that old-fashioned charm people love.
Modern Minimal Basket
Stick with one or two plant varieties, such as all white calibrachoa with trailing silver foliage. Clean, simple, and no visual chaos.
Low-Maintenance Basket
Choose drought-tolerant succulents or heat-tolerant flowers like scaevola and lantana. It will still need care, just less dramatic care.
Edible Flower and Herb Basket
Mix trailing nasturtiums, thyme, parsley, and compact basil. Pretty, fragrant, and useful. Your basket can literally contribute to lunch, which is more than most decor can say.
Real-World Experiences and Lessons from Making a DIY Chicken Wire Flower Basket
The biggest lesson people learn with a DIY chicken wire flower basket is that the structure is only half the project. The other half is understanding how a hanging basket behaves once it is planted and exposed to real weather. On day one, almost every basket looks amazing. The shape is fresh, the flowers are happy, and there is a dangerous temptation to believe the work is done. Then summer arrives with heat, wind, and gravity, and suddenly the basket starts teaching life lessons.
One common experience is underestimating weight. A dry basket feels manageable. A fully watered basket with damp potting mix, mature roots, and a thick liner feels very different. This is why experienced DIY gardeners often start smaller than planned, especially on a first attempt. A medium-size basket is easier to lift, easier to hang, and easier to water well. It is also less likely to pull at weak hooks or tilt awkwardly after a heavy rain.
Another lesson is that plant choice matters more than color palette. Many beginners build a basket around whatever blooms look prettiest at the garden center, only to discover those plants have completely different preferences. One wants full blazing sun, one prefers afternoon shade, and one apparently wants to be left alone with a novel and soft jazz. Matching plants by light and water needs creates a basket that stays attractive longer and requires less rescue work later.
Watering is where experience really changes results. Most first-time DIYers either water too lightly or too often. A quick splash on top is rarely enough for a lined basket because the root ball can stay dry inside while the surface looks damp. On the other hand, keeping the basket constantly soaked leads to tired roots and sad flowers. The most practical habit is checking the basket every day, feeling the soil, and watering deeply only when it needs it. It sounds simple because it is simple, but simple is not the same thing as automatic.
People also learn that trimming is not failure. When a basket starts looking stringy in midsummer, many gardeners hesitate to cut anything back because they fear making it worse. In reality, a light trim and regular deadheading often bring the whole arrangement back to life. The basket may look slightly offended for a few days, then return fuller, fresher, and more willing to participate in being beautiful.
Finally, there is the confidence factor. After one successful chicken wire basket, most people stop seeing chicken wire as a plain utility material and start seeing possibilities. It becomes a frame for rustic planters, porch decor, seasonal centerpieces, and custom hanging displays. That is what makes this project so satisfying. It is not just about saving money or making something pretty. It is about building a planter with your own hands, learning how it works, adjusting as you go, and ending up with a living piece of garden design that feels personal. That kind of project sticks with you, which is more than can be said for many store-bought baskets and nearly all impulse purchases at the home decor aisle.
Conclusion
A DIY chicken wire flower basket is one of those rare projects that lands in the sweet spot between practical and charming. It lets you create a custom hanging planter, use real container-gardening techniques, and turn simple materials into something that looks lush and intentional. Whether you go for a cottage-style overflow of blooms, a modern trailing design, or a low-maintenance succulent basket, the keys are the same: build a secure frame, line it properly, use a quality potting mix, choose compatible plants, and keep up with watering and feeding.
In other words, the secret is not magic. It is good structure, good plant choices, and a little regular attention. Also gloves. Definitely gloves.


