Table of Contents >> Show >> Hide
- Why Build a DIY Wood Shoe Rack Instead of Buying One?
- Before You Cut Anything, Plan Like a Person Who Enjoys Fewer Regrets
- Best Wood and Materials for a DIY Shoe Rack
- Tools That Make the Job Easier
- How to Build a Simple DIY Wood Shoe Rack
- Design Tips That Make a Shoe Rack Better
- Common Mistakes to Avoid
- Easy Variations to Try
- DIY Wood Shoe Rack: Real-Life Experience and Lessons Learned
- Conclusion
- SEO Tags
If your entryway currently looks like a sneaker convention that got wildly out of hand, a DIY wood shoe rack might be the home upgrade you didn’t know you needed. It is practical, affordable, customizable, and far more attractive than the sad pile of shoes currently performing a slow takeover of your floor. Better yet, this is one of those woodworking projects that feels impressive without requiring you to become a lumber whisperer overnight.
A well-built wooden shoe rack can do more than hold footwear. It can create an organized drop zone, make a small entryway feel calmer, help wet shoes dry better, and even give you a nice bench top for sitting while you untie boots like a civilized adult. Whether you want a slim rack for a hallway, a sturdy bench for the mudroom, or a simple open shelf for a closet, the basic ideas are wonderfully flexible.
Why Build a DIY Wood Shoe Rack Instead of Buying One?
The biggest advantage is customization. Store-bought shoe racks often come in only two flavors: flimsy or weirdly expensive. When you build your own, you control the width, height, shelf spacing, wood type, and finish. You can design it around sneakers, sandals, work boots, or the mystery category known as “shoes nobody remembers buying but somehow still live by the front door.”
There is also the matter of durability. A DIY wood shoe rack made from pine, fir, poplar, oak, plywood, or edge-glued panels can be much sturdier than lightweight plastic or wire options. Open slats or spaced shelves improve airflow, which helps shoes dry and keeps the rack from feeling like a damp little cave. And if your household is busy, a wood shoe rack bench adds seating and storage in one smart piece.
Before You Cut Anything, Plan Like a Person Who Enjoys Fewer Regrets
Measure Your Space First
Start with the exact spot where the rack will live. Measure the width, depth, and height available. A slim hallway rack may need to stay around 10 to 12 inches deep, while a mudroom bench can go deeper for extra comfort and stability. If the rack will sit near a door swing, radiator, or closet opening, measure that clearance too. Nothing says “learning experience” quite like building a lovely shoe rack that blocks the front door.
Count the Shoes You Actually Need to Store
Do not design for every shoe you have ever owned since middle school. Design for the shoes that need daily or weekly access. Everyday footwear belongs near the entryway. Dress shoes and off-season pairs can live elsewhere. This approach keeps the rack functional instead of turning it into a wooden monument to overthinking.
Choose the Right Style
There are several easy directions you can take:
- Open slat rack: Great for airflow and quick drying.
- Shelf rack: Easy to build and ideal for sneakers and flats.
- Bench with shelves: Best for entryways and families.
- Vertical or modular rack: Perfect for closets and small spaces.
- Cubby-style rack: Keeps pairs separated and visually tidy.
Best Wood and Materials for a DIY Shoe Rack
If you want budget-friendly and beginner-friendly, pine and fir are excellent choices. They are easy to cut, easy to sand, and easy on the wallet. If you want a more polished furniture look, poplar and oak are solid upgrades. Plywood is also a smart option for boxy or bench-style builds because it is stable, widely available, and efficient for wider panels.
For a basic wood shoe rack, you will usually need:
- Wood boards or plywood panels
- Wood glue
- Screws or pocket hole screws
- Sandpaper in several grits
- Wood filler
- Paint, stain, or clear protective finish
- Optional felt pads, boot tray inserts, or rubber shelf liners
If the rack will hold wet or muddy shoes, consider protecting the shelf surfaces with polyurethane, a liner, or removable trays. That small decision can save you from water marks, dirt buildup, and the annual tradition of pretending you will clean it “this weekend.”
Tools That Make the Job Easier
You do not need a giant workshop that looks like a TV set. For most DIY wood shoe rack projects, a manageable tool list is enough:
- Miter saw or circular saw for cutting boards
- Drill/driver
- Pocket hole jig or drill bit set
- Clamps
- Tape measure and speed square
- Orbital sander or sanding block
- Paintbrush or clean rags for finishing
Wear eye protection, hearing protection, and a dust mask or respirator when cutting or sanding. Keep the work area bright, clean, and free of tripping hazards. Woodworking is fun. Unexpected ambulance paperwork is not.
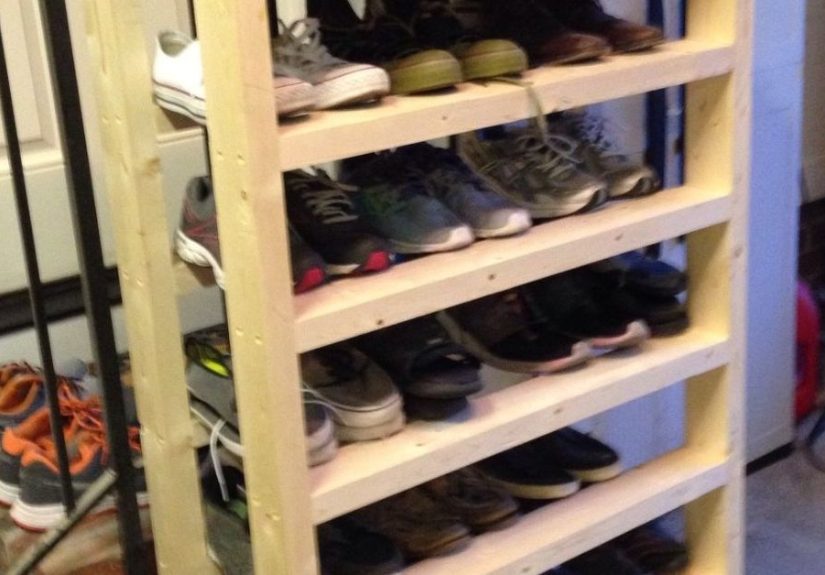
How to Build a Simple DIY Wood Shoe Rack
Step 1: Pick a Practical Size
A very workable beginner size is about 30 to 36 inches wide, 11 to 12 inches deep, and 18 to 24 inches high. That usually gives you two or three levels for shoes without eating your whole entryway. For boots, include one taller opening or leave the bottom shelf more open.
Step 2: Cut Your Pieces
For a simple two-tier rack, cut two side panels, two or three shelf pieces, and optional top boards if you want a bench-style surface. If you prefer a slatted look, cut multiple narrow slats instead of full shelves. Slats improve airflow and look lighter visually, which is especially helpful in a small entryway.
Step 3: Sand Before Assembly
Sand all faces and edges before putting the rack together. Start with a coarser grit if the boards are rough, then move up to finer grits for smoothness. This step is wildly unglamorous and completely worth it. Smooth edges feel better, finish better, and immediately make the project look more professional.
Step 4: Assemble the Frame
Attach the shelves to the side panels using wood glue and screws or pocket hole joinery. Use clamps and a square to keep everything aligned while fastening. If the rack is more than a couple of feet wide, add a center support under one shelf or under the top bench surface to prevent sagging over time.
Step 5: Check for Level and Wobble
Place the assembled rack on a flat surface before finishing. If it rocks, fix it now, not after painting it and dramatically announcing the project complete. Small adjustments at this stage save major irritation later.
Step 6: Fill, Sand Again, and Clean Dust
Fill visible screw holes if you want a cleaner furniture-style look. Once dry, sand again lightly and remove dust thoroughly. Dust left on the surface can ruin an otherwise beautiful finish and make your project look like it was sealed under a layer of snack crumbs.
Step 7: Apply Your Finish
You have three classic options. Paint gives a crisp, customizable look. Stain highlights the wood grain and adds warmth. Clear polyurethane keeps things natural while protecting the surface. If you are staining softwood like pine, a pre-stain conditioner can help reduce blotchiness. For busy households, a durable satin or semi-gloss protective topcoat is a very smart move.
Design Tips That Make a Shoe Rack Better
Use Open Storage for Everyday Shoes
Open shelves are best for the pairs you wear constantly. They are easy to grab, easy to air out, and easy to clean around. This works especially well in mudrooms, garages, and entryways where convenience matters more than hiding everything behind doors.
Add a Bench Top if You Have the Room
A bench-style DIY wood shoe rack is one of the most practical versions because it doubles as seating. That means kids can put on shoes without becoming interpretive dancers, and adults can sit while tying boots instead of wobbling like flamingos.
Build for the Shoes You Own
Chunky sneakers need different spacing than slim flats. Work boots may need a taller cubby. Heels can benefit from shallower rails or creative slat arrangements. If you have a mixed household, adjustable shelves or a modular design can be the best long-term solution.
Keep the Entryway Under Control
Even the best wooden shoe rack will look overloaded if it becomes storage for every shoe in the house. Keep only the current daily-use pairs by the door. Rotate seasonal shoes into closet bins, under-bed storage, or another dedicated spot. Your rack should be helpful, not heroic.
Common Mistakes to Avoid
- Making it too shallow: Shoes should sit securely without hanging halfway off the shelf.
- Ignoring wet shoes: Use a protective finish, liners, or trays if moisture is common.
- Skipping airflow: Slats or open shelves work better than fully enclosed surfaces for everyday shoes.
- Forgetting wall clearance: Baseboards, door trim, and outlets can affect fit.
- Overbuilding: A simple rack done well beats an ambitious masterpiece that stays half-finished in the garage until next spring.
Easy Variations to Try
Once you understand the basic build, you can customize it in all sorts of useful ways. Add hooks above the rack for bags and coats. Install baskets underneath for flip-flops or kids’ shoes. Make the rack stackable if your collection grows. Add casters if you need a mobile rack for a mudroom or laundry space. Use a dark stain for a classic entryway look, or paint it white for a clean cottage style. If your aesthetic leans modern, keep the lines simple and the hardware minimal.
DIY Wood Shoe Rack: Real-Life Experience and Lessons Learned
The first time I built a DIY wood shoe rack, I had a simple goal: stop tripping over sneakers every morning like my hallway was an obstacle course designed by a very petty interior designer. I assumed the project would be fast, easy, and satisfyingly cinematic. In reality, it was fast-ish, easy enough, and came with a few humbling moments that turned out to be incredibly useful.
My original mistake was building for the ideal version of my home instead of the actual one. I imagined a sleek, magazine-worthy wooden shoe rack holding exactly six beautiful pairs of neutral-toned shoes. What I really needed was room for running shoes, sandals, muddy slip-ons, guest shoes, and one mysterious boot that apparently had no plans to reunite with its partner. That experience taught me to design around habits, not fantasies. If the rack is for a real entryway, it needs to handle real-life mess.
I also learned that wood choice changes the whole mood of the project. My first rack used inexpensive pine, which was perfect for learning because it was affordable and easy to cut. It also dented more easily than I expected, which made me a little more careful with assembly and finishing. On the next build, I used better boards and spent more time picking straight pieces. That one looked sharper immediately, even before stain. So yes, technique matters, but shopping carefully matters too.
Another lesson was the value of open shelves. At first, I considered closed cubbies because they looked tidy. But in daily life, open slats or simple shelves were easier to use and easier to clean. Wet shoes dried faster. Dirt was more obvious, which sounds bad until you realize obvious dirt gets cleaned while hidden dirt throws a long, nasty party. I started keeping only everyday shoes on the rack and moved seasonal pairs elsewhere. Suddenly the whole entryway looked calmer.
Finishing was another surprise. I used to think stain was the “fancy” option and paint was the backup plan. Now I think the best finish is the one that fits your life. If your family is rough on furniture, painted and sealed can be a brilliant choice because it is forgiving and easy to refresh. If you love natural wood grain, stain plus polyurethane looks warm and classic. Either way, sanding properly before finishing makes the biggest difference. Good sanding is like flossing: nobody wants to do it, but everyone notices when you skip it.
The best part of building a DIY wood shoe rack, though, was not just the final product. It was the small shift in how the space functioned. People came in, sat down, put shoes away, and moved on. The floor stayed clearer. The room felt less chaotic. The routine became easier. That is what makes this project so satisfying. You are not just building a wooden shoe rack. You are building a tiny system that makes everyday life a little smoother, which is honestly the dream of most home projects.
Conclusion
A DIY wood shoe rack is one of those rare home projects that checks every box. It is useful, beginner-friendly, customizable, and genuinely attractive when done well. You can build a simple open rack in an afternoon or create a polished shoe rack bench that looks like custom furniture. Start with your space, build for your actual shoe habits, use durable materials, and finish it well. Do that, and you will end up with a piece that earns its keep every single day.
And perhaps most importantly, you will finally know where your shoes are. Well, most of them. There is still no known system for the one missing sneaker.


