Table of Contents >> Show >> Hide
- Why the Leg Press Gets People in Trouble (Even Though It’s a “Machine”)
- Quick Setup Checklist (Do This Before You Add Plates Like You’re Paying Per Plate)
- 12 Common Leg-Press Mistakes (and Exactly How to Fix Them)
- 1) Rushing the setup (a.k.a. “close enough” seat position)
- 2) Letting your butt and lower back lift off the pad
- 3) Going too deep for your current mobility (depth you can’t control)
- 4) Partial reps because the weight is too heavy
- 5) Bouncing out of the bottom
- 6) Locking out hard (or hyperextending) at the top
- 7) Knees caving in (valgus) or flaring unpredictably
- 8) Feet placed too low (and knees traveling into “why are my kneecaps screaming?” territory)
- 9) Feet placed too high (and turning it into a hamstring curl cosplay)
- 10) Letting heels pop up or pushing through toes only
- 11) Turning the leg press into a cardio sprint (too fast, too sloppy)
- 12) Poor bracing and breathing (the “I forgot I have a torso” mistake)
- Foot Placement: What It Really Changes (and What It Doesn’t)
- Programming Tips: Make the Leg Press Work for Strength, Size, or Better Knees
- Smart “Form Fix” Cues You Can Use Immediately
- When to Swap the Leg Press for Something Else
- of Real-World Experiences: “Leg Press Reality Checks”
- Conclusion: Make the Leg Press Count
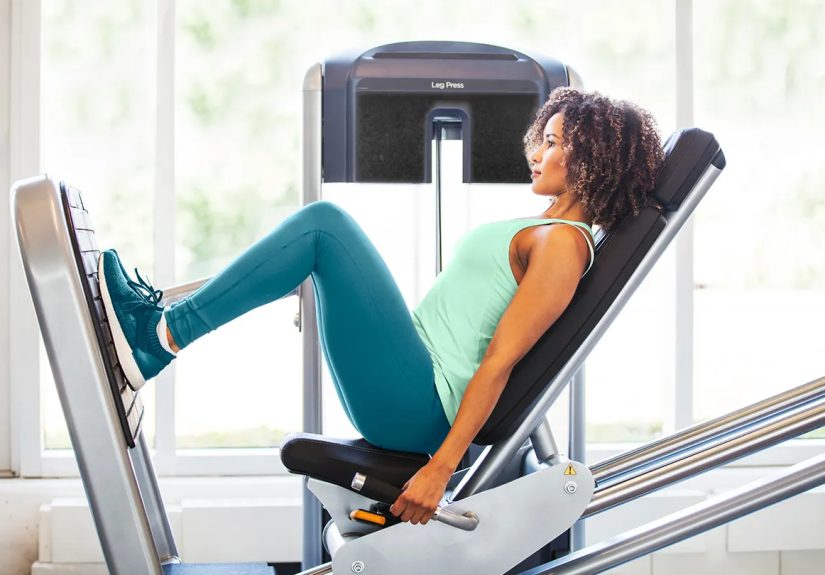
The leg press is the “nice, polite” cousin of the squat: it doesn’t demand a rack, it won’t judge your ankle mobility, and it lets you sit down while doing something that looks suspiciously like hard work. Unfortunately, that comfort can turn into overconfidence. The leg press is one of the easiest lower-body tools to load heavy… and one of the easiest to do a little wonky without realizing it.
If your quads aren’t lighting up, your glutes feel missing in action, or your knees and low back are filing formal complaints, you probably don’t need a new program. You need a cleanup crew for your technique. Let’s fix the most common leg-press mistakes so every rep trains muscle (not your future physical therapist’s vacation fund).
Why the Leg Press Gets People in Trouble (Even Though It’s a “Machine”)
Machines feel safe because the movement path is guided. But “guided” doesn’t mean “idiot-proof.” If your seat is set wrong, your feet are placed poorly, or you chase depth that your hips can’t actually own, the machine will still let you push. It just won’t tell you where the stress is going until your joints start sending push notifications.
The good news: small tweaks often produce big returnsbetter muscle tension, better range of motion, and fewer sketchy reps.
Quick Setup Checklist (Do This Before You Add Plates Like You’re Paying Per Plate)
- Seat distance: Start so your knees bend to about a comfortable right angle (roughly 90°) with your hips and back supported.
- Back and pelvis contact: Keep your low back and hips “glued” to the pad. If they peel up, you’re either too deep or set up too close.
- Feet: Flat contact through heel and midfoot, not just the toes.
- Handles: Use them to keep your torso stable (not to perform an interpretive dance with your shoulders).
- Safety stops: Know where they are and how to rack safely before you go heavy.
12 Common Leg-Press Mistakes (and Exactly How to Fix Them)
1) Rushing the setup (a.k.a. “close enough” seat position)
When the seat is too close, your knees get jammed toward your chest, your pelvis is more likely to tuck under at the bottom, and your lower back may round. Too far away and you’ll shorten the range, turning the leg press into a glorified ankle wiggle.
Fix it: Adjust so you can lower with control to a deep but comfortable position without your hips lifting or your low back flattening/rounding. Do a few reps with the empty sled to confirm you can keep your spine and pelvis steady.
2) Letting your butt and lower back lift off the pad
This is the classic “butt pop.” It usually happens when you go deeper than your hips can tolerate or you set the seat too close. When the pelvis lifts, your lower back often rounds, and the stress shifts away from legs and toward the spine.
Fix it: Reduce depth slightly, lighten the load, or adjust the seat. Think: “ribcage down, pelvis heavy.” If you can’t keep your hips down, the rep doesn’t count. (Yes, your ego will survive.)
3) Going too deep for your current mobility (depth you can’t control)
Deep range of motion can be greatif it’s your range and you can own it. But if the bottom position forces your pelvis to roll, you’re borrowing range from your spine. That’s a bad loan with high interest.
Fix it: Use the deepest position where your hips stay down and your low back stays neutral. Over time, improve comfort with targeted mobility work (hips/ankles) and gradually increase depth.
4) Partial reps because the weight is too heavy
Short, choppy reps are a sneaky way to convince yourself you’re strong while your quads quietly unsubscribe from the workout. Consistently cutting range can reduce muscular work and make knee stress feel weirder than it needs to be.
Fix it: Choose a load that lets you hit a repeatable depth and a controlled lockout without losing position. If you want heavy work, do it with clean reps firstthen earn the right to load up.
5) Bouncing out of the bottom
Dropping fast and rebounding may feel powerful, but it often shifts stress to passive structures and turns your set into a momentum contest. Your muscles want tension, not a surprise trampoline routine.
Fix it: Control the descent. Pause lightly near the bottom (even half a second) and drive up smoothly. You’ll feel more muscle and you’ll still be able to walk tomorrow.
6) Locking out hard (or hyperextending) at the top
“Never lock your knees” is a common cue, but the real villain is aggressively slamming into end rangeespecially if you drift into hyperextension or unload muscle tension to rest on joints.
Fix it: Finish the rep with the legs almost straight, keep tension, and avoid snapping into the stop. Think “stand tall,” not “knees backward.”
7) Knees caving in (valgus) or flaring unpredictably
If your knees cave inward, you’re often losing hip control or your stance is too narrow for your anatomy. If they flare wildly, you may be forcing a stance/foot angle you can’t control.
Fix it: Aim for knees tracking in line with toes. Use a stance that lets you keep your feet flat and your knees stable. A simple cue: “push the platform apart” (gentle outward pressure) while keeping full-foot contact.
8) Feet placed too low (and knees traveling into “why are my kneecaps screaming?” territory)
A very low foot placement can increase knee bend and shift emphasis toward the quadsbut it can also feel rough if you lack ankle mobility or if your knees drift in awkward angles.
Fix it: Start with feet about shoulder-width in the middle of the platform. If you move lower for more quad bias, do it gradually and keep knees tracking well. If discomfort shows up, go back to a more neutral placement.
9) Feet placed too high (and turning it into a hamstring curl cosplay)
A higher foot placement often shifts work toward glutes and hamstrings and may reduce knee bendbut too high can shorten range or make you lose stable foot pressure.
Fix it: Keep your whole foot planted and choose a position that lets you reach a controlled depth. “High” should still feel stable, not like your heels are about to file for independence.
10) Letting heels pop up or pushing through toes only
If your heels lift, you lose power, stability, and consistent knee tracking. It often happens when feet are too low, the sled is too heavy, or you’re trying to “help” the press with ankles instead of legs.
Fix it: Drive through heel and midfoot, keep full contact, and lower the load if needed. If you can’t keep your heels down, the weight is choosing your form for you.
11) Turning the leg press into a cardio sprint (too fast, too sloppy)
Speed isn’t automatically badbut uncontrolled speed is. A rushed eccentric (lowering phase) often leads to butt lift, knee wobble, and bouncing. Also: fast reps make it easier to hide technique issues from yourself.
Fix it: Use a controlled tempo: steady down, smooth up. A simple starting point is about 2–4 seconds down and 1–2 seconds up while staying in control.
12) Poor bracing and breathing (the “I forgot I have a torso” mistake)
Even though you’re seated, your trunk still needs to stabilize. Without bracing, your pelvis shifts, your ribs flare, and your low back may lose position. Breath-holding done randomly can also spike tension in all the wrong places.
Fix it: Inhale and brace before you lower, keep your ribs “stacked” over your pelvis, then exhale as you press. Use the handles to anchor your torso. You want pressure and controlnot a dramatic gasp at rep seven.
Foot Placement: What It Really Changes (and What It Doesn’t)
Foot placement can change which muscles feel the most loaded, but it doesn’t turn the leg press into twelve different exercises. Think of it like adjusting the spotlight: you can highlight quads, glutes, or adductors more, but the whole lower body is still on stage.
High vs. low
- Lower placement: typically more knee bend and more quad emphasisif you can keep heels down and knees tracking well.
- Higher placement: often shifts the load toward glutes/hamstrings and can feel friendlier for some knees, but don’t sacrifice range and control.
Wide vs. narrow
- Shoulder-width is a great default for most people.
- Slightly wider can increase adductor involvement and sometimes allows a deeper, more comfortable bottom position.
- Very narrow can limit stability and range for many lifters, especially if knees cave.
Toe angle
A slight toe-out can help many people track knees comfortably and hit depth without knee strain. But if toe angle is extreme, it can create sloppy knee paths. Choose the smallest angle that feels stable and smooth.
Programming Tips: Make the Leg Press Work for Strength, Size, or Better Knees
Once form is cleaned up, the leg press becomes a reliable way to build legs without needing a spotter or a PhD in bar path physics. Here are practical ways to program it based on your goal.
For muscle growth (hypertrophy)
- Sets/Reps: 3–5 sets of 8–15 reps
- Effort: Stop 1–3 reps before failure for most sets, then push closer on the final set if form stays solid
- Tempo: controlled lowering (2–4 seconds), smooth press (1–2 seconds)
- Rest: 1–2 minutes (longer if you go heavier)
For strength (without turning it into a circus act)
- Sets/Reps: 3–6 sets of 4–8 reps
- Key rule: range stays consistent; no “mystery depth” sets
- Rest: 2–3+ minutes as loads get heavier
For “knee-friendly” training and joint respect
- Pick a depth you can control with hips down and knees tracking well.
- Use moderate loads and a slower eccentric to build control and tolerance.
- Balance the week: include hamstring and glute work (RDLs, hip hinges, hamstring curls) so the knee has support from all sides.
Progression doesn’t have to be dramatic. A simple rule: when you can complete your target reps with clean form, add a small amount of load next time. Small jumps, consistent reps, better long-term gains.
Smart “Form Fix” Cues You Can Use Immediately
- “Hips heavy.” Keep pelvis glued to the pad; stop the rep before it lifts.
- “Knees track toes.” Don’t let them cave in or wander.
- “Whole foot.” Heel + midfoot pressure stays planted.
- “Control down.” Own the eccentric; don’t free-fall.
- “Soft finish.” Don’t slam into lockout; keep tension.
When to Swap the Leg Press for Something Else
The leg press is a tool, not a moral obligation. If you can’t find a setup that keeps your hips down and your knees happy, or if you feel sharp pain (not normal muscle effort), it’s smart to pivot.
Good alternatives that still build legs: split squats, step-ups, goblet squats to a box, hip hinges (like RDLs), and machine options that feel better for your structure. If pain persists, get guidance from a qualified coach or clinician.
of Real-World Experiences: “Leg Press Reality Checks”
Spend enough time in any gym and you’ll notice a few recurring leg-press storylines. They’re so common they might as well be on a streaming service: Season 1: The Sled Is Heavy. Season 2: The Knees Are Confused. Here are some real-life patterns lifters often run intoand what usually fixes them.
Experience #1: The “I can leg press a small planet” phase. Someone discovers they can load the machine with far more weight than they can squat. The confidence spike is immediate. The range of motion, however, quietly disappears. Reps become tiny, fast, and strangely noisy. The fix is almost always the least exciting one: drop the load, re-learn a consistent depth, and build back up. Within a few sessions, most people report their legs working harder with less joint crankinessbecause the muscles are actually doing the job again.
Experience #2: The butt-pop surprise. A lifter feels strong until the bottom of the rep, where their hips lift and their low back rounds. They may not even notice until someone points it outor until their lower back feels “tight” later. The common solutions: adjust the seat, shorten depth slightly, and slow down the descent. Many lifters also find that a brief pause near the bottom helps them stay honest and stable.
Experience #3: The “my knees hate leg day” mystery. This often comes down to knee tracking and foot pressure. People push through their toes, let heels lift, or allow knees to cave. Once they switch to full-foot contact and cue “knees follow toes,” discomfort often decreases, and the quads finally show up. It’s not magicit’s alignment and control.
Experience #4: The foot-placement rabbit hole. Some lifters spend more time micro-adjusting foot position than actually training. Here’s what usually works: pick a stable middle placement, do a few controlled reps, and only adjust if you have a clear reason (more quad emphasis, more glute emphasis, or better comfort). Most people land on a “boring” stance because boring is repeatableand repeatable builds muscle.
Experience #5: The tempo glow-up. When someone switches from a fast drop-and-bounce style to a controlled 3-second lower, they almost always say the same thing: “Wow… I feel everything.” Exactly. The controlled eccentric exposes weak points, reinforces good positions, and makes lighter weights surprisingly challenging. It’s also a great confidence builder because you can track progress without chasing reckless loads.
The big takeaway from these common experiences is simple: most leg-press problems aren’t solved by more intensitythey’re solved by better repeatability. Same setup, same depth, stable knees, full-foot pressure, controlled reps. Do that for a month and your lower body will start responding like it finally got the memo.
Conclusion: Make the Leg Press Count
The leg press can be a lower-body powerhouse when you treat it like a skill, not a shortcut. Nail your setup, keep your hips down, track knees over toes, stay planted through the feet, and control the descent. Then load it progressivelywithout sacrificing your positions. Your quads, glutes, and hamstrings will thank you. Your knees and low back will thank you louder.


