Table of Contents >> Show >> Hide
- Why This Herbed Chicken Parm Slider Recipe Works
- Ingredients for Herbed Chicken Parm Sliders
- How to Make Herbed Chicken Parm Sliders (Step-by-Step)
- Time-Saving Variations
- Pro Tips for the Best Chicken Parmesan Sliders
- Food Safety, Storage, and Reheating
- What to Serve With Herbed Chicken Parm Sliders
- Common Mistakes and How to Fix Them
- Conclusion
- Experience Section: What People Usually Experience When Making Herbed Chicken Parm Sliders (About )
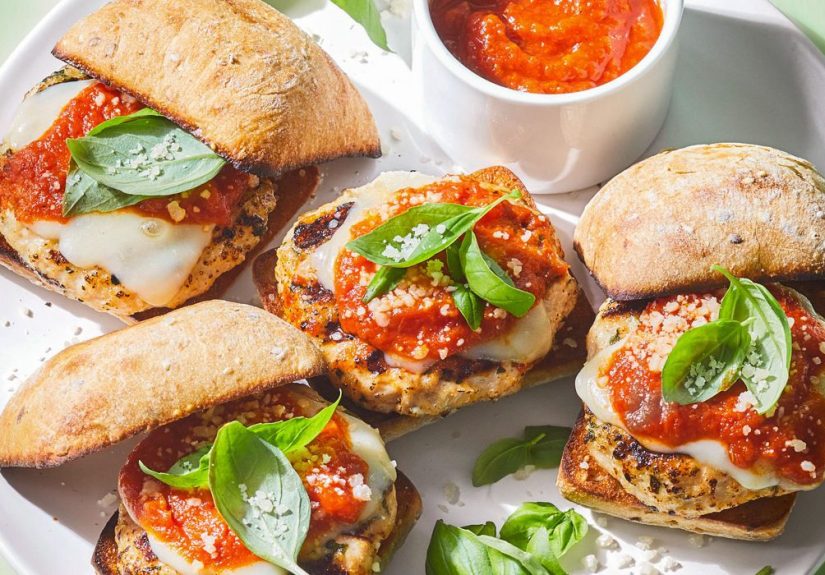
If classic chicken Parmesan and game-day finger food had a very delicious baby, this would be it:
Herbed Chicken Parm Sliders. You get crispy chicken, warm marinara, melty mozzarella, and a buttery herb topping on soft pull-apart rolls.
Translation: crunchy, saucy, cheesy happiness in two bites.
This recipe is built for real life, not fantasy cooking shows where someone has ten burners and no dishes in the sink.
You can go full homemade with breaded cutlets, use cooked chicken to save time, or use frozen breaded tenders for a fast weeknight shortcut.
The method below gives you that “wow, you made these?” result without a 3-hour kitchen marathon.
You’ll also get smart technique tips for texture (goodbye, soggy sliders), flavor layering (hello, garlic-herb butter), and food safety basics for storing and reheating leftovers.
By the time you’re done, you’ll have a repeatable slider formula you can pull out for parties, potlucks, and “I need comfort food now” Tuesdays.
Why This Herbed Chicken Parm Slider Recipe Works
1) It balances crunch, sauce, and cheese
Great chicken parm sliders live or die by texture. Too much sauce and your rolls collapse. Too little sauce and you’re basically eating chicken nuggets in bread pajamas.
Here, the trick is a light sauce layer under the cheese, then a finishing drizzle at serving time for anyone who wants extra marinara.
2) Herbs show up in layers, not just garnish
A lot of recipes toss basil on top and call it done. We build herb flavor in three places:
- In the breading (dried oregano + basil + garlic powder)
- In the garlic-herb butter brushed over rolls
- As a fresh finishing hit (basil and parsley)
This gives you that bright “herbed chicken parm” flavor without overpowering the classic marinara-parmesan profile.
3) It scales up beautifully
Need 12 sliders? Easy. Need 24? Still easyjust double and use two pans.
That’s why this is ideal for parties, game nights, family movie nights, and those “someone invited extra people and forgot to tell me” moments.
Ingredients for Herbed Chicken Parm Sliders
For the chicken
- 1 1/2 pounds boneless skinless chicken breasts (or thin cutlets)
- 1 teaspoon kosher salt
- 1/2 teaspoon black pepper
- 3/4 cup all-purpose flour
- 2 large eggs
- 2 tablespoons milk
- 1 1/2 cups panko breadcrumbs
- 1/2 cup finely grated Parmesan cheese
- 1 teaspoon dried oregano
- 1 teaspoon dried basil
- 1 teaspoon garlic powder
- Neutral oil for pan-frying (or baking spray for oven method)
For slider assembly
- 1 package (12-count) slider rolls (Hawaiian, potato, or dinner rolls)
- 1 to 1 1/4 cups marinara sauce, warmed
- 8 ounces low-moisture mozzarella, shredded
- 1/3 cup grated Parmesan cheese
- Optional: 2 ounces fresh mozzarella, torn for pockets of gooey texture
For garlic-herb butter topping
- 4 tablespoons unsalted butter, melted
- 1 clove garlic, finely grated
- 1 tablespoon chopped fresh parsley
- 1 tablespoon chopped fresh basil
- 1/2 teaspoon dried Italian seasoning
- Pinch of salt
- Pinch of red pepper flakes (optional)
Optional finishing touches
- Fresh basil ribbons
- Extra warm marinara for dipping
- A little hot honey (sounds weird, tastes amazing)
How to Make Herbed Chicken Parm Sliders (Step-by-Step)
Step 1: Prep the chicken
Slice each chicken breast horizontally to make thinner cutlets, then lightly pound to an even thickness (about 1/4 to 1/3 inch).
Even thickness = even cooking and better crunch. Season both sides with salt and pepper.
Step 2: Build your breading station
Set up three shallow bowls:
- Bowl 1: flour
- Bowl 2: whisked eggs + milk
- Bowl 3: panko + Parmesan + oregano + basil + garlic powder
Dredge each cutlet in flour, dip in egg mixture, then press into the breadcrumb mix.
Don’t just toss it inpress the coating firmly so it adheres.
Step 3: Cook the chicken
Pan-fry method (best crunch):
- Heat 1/4 inch of oil in a skillet over medium to medium-high heat.
- Cook cutlets 2–3 minutes per side until golden and cooked through.
- Transfer to a rack or paper towels.
Oven method (lighter, less mess):
- Preheat oven to 425°F.
- Place breaded cutlets on a lightly oiled sheet pan.
- Spray tops lightly with oil and bake 15–18 minutes, flipping once.
Let cooked cutlets rest for 3–5 minutes, then cut into slider-sized pieces.
Step 4: Prep rolls and herb butter
Keep slider rolls connected; slice them horizontally like one giant sandwich slab.
Place bottom half in a greased baking dish or sheet pan.
Mix melted butter, garlic, parsley, basil, Italian seasoning, and salt.
Brush a little on the cut side of the top buns, and reserve the rest for the tops.
Step 5: Assemble the sliders
- Spread a thin layer of warm marinara over bottom buns.
- Add chicken pieces in an even layer.
- Sprinkle mozzarella and a little Parmesan.
- Drizzle a bit more marinara (light handthis is where sogginess starts).
- Place top slab of buns over the filling.
- Brush tops generously with remaining garlic-herb butter.
- Sprinkle with extra Parmesan.
Step 6: Bake and finish
- Cover loosely with foil and bake at 375°F for 10 minutes.
- Uncover and bake another 5–8 minutes until tops are golden and cheese is melted.
- Rest 3 minutes, then cut with a serrated knife.
- Top with fresh basil and serve with warm marinara.
Congratulations. You’ve just made a tray of sliders that disappear faster than your phone battery at 3% with no charger in sight.
Time-Saving Variations
Weeknight Shortcut Version
Use frozen breaded chicken tenders or nuggets. Bake according to package directions, chop, and assemble as directed.
You’ll still get that chicken parm flavor profile with significantly less prep.
Rotisserie Version
Toss shredded rotisserie chicken with a little marinara, dried oregano, and grated Parmesan.
Layer it with mozzarella and herbs. You lose some crunch, but gain speed and convenience.
Extra-Herby Pesto Twist
Spread a thin swipe of pesto under the top buns before baking.
Keep it light so it complements, not competes with, marinara.
Spicy Version
Add crushed red pepper to the breading and herb butter, then drizzle hot honey after baking.
Sweet heat + savory parm is a very good decision.
Pro Tips for the Best Chicken Parmesan Sliders
Keep chicken crisp
- Don’t drown the cutlets in sauce before baking.
- Use warm, not watery, marinara.
- Place sauce under and over in thin layers, not thick pools.
Use the right cheese blend
- Low-moisture mozzarella melts evenly and avoids puddles.
- Parmesan adds salty, nutty depth and browning.
- A little fresh mozzarella is optional for extra gooey bites.
Herbs matter
- Dried herbs bloom during baking and help season the whole slider.
- Fresh herbs added at the end bring aroma and brightness.
Don’t skip resting time
Let sliders rest 2–3 minutes after baking so cheese sets slightly.
If you cut immediately, everything may slide out like a cheesy avalanche.
Food Safety, Storage, and Reheating
Safe cooking temp
Chicken should reach an internal temperature of 165°F at the thickest part.
Use an instant-read thermometer for accuracy.
Cooling and storage
- Refrigerate leftovers within 2 hours (or 1 hour if very hot conditions).
- Store in an airtight container up to 3 days.
- For best texture, store extra marinara separately and reheat before serving.
Reheating without sadness
- Oven: 350°F for 8–12 minutes (best texture).
- Air fryer: 325°F for 4–6 minutes (excellent for crisping).
- Microwave: usable, but bread softens quickly.
What to Serve With Herbed Chicken Parm Sliders
- Simple arugula salad with lemon and olive oil
- Roasted broccoli or green beans
- Crispy potatoes or oven fries
- Caesar salad for full Italian-American comfort vibes
- Sparkling water with citrus, iced tea, or a light red wine (for adults)
Common Mistakes and How to Fix Them
Mistake: Soggy bottoms
Fix: Use less sauce and toast the bottom buns lightly before assembling.
Mistake: Breading falls off chicken
Fix: Pat chicken dry first, press crumbs firmly, and let breaded cutlets sit 5 minutes before cooking.
Mistake: Sliders taste flat
Fix: Salt each layer lightly and finish with fresh basil + extra Parmesan.
Mistake: Cheese melts unevenly
Fix: Use shredded low-moisture mozzarella across the entire layer; dot fresh mozzarella sparingly.
Conclusion
A great Herbed Chicken Parm Slider Recipe should feel like comfort food with a little polish: crispy chicken, bright herbs, balanced sauce, and melted cheese that stretches just enough to impress your guests.
This version hits all those notes while staying flexible for both “I have time to cook” days and “please let dinner be easy” days.
Keep this as your base formula, then adjust herbs, sauce level, and spice to match your crowd.
Once you make it once, you’ll start finding excuses to make it again.
Game day? Yes. Family dinner? Yes. Random Wednesday where everyone needs a morale boost? Extremely yes.
Experience Section: What People Usually Experience When Making Herbed Chicken Parm Sliders (About )
The first time most home cooks make herbed chicken parm sliders, they expect “cute little sandwiches.” What they actually get is a full kitchen event.
The aroma of garlic butter pulls people into the kitchen before the sliders are even baked, and once the tray comes out, everyone suddenly becomes very interested in “helping” cut and plate.
One common experience is the texture revelation. Many cooks have made chicken parm before and accepted a slightly soggy result as normal.
But with sliders, especially when sauce is layered lightly and the tops are brushed with herb butter, people notice how much better the bite is: crispy edges, fluffy roll center, stretchy cheese, and just enough marinara to keep it juicy.
It changes how they approach all saucy sandwiches afterward.
Another frequent experience is discovering how social this recipe is.
Standard chicken parm often gets plated and served quietly. Sliders, on the other hand, are built for sharing.
People grab one, then another, then stand around the tray debating whether basil-on-top is “mandatory” or “an art choice.”
If you bring these to a watch party, the dish rarely returns home with leftovers.
There’s also a real learning curve with sauce control.
First-timers usually add too much marinara because it smells amazing and seems harmless.
Then they learn that sliders are architecture: too much liquid, and the structure starts to slump.
By round two, they usually hold back sauce inside the sliders and serve extra warm marinara on the side for dipping.
That one change alone often upgrades the entire batch.
Families with kids often report a funny split-screen moment: adults appreciate the herb complexity, while younger eaters call them “pizza chicken burgers” and inhale them at record speed.
Because each slider is individually portioned, it’s easier for picky eaters to try one without feeling pressured by a huge plated meal.
Many parents also like that they can control spice, herb level, and even cheese amount slider by slider.
For meal preppers, the biggest experience is realizing this recipe can be modular.
Chicken can be breaded ahead. Herb butter can be mixed in advance. Rolls can be pre-sliced.
Sauce can be warmed while chicken bakes.
Once people run this assembly flow one time, they stop seeing sliders as “party-only food” and start using the format for practical weeknight dinners.
Potluck cooks often mention transport lessons: keeping sliders covered while warm preserves moisture, but uncovering for a few minutes before serving helps maintain top-crust texture.
Bringing extra basil and Parmesan to finish on-site makes the tray look fresh, even if it traveled 30 minutes in a car.
Finally, there’s the emotional experience: chicken parm sliders feel festive without being fancy.
They’re comfort food with personality.
People remember them not because they were complicated, but because they were satisfying, fragrant, and fun to eat with their hands.
In a world full of recipes that look great online but disappoint at the table, this one usually delivers exactly what it promises: crispy, cheesy, herby joy in slider form.


