Table of Contents >> Show >> Hide
- What Makes a Great Chocolate Cake (The Delicious Science)
- Ingredients for a Classic, Moist Chocolate Cake
- Equipment Checklist
- Step-by-Step: How to Make Chocolate Cake
- Step 1: Prep the pans and oven
- Step 2: Measure flour like you actually want cake (not despair)
- Step 3: Bloom the cocoa
- Step 4: Mix the dry ingredients
- Step 5: Mix the wet ingredients
- Step 6: Combine wet + dry (don’t overmix)
- Step 7: Bake
- Step 8: Test for doneness (use more than one clue)
- Step 9: Cool correctly
- Step 10: Level and assemble (optional but fancy)
- Frosting Options (Pick Your Chocolate Personality)
- Troubleshooting: Fix Common Chocolate Cake Problems
- Storage and Make-Ahead Tips
- Chocolate Cake Variations You Can Pull Off Without Panic
- Real-Life Chocolate Cake Experiences (The 500-Word Part Recipes Never Tell You)
Chocolate cake sounds simpleuntil you’re scraping a dry layer out of a pan like a sad archaeologist. The good news: making a rich, moist, deeply chocolatey cake isn’t about secret chef handshakes. It’s about a few smart choices (hello, cocoa blooming), a repeatable method, and knowing what “done” actually looks like (spoiler: not always a squeaky-clean toothpick).
This guide walks you through a reliable, from-scratch chocolate cake you can bake as a layer cake, sheet cake, or cupcakeswith frosting options, troubleshooting, storage tips, and a longer “real-life baking experiences” section at the end for the parts recipes never warn you about.
What Makes a Great Chocolate Cake (The Delicious Science)
1) Cocoa powder choice matters more than you think
Most chocolate cakes get their flavor from cocoa powder, not melted chocolate. Cocoa comes in a few styles:
- Natural cocoa: more acidic, lighter in color, often paired with baking soda.
- Dutch-process cocoa: alkalized (less acidic), darker, smoother; often paired with baking powder (or recipes that use both leaveners).
- Black cocoa: ultra-dark, dramatic color, milder “oreo-like” vibebest used as part of a blend so it doesn’t taste flat.
Bottom line: if your recipe calls for a specific cocoa type, follow it. If it doesn’t, you can usually use either natural or Dutch-process as long as the recipe uses both baking soda and baking powder (a common “universal” approach). If the recipe relies only on baking soda, it’s usually designed for natural cocoa’s acidity.
2) Blooming cocoa = stronger chocolate flavor (without adding more cocoa)
“Blooming” means mixing cocoa powder with a hot liquid (like hot water or hot coffee) before it goes into the batter. Heat helps cocoa dissolve, reduces clumps, and boosts chocolate aroma and depthkind of like waking cocoa up with a tiny espresso shot… except for cocoa. (Yes, that’s a thing. No, cocoa doesn’t get the zoomies.)
3) Coffee doesn’t make it taste like coffeeit makes it taste like more chocolate
Hot coffee (or espresso powder) intensifies chocolate’s bitter notes in a good way, so the cake tastes richer. If you’re coffee-avoidant, use hot water insteadyour cake will still be great.
4) Moisture comes from fat, sugar, and not overbaking
Oil keeps cakes moist even when chilled. Sugar attracts and holds moisture. And overbaking is the #1 way to turn a plush cake into chocolate sandpaper. We’ll use multiple doneness cues (including temperature, if you have a thermometer) to keep things tender.
Ingredients for a Classic, Moist Chocolate Cake
This makes two 9-inch round layers, a 9×13-inch sheet cake, or about 24 cupcakes.
Dry ingredients
- 1 3/4 cups (about 210g) all-purpose flour
- 3/4 cup (about 65–75g) unsweetened cocoa powder (natural or Dutch-process; see notes above)
- 2 cups (about 400g) granulated sugar
- 1 1/2 teaspoons baking powder
- 1 1/2 teaspoons baking soda
- 1 teaspoon fine salt
Wet ingredients
- 2 large eggs, room temperature
- 1 cup buttermilk, room temperature (or 1 cup milk + 1 tablespoon vinegar/lemon juice, rested 5 minutes)
- 1/2 cup neutral oil (canola, vegetable, avocado)
- 2 teaspoons vanilla extract
- 3/4 cup hot coffee or hot water (for blooming cocoa)
Optional “make it extra” upgrades
- 1 teaspoon espresso powder (adds depth)
- 2 ounces chopped dark chocolate, melted and cooled (adds fudginess)
- 1/2 cup sour cream (swap for 1/2 cup of the buttermilk for extra tenderness)
Equipment Checklist
- 2 (9-inch) round pans or 1 (9×13-inch) pan or muffin tin
- Parchment paper (highly recommended for layers)
- Mixing bowls + whisk
- Electric mixer (helpful, not required)
- Wire rack for cooling
- Instant-read thermometer (optional, but a game-changer)
Step-by-Step: How to Make Chocolate Cake
Step 1: Prep the pans and oven
- Heat oven to 350°F.
- Grease pans. For layer cakes, line bottoms with parchment, then grease again.
- Lightly dust with cocoa powder (less white residue than flour). Tap out excess.
Why this matters: parchment prevents “beautiful cake meets pan, chooses pan” tragedy.
Step 2: Measure flour like you actually want cake (not despair)
If you’re using cups, spoon flour into the cup and level itdon’t scoop straight from the bag like you’re digging for buried treasure. Too much flour is a fast track to dry cake.
Step 3: Bloom the cocoa
- In a small bowl, whisk cocoa powder with hot coffee or hot water until smooth and glossy.
- Let it cool slightly while you prep the rest.
Bonus: this also eliminates cocoa lumps without making you sift like you’re panning for gold.
Step 4: Mix the dry ingredients
In a large bowl, whisk together flour, sugar, baking powder, baking soda, and salt. Whisking evenly distributes leaveners so you don’t get “surprise volcano bite.”
Step 5: Mix the wet ingredients
In another bowl, whisk eggs, buttermilk, oil, and vanilla. Add the cooled cocoa-coffee mixture and whisk until uniform.
Step 6: Combine wet + dry (don’t overmix)
- Pour wet into dry.
- Mix on low speed (or whisk gently) just until the flour disappears.
- Scrape the bowl; give 3–5 final gentle strokes.
Why: overmixing builds gluten, which is great for bread and terrible for soft cake.
Step 7: Bake
- Two 9-inch layers: 28–35 minutes
- 9×13 sheet cake: 30–40 minutes
- Cupcakes: 18–22 minutes
Step 8: Test for doneness (use more than one clue)
Use a combo of checks:
- Look: cake pulls slightly from edges; center no longer looks wet.
- Touch: center springs back when lightly pressed.
- Pick test: toothpick comes out with moist crumbs, not perfectly clean.
- Best test (if you can): internal temp around 200–210°F (about 205°F is a great target).
Pro tip: a toothpick that comes out “clean” can mean you’ve already crossed into dry-cake territory.
Step 9: Cool correctly
- Cool in pan 10–15 minutes.
- Turn out onto a rack; remove parchment; cool completely before frosting.
Why: frosting a warm cake = melted frosting + sliding layers = a chocolate landslide event.
Step 10: Level and assemble (optional but fancy)
If making layers, trim domes with a serrated knife. Add frosting, stack, crumb-coat (thin layer), chill 15 minutes, then finish frosting. Your cake will look like it went to finishing school.
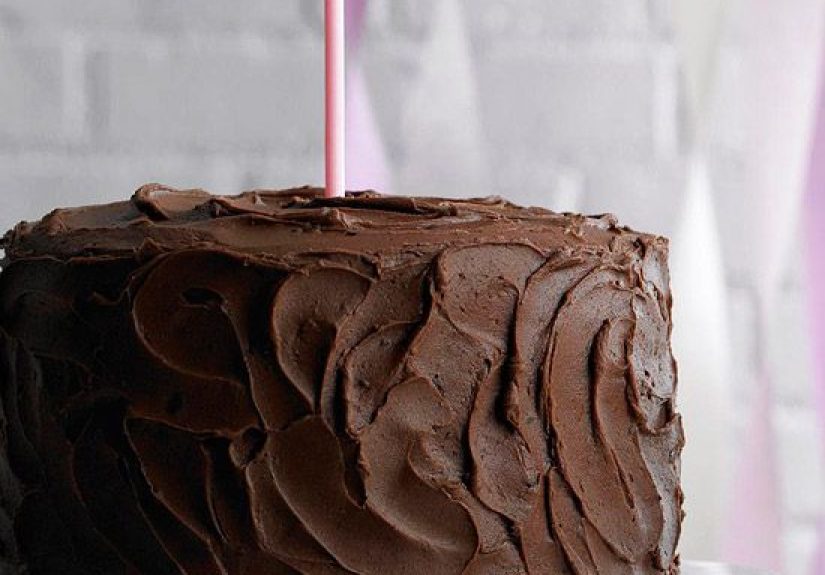
Frosting Options (Pick Your Chocolate Personality)
Option A: Easy Chocolate Buttercream (classic birthday energy)
Quick formula: Beat 1 cup softened butter, 3–3 1/2 cups powdered sugar, 1/2 cup cocoa, pinch of salt, 2 teaspoons vanilla, and 2–4 tablespoons milk/cream until fluffy. For deeper flavor, bloom the cocoa with a splash of hot water first, cool, then beat it in.
Option B: Glossy Chocolate Ganache (minimal effort, maximum drama)
Heat 1 cup heavy cream until steaming (not boiling). Pour over 8 ounces chopped chocolate. Rest 2 minutes, then whisk smooth. Let thicken to spreadable. If your chocolate ever seizes, adding more hot liquid (not a tiny drip) can bring it back into a smooth emulsionganache is basically delicious chemistry.
Option C: Whipped Chocolate Frosting (lighter, mousse-ish vibe)
Whip chilled heavy cream with powdered sugar and cocoa, or fold whipped cream into cooled, thick ganache. Great if you want “cloud cake,” but store it chilled.
Troubleshooting: Fix Common Chocolate Cake Problems
My cake is dry
- Overbaked: start checking early; consider using temperature.
- Too much flour: spoon-and-level or weigh ingredients.
- Oven runs hot: an oven thermometer can save your cake life.
My cake sank in the middle
- Underbaked center (set edges, raw middle).
- Oven door opened too early (cake collapses like it heard bad news).
- Expired baking powder/soda (they lose punch over time).
My cake tastes bitter
- Too much baking soda or cocoa; measure carefully.
- Very dark cocoa (like black cocoa) used aloneblend it with regular cocoa.
- Try adding a touch more sugar or pairing with a sweeter frosting.
My cake stuck to the pan
- Use parchment for layers.
- Grease thoroughly and don’t rush the cool-down.
Storage and Make-Ahead Tips
How long does chocolate cake last?
- Unfrosted: tightly wrapped at room temp for 1–2 days; refrigerate if your kitchen is warm.
- Frosted (buttercream that doesn’t contain perishable fillings): often safe at room temperature for a short period, but quality is best when stored airtight and cool.
- Whipped cream or custard fillings: refrigerate.
Freezing (the secret weapon)
Wrap cooled layers tightly in plastic wrap, then foil. Freeze up to 2–3 months. Thaw still wrapped at room temperature, then frost. Slightly chilled layers are easier to frost cleanly.
Chocolate Cake Variations You Can Pull Off Without Panic
- Sheet cake: bake in 9×13, frost right in the pan, serve like a hero.
- Cupcakes: same batter, shorter bake. Don’t overfill liners2/3 full is plenty.
- One-bowl method: whisk dry, add wet, mix gentlyfewer dishes, more happiness.
- Chocolate-orange: add 1 tablespoon orange zest + a splash of orange extract.
- Mint-chocolate: add 1/4 teaspoon peppermint extract (it’s powerfulgo easy).
- “Fudgier” texture: swap part of the buttermilk for sour cream, or add a bit of melted chocolate.
Real-Life Chocolate Cake Experiences (The 500-Word Part Recipes Never Tell You)
Here are a few ultra-common chocolate cake “moments” that happen in real kitchensplus what they usually meanso you can feel prepared instead of personally attacked by baked goods.
Experience #1: “Why is the batter so thin? Did I ruin it?”
Chocolate cake battersespecially ones that use hot coffee or hot watercan look surprisingly loose. The first time you pour it into pans, it may feel like you’re making cake-flavored soup. That thinness is often intentional: it helps the cake bake up tender and evenly, and it pairs well with cocoa blooming. The trick is to trust the method and make sure you measured flour correctly. If you scooped flour straight from the bag and packed it, the batter might look thicker but bake drier. If you spoon-and-level or weigh, you’ll usually get the texture the recipe expects.
Experience #2: “The top domed and cracked like a tiny chocolate volcano.”
Doming happens when the outside of the cake sets before the center finishes rising. A slightly hot oven is a frequent culprit. Another cause: pans that are too dark or too small, which push heat into the batter faster. If it’s only a small dome, you can level it (snack on the scraps like a responsible adult). If it’s dramatic, consider lowering oven temperature by 25°F next time or using cake strips for gentler baking. The cake usually still tastes greatthe dome is mostly a cosmetic plot twist.
Experience #3: “My toothpick came out clean… and the cake is dry.”
This is the cake equivalent of being told “no notes” and still getting rejected. A totally clean toothpick can mean the cake is overbakedbecause by the time the center hits the boiling point of water, moisture starts leaving the building. If you can, use a thermometer and aim around 205°F in the center. If you can’t, look for moist crumbs and rely on the spring-back test. Also: start checking earlier than the recipe suggests, because ovens love to freestyle.
Experience #4: “I frosted too soon and it turned into a glossy slip-and-slide.”
Warm cake + buttercream = melted frosting. Warm cake + stacked layers = a slow-motion landslide. If you’re in a hurry, cool layers on a rack, then chill them briefly (even 20–30 minutes helps). Slightly chilled layers are easier to handle, less crumbly, and way less likely to absorb frosting into a sad, oily blur.
Experience #5: “It tastes good… but not chocolatey enough.”
This is where blooming cocoa and coffee earn their keep. Bloom cocoa with hot liquid for deeper flavor, and consider adding a small amount of espresso powder (you won’t taste coffeejust amplified chocolate). Also check your cocoa powder freshness; it doesn’t “spoil” quickly, but older cocoa can taste dull. A pinch more salt can also make chocolate taste louder without adding sweetness.
Experience #6: “I wanted bakery vibes; I got homemade vibes.”
First, homemade vibes are not a crime. But if you want cleaner layers, focus on three things: parchment-lined pans, fully cooled (or lightly chilled) layers, and a crumb coat. That thin first layer of frosting seals in crumbs so your final coat looks smooth. It’s the difference between “I made cake” and “I made a cake.”
Chocolate cake gets easier every time you bake itnot because the recipe changes, but because you learn to read the batter, the oven, and the doneness cues. Once you’ve nailed the basics, you can riff with different cocoas, fillings, and frostings without fear. And that’s when chocolate cake stops being a project and starts being a power move.


