Table of Contents >> Show >> Hide
- How a Sand Filter Actually Gets Dirty
- Signs Your Pool Sand Filter Needs Cleaning
- What You Need Before You Start
- How to Clean a Sand Filter the Right Way
- 1. Record the Clean Pressure First
- 2. Turn the Pump Off Completely
- 3. Open the Backwash Line and Prepare the Hose
- 4. Set the Valve to Backwash
- 5. Run the Backwash Until the Water Turns Clear
- 6. Turn the Pump Off Again and Switch to Rinse
- 7. Rinse for About 20 to 30 Seconds
- 8. Return the Valve to Filter
- 9. Check Pressure, Water Level, and Chemistry
- When a Standard Backwash Is Not Enough
- How to Deep Clean a Sand Filter
- Common Mistakes That Make Sand Filter Cleaning Worse
- When to Replace the Sand Instead of Cleaning It
- Troubleshooting After You Clean the Filter
- Real-World Pool Owner Experiences and Practical Lessons
- Conclusion
- SEO Tags
Note: Body-only HTML, ready to copy and publish.
A sand filter is one of those pool parts that gets very little applause and a whole lot of blame. When the water turns cloudy, the return jets get lazy, or the pressure gauge starts acting dramatic, the filter suddenly becomes the main character. The good news is that cleaning a sand filter is not complicated. The bad news is that many pool owners do it too often, too fast, or in the wrong order. That is how a simple maintenance job turns into wasted water, lousy filtration, and a multiport valve that feels personally offended.
If you want clear water, steady circulation, and a filter that lasts, the trick is not just cleaning it. The trick is cleaning it the right way. That means knowing when to backwash, how long to rinse, when a chemical deep clean makes sense, and when the sand itself is the problem. This guide walks through the full process in plain English, with no mystery, no fluff, and no “just jiggle the handle and hope” advice.
How a Sand Filter Actually Gets Dirty
A pool sand filter works by pushing water through a bed of specially graded filter sand. As the water passes through, the sand traps dirt, oils, bugs, sunscreen residue, and all the other tiny things that prefer your pool over your patio. Over time, that trapped debris builds up inside the sand bed. As buildup increases, water flow slows down and pressure rises.
Here is the part that surprises a lot of pool owners: a sand filter often performs better when it is slightly dirty than when it is squeaky clean. A lightly loaded sand bed can catch smaller particles more effectively. That is why you should not backwash just because it is Saturday or because you enjoy flipping the multiport valve like a slot machine. Clean it too often and you can reduce filtration performance while wasting a lot of water.
The goal is not to keep the filter perfectly spotless. The goal is to keep it operating efficiently, with good flow, reasonable pressure, and clear water.
Signs Your Pool Sand Filter Needs Cleaning
The most reliable sign is pressure. After a proper backwash and rinse, note your clean starting pressure on the gauge. That number becomes your baseline. In most cases, it is time to clean the filter when the gauge climbs about 8 to 10 PSI above that clean reading. If your system uses flow readings, a noticeable drop in flow can also tell you the filter is loaded up.
Other signs include:
- Weak return jet pressure
- Cloudy pool water that does not improve with normal circulation
- Reduced suction while vacuuming
- Heavy debris after storms, pollen season, or an algae cleanup
- A new plaster or freshly finished pool during the first couple of days of operation
If the filter pressure is normal but the pool is still cloudy, do not assume the filter is guilty. Water chemistry, poor circulation, clogged baskets, air leaks, or worn sand can create symptoms that look like a dirty filter. In pool care, blaming the filter too early is a bit like blaming the refrigerator because dinner burned.
What You Need Before You Start
- A working pressure gauge
- A backwash hose, if your setup uses one
- Access to the waste line or approved drainage point
- Pool water high enough to handle some water loss
- Your filter manual, especially if the valve settings differ from a typical multiport valve
- Optional: sand filter cleaner for a chemical deep clean
Before doing anything, make sure your pool water level is high enough. Backwashing sends water out of the system, and if your water level is already low, you can create suction issues fast.
How to Clean a Sand Filter the Right Way
1. Record the Clean Pressure First
If you have never written down your clean filter pressure, start there. After the next successful cleaning, note the PSI. Without that baseline, you are basically guessing, and guessing is how people end up backwashing a filter that was doing its job just fine.
2. Turn the Pump Off Completely
Always shut off the pump before changing the valve position. This is not optional. Moving a multiport valve while the pump is running can damage the valve, wear out the gasket, and turn a five-minute job into a repair project. If your system has automatic controls, make sure the pump cannot unexpectedly restart while you are working.
3. Open the Backwash Line and Prepare the Hose
Check that the backwash line is open and that your backwash hose is attached securely if your system uses one. Put the hose where the discharged water can safely go. The “right place” is not your neighbor’s flower bed, your own basement window well, or any location your local rules would strongly frown upon.
4. Set the Valve to Backwash
With the pump off, turn the multiport valve to BACKWASH. If your valve uses a different arrangement, follow the manufacturer’s labels. Once the valve is in place, stand clear of the equipment and restart the pump.
5. Run the Backwash Until the Water Turns Clear
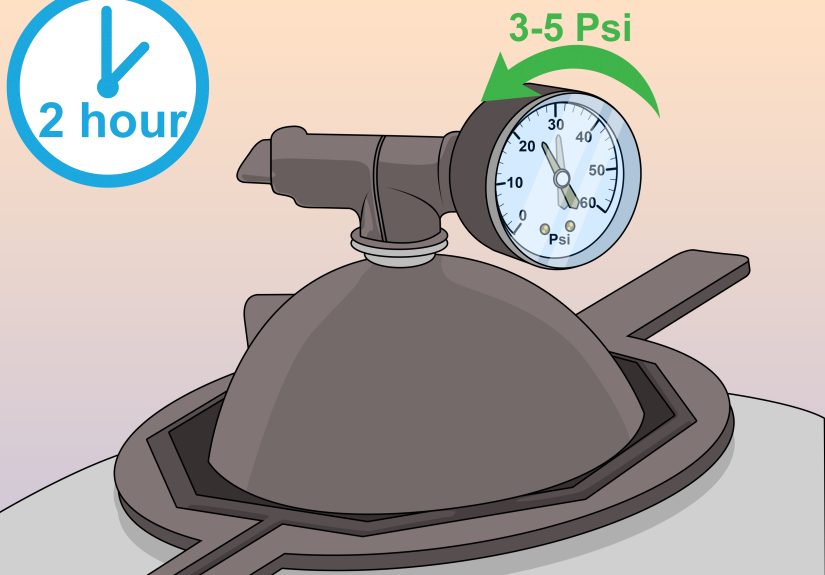
Let the filter backwash until the discharged water runs clear. On many residential pools, that takes about 1 to 5 minutes, depending on the filter size, debris load, and how dirty the sand bed is. Some manufacturers give a range closer to 3 to 5 minutes, especially for a heavier cleanup. The better rule is simple: watch the water, not the clock.
If you are cleaning up after an algae bloom, a major storm, or a dusty construction project next door, the backwash cycle may take longer than usual. That is normal. This is one of the few moments in pool ownership where staring at murky water is actually productive.
6. Turn the Pump Off Again and Switch to Rinse
Once the backwash water is clear, shut the pump off before touching the valve again. Set the multiport valve to RINSE. This step matters more than many pool owners realize. Rinsing helps settle the sand bed back into place and flushes leftover debris out the waste line instead of sending it right back into the pool.
7. Rinse for About 20 to 30 Seconds
Restart the pump and run the rinse cycle for roughly 20 to 30 seconds. Some owners go a little longer if the filter was especially dirty, and that is fine. What matters is that you do not skip this step. Skipping rinse is one of the fastest ways to get that “why is there junk blowing back into my pool?” experience.
8. Return the Valve to Filter
Turn the pump off again. Set the valve back to FILTER. Reopen any return lines if needed. If your system has a manual air bleeder, open it during restart so trapped air can escape. Then start the pump and let the system return to normal operation. Once a steady stream of water appears and the air is out, close the bleeder.
9. Check Pressure, Water Level, and Chemistry
Look at the pressure gauge and compare it with your clean baseline. You should see pressure return close to normal. Then top off the pool water if needed and rebalance the chemistry, since backwashing removes some treated water from the pool.
That is the standard, correct cleaning cycle: Backwash, Rinse, Filter. In that order. Every time. No freestyle remix needed.
When a Standard Backwash Is Not Enough
Sometimes you backwash properly, the water looks clear coming out of waste, and the pressure still stays noticeably high. That is often a sign the sand bed is holding oils, scale, or sticky residue that plain backwashing cannot remove. Sunscreen, body oils, metal staining, and mineral deposits can all contribute to that grimy, channeling mess inside the filter.
This is when a chemical deep clean can help. A good sand filter cleaner is designed to break up oils, rust, and scale trapped in the sand bed. Many pool-care professionals recommend this when pressure stays elevated after a normal clean or when the sand feels greasy, clumpy, or sluggish.
How to Deep Clean a Sand Filter
1. Backwash the Filter Normally First
Start with a regular backwash and rinse cycle to remove loose debris. There is no point pouring cleaner into a filter that is still stuffed with obvious gunk.
2. Shut the Pump Off and Drain the Filter if Required
Follow your filter manufacturer’s instructions. On some systems, the deep-cleaning process includes opening the filter drain and letting the tank drain before treatment. If your equipment sits below pool water level, isolate the system as needed before opening anything.
3. Clean the Pump Basket
Take a minute to clean the pump strainer basket. It is a small step, but it helps circulation during the cleaning cycle and removes one more possible cause of poor flow.
4. Add the Cleaner Exactly as Directed
Use only a cleaner labeled for pool sand filters and follow the product instructions exactly. Some systems introduce the cleaning solution through the pump strainer pot. Others may use a different method. The cleaner needs time to soak the sand bed and loosen the residue plain water leaves behind.
5. Let the Cleaner Soak
Many deep-clean procedures call for an overnight soak. This gives the cleaner time to work on oils, scale, and compacted debris inside the media bed. Think of it as letting the filter enjoy a spa day, except instead of cucumber slices it gets chemistry and self-reflection.
6. Backwash Thoroughly the Next Day
After the soak, perform another full backwash and rinse cycle. Watch the waste water until it runs clear. Then return the system to filter mode and check pressure again.
If the PSI drops back near your normal clean reading, great. If not, the issue may be worn-out sand, internal damage, or a restriction elsewhere in the plumbing.
Common Mistakes That Make Sand Filter Cleaning Worse
- Backwashing on a fixed schedule: Clean based on pressure and flow, not habit.
- Skipping the rinse cycle: That invites debris and sometimes sand right back into the pool.
- Turning the valve while the pump is running: A classic way to damage the multiport valve.
- Ignoring pump and skimmer baskets: A clogged basket can mimic filter trouble.
- Over-cleaning the filter: Sand filters do not need constant backwashing to work well.
- Blaming the filter for chemistry problems: Cloudy water can come from low sanitizer, pH problems, or poor circulation.
- Using the wrong replacement media: When sand is replaced, use the media type and grade specified for the filter.
When to Replace the Sand Instead of Cleaning It
Filter sand does not last forever. In many residential pools, it is commonly replaced about every 3 to 5 years, though some owners get longer life depending on bather load, chemistry, and maintenance habits. If the sand bed becomes rounded, greasy, clumped, or heavily channeled, filtration quality drops even if the pressure looks normal.
Typical signs that it may be time to replace the sand include:
- Cloudy water that keeps returning even with proper chemistry
- Pressure problems that come back quickly after cleaning
- Greasy or hardened clumps in the media
- Short cycles between backwashes
- Visible channeling or water bypassing the sand bed
If you see sand blowing into the pool through the return jets, the problem may not be old sand alone. That can also point to broken laterals or another internal failure inside the filter.
Troubleshooting After You Clean the Filter
Pressure Is Still High
If pressure remains high after a correct backwash and rinse, check the pump basket, skimmer baskets, return eyeballs, and any partially closed valves. If those are fine, the sand bed may need chemical cleaning. Persistent high pressure can also mean scale or compacted debris deep in the filter.
Pressure Is Low but the Pool Is Still Dirty
Low pressure with poor cleaning can point to suction-side issues, a clogged impeller, air leaks, or channeling inside worn sand. In other words, the filter may not be getting enough water, or the water may be sneaking through the media instead of actually being filtered.
The Pool Gets Cloudy Right After Backwashing
This usually means the rinse cycle was skipped or too short. It can also happen if the sand bed is worn or if the filter is not fully settled before normal circulation resumes.
Sand Is Returning to the Pool
Check for broken laterals, damaged internal parts, or incorrect media. Also confirm that you are not overfilling the tank with sand and that the correct filter sand was used in the first place.
Real-World Pool Owner Experiences and Practical Lessons
One of the most common experiences pool owners have is discovering that their sand filter was not actually “bad,” just misunderstood. A lot of people see cloudy water, glance at the filter, and assume it needs an immediate backwash. Then they backwash every few days, skip the rinse cycle because they are in a hurry, and wonder why the pool still looks like weak lemonade. The lesson usually comes fast: a sand filter likes method, not panic.
Another frequent experience happens after a storm. The pool fills with leaves, pollen, grit, and whatever the wind felt like donating that day. The owner runs the system, sees pressure climb, backwashes once, and expects the pool to transform into a resort commercial by lunch. In real life, storm cleanup often takes multiple steps. You skim first, vacuum carefully, empty baskets, and then backwash when the pressure says it is time. People who rush that sequence usually end up doing the whole thing twice.
Many pool owners also learn the hard way that a pressure gauge is not decoration. At first, it is just that round little dial sitting on the filter like a dashboard clock nobody sets. But once you begin tracking clean pressure, the whole system starts making more sense. You can tell when the filter is loading up, when a backwash worked, and when something else is wrong. The gauge stops being background scenery and becomes your most honest pool friend.
There is also the classic first-time deep-clean experience. Someone backwashes correctly, but the pressure still will not drop enough. The water may improve a little, but not much. After using a proper sand filter cleaner and letting it soak, the next day’s backwash often looks dramatically nastier than expected. That moment teaches a valuable lesson: not all dirt is loose dirt. Oils, scale, and sunscreen build a stubborn film inside the sand bed, and plain water is not always enough to break it apart.
Then there are the owners who replace sand for the first time and realize they waited too long. They had been fighting cloudy water for weeks, maybe months, and assumed chemistry was the only issue. New sand, or repaired laterals, suddenly restores the sharp sparkle they forgot their pool could have. It is a satisfying fix, though usually followed by the sentence, “I probably should have done this last season.” Pool care has a funny way of turning hindsight into a maintenance schedule.
Perhaps the most useful real-world takeaway is this: the right cleaning routine makes pool ownership calmer. When you know your clean PSI, backwash only when needed, rinse every time, keep baskets clear, and deep clean the sand bed when pressure stays elevated, the filter becomes predictable. And predictable pool equipment is beautiful. It may not get a standing ovation, but it will quietly reward you with better water, fewer headaches, and less time standing in flip-flops staring suspiciously at a pressure gauge.
Conclusion
Cleaning a sand filter the right way is less about doing more and more about doing things in the correct order. Wait until the pressure rises above the clean baseline, shut the pump off before changing valve positions, backwash until the water runs clear, rinse before returning to filter mode, and check chemistry afterward. When ordinary backwashing no longer restores normal pressure, a chemical deep clean may solve the issue. And when the sand is old, clumped, or channeling, replacement is often the smarter move.
Do that consistently and your sand filter will do what it was born to do: trap the gross stuff, keep the water moving, and make your pool look like you know exactly what you are doing. Which, after reading this, you actually do.


