Table of Contents >> Show >> Hide
- Before You Start: Know What Kind of Speakers You Have
- Method 1: Connect External Speakers with a 3.5 mm Audio Cable
- Method 2: Connect USB-C or USB Speakers to MacBook Pro
- Method 3: Connect Bluetooth Speakers to MacBook Pro
- Method 4: Connect Speakers Through HDMI
- Method 5: Connect AirPlay Speakers to MacBook Pro
- How to Choose the Best Connection Method
- How to Change Audio Output on MacBook Pro
- How to Configure Stereo or Surround Speakers
- Fixes When External Speakers Are Not Working
- Tips for Better Sound Quality
- Real-World Experiences: What Actually Works Best
- Conclusion
- SEO Tags
Connecting external speakers to a MacBook Pro should not feel like launching a tiny NASA mission from your desk. The good news is that Apple gives you several easy ways to send sound from your MacBook Pro to better speakers: a 3.5 mm audio cable, USB-C or Thunderbolt audio devices, Bluetooth speakers, HDMI-connected displays or receivers, and AirPlay-compatible speakers. The “best” method depends on what kind of speakers you own, how clean you want your desk to look, and whether you care more about sound quality, convenience, or not having another cable mysteriously disappear behind your monitor.
This guide walks through the simplest ways to connect external speakers to MacBook Pro, including step-by-step setup instructions, troubleshooting tips, and real-world advice for getting stronger, clearer, and more reliable sound. Whether you are upgrading your home office, editing video, watching movies, gaming, or just trying to make your playlist sound less like it is trapped inside a cereal box, the steps below will help you get your speakers working quickly.
Before You Start: Know What Kind of Speakers You Have
Before plugging things in, take ten seconds to identify your speaker type. That small pause can save you from buying the wrong adapter, blaming your MacBook Pro, or angrily staring at a cable that was never going to fit in the first place.
Common External Speaker Types
- 3.5 mm wired speakers: These use the classic headphone-style plug and are often the easiest to connect.
- USB or USB-C speakers: These connect digitally and may appear as a separate audio device in macOS.
- Bluetooth speakers: These connect wirelessly and are great for casual listening.
- HDMI speakers or AV receivers: These are often used with monitors, TVs, projectors, or home theater systems.
- AirPlay speakers: These stream audio over Wi-Fi and work well in Apple-friendly homes.
- Studio monitors or professional speakers: These may require an audio interface, DAC, mixer, or balanced cables.
Recent MacBook Pro models include a 3.5 mm headphone jack, HDMI, and USB-C/Thunderbolt ports, so most speakers can connect directly or with a simple adapter. Older models may have different port layouts, especially if they are from the USB-C-only era, so check your exact MacBook Pro model if something does not match.
Method 1: Connect External Speakers with a 3.5 mm Audio Cable
The 3.5 mm connection is the old reliable of MacBook Pro audio. It is simple, fast, and does not require pairing, Wi-Fi, drivers, or a small prayer to the Bluetooth gods.
Steps to Connect 3.5 mm Speakers
- Turn the speaker volume down before connecting.
- Plug the speaker’s 3.5 mm cable into the headphone jack on your MacBook Pro.
- Turn on the speakers and raise the volume slowly.
- Click the Apple menu, then open System Settings.
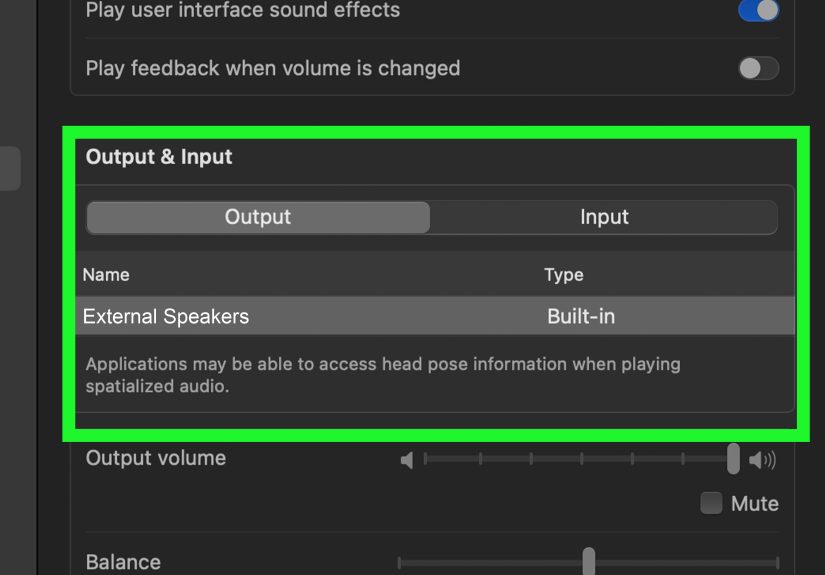
- Select Sound, then choose the Output tab.
- Choose External Headphones, Headphones, or the listed audio output device.
- Play music or a video to test the sound.
If the sound does not switch automatically, macOS may still be using the internal MacBook Pro speakers. Open Sound settings and manually select the external output. Also check the volume controls on both the Mac and the speakers. Yes, this sounds obvious, but “the speaker was muted” has embarrassed every tech person at least once.
Best For
This method is best for basic desktop speakers, portable wired speakers, older speaker systems, and users who want dependable audio with minimal setup. It is also a smart option for video calls because wired audio generally has less delay than Bluetooth.
Method 2: Connect USB-C or USB Speakers to MacBook Pro
USB speakers are another excellent option. Instead of using the MacBook Pro’s analog headphone output, USB speakers use a digital connection. Many modern desktop speakers, soundbars, DACs, and audio interfaces connect through USB-C or USB-A.
Steps to Connect USB Speakers
- Plug the speaker, DAC, or audio interface into your MacBook Pro using USB-C.
- If your speaker uses USB-A, connect it with a reliable USB-C to USB-A adapter or hub.
- Power on the speaker system.
- Open System Settings and go to Sound.
- Click Output.
- Select the USB speaker, DAC, or audio interface from the list.
- Adjust volume and test playback.
USB audio is especially useful if you care about cleaner sound or if your speakers include their own digital-to-analog converter. Some USB speakers draw power from the MacBook Pro, while larger systems require separate power. If the speakers do not appear, try a different cable, avoid underpowered hubs, and restart the speaker device.
When You Might Need an Audio Interface
If you use studio monitors, microphones, instruments, or professional audio gear, an audio interface is usually the right tool. The MacBook Pro connects to the interface through USB-C or Thunderbolt, and the speakers connect to the interface using cables such as TRS, XLR, or RCA. This setup gives better control, lower noise, and more reliable performance for recording, mixing, podcasting, and video editing.
Method 3: Connect Bluetooth Speakers to MacBook Pro
Bluetooth speakers are perfect when you want a clean desk and fewer cables. They are easy to set up, portable, and convenient for casual listening. The trade-off is that Bluetooth can introduce slight audio delay, and sound quality depends on the speaker, codec support, distance, and wireless interference.
Steps to Pair Bluetooth Speakers
- Turn on your Bluetooth speaker.
- Put the speaker into pairing mode. This usually involves pressing and holding a Bluetooth button.
- On your MacBook Pro, open System Settings.
- Click Bluetooth.
- Find your speaker in the list of nearby devices.
- Click Connect.
- Open Sound settings and choose the Bluetooth speaker under Output if needed.
Once paired, your MacBook Pro should remember the speaker. The next time you turn the speaker on, it may reconnect automatically. If it does not, open Bluetooth settings and click Connect again.
Bluetooth Troubleshooting Tips
- Keep the speaker near the MacBook Pro during pairing.
- Disconnect the speaker from phones or tablets if it keeps connecting to the wrong device.
- Turn Bluetooth off and on again if the speaker does not appear.
- Remove the device from Bluetooth settings and pair it again if connection problems continue.
- Use wired audio for gaming, editing, or lip-sync-sensitive video if Bluetooth delay bothers you.
Method 4: Connect Speakers Through HDMI
HDMI is useful when your MacBook Pro is connected to a monitor, TV, projector, soundbar, or AV receiver. HDMI can carry both video and audio, which makes it convenient for home theater setups and presentations.
Steps to Use HDMI Audio
- Connect your MacBook Pro to a TV, monitor, soundbar, or AV receiver using HDMI.
- Turn on the external device and choose the correct HDMI input.
- Open System Settings on your Mac.
- Go to Sound, then Output.
- Select the HDMI device, display, TV, receiver, or soundbar.
- Play audio and adjust volume from the Mac, display, receiver, or speaker system.
If the monitor has no built-in speakers, HDMI audio may not produce sound unless the display passes audio to another device. In that case, use the speaker system directly, connect through an AV receiver, or use the MacBook Pro’s headphone jack or USB-C audio output.
Best For
HDMI is best for movies, presentations, TV setups, and surround sound systems. It is not always the best option for small desktop speakers unless your display or receiver is part of the audio chain.
Method 5: Connect AirPlay Speakers to MacBook Pro
AirPlay is Apple’s wireless streaming option for compatible speakers, Apple TV devices, and smart audio systems. Unlike Bluetooth, AirPlay uses Wi-Fi, which can provide better range and is especially convenient for whole-room or multi-room listening.
Steps to Use AirPlay Audio
- Make sure your MacBook Pro and AirPlay speaker are on the same Wi-Fi network.
- Click Control Center in the menu bar.
- Open the audio or sound section.
- Select your AirPlay speaker from the available output options.
- Start playing music, video, or other audio.
You can also select AirPlay speakers inside supported apps such as Apple Music. AirPlay is excellent for music, podcasts, and background listening. For gaming or live editing, a wired connection is usually better because AirPlay can introduce delay.
How to Choose the Best Connection Method
Each connection method has a personality. The headphone jack is dependable. USB-C is polished and often higher quality. Bluetooth is convenient but occasionally moody. HDMI is great for big screens. AirPlay is elegant when your Wi-Fi behaves itself.
Quick Recommendation Table
| Speaker Type | Best Connection | Why It Works Well |
|---|---|---|
| Basic desktop speakers | 3.5 mm audio cable | Simple, cheap, and reliable |
| Modern powered speakers | USB-C or 3.5 mm | Clean setup with good sound quality |
| Portable wireless speaker | Bluetooth | Convenient and cable-free |
| TV, soundbar, or receiver | HDMI | Carries video and audio together |
| Smart home speaker | AirPlay | Great for Wi-Fi streaming |
| Studio monitors | Audio interface | Better control and professional audio quality |
How to Change Audio Output on MacBook Pro
After connecting external speakers, you may need to tell macOS where to send sound. This is the step many people miss. The cable can be perfect, the speaker can be powered on, and the music can still come from the MacBook Pro’s built-in speakers like nothing happened.
Steps to Select the Correct Output
- Click the Apple menu.
- Choose System Settings.
- Select Sound in the sidebar.
- Click Output.
- Choose your external speaker, headphones, HDMI device, USB audio device, Bluetooth speaker, or AirPlay speaker.
- Adjust the output volume.
You can also use Control Center in the menu bar for faster switching. This is helpful if you move between headphones, desktop speakers, Bluetooth speakers, and external monitors during the day.
How to Configure Stereo or Surround Speakers
If you use advanced speaker setups, such as stereo monitors, surround sound systems, or multichannel HDMI audio, open Audio MIDI Setup. This built-in macOS utility gives you more control over speaker configuration, sample rate, balance, and channel mapping.
Steps to Configure Speakers in Audio MIDI Setup
- Open Finder.
- Go to Applications, then Utilities.
- Open Audio MIDI Setup.
- Select your speaker device from the left sidebar.
- Click Configure Speakers.
- Choose stereo, multichannel, or surround options if available.
- Test the left and right channels to make sure sound comes from the correct speaker.
This is especially useful if your left and right speakers are reversed, your receiver supports multiple channels, or your audio interface offers more outputs than macOS shows in basic Sound settings.
Fixes When External Speakers Are Not Working
If your MacBook Pro is connected to external speakers but nothing plays, do not panic. Most problems come down to output selection, cable issues, power, pairing, or volume settings.
Check the Output Device
Open System Settings > Sound > Output and confirm that the correct speaker is selected. If you see several devices, test them one by one. For example, your monitor, headphones, Bluetooth speaker, and internal speakers may all appear as possible outputs.
Check Volume in More Than One Place
Your MacBook Pro has volume controls. Your speakers may also have a physical volume knob, remote, app, or touch control. Apps such as Zoom, Spotify, YouTube, Final Cut Pro, and games may have separate volume settings too. Audio troubleshooting is basically a tiny scavenger hunt for mute buttons.
Try Another Cable or Port
For wired speakers, test a different cable if possible. A damaged 3.5 mm cable can cause silence, crackling, or sound from only one speaker. For USB-C speakers or audio interfaces, try another USB-C port and avoid cheap adapters when audio stability matters.
Restart the Speaker and the Mac
Restarting is not glamorous, but it works often enough to deserve its reputation. Turn the speakers off and back on. If macOS still does not recognize the device, restart your MacBook Pro and reconnect the speakers after it boots.
Forget and Re-Pair Bluetooth Speakers
For Bluetooth issues, open Bluetooth settings, remove the speaker, then pair it again. Also make sure the speaker is not already connected to your phone. Many Bluetooth speakers cling to the last device like a toddler holding a snack.
Check App-Specific Audio Settings
Some apps allow you to choose a separate audio output. Video conferencing apps are famous for this. If your music plays through external speakers but your meeting audio does not, check the app’s audio settings and select the same speaker there.
Tips for Better Sound Quality
Getting speakers connected is step one. Making them sound good is the part where your ears start sending thank-you notes.
Place Speakers Correctly
For desktop speakers, place the left and right speakers at roughly ear height and angle them slightly toward you. Keep them balanced on both sides of your MacBook Pro or monitor. Avoid pushing them flat against a wall unless the manufacturer recommends it.
Use a Stable Surface
Speakers sitting on a wobbly desk can buzz or vibrate. If your desk rattles whenever bass hits, try speaker pads, stands, or a more stable surface. Even small foam isolation pads can make desktop speakers sound cleaner.
Avoid Maximum Volume
Running everything at 100 percent can cause distortion. A better approach is to set the speaker volume at a comfortable middle-to-high level, then adjust day-to-day listening from the MacBook Pro. If the sound is harsh or crunchy, lower one of the volume controls.
Choose Wired Audio for Precision
Bluetooth and AirPlay are convenient, but wired audio is better when timing matters. Use 3.5 mm, USB-C, or an audio interface for music production, video editing, livestreaming, gaming, and any situation where delay can be annoying.
Real-World Experiences: What Actually Works Best
After setting up many MacBook Pro speaker arrangements, one lesson stands out: the easiest connection is not always the best one, and the fanciest connection is not always necessary. A $30 pair of wired desktop speakers can be a huge improvement over built-in laptop audio for everyday work. Meanwhile, a premium Bluetooth speaker may sound impressive for music but feel slightly delayed when watching dialogue-heavy video. The right choice depends on how you use your MacBook Pro.
For a home office, the 3.5 mm headphone jack is still wonderfully practical. You plug the speakers in, select the output if needed, and get on with your day. There is no pairing drama and no surprise disconnection five minutes before a meeting. If you mostly listen to music, watch tutorials, or join video calls, wired desktop speakers are simple and reliable. They also make volume control easy because many have a physical knob. A physical volume knob may not sound exciting, but when a video suddenly blasts at full volume, it becomes the most important technology in the room.
For clean desks, USB-C speakers and compact USB DACs are excellent. A small USB-C DAC can improve the sound from good speakers or headphones, and many powered speakers now include USB inputs. This is a good middle ground for users who want better audio without building a full studio setup. The only warning is to use quality cables and adapters. Some cheap hubs work fine for charging but behave strangely with audio devices. If your speaker randomly disappears from Sound settings, test it directly in the MacBook Pro instead of through a hub.
Bluetooth speakers are best when flexibility matters. They are great for dorm rooms, bedrooms, kitchens, and casual listening. The experience is usually smooth once paired, but Bluetooth is not perfect. Sometimes the speaker connects to your phone instead of your MacBook Pro. Sometimes it appears connected but refuses to play sound until you select it again under Output. Sometimes it works perfectly for months, just to remind you one Tuesday morning that wireless technology has a sense of humor. Still, for music and podcasts, Bluetooth is convenient and good enough for most people.
HDMI is the winner for entertainment setups. If your MacBook Pro is connected to a TV, soundbar, or AV receiver, HDMI keeps things tidy because one cable can handle both picture and sound. This is especially useful for movie nights, presentations, and living room setups. The main trick is remembering to choose the HDMI device as the audio output. Many users connect the Mac to a TV and wonder why sound still comes from the laptop. The fix is usually one quick trip to Sound settings.
For creators, musicians, podcasters, and video editors, an audio interface is usually worth it. Studio monitors connected through an interface sound more controlled, and the interface gives you proper volume knobs, cleaner outputs, and microphone inputs. It also keeps your setup more predictable. Instead of swapping between random devices, your MacBook Pro sees the interface as the main audio hub. This is the setup to choose if sound quality matters for your work, not just your weekend playlist.
My practical recommendation is simple: use wired speakers for a desk, Bluetooth for casual rooms, HDMI for TVs, AirPlay for smart-home convenience, and an audio interface for serious audio work. Keep your setup boring where reliability matters and fancy where convenience matters. Your MacBook Pro can handle all of these options; the trick is matching the connection to the job.
Conclusion
Learning how to connect external speakers to MacBook Pro is easy once you understand your options. For the fastest setup, use the 3.5 mm headphone jack. For cleaner digital audio, choose USB-C speakers or a DAC. For wireless convenience, pair a Bluetooth speaker or use AirPlay. For TVs, monitors, soundbars, and receivers, HDMI is usually the cleanest path. And for professional work, an audio interface gives you the most control.
The most important step after connecting speakers is choosing the correct output in System Settings > Sound > Output. If something does not work, check power, volume, cables, pairing, and app-specific settings. In most cases, the fix is simple. Your MacBook Pro is already built to work with multiple audio outputs; you just need to point the sound in the right direction.


