Table of Contents >> Show >> Hide
- What “Delicious Ribs” Actually Means (So You Can Nail It on Purpose)
- Pick Your Ribs Like You Mean It
- Food Safety in One Minute (Because No One Wants “Regret Ribs”)
- Rib Prep That Makes Everything Easier (and Better)
- Build Flavor: Rub + Heat + Time + Finish
- Choose Your Cooking Method
- How to Know When Ribs Are Done (Without Guessing)
- How to Make Ribs Look Stunning (Even If You’re Not a Food Stylist)
- Common Rib Problems (and the Fixes That Actually Work)
- Make-Ahead Game Plan (Because Ribs Shouldn’t Stress You Out)
- Quick Example Timelines
- Experiences: The Real-Life Rib Lessons That Make You Better Fast (About )
Pork ribs are basically the edible equivalent of showing up to the party with great hair: everyone notices,
nobody forgets, and you suddenly have a suspicious number of “new best friends.” The only problem? Ribs can
go from glossy, juicy masterpiece to sad, chewy plank if you miss a few key details.
The good news: delicious ribs aren’t mysterious. They’re a series of small, very learnable choiceshow you
prep the rack, how you build flavor, and how you finish so they look like they belong on a magazine cover
(or at least on your phone’s camera roll).
What “Delicious Ribs” Actually Means (So You Can Nail It on Purpose)
Different people want different rib textures, so let’s define the targets:
-
Clean bite (competition-style): The meat releases cleanly when you bite, leaving a neat
“bite mark,” but it doesn’t fall off the bone. -
Backyard tender: Soft and juicy with a gentle tug. The bones peek out a bit, and the rack
bends nicely when lifted. -
Fall-off-the-bone: Very soft, almost braised. Great for some crowds, but easy to push into
“mushy” territory if you overdo the wrap phase.
You can choose your vibe. The methods below let you steer the final texture instead of hoping the Rib Fairy
blesses your grill.
Pick Your Ribs Like You Mean It
Baby Back Ribs
These come from the loin side of the rib cage. They’re shorter, leaner, and cook a little faster. Great for
beginners and weeknight oven ribs.
Spare Ribs and St. Louis–Style Ribs
Spare ribs are bigger and meatier with more fat. St. Louis ribs are spares trimmed into a neater rectangle,
which means more even cooking and prettier slices (yes, ribs can be photogenic).
Country-Style “Ribs”
Not technically ribsmore like thick strips from the shoulder/loin area. They’re delicious, but they cook
differently (treat them more like small roasts). This article focuses on rack ribs (baby back, spare, St. Louis).
Food Safety in One Minute (Because No One Wants “Regret Ribs”)
Pork is considered safe at 145°F with a 3-minute rest, and it may still look a
little pink at that temp. But ribs usually taste best when cooked longer until connective tissue breaks down,
often landing somewhere around the 180–200°F+ zone for tenderness.
- Use a thermometer and avoid cross-contamination (separate board/knife for raw meat).
- Wash hands and sanitize surfaces after handling raw pork.
- Sauce late if it contains sugarburnt sugar is not a personality trait you want in your ribs.
Rib Prep That Makes Everything Easier (and Better)
Step 1: Remove the membrane (or decide not toon purpose)
On the bone side there’s often a papery membrane. Removing it helps seasoning penetrate and improves bite.
To remove: slide a butter knife under it near a middle bone, lift, grab with a paper towel, and peel.
Pro choice: If the membrane is thin and already split, you can score it with a knife instead.
But if it’s thick and rubbery, peel it off. Your teeth will thank you.
Step 2: Trim for beauty and even cooking
- Trim dangling flaps so they don’t burn.
- Square up the rack (especially spares) so the thickness is more consistent.
- Pat drydry surface helps rub stick and improves bark.
Step 3: Salt early (dry brine) for deeper flavor
If you have time, salt the ribs and let them sit uncovered in the fridge for at least 2 hours (up to overnight).
This seasons the meat more evenly and helps the surface dry slightly for better texture.
Step 4: Add a “slather” (optional, but useful)
A thin coat of yellow mustard, mayo, or hot sauce helps the dry rub cling. It won’t taste like mustard once cooked.
Think of it as edible glue with good manners.
Build Flavor: Rub + Heat + Time + Finish
A reliable all-purpose dry rub (make it your own)
Combine:
brown sugar, kosher salt, black pepper, paprika,
garlic powder, onion powder, and a little chili powder or cayenne.
Add cumin for warmth or celery salt for a classic BBQ vibe.
Apply generously and press it in. Don’t “massage” like you’re kneading bread. You’re building a crust, not writing a love letter.
Sauce strategy (so it looks glossy, not scorched)
- Sweet sauce: Apply near the end; sugar burns quickly.
- Vinegar sauce: More forgiving; can be used earlier as a mop.
- Layering: Two thin coats beat one thick coat for shine and control.
Choose Your Cooking Method
You can make ribs that look and taste amazing in the oven, on the grill,
or on a smoker. The secret isn’t the equipmentit’s controlling moisture, heat, and the final finish.
Method 1: The Foolproof Oven Ribs (Low & Slow, Then Lacquer)
This is the method for when you want “I totally meant to do that” ribstender, juicy, and picture-readywithout
babysitting a fire.
- Preheat the oven to 250°F–300°F. Lower temps take longer but are more forgiving.
-
Season the ribs (bone side down), then wrap tightly in foil on a rimmed baking sheet.
Add a small splash of apple juice or water if you want extra steam, but don’t drown them. -
Bake until tender:
- Baby backs: about 2–3 hours
- St. Louis/spares: about 3 hours (sometimes a bit longer)
-
Unwrap carefully (hot steam!). Return ribs to the oven uncovered for 30–60 minutes
to firm the surface. -
Glaze with BBQ sauce and finish under the broiler for 2–6 minutes,
watching closely, until shiny and caramelized. - Rest 10–15 minutes before slicing.
Why this works: The wrap phase tenderizes; the uncovered phase dries the surface a bit for better texture;
the broiler creates that sticky, glossy “restaurant ribs” finish.
Method 2: The Grill Method (Indirect Heat + Optional Wrap + Quick Sizzle)
If you want smoke-kissed ribs without a dedicated smoker, your grill can absolutely do the job.
The key is two-zone cooking: hot side / cool side.
-
Set up two zones: coals/burners on one side, ribs on the other.
Target a grill temp around 250°F–300°F. -
Cook indirect, lid closed, bone side toward the heat source.
Start checking around:- Baby backs: 3–4 hours
- St. Louis/spares: 4–6 hours
-
Optional wrap (Texas crutch style): If the ribs are browning well but feel tight, wrap in foil
for 30–90 minutes to push tenderness. Add a spoon of honey or a splash of apple juice if you like. -
Finish: Unwrap, sauce lightly, and move briefly to direct heat just to set the glaze.
Think minutes, not a Netflix episode.
Looks tip: Brush sauce on the ribs, then close the lid for a minute to let it “tack up.”
A set glaze looks glossy; a wet glaze looks like it’s still thinking about it.
Method 3: The Smoker Method (Low & Slow, with Smart Flexibility)
Smoking ribs is where you can build that legendary bark and deep flavor. But you don’t need complicated rituals
you need a steady temperature and a doneness test you trust.
Base plan: Smoke at about 225°F until tender. Wood choices like hickory, apple, or cherry are popular.
About the famous “3-2-1” approach
The 3-2-1 schedule (smoke, wrap, sauce) is popular because it’s simple. It can also make ribs very softsometimes too soft.
Consider it a starting framework, not a law of physics:
- Baby backs: often do better with shorter wrap time (think “2-1-1” or “2-2-1” depending on thickness).
- St. Louis/spares: can handle longer cooking and sometimes benefit more from the full wrap phase.
Simple smoker workflow
- Smoke unwrapped until the color is rich and the rub doesn’t look wet (often 2–3 hours).
- Wrap only if needed to soften the meat (45–120 minutes).
- Finish unwrapped to firm bark and set glaze (30–60 minutes).
Key idea: Wrapping speeds tenderness but softens bark. Unwrapped time builds bark but can dry edges if you go too hot or too long.
Balance them based on the texture you want.
Method 4: The Hybrid “Party Trick” (Oven First, Grill or Broiler Finish)
Want the easiest ribs that still look grilled? Cook them mostly in the oven, then finish on a hot grill for char and shine.
This is also the best “make-ahead” approach.
- Oven-bake wrapped at 275°F until tender (see oven method timeline).
- Cool slightly, then sauce.
- Grill over medium heat for 5–10 minutes total, flipping carefully, just to set the glaze and add light char.
How to Know When Ribs Are Done (Without Guessing)
Ribs are tricky to judge by “internal temp only” because you’re dealing with thin meat and bones. Use a combination of cues:
1) The Bend Test
Lift the rack with tongs from one end. If it bends into a deep U and the surface starts to crack slightly between bones,
you’re in the tenderness zone.
2) The Toothpick/Skewer Test
Slide a toothpick or skewer between bones. If it goes in with little resistance (like pushing into softened butter),
you’re close or done.
3) The “Bite Test” (Best for eaters, not perfectionists)
Take a bite. If you can see a clean bite mark and the meat doesn’t fall off the bone, it’s that competition-style sweet spot.
If it falls apart completely, it’s likely over that line (still tasty, just a different style).
4) Thermometer as a guide
For tenderness, many cooks see great results once ribs spend time in the higher range where collagen breaks down. Don’t chase a single number.
Use temperature as a clue, and tenderness tests as the final decision.
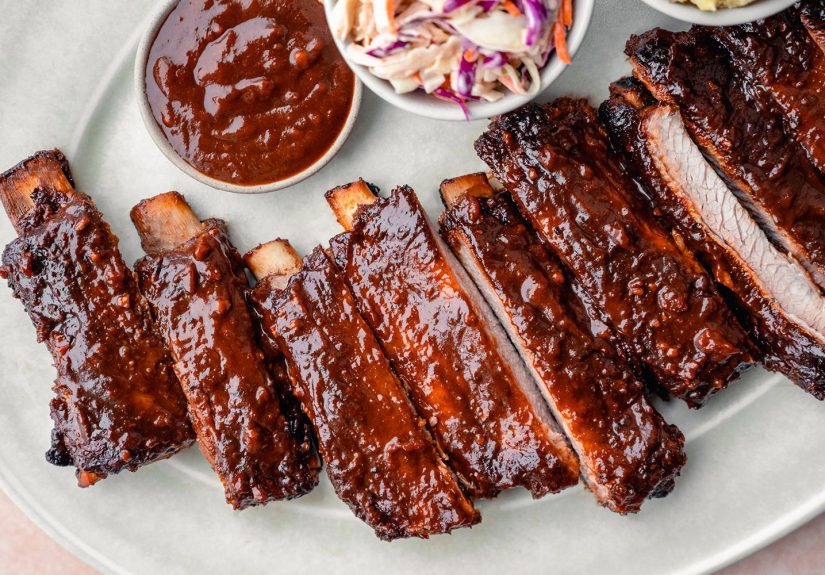
How to Make Ribs Look Stunning (Even If You’re Not a Food Stylist)
Make the glaze shine
- Warm your sauce before brushingcold sauce can smear and look dull.
- Apply two thin coats, letting the first set before the second.
- Finish with a quick blast of heat (broiler or grill) to “lock” the glaze.
Slice like a pro
- Rest 10–15 minutes so juices settle and slices stay neat.
- Flip bone-side up to see the bones clearly, then slice between them.
- Use a sharp chef’s knife (serrated can tear the bark you worked so hard for).
Plate for compliments
- Serve on a board with ribs stacked slightly, not laid flat like paperwork.
- Add a tiny pop of color: chopped parsley, sliced scallions, or quick-pickled onions.
- Offer sauce on the side so the bark stays crisp(ish) and everyone sauces to taste.
Common Rib Problems (and the Fixes That Actually Work)
“They’re tough and chewy.”
They’re undercooked for tenderness. Keep cooking at low heat and use the toothpick/bend test. Ribs get tender with time,
not motivational speeches.
“They’re falling apart and kind of mushy.”
Likely overwrapped or cooked too long in a steamy environment. Next time, shorten the foil phase and add more unwrapped finishing time
to firm the bark.
“My sauce burned.”
Sugary sauces burn fast. Sauce at the end and set the glaze with indirect heat or a quick broil, not a long direct blast.
“They taste flat.”
Add salt earlier (dry brine), increase black pepper or paprika in the rub, and consider a finishing squeeze of lemon or a splash of vinegar in the sauce.
Brightness wakes up rich pork.
Make-Ahead Game Plan (Because Ribs Shouldn’t Stress You Out)
Ribs are surprisingly party-friendly if you cook them earlier:
- Cook ribs until tender (oven wrapped is easiest), then cool.
- Refrigerate overnight (this can actually make slicing cleaner).
- Rewarm covered at 300°F until hot, then sauce and broil/grill to finish right before serving.
This method gives you controland control is what makes ribs look intentional instead of accidental.
Quick Example Timelines
Weeknight Oven Ribs (Minimum Fuss)
- 6:00 pm: Remove membrane, season, wrap.
- 6:15 pm: Into 275°F oven.
- 8:45 pm: Unwrap, return uncovered 30–45 min.
- 9:30 pm: Sauce + broil 3–5 min, rest, slice, brag.
Weekend Smoked Ribs (Maximum Bragging Rights)
- Morning: Season + smoke at 225°F.
- Midday: Wrap only if needed for tenderness.
- Afternoon: Unwrap, set bark, glaze late.
- Serve: Rest, slice cleanly, accept compliments like it’s your job.
Experiences: The Real-Life Rib Lessons That Make You Better Fast (About )
Cooking ribs has a funny way of turning normal, reasonable people into backyard philosophers. One moment you’re calmly seasoning pork;
the next you’re staring through a grill lid like you’re watching the season finale of a prestige drama. The truth is, ribs teach you patience
in a way very few foods canbecause ribs don’t respond to panic. You can’t “save time” by blasting them with high heat without paying for it
in dryness or toughness. Ribs reward calm, steady cooking and punish impatience with a texture that feels like it’s holding a grudge.
A lot of cooks discover their first rib “breakthrough” when they stop chasing a single magic number and start chasing tenderness.
Maybe you’ve had that moment: the thermometer says you’re “in the zone,” but the rack still feels stiff. Then you waitjust a little longer
and suddenly the toothpick slides in like it’s got someplace better to be. That’s when you realize ribs are less about temperature and more about
what time and heat do to collagen. It’s a small science lesson you can eat.
Another rite of passage is learning the difference between glaze and sauce soup. Early on, it’s tempting to paint ribs with a thick,
sugary layer and hope it turns into a shiny lacquer. But too much sauce too soon can burn or turn sticky in an unpleasant way.
The “aha” moment is when you brush on a thin, warm layer near the end, let it set, then add a second thin layer. The ribs come out glossy and
appetizinglike you planned it. That’s the day you start taking pictures before anyone grabs a rib.
Ribs also teach you how to cook for people, not just for your own ego. Some friends want a clean bite with a little tug; others want fall-off-the-bone
tenderness that practically self-debones. Once you realize there’s no single “correct” rib texture for every crowd, cooking gets easier.
You start adjusting: a shorter wrap for more bark and bite, a longer wrap for softer ribs, sauce on the side for the “don’t-touch-my-bark” folks.
That flexibility is what turns ribs from a stressful project into a repeatable win.
And finally, ribs teach the best hosting lesson: the best food looks effortless, even when it isn’t. The make-ahead hybrid methodoven first,
grill or broiler finishcan feel like a secret cheat code. You get tenderness without chaos, then you finish with heat for that glossy, just-cooked look.
Guests see the shine, smell the caramelized sauce, and assume you’ve been working all day. You can nod like a BBQ wizard while quietly enjoying the fact
that you were never actually trapped outside “watching the fire” for six straight hours.


