Table of Contents >> Show >> Hide
- First: Is It a Windshield Crack or a Car Window Crack?
- When Can You Fix a Hairline Crack in a Windshield?
- The Best Method: Professional Resin Injection
- DIY Windshield Repair: When It Makes Sense
- Step-by-Step: How to Fix a Hairline Crack in a Windshield
- 1. Park in the shade and let the glass cool
- 2. Keep the crack dry and clean
- 3. Inspect the crack from inside and outside
- 4. Clean around the damaged area
- 5. Set up the applicator
- 6. Add the repair resin
- 7. Use pressure and vacuum cycles
- 8. Apply curing film
- 9. Cure the resin with UV light or sunlight
- 10. Scrape and polish the surface
- Common Mistakes That Make Hairline Cracks Worse
- How Much Does It Cost to Fix a Hairline Crack?
- What About ADAS Calibration?
- Temporary Fixes: What to Do Before the Real Repair
- Best Method Summary: Repair or Replace?
- Experience-Based Tips for Fixing Hairline Cracks in Car Windows
A hairline crack in a car window looks innocent at first. It is thin, quiet, and almost politeuntil one cold morning, one pothole, or one dramatic door slam turns it into a windshield spiderweb auditioning for a horror movie. The good news is that many small cracks in a windshield can be stabilized or repaired if you act quickly. The not-so-fun news is that not every car window crack should be fixed with a $15 repair kit and a prayer.
The best method to fix a hairline crack in a car window is usually a resin-based windshield repair, done either by a professional technician or, for very minor damage, with a quality DIY windshield repair kit. The goal is not to “glue glass back together” like a broken coffee mug. The goal is to remove air from the crack, fill the damaged area with optical resin, cure it with UV light, and restore strength and visibility as much as possible.
This guide explains when a hairline crack is repairable, when replacement is the safer choice, how to use a windshield repair kit correctly, what mistakes to avoid, and why side windows and rear windows are a different story. Let’s save your glass before it decides to become modern art.
First: Is It a Windshield Crack or a Car Window Crack?
Before you touch the resin, tape, razor blade, or your emergency “I saw this on the internet” toolkit, identify the glass. Most front windshields are laminated safety glass. Laminated glass has two layers of glass with a plastic interlayer between them, which helps hold the windshield together when damaged. This is why a windshield often cracks instead of exploding into tiny pieces.
Many side and rear car windows, however, are made of tempered glass. Tempered glass is designed to shatter into small pieces when it breaks. That makes it safer in many crash situations, but it also means hairline crack repair usually is not practical for side windows or rear windows. If a side window has a true crack, replacement is normally the correct fix.
The simple rule
If the crack is in the windshield, it may be repairable. If the crack is in a side window or rear window made of tempered glass, plan on replacement. Some newer vehicles use laminated glass in side windows too, especially for sound reduction or security, but you should verify this with your owner’s manual, glass marking, or a professional auto-glass shop.
When Can You Fix a Hairline Crack in a Windshield?
A windshield hairline crack is most likely repairable when it is short, shallow, clean, and away from critical safety areas. The exact repair limits vary by technician, vehicle, state inspection rules, and the equipment used, but the following checklist is a practical starting point.
A hairline crack may be repairable if:
- The crack is under about 6 inches long.
- It is not directly in the driver’s primary line of sight.
- It does not reach the edge of the windshield.
- It has not penetrated both layers of the laminated glass.
- There is no major dirt, water, oil, or glass cleaner trapped inside.
- The crack is not spreading quickly.
- There are not multiple cracks crossing each other.
Replacement is usually better if:
- The crack is longer than 6 inches.
- The crack touches the windshield edge.
- The damage is in front of the driver and still distorts vision after repair.
- The glass is crushed, missing, or deeply pitted.
- The windshield has several cracks, large chips, or previous failed repairs.
- The vehicle has camera-based safety systems and the damage affects that area.
Why does location matter so much? Because your windshield is not just a bug shield with a nice view. It contributes to visibility, roof support, passenger airbag performance, and the correct mounting of cameras or sensors on many modern vehicles. A weak windshield in the wrong place is not a cosmetic issue; it is a safety issue wearing a transparent disguise.
The Best Method: Professional Resin Injection
The best overall method for fixing a hairline crack in a windshield is professional resin injection. A trained technician uses specialized tools to clean the damage, create vacuum pressure, remove trapped air, inject clear repair resin, cure it, and polish the surface. This repair can make the crack far less visible and help prevent it from spreading.
Professional repair is especially smart if the crack is near the edge, longer than a few inches, close to the driver’s line of sight, or connected to a chip. Professionals also have better equipment for controlling pressure and filling the entire crack. A DIY kit can help with small damage, but a pro repair is more consistent, especially when the crack is not just a tiny surface mark.
Why resin works
Windshield resin is designed to flow into the damaged area, replace trapped air, bond with the glass, and cure into a clear, hard material. Once cured, it helps stabilize the crack and improves appearance. The crack may not vanish completely. If someone promises to make all damage disappear like a magician with a squeegee, keep your wallet alert. The realistic goal is strength, stability, and improved visibilitynot time travel.
DIY Windshield Repair: When It Makes Sense
A DIY windshield repair kit can be useful for a very small hairline crack or chip when professional repair is not immediately available. Most kits include resin, an applicator, curing strips, a pedestal or bridge, a syringe or pressure device, and a razor blade. The kit works best when the damage is fresh and clean.
DIY repair is not ideal for long cracks, cracks at the windshield edge, cracks in the driver’s direct view, or damage that has already collected dirt and moisture. If the crack looks like it is planning a road trip across your entire windshield, skip the kit and call a professional.
Step-by-Step: How to Fix a Hairline Crack in a Windshield
Use these steps for a minor windshield crack only. Always follow the instructions included with your specific repair kit, because cure times and tool designs vary.
1. Park in the shade and let the glass cool
Do not repair hot glass in direct sunlight unless your kit specifically tells you to move into sunlight for curing. Heat can make resin cure too quickly and may cause the crack to expand. A shaded area with moderate temperature is best for preparation.
2. Keep the crack dry and clean
Moisture is the enemy of a clean repair. If the crack just happened, place clear packing tape over it temporarily to keep out dirt and water. Do not press hard. Do not wash the car. Do not spray glass cleaner into the crack. Your windshield does not need a spa day right now.
3. Inspect the crack from inside and outside
Look at the crack from several angles. If you see the crack reaching the edge of the windshield, if it is longer than the kit’s recommended repair size, or if it blocks your view, stop and call a professional. A repair kit is helpful, but it is not a superhero cape.
4. Clean around the damaged area
Clean the surrounding glass with a dry microfiber cloth. If needed, use a small amount of glass cleaner around the crack, not inside it. Remove loose glass fragments carefully with the pin or tool included in the kit. Avoid digging aggressively, because you can make the damage worse.
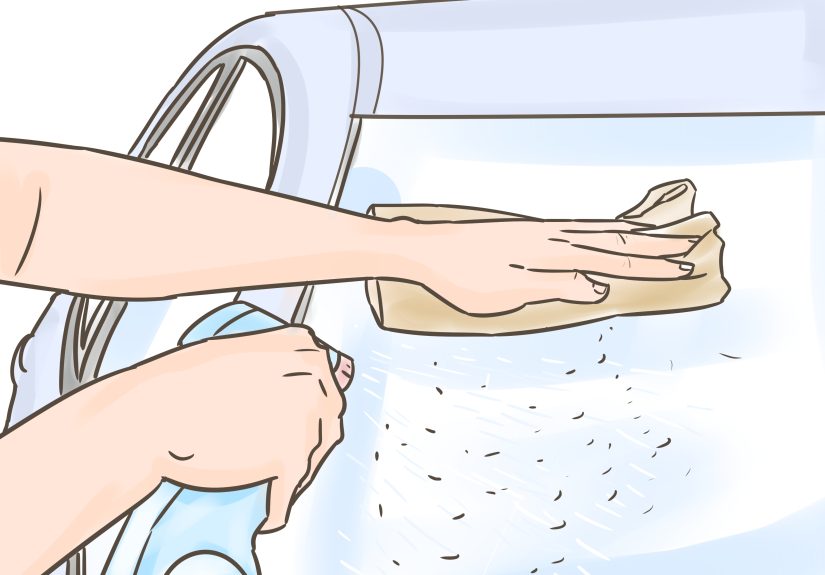
5. Set up the applicator
Most kits use a suction-cup bridge, adhesive patch, or pedestal that centers over the damaged area. Place it carefully so the resin can flow directly into the crack or chip. Alignment matters. If the applicator is crooked, the resin may go everywhere except where you need it, which is very on-brand for rushed DIY projects.
6. Add the repair resin
Apply the recommended number of resin drops into the applicator. More resin is not always better. Too much can create a messy surface and make curing harder. Follow the kit instructions exactly.
7. Use pressure and vacuum cycles
Many kits use a syringe or pressure driver to pull air out and push resin in. This step is important because trapped air makes the crack more visible and weaker. Watch for bubbles leaving the damaged area. Give the resin time to penetrate. Patience here is cheaper than a new windshield.
8. Apply curing film
After the crack is filled, remove the applicator as directed and place a curing strip over the resin. Do this gently so you do not pull resin back out of the crack.
9. Cure the resin with UV light or sunlight
Most repair resins cure with ultraviolet light. Some kits direct you to move the vehicle into sunlight after application. Cure time may be longer on cloudy days. Do not drive, wash, or flex the windshield while the resin is curing.
10. Scrape and polish the surface
Once the resin is fully cured, remove the curing strip and use a razor blade at a shallow angle to scrape away excess resin. Wipe the area clean. The repair should feel smooth and look clearer than before, although a faint line may remain.
Common Mistakes That Make Hairline Cracks Worse
Windshield repair is simple in theory, but small mistakes can turn a repairable crack into a replacement bill. Avoid these common errors.
Using super glue
Super glue is not windshield repair resin. It may dry cloudy, fail under heat, and make later professional repair harder. Your windshield deserves better than a craft drawer solution.
Repairing dirty or wet cracks
Water and dirt prevent resin from bonding properly. If the crack has been exposed to rain for days, a professional may need to dry and clean it before repair.
Ignoring temperature
Very hot or very cold glass is more likely to expand, contract, and spread damage. Avoid blasting the defroster on a cracked windshield. Sudden temperature changes can make the crack grow dramatically.
Waiting too long
Fresh cracks repair better. The longer you wait, the more dirt, moisture, and stress enter the damage. A tiny crack today can become a dashboard-to-roofline lightning bolt by next week.
Repairing damage in the driver’s direct view
Even a properly repaired crack can leave slight distortion. If that distortion is in your main field of vision, replacement may be safer and may be required for inspection in some areas.
How Much Does It Cost to Fix a Hairline Crack?
A DIY windshield repair kit often costs far less than professional repair, but it is best for very small, simple damage. Professional chip or crack repair usually costs more than a kit but far less than windshield replacement. Replacement can be much more expensive on newer vehicles with rain sensors, cameras, heating elements, head-up displays, or advanced driver assistance systems.
If your vehicle has comprehensive insurance coverage, glass repair may be covered, sometimes with little or no deductible depending on your policy and state. Replacement may also be covered, but deductibles and policy rules vary. Before paying out of pocket, check your insurance app or call your insurer. That two-minute call may save enough money to buy lunch, windshield wipers, and a celebratory coffee.
What About ADAS Calibration?
Many modern vehicles have cameras and sensors mounted near the windshield. These systems may support lane keeping, automatic emergency braking, adaptive cruise control, traffic sign recognition, or forward collision warning. If the windshield is replaced, these systems often need recalibration so they can “see” correctly.
This is one reason a windshield replacement is not always a simple glass swap anymore. The glass may be only part of the cost. Calibration, correct glass type, proper installation, and manufacturer procedures all matter. If your car has a camera behind the rearview mirror, ask the glass shop whether recalibration is required.
Temporary Fixes: What to Do Before the Real Repair
If you cannot repair the crack immediately, you can take a few temporary steps to reduce the chance of spreading.
- Cover the crack with clear tape to keep out dirt and water.
- Avoid slamming doors.
- Do not blast heat or air conditioning directly onto the glass.
- Avoid car washes and pressure washers.
- Drive gently over rough roads when possible.
- Schedule repair as soon as you can.
These steps do not fix the crack. They simply buy time. Think of them as putting a bandage on the problem, not performing surgery.
Best Method Summary: Repair or Replace?
The best method depends on the type, size, and location of the crack. For a small hairline crack in a laminated windshield, professional resin injection is the best overall repair. A DIY kit can work for tiny, fresh damage if it is outside the driver’s direct view and away from the windshield edge. For side windows, rear windows, long cracks, edge cracks, deep damage, or cracks that affect visibility, replacement is the smarter and safer solution.
If you are unsure, get a professional inspection. Most auto-glass shops can tell you quickly whether the damage is repairable. A good shop would rather repair a safe candidate than replace glass unnecessarily, but they should also be honest when replacement is the only responsible option.
Experience-Based Tips for Fixing Hairline Cracks in Car Windows
Here is where real-world experience matters: the best windshield repairs usually happen early, calmly, and with boring attention to detail. The worst ones happen after someone notices a crack, ignores it for three weeks, takes the car through a high-pressure wash, parks in blazing sun, then wonders why the crack now resembles a river system on a map.
One common situation is the tiny crack that starts from a rock chip after highway driving. At first it may look like a small white line, maybe only an inch or two. This is the golden window for repair. Cover it with clear tape, avoid washing the windshield, and get it repaired quickly. When resin fills fresh damage, the result is often much cleaner because there is less contamination inside the break.
Another common experience involves temperature shock. A driver sees a small crack on a freezing morning, starts the car, and blasts the defroster at full heat. Within minutes, the crack grows several inches. Glass expands and contracts with temperature changes, and damaged glass is already under stress. A gentler warm-up can help reduce the risk until the repair is done.
DIY kits can be satisfying when the crack is tiny and the instructions are followed exactly. The best DIY results usually come from taking extra time during the air-removal step. If bubbles remain, the repair may look cloudy or incomplete. People often rush this part because nothing exciting seems to be happening. But in windshield repair, “nothing exciting” is usually the sound of money being saved.
On the other hand, some cracks should not become weekend experiments. Edge cracks are notorious for spreading because the windshield edge handles a lot of structural stress. Cracks in the driver’s line of sight are also tricky because even a successful repair can leave distortion. If you find yourself squinting through the repaired area, that is not a victory. That is your windshield asking for retirement.
There is also the modern-vehicle factor. If your car has lane-assist cameras, rain sensors, heating elements, or a head-up display, windshield replacement can be more involved than expected. Many drivers are surprised when the glass shop mentions calibration. It may feel like an upsell, but camera alignment is a safety issue. A slightly misaligned system can affect how driver-assistance features behave.
The most practical lesson is simple: treat hairline cracks like dental cavities. Small ones are cheaper, faster, and easier to fix. Ignore them, and the repair becomes bigger, more expensive, and much less fun. A clean resin repair done early can extend the life of a windshield and keep your view clear. Waiting too long can turn a tiny line into a full replacement, and your wallet will not send a thank-you card.
Note: This article is for educational purposes. If a crack affects your visibility, reaches the windshield edge, appears on a side or rear tempered window, or involves a vehicle with advanced safety cameras, have the glass inspected by a qualified auto-glass professional.


