Table of Contents >> Show >> Hide
- What Tree Flocking Actually Is
- Why Dollar Store Ingredients Work So Well
- Best DIY Flocking Recipes With Dollar Store Ingredients
- Supplies You’ll Need Before You Start
- How to Make Tree Flocking With Dollar Store Ingredients DIY Step by Step
- How to Make It Look Real Instead of Homemade
- Common Mistakes to Avoid
- Can You Use This on Real Trees?
- Cleanup and Storage Tips
- Budget Example for a Dollar Store DIY
- Final Thoughts
- Real-Life DIY Experiences and Lessons Learned
If you have looked at a snowy Christmas tree in a store and thought, “Wow, that’s gorgeous, but my wallet just made a choking sound,” welcome. You are among friends. The good news is that you do not need a fancy designer kit or a holiday budget the size of Santa’s logistics department to create that soft, snowy look. With a few inexpensive items from a dollar store, you can make DIY tree flocking that looks charming, cozy, and surprisingly high-end.
This guide walks you through how to make tree flocking with dollar store ingredients DIY style, with practical steps, realistic expectations, safety tips, cleanup advice, and a few hard-earned lessons so your tree ends up looking wintery instead of like it lost a fight with whipped cream. Whether you are decorating a full-size artificial tree, a tiny tabletop tree, a wreath, a garland, or a handful of pine branches, this method can help you create a frosted look for less.
What Tree Flocking Actually Is
Tree flocking is the process of adding a white, snow-like coating to branches so they look dusted, frosted, or fully blanketed in fresh snow. Store-bought flocking is often sold as powder, spray, or pre-flocked décor. DIY versions usually mimic the same look with household ingredients that dry into a soft white finish.
The trick is understanding that not every fake snow recipe is perfect for every decorating job. Some mixes are best for quick party décor. Some are better for pinecones and wreaths. Others work best on artificial tree tips where you want fluffy clusters that stay put. The secret is choosing the right recipe for the look you want.
Why Dollar Store Ingredients Work So Well
Dollar stores are surprisingly stacked for this project. You can often find white shaving cream, white glue, baking soda, cornstarch, soap bars, spray bottles, plastic tablecloths, mixing bowls, cheap paintbrushes, and disposable gloves in one trip. In other words, the holiday craft gods occasionally smile upon us.
These ingredients work because each one brings something useful to the mix:
White Glue
Glue helps the flocking stick and dry with better staying power. If you want a finish that lasts longer than one dramatic sneeze, glue is your friend.
Shaving Cream
Foam shaving cream creates volume and that fluffy, just-fallen-snow texture. Use foam, not gel. Gel belongs in a different story.
Cornstarch
Cornstarch thickens the mixture and helps create a more matte, powdery look.
Baking Soda
Baking soda brightens the white tone and creates a soft snow effect. It is great for lighter dusting or temporary winter scenes.
White Soap Bars
Grated white soap can be mixed into a snowy paste that looks surprisingly realistic on branches, pinecones, and garlands.
Best DIY Flocking Recipes With Dollar Store Ingredients
You do not need ten recipes. You need the right two. These are the most useful homemade options for most DIY decorators.
Recipe 1: The Best All-Around Tree Flocking Paste
This is the one to use if you want fluffy, visible snow that clings well to an artificial tree.
Ingredients:
- 1 cup white glue
- 3 cups foam shaving cream
- 2 to 4 tablespoons cornstarch
- Optional: 1 to 2 tablespoons baking soda for a brighter white finish
Why it works: The glue gives grip, the shaving cream builds volume, and the cornstarch keeps the mix from looking too slick or foamy.
Recipe 2: Powdery Snow for Light Dusting
This one is good for mini trees, village scenes, tabletops, and quick decorative accents. It is less durable, but it is cheap and easy.
Ingredients:
- 1 box baking soda
- Foam shaving cream, added slowly
Why it works: It makes a soft, cold-feeling, crumbly snow texture. It is better for temporary décor than a long-term flocked tree, but it can still be useful for small projects.
Optional Recipe 3: Soap Flocking for Rustic Branches and Pinecones
If you want a more old-school DIY approach, grate white soap bars and mix the shavings with a small amount of warm water until you get a whipped, spreadable consistency. Some crafters add a little glue or cornstarch to improve the hold. This method looks especially pretty on pinecones and garlands.
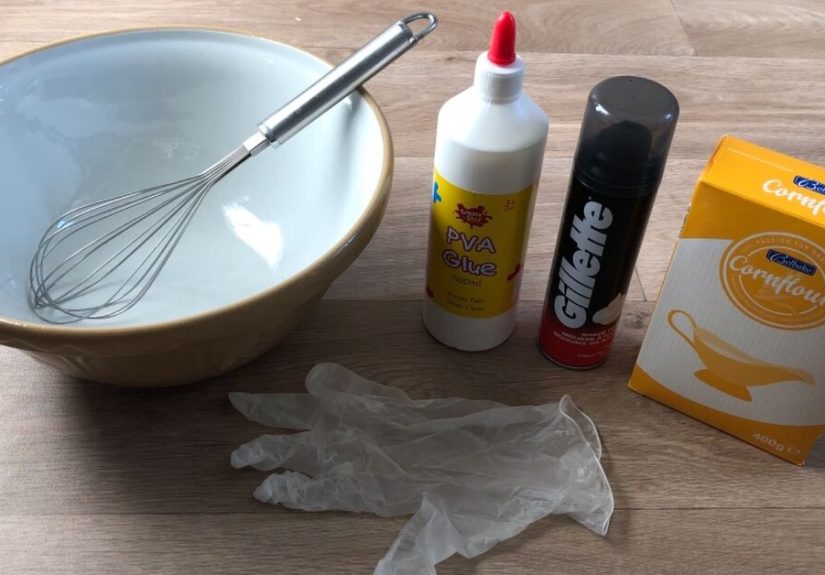
Supplies You’ll Need Before You Start
- Artificial tree, mini tree, wreath, garland, or branches
- Your DIY flocking mixture
- Spray bottle with water
- Cheap paintbrush or spatula
- Large mixing bowl
- Plastic tablecloth or drop cloth
- Gloves
- Old towel or paper towels
- Vacuum for cleanup
If you are flocking a full-size tree indoors, do yourself a favor and protect the floor first. “I’ll just be careful” is the opening line of many avoidable holiday cleaning sagas.
How to Make Tree Flocking With Dollar Store Ingredients DIY Step by Step
Step 1: Fluff and Prep the Tree
If you are using an artificial tree, shape and fluff it before adding anything white. Once the flocking goes on, you do not want to keep bending branches around too much or you may knock off your pretty snow. Make the tree look full and natural first.
Step 2: Cover Your Work Area
Lay down a plastic tablecloth, drop cloth, or even a few trash bags cut open. Flocking can get messy, especially if you go for that “heavy Alpine chalet” look instead of “light dusting in a Hallmark movie.”
Step 3: Mix the Flocking
In a bowl, combine the glue, shaving cream, and cornstarch. Stir until the mixture forms soft peaks and looks like thick whipped frosting. Not runny. Not soupy. Not suspicious. If it feels too loose, add a bit more cornstarch. If it feels too stiff, add a spoonful of shaving cream.
Step 4: Lightly Mist the Branches
Use a spray bottle to dampen the branch tips very lightly. This helps the flocking grab instead of sliding around like a holiday prank. Do not soak the tree. Damp is enough.
Step 5: Apply the Flocking to the Tips
Use a paintbrush, spoon, or gloved fingers to dab the mixture onto the branch tips. Focus on the top surfaces where real snow would naturally settle. Let some of it fall into lower branches for a layered, natural effect. Avoid coating every inch evenly, because real snow does not look machine-stamped.
Step 6: Build in Light Layers
Start light, step back, and assess. Then add more. This is the golden rule. It is much easier to add extra flocking than it is to scrape off a tree that now looks like it got trapped in a marshmallow factory explosion.
Step 7: Let It Dry Completely
Allow the tree to dry for several hours or overnight before decorating. A heavily flocked tree may need longer. If you rush and start hanging ornaments too soon, you may smudge the finish and transfer white goo to your hands, sleeves, and mood.
How to Make It Look Real Instead of Homemade
Flock Only the Tips and Upper Surfaces
This is the biggest realism trick. Real snow lands on the tops of branches, not the undersides.
Vary the Coverage
Keep some areas lightly dusted and others thicker. Uniform coverage often looks artificial.
Let Gravity Help
As you apply the flocking, let some bits fall naturally to lower branches. That soft cascade creates depth.
Use Warm White Lights
Warm white lights glow beautifully against flocking and make the tree feel cozy instead of icy and flat.
Decorate With Restraint
A flocked tree already has visual texture. You usually need fewer ornaments than you think. Ribbons, wood beads, neutral baubles, pinecones, and velvet accents work especially well.
Common Mistakes to Avoid
Using Gel Shaving Cream
Foam shaving cream creates volume. Gel just makes disappointment.
Making the Mixture Too Wet
If the mixture drips like cake batter, it will slide and dry unevenly. Thicken it before applying.
Overloading the Branches
Too much flocking can weigh down delicate tips, especially on cheaper artificial trees. Go light and layer gradually.
Skipping the Test Branch
Always test a small hidden section first. Some trees, wreaths, or dollar-store mini branches react differently.
Decorating Too Soon
Patience is boring, but redecorating because the flocking smeared is worse.
Can You Use This on Real Trees?
Yes, but carefully. If you use a live tree, keep the flocking light and avoid sealing off large areas with thick paste. Most importantly, continue following real-tree safety basics: keep the tree watered, keep it away from heat sources, and do not block exits. A dry real tree is never a cute holiday detail.
Cleanup and Storage Tips
Once the project is dry, gently shake loose debris onto the drop cloth and vacuum the floor. For future storage, wrap the tree loosely and avoid crushing the flocked branches into a tight box if possible. Compression is one of the fastest ways to lose that pretty snowy texture.
If small areas wear off next season, simply mix a small fresh batch and touch up the tips. One of the perks of homemade flocking is that matching the finish is easy and cheap.
Budget Example for a Dollar Store DIY
Here is a simple example for a small to medium tree:
- 2 cans foam shaving cream
- 1 bottle white glue
- 1 box cornstarch
- 1 box baking soda
- 1 spray bottle
- 1 cheap brush
- 1 plastic tablecloth
You can often assemble the whole setup for far less than the cost of a commercial flocking kit or a pre-flocked replacement tree. That is the kind of math holiday crafters like.
Final Thoughts
Learning how to make tree flocking with dollar store ingredients DIY style is one of those projects that feels a little magical because the before-and-after difference is huge. A plain green tree can suddenly look soft, snowy, and expensive with a handful of affordable ingredients and a little patience. Better yet, you control the finish. Want a barely frosted woodland look? Easy. Want a dramatic winter wonderland moment? Also easy. Want to spend less and still make people ask where you bought it? That is the sweet spot.
The best results come from keeping the mixture thick, applying it in light layers, focusing on the branch tips, and letting it dry fully before decorating. The process is not hard, but it does reward patience and a willingness to embrace a little mess. Fortunately, holiday mess with a pretty ending is still a win.
Real-Life DIY Experiences and Lessons Learned
The first time I tried homemade tree flocking, I assumed this would be a ten-minute craft. That is a hilarious memory now. What actually happened was more like this: I mixed a batch that looked promising, dabbed it on a cheap tabletop tree, stepped back proudly, and realized I had created something that looked less like fresh snow and more like the tree had been attacked by white mashed potatoes. The fix was simple, though important. I had used too much mixture at once and spread it too evenly. Once I started dabbing smaller amounts just on the tips and letting gravity create a natural fall pattern, the tree transformed from “craft emergency” to “cozy cabin chic.”
Another lesson came from using baking soda and shaving cream alone. It looked lovely at first on a miniature village scene, especially under twinkle lights, but by the next day the texture had dried more brittle and crumbly than I expected. That taught me something useful: lighter, powdery mixes are great for quick scenes, photo setups, and temporary décor, but if I want something that can survive a full season on a tree, glue needs to join the party. Since then, I use the baking soda mix only for accents and the glue-based mix for anything I want to keep looking good through the holidays.
I also learned that inexpensive mini trees from discount stores are perfect practice material. They let you experiment without the pressure of ruining your main tree. One year, I made three tiny flocked trees for a mantel using dollar store supplies and mismatched ornaments I already had. They ended up looking more charming than my larger tree, mostly because I was less nervous and more playful. That is the sneaky truth about DIY holiday décor: sometimes the smaller, lower-stakes projects are the ones that come out looking the most polished.
The biggest surprise was how much difference lighting makes. A flocked tree under cool lighting can look sharp and flat, but under warm white lights it suddenly feels soft, layered, and expensive. It is almost unfair. The tree did not change. The lighting did all the flirting. I now test lights before I decorate the rest of the tree because the glow affects how snowy the branches appear.
My favorite experience, though, was turning leftover flocking into extra décor. After finishing the tree, I dabbed the remaining mixture onto pinecones, a plain wreath, and a few loose faux branches tucked into a basket by the fireplace. That small move tied the whole room together. It looked intentional, cohesive, and much more custom than it actually was. In reality, it was just me refusing to waste craft supplies. Holiday magic and budget instincts can absolutely coexist.
So if your first attempt is imperfect, welcome to the club. Homemade tree flocking gets better fast once you understand the texture, the layering, and the value of stepping back every few minutes to check your work. The goal is not factory perfection. The goal is warmth, charm, and that little moment when someone walks in and says, “Wait, you made that?” That is the real holiday victory.


