Table of Contents >> Show >> Hide
- What “From Scratch” Really Means in Glass Beadmaking
- What You Need to Make Glass Beads at Home
- Safety First, Because Burned Eyebrows Are Not a Milestone
- How to Make Your Own Glass Beads Step by Step
- Step 1: Prepare the mandrels
- Step 2: Set up your torch and warm your workspace rhythm
- Step 3: Warm the glass rod gradually
- Step 4: Warm the mandrel and start the wind
- Step 5: Build the bead to the size you want
- Step 6: Decorate while the bead is hot
- Step 7: Shape and refine
- Step 8: Cool the bead properly
- Step 9: Remove and clean the bead
- Can You Really Make Glass Beads from Raw Glass Ingredients?
- Common Mistakes Beginners Make
- Tips for Better Homemade Glass Beads
- Why Glass Beadmaking Is So Addictive
- Experience: What It Really Feels Like to Make Your Own Glass Beads from Scratch
- Final Thoughts
Making your own glass beads from scratch sounds wonderfully dramatic, doesn’t it? Like you’re about to become part artist, part alchemist, part dragon trainer. And honestly, that’s not far off. Glass beadmaking is one of those rare crafts that feels both ancient and thrillingly hands-on. You take a rigid little rod of glass, introduce it to a very serious flame, and a few careful turns later it becomes a glowing bead that can end up on a bracelet, necklace, keychain, or proudly sitting on your desk while you whisper, “I made that.”
But let’s clear up one tiny detail before we stride heroically into the fire: when most people make glass beads at home, they start with glass rods, not a bucket of sand and a backyard furnace. In other words, you can absolutely make your own glass beads from scratch in the creative, from-the-beginning sense, but manufacturing the glass itself from raw minerals is a much bigger project. For beginners, lampworking or flameworking with pre-made compatible rods is the smart, safe, realistic route.
This guide walks you through the full beginner-friendly process: tools, safety, setup, step-by-step beadmaking, common mistakes, finishing techniques, and the real-life experience of learning how to make glass beads at home. If you’ve been curious about lampworking for beginners, grab your imaginary cape. We’re getting warm.
What “From Scratch” Really Means in Glass Beadmaking
There are two ways people use the phrase “from scratch” when talking about glass beads:
1. Studio scratch
You start with glass rods, a torch, a mandrel, bead release, and basic tools. Then you melt, wind, shape, decorate, cool, anneal, and clean the bead yourself. This is how most home beadmakers and hobbyists work.
2. Raw-material scratch
You mix silica, fluxes, stabilizers, and colorants, melt them in a furnace, gather the molten glass, and then form beads. That is not a casual weekend craft. It requires a much more advanced setup, serious heat, and a deeper knowledge of glass chemistry.
So for this article, we’re focusing on the version normal humans can actually do in a home or studio environment without accidentally reinventing an industrial glass plant.
What You Need to Make Glass Beads at Home
If you want to make your own glass beads from scratch in the practical lampworking sense, you’ll need the following tools and materials:
Essential tools
- Torch: A beginner beadmaking torch or lampworking torch designed for glass.
- Fuel source: Depending on your torch, this may be propane, MAPP gas, oxygen-propane, or another approved setup.
- Glass rods: Beginners often start with soft glass rods, especially compatible beadmaking glass.
- Mandrels: Stainless steel rods that create the bead hole.
- Bead release: A coating that prevents molten glass from sticking permanently to the mandrel.
- Marver or shaping pad: Used to smooth or shape hot glass.
- Graphite or stainless tools: Helpful for shaping, pressing, or decorating.
- Annealing kiln: Best option for cooling beads slowly and reducing internal stress.
- Fiber blanket: A temporary cooling aid if you are not placing beads directly into a kiln.
- Bead reamer: Used after cooling to clean bead holes.
Safety gear
- Protective lampworking glasses: Designed for sodium flare and appropriate heat/light protection.
- Ventilation: Good airflow is not optional.
- Heat-resistant work surface: Because your dining table deserves better.
- Fire extinguisher: Keep one nearby.
- Tied-back hair and fitted clothing: Flowing sleeves and open flames are terrible roommates.
Safety First, Because Burned Eyebrows Are Not a Milestone
Before you light a torch, set up your workspace correctly. Glass beadmaking is exciting, but it is still flame work. That means heat, combustion, hot glass, bright flare, and the occasional surprise crack if the glass is shocked by temperature changes.
Start with a stable bench in a well-ventilated area. Use the eye protection recommended for the type of glass and torchwork you’re doing. Make sure your fuel connections are secure. Keep your tools where you can reach them without twisting like a pretzel. And never assume a piece of glass is cool just because it looks innocent. Hot glass has a talent for pretending it’s harmless right before it proves otherwise.
If you only remember one thing, remember this: controlled heat and controlled cooling are everything. Most beginner problems come from rushing one of those two steps.
How to Make Your Own Glass Beads Step by Step
Step 1: Prepare the mandrels
Dip each mandrel into bead release so the coating is smooth and even. Let it dry completely before you use it. Some beadmakers air-dry mandrels, while others flame-dry them carefully. Either way, don’t rush it. Wet or poorly dried bead release can flake, bubble, or fail, and then your glass bead may weld itself to the mandrel like it’s signing a lifelong contract.
Step 2: Set up your torch and warm your workspace rhythm
Light the torch according to the manufacturer’s instructions and adjust the flame to the type of glass you’re using. Keep your tools within easy reach. If you’re using a kiln, preheat it to the appropriate holding temperature for your process. If you’re cooling beads in a fiber blanket before later annealing, have the blanket ready and safely positioned away from clutter.
Step 3: Warm the glass rod gradually
Do not shove the tip of a cold glass rod straight into the hottest part of the flame unless you enjoy hearing sharp little “tink” sounds of disappointment. Instead, introduce the rod slowly at the edge of the flame so it warms gradually. Rotate it as it heats. Once the end begins to glow and soften, you can move it into the hotter zone.
Step 4: Warm the mandrel and start the wind
Heat the coated part of the mandrel gently, then bring the softened glass to it. Rotate the mandrel steadily while allowing the molten glass to wrap around it. This is called winding the bead. At first, the bead may look lumpy, crooked, or emotionally confused. That is normal. Keep turning. Consistent rotation helps gravity work in your favor rather than against you.
A beginner trick: focus more on a steady rhythm than on perfection. Smooth, even turning produces better results than frantic overcorrection. Glass responds well to calm confidence and badly to panic.
Step 5: Build the bead to the size you want
Once the first layer is on the mandrel, add more molten glass if needed. Continue rotating the bead in the flame so it stays evenly heated. If one side grows too thick, adjust your angle and let the heat help you rebalance the shape.
For a basic round bead, surface tension does much of the work if the glass is heated evenly. For barrel beads, bicones, lentils, or more sculpted shapes, use a marver, paddle, or shaping tools while the glass is still workable.
Step 6: Decorate while the bead is hot
Here’s where the fun gets loud. You can add stringers, dots, trails, twists, or layered colors. Heat the decorative glass gently, then apply it to the bead while rotating. If you add dots, you can leave them raised for texture or melt them in for a smoother surface. If you drag the dots or rake the surface, you can create floral, feathery, or spiraled effects.
Keep in mind that decoration changes the heat balance of the bead. Every added dot or stripe creates a new area that needs to be incorporated smoothly. Think of it like frosting a cupcake with a blowtorch involved.
Step 7: Shape and refine
After decorating, gently heat the bead until the surface evens out and the design settles into place. Use shaping tools if necessary, but avoid pressing too hard. Glass remembers pressure marks, and it is not always forgiving.
At this stage, check the bead hole area. If the bead starts creeping too far toward one end, carefully re-center the visual balance while the glass is still soft. Don’t obsess over microscopic perfection. Handmade beads should look handmade, not like they were manufactured by a robot with trust issues.
Step 8: Cool the bead properly
Once the bead is finished, it needs to cool in a controlled way. This is where many beginners go wrong. A bead that looks fine right after the torch can crack later if it holds too much internal stress.
The best practice is to place the bead into a preheated annealing kiln. Proper kiln annealing gives the glass time to equalize temperature and relieve stress before cooling through the critical range. If you are working with a fiber blanket, understand that it only slows cooling; it is helpful, but it is not the same as a full annealing cycle in a programmable kiln.
Step 9: Remove and clean the bead
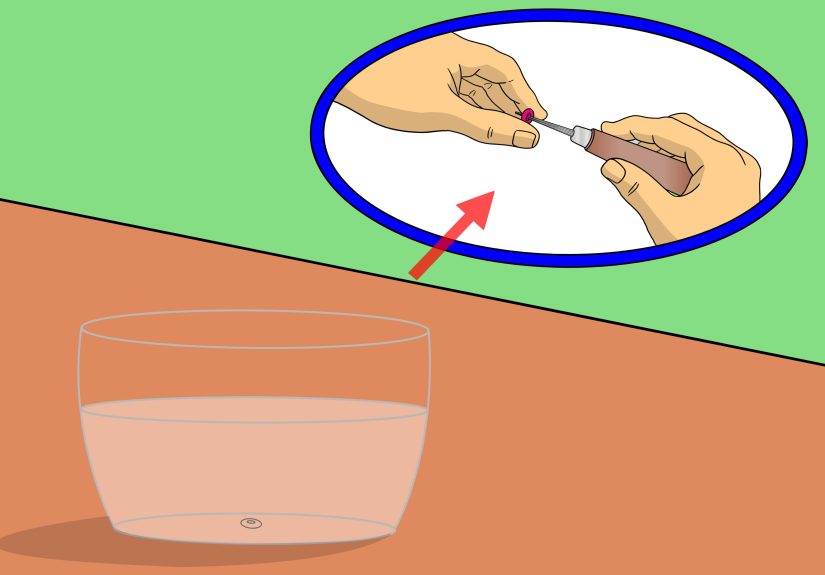
After the bead has fully cooled and been annealed, remove it from the mandrel. Twist gently. If it resists, don’t go full medieval on it. Try soaking the mandrel or using a gentle grip technique. Once the bead is off, clean out the bead hole with a bead reamer to remove leftover release material.
Now you finally have a real glass bead made by your own hands. It may be slightly asymmetrical. It may have one dot that wandered off course. It may also be your favorite thing in the room.
Can You Really Make Glass Beads from Raw Glass Ingredients?
Technically, yes. Practically, most beginners should not start there.
Making glass from raw materials means blending a glass batch, melting it at very high temperatures, controlling chemistry, managing compatibility, and then turning that hot material into rods or workable gathers. That is much closer to furnace glass or industrial production than beginner beadmaking. It also raises the bar dramatically for ventilation, dust control, protective gear, and equipment cost.
So if your dream is “I want to make my own glass beads,” don’t feel like using pre-made compatible rods is cheating. It isn’t. It is the standard entry point, and it still leaves plenty of room for technique, artistry, colorwork, and personal style.
Common Mistakes Beginners Make
Heating too fast
Cold glass hates thermal shock. Ease it into the flame.
Using random glass together
Do not mix glass families casually. Even if expansion numbers sound similar, compatibility is more complicated than one number. Stick to a tested, compatible line of glass until you know exactly what you are doing.
Skipping proper annealing
If you want beads that last, controlled cooling matters. Tiny stress fractures can hide until later.
Overworking the bead
Yes, it’s tempting to keep fixing it forever. But glass reaches a point where “one more touch” becomes “why did I ruin the nice part?” Learn when to stop.
Ignoring ergonomics
Beadmaking uses repetitive hand and wrist motions. Sit well, support your arms, and build good habits early.
Tips for Better Homemade Glass Beads
- Start with simple round beads before attempting sculptural masterpieces.
- Keep your rotation steady and relaxed.
- Use fewer colors at first so you can focus on heat control.
- Practice making matching pairs if you want beads for earrings.
- Write down what worked, including torch settings, glass type, and cooling method.
- Learn how different colors behave. Some are stiff, some move quickly, and some act like divas under heat.
Why Glass Beadmaking Is So Addictive
Glass beadmaking gives you instant drama and delayed satisfaction. At the torch, everything is alive: the glass glows, the shape shifts, the bead starts to form in seconds. Then later, after annealing and cleaning, you get the quieter reward of holding a finished object that came from heat, timing, and skill.
It’s part craft, part science, part patience training. You learn to read viscosity, color response, flame placement, and cooling behavior. And every bead teaches you something. A cracked bead teaches you about cooling. A lopsided bead teaches you about rotation. A gorgeous bead teaches you not to act too smug because the next one may look like a boiled jellybean.
Experience: What It Really Feels Like to Make Your Own Glass Beads from Scratch
The first time you sit in front of a torch to make a glass bead, the experience is equal parts exciting and humbling. You think, “How hard can one bead be?” Then the glass starts glowing, gravity enters the chat, and suddenly your bead has the silhouette of a tiny potato with opinions. That is normal. In fact, it’s practically a rite of passage.
What surprises most beginners is how physical the process feels. You are not just “crafting.” You are coordinating your eyes, hands, shoulders, breath, timing, and temperature control all at once. You are watching the glass soften while keeping the mandrel moving. You are making dozens of tiny decisions in real time: hotter or cooler, closer or farther, add more glass or shape what is already there, melt the dots in or leave them raised. It feels like learning a musical instrument that occasionally glows orange.
There is also a very specific emotional arc that happens at the torch. First comes confidence. Then comes confusion. Then comes the moment where you think you have ruined everything. Then, if you keep rotating and stay calm, the bead often pulls itself back together. That little rescue is addictive. It teaches you that glass rewards patience more than force.
Another big lesson is that every color has a personality. Some colors melt like butter. Some stay stubbornly firm. Some look muddy in the flame and magically brighten after cooling. Some react badly if you overheat them. You begin to understand that beadmaking is not just about shape; it’s about behavior. The more time you spend with the material, the more you can predict how it will move, and the more intentional your designs become.
Then there’s the cooling phase, which feels strangely ceremonial. You finish a bead that looks promising, place it in the kiln or blanket, and wait. You can’t really rush this part. Glass insists on its own timeline. Later, when you clean the bead and finally slide it off the mandrel, that first good reveal is ridiculously satisfying. The hole is open, the surface is glossy, and there it is: proof that you turned a simple rod of glass into something wearable.
Over time, your experience shifts. You stop fighting the process and start reading it. Your hands relax. Your beads become rounder, then more deliberate, then more expressive. You start noticing the difference between a bead that is merely finished and one that feels balanced, clean, and confident. That’s the moment beadmaking becomes more than a hobby. It becomes a language.
And perhaps the best part is this: even after you improve, the process never becomes boring. There is always a new shape, a new color combination, a new decorative trick, a new technical challenge. One day you’re trying to make evenly spaced dots. The next day you’re experimenting with twisted stringers or encased designs and feeling like a tiny wizard with safety glasses.
So yes, making your own glass beads from scratch takes equipment, practice, and patience. It also gives you something rare: a craft that is deeply technical and deeply joyful at the same time. Few things beat the moment when a finished bead catches the light and you realize that the shimmer, the color, the shape, and even the little imperfections are yours. That’s not just beadmaking. That’s art with a pulse.
Final Thoughts
If you want to make your own glass beads from scratch, start with the real beginner path: compatible glass rods, proper safety gear, a well-planned torch setup, and a strong respect for heat and annealing. Learn the fundamentals first. Master round beads. Understand compatibility. Pay attention to cooling. Then build from there.
The beauty of homemade glass beads is not that they come out machine-perfect. It’s that each one carries the evidence of the maker: your heat control, your color choices, your hand rhythm, your patience. Even your imperfect early beads matter, because they are the foundation of the beautiful ones you’ll make next.
In other words, yes, you can make your own glass beads at home. And once you do, there is a very real chance you’ll start looking at every plain bracelet and thinking, “This could use my fire magic.”


