Table of Contents >> Show >> Hide
- What You’ll Learn
- Before You Start: Tools, Mulch Types, and the #1 Rule
- Step 1: Mark Your Mulch Ring (Size Matters)
- Step 2: Clear Grass and Weeds (Without Hurting Roots)
- Step 3: Add Mulch the Right Way (Donut, Not Volcano)
- Step 4: Finish the Edges, Water In, and Plan Maintenance
- Mulch Math: How Much Mulch Do You Need?
- Common Mulching Mistakes (And How to Fix Them)
- Mini Checklist: What “Correct Mulching” Looks Like
- FAQ: Quick Answers for Real Yards
- Experiences Related to Mulching Around Trees (What People Learn After Step 4)
- Conclusion
Mulch is one of those yard upgrades that looks decorative, feels satisfying, and quietly does the most for your treelike a good friend who brings snacks and never asks for gas money. Done right, mulching around trees helps conserve moisture, soften temperature swings, reduce lawnmower “oops” moments, and suppress weeds. Done wrong (hello, mulch volcano), it can trap moisture against bark, invite pests, and stress the tree.
This guide walks you through how to mulch around a tree in 4 easy steps, with picture ideas you can copy for your own yard. You’ll also get quick “mulch math” (so you don’t buy 37 bags when you needed 7) and a maintenance plan that keeps your mulch ring looking crisp all year.
Before You Start: Tools, Mulch Types, and the #1 Rule
The #1 rule (tattoo it on your rake)
Keep mulch off the trunk. A proper mulch ring looks like a donut: mulch around the tree, with a clear gap near the bark and the root flare. When mulch is piled up against the trunk, it can hold moisture where it doesn’t belong and create conditions for decay, pests, and girdling roots.
Tools you’ll want nearby
- Work gloves
- Rake (garden rake or bow rake)
- Hand trowel (for careful digging near roots)
- Edging tool or flat spade (optional, for sharp borders)
- Tape measure or a length of string (to keep your ring circular)
- Wheelbarrow or tarp (for moving mulch)
- Hose/watering can
Choosing the best mulch for trees
For most home landscapes, organic mulch is the sweet spot because it breaks down slowly and improves soil over time. Popular choices:
- Wood chips (arborist chips): great for moisture control; long-lasting; looks natural.
- Shredded bark: tidy look, stays in place better on slopes.
- Leaf mulch: excellent for soil health; best in beds or low-wind areas.
- Compost: more of a soil amendment than a “mulch”; use thinly and consider topping with wood chips.
Avoid piling heavy, heat-holding materials (like rock) right over the root zone unless you have a specific landscape design reason and you understand the tradeoffs. For most trees, organic mulch is easier on roots and easier to maintain.

Step 1: Mark Your Mulch Ring (Size Matters)
A mulch ring works best when it’s wide, not tall. Wider mulch means less competition from turfgrass, fewer weeds, and less chance your mower “accidentally” kisses the trunk.
How wide should the ring be?
- Newly planted trees: aim for a ring about 3–4 feet wide (or wider if you can).
- Established trees: go as wide as practicalmany tree-care recommendations suggest extending mulch outward toward the canopy dripline when possible.
- Simple beginner rule: start with at least a 3-foot diameter ring for small trees, and expand over time.
Easy way to mark a circle
- Push a small stake (or screwdriver) into the ground a few inches from the trunk (not touching it).
- Tie a string to the stake and measure your desired radius (for example, 18 inches to start, or 3 feet for a bigger ring).
- Walk the string in a circle and sprinkle a light line of mulch/soil to “draw” the border.

Step 2: Clear Grass and Weeds (Without Hurting Roots)
Grass is a surprisingly intense competitor. It steals water and nutrients and makes tree care harder. Clearing turf inside your ring helps your mulch do its job.
Choose your method
- Gentle dig-out (best for small rings): Use a flat spade to lift sod in thin sections. Stay shallowtree roots often sit close to the surface.
- Sheet mulching (low effort, great for expanding rings): Lay down plain cardboard (no glossy ink), overlap edges, then mulch on top. Cardboard breaks down over time and suppresses grass.
- Hand weeding: Works if you’re dealing with a few weeds, not a full turf invasion.
What to avoid
- Deep chopping near the trunktree roots can be shallow and easy to damage.
- Plastic sheeting under mulchit can interfere with air and water movement.
- “Perfectly sealed” weed barriers under organic mulchorganic mulch decomposes and creates a layer where weeds can still germinate. Maintenance becomes harder, not easier.

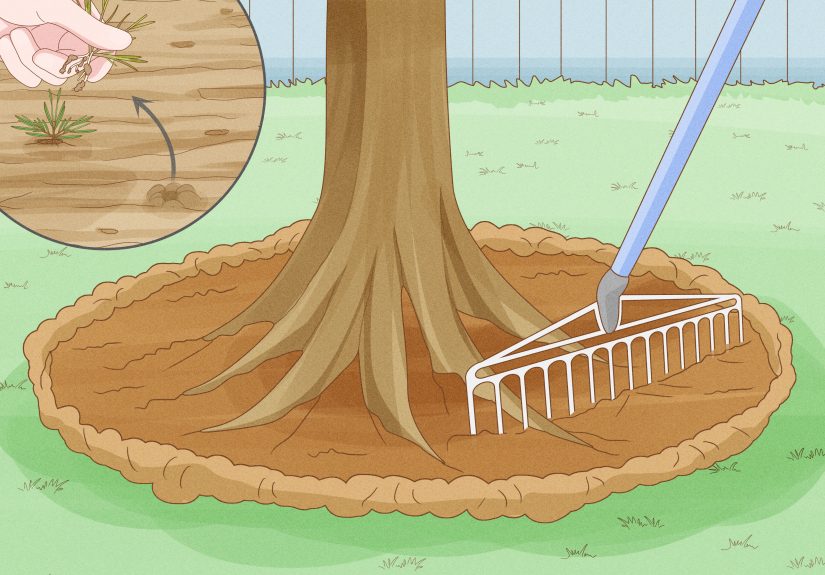
Step 3: Add Mulch the Right Way (Donut, Not Volcano)
This is the moment where yards everywhere either become tree-friendly or accidentally invent a tiny bark mountain. Your goal is a uniform layer of mulch, spread wide, with a clear gap at the trunk.
How deep should mulch be?
A common recommendation for mulching around trees is about 2–4 inches deep (often closer to 2–3 inches for many situations), spread evenly. Deeper isn’t “extra helpful”it can reduce oxygen reaching the root zone and encourage roots to grow into mulch instead of soil.
How far from the trunk should mulch be?
Leave a visible gapthink 2–6 inches of “breathing room” (or more on larger trees). You want the trunk and root flare visible. The mulch should never touch the bark.
How to spread mulch (the clean way)
- Dump mulch in small piles around the ring (not right at the trunk).
- Use a rake to spread it evenly to your target depth.
- Pull mulch back from the trunk to form the donut hole.
- Check depth with your hand: 2–4 inches is roughly “a couple finger joints” to “about the heel of your hand,” depending on hand size.

Pro tip: keep the root flare visible
If the trunk looks like a straight telephone pole going into the ground, the root flare may be buried (by soil, mulch, or both). Gently pull mulch back until you see the trunk widen and the first big roots begin. That flare wants fresh airnot a bark blanket.
Step 4: Finish the Edges, Water In, and Plan Maintenance
Option A: Natural edge (easy and tree-friendly)
Simply taper the mulch down at the edge of the ring. This looks natural and helps prevent mulch from drifting into the lawn.
Option B: Crisp edge (photo-ready)
- Use an edging tool or flat spade to cut a shallow trench along your marked border (about 2–4 inches deep).
- Push soil outward (away from the trunk) and then spread mulch up to that edge.
- Keep the interior flatdon’t slope mulch upward toward the trunk.

Water it in
After mulching, water the ring to settle dust, help moisture reach the soil, and reduce the chance mulch blows away in the next dramatic wind event. Mulch helps soil hold moisture longer, but new trees (and hot summers) still need consistent watering.
Maintenance schedule (simple and realistic)
- Monthly (growing season): Pull mulch back if it creeps toward the trunk. Fluff matted spots with a rake.
- 1–2 times per year: Top up mulch to maintain the 2–4 inch depth (don’t stack year after year without checking depth).
- After storms: Rake mulch back into place if it washes out.
Mulch Math: How Much Mulch Do You Need?
Estimating mulch is easy when you think in area × depth. Here’s a quick way to avoid the classic mistake of buying either: (A) not enough, or (B) enough to mulch your neighborhood’s emotional baggage.
Fast estimate (good enough for most yards)
- Measure the radius of your ring (distance from trunk to edge), in feet.
- Estimate area using a circle: Area ≈ 3.14 × radius².
- Convert depth to feet (3 inches = 0.25 ft; 2 inches ≈ 0.17 ft; 4 inches ≈ 0.33 ft).
- Volume (cubic feet) = area × depth.
- Cubic yards = cubic feet ÷ 27.
Example
You want a ring with a 3-foot radius (6 feet across) at 3 inches deep.
- Area ≈ 3.14 × 3² = 3.14 × 9 ≈ 28.3 sq ft
- Depth = 3 inches = 0.25 ft
- Volume ≈ 28.3 × 0.25 ≈ 7.1 cubic feet
- In cubic yards: 7.1 ÷ 27 ≈ 0.26 cubic yards
Bag check: many bagged mulches are sold in 2-cubic-foot bags. That example ring would need about 4 bags (round up a bit for settling).
Common Mulching Mistakes (And How to Fix Them)
1) Mulch volcanoes
If your mulch looks like a cone leaning on the trunk, pull it back immediately. The trunk should be dry, visible, and able to “breathe.” Rebuild the ring flat and wide.
2) Too deep, too often
“Refreshing mulch” shouldn’t mean adding a new layer every year without checking what’s already there. If the ring is already 4+ inches deep, rake it out and redistribute rather than piling more on top.
3) Mulch touching bark (even “just a little”)
Mulch drifts. Wind, rain, enthusiastic pets, and your own raking can slowly push it toward the trunk. Make it a habit: when you walk by, pull it back. Two seconds now can prevent stress later.
4) Edging too aggressively
Cutting deep trenches or chopping into roots can hurt the tree more than weeds ever could. Keep edging shallow and avoid digging aggressively near the base.
5) Relying on landscape fabric under organic mulch
Weed barrier sounds like a dream, but under organic mulch it often becomes a messy, root-tangled, weed-growing layer over time. If your goal is to smother grass while expanding the ring, cardboard can be a simpler, more temporary approach that breaks down naturally.
Mini Checklist: What “Correct Mulching” Looks Like
- Shape: Donut (wide ring), not volcano (tall mound).
- Depth: Even layer, usually around 2–4 inches.
- Trunk gap: Mulch never touches bark; root flare stays visible.
- Width: As wide as practical (especially for young trees), expanding over time.
- Maintenance: Pull back drifted mulch; top up only when needed.
FAQ: Quick Answers for Real Yards
Should I mulch a mature tree the same way as a new tree?
The rules are the samewide ring, shallow depth, keep it off the trunk. The main difference is scale: with mature trees, you may not mulch all the way to the dripline, but the wider you can go (without burying roots or changing grade), the better.
Can I use grass clippings as mulch around a tree?
You can, but use them carefully. Clippings can mat down, smell, and block airflow if applied thickly. If you use them, apply a very thin layer and mix with a coarser mulch (like wood chips) rather than making a dense blanket.
Do I need to remove old mulch before adding new mulch?
Not always. First, check depth. If you’re already at the right depth, rake and fluff the existing mulch to refresh the look. If it’s too deep, pull some out and redistribute; don’t keep stacking.
Is dyed mulch bad for trees?
Many dyed mulches are used without obvious issues in landscapes, but quality matters. If you choose dyed mulch, buy from reputable suppliers, avoid anything that smells strongly of chemicals, and still follow the same rules: keep it shallow and off the trunk. When in doubt, natural wood chips are a safe, tree-friendly choice.
Experiences Related to Mulching Around Trees (What People Learn After Step 4)
Once the mulch ring is down, people often expect the job to be “done.” In reality, the most useful lessons show up in the weeks that followusually right after the first heavy rain, the first heat wave, or the first time you catch yourself admiring your yard like it’s a magazine spread.
One common experience: mulch moves. Wind can nudge lightweight bark pieces, pets can kick chips into the lawn, and rain can wash mulch downhill on slopes. Homeowners who are happiest with the long-term look tend to do one small habit: when they pass the tree, they give the ring a quick “donut check”pull mulch back from the trunk and rake it level where it has drifted. It’s a 30-second tune-up that prevents the slow creep toward a volcano.
Another frequent surprise is how quickly the soil stays moist under a proper layer. People report watering less often (especially once the tree is established) because mulch slows evaporation. The flip side: if your yard already holds water or drains slowly, too-thick mulch can keep things overly damp. That’s why “more” isn’t always better. Folks with clay-heavy soils often find the sweet spot is a thinner, even layer that still blocks weeds without turning the root zone into a long-term wet sponge.
Then there’s the “what is that?” moment: fungus and mushrooms in the mulch. This is extremely common with wood-based mulches and is usually a sign the mulch is decomposingpart of the soil-building process. Most of the time, it’s harmless to the tree. People who panic and strip all the mulch away often end up re-buying mulch later, so the calmer approach is usually: rake lightly to break up matted areas, keep the trunk gap clear, and let the natural breakdown continue.
A practical lesson many learn the hard way: edging can be either your best friend or your worst enemy. A crisp edge looks amazing in photos and helps keep mulch contained, but aggressive digging can nick shallow rootsespecially near older trees. The gardeners who keep both good looks and good tree health tend to use shallow edging, then rely on maintenance (a light raking and occasional touch-up) instead of re-cutting deep trenches every season.
Finally, people often notice that mulching changes how they use the space around a tree. With grass removed, the ring becomes a small “no-mow zone,” which lowers the risk of trunk damage from mowers and string trimmers. Over time, many homeowners expand the ring and turn it into a mini bedadding spring bulbs, shade-tolerant perennials, or groundcovers at the outer edge (not right at the trunk). The best results usually come from keeping the inner donut area simple and breathable while treating the outer ring as the “design space.” In other words: protect the tree first, decorate second. Your tree will thank youquietly, by not dying.


