Table of Contents >> Show >> Hide
- Before You Start: The 60-Second Container Garden Checklist
- Step 1: Pick the Right Containers (and Put Them in the Right Spot)
- Step 2: Use Potting Mix (Not Garden Soil), and Set Up Smart Drainage
- Step 3: Choose Plants That Will Thrive Together
- Step 4: Plant Your Container Garden the Right Way
- Step 5: Water and Fertilize Like You Mean It (But Don’t Overthink It)
- Step 6: Maintain, Troubleshoot, and Keep Things Looking Great
- Real-Life Container Gardening Experience (500+ Words of Lessons, Mistakes, and Tiny Victories)
- Conclusion: Your 6-Step Container Garden Plan (Quick Recap)
Want a garden but don’t have a yard? Or maybe you do have a yard, but you’re not trying to start a lifelong
relationship with weeds. Welcome to container gardeningthe low-commitment, high-reward way to grow flowers, herbs,
and even vegetables in pots, planters, buckets, and anything else that can hold soil (and doesn’t roll away in the wind).
A container garden is basically “gardening with a steering wheel.” You can move it to chase the sun, dodge a storm,
or hide it from the neighborhood deer who treat your petunias like a salad bar. The trade-off? Containers dry out
faster and need a little more attention than in-ground beds. Don’t worrythis guide makes it simple, and yes,
you’ll still get brag-worthy results.
Before You Start: The 60-Second Container Garden Checklist
- Container with drainage holes (non-negotiable)
- Quality potting mix (not yard dirtmore on this soon)
- Plants matched to light (sun lovers in sun, shade lovers in shade)
- Watering plan (a simple routine beats “panic watering”)
- Fertilizer plan (containers run out of nutrients faster)
Step 1: Pick the Right Containers (and Put Them in the Right Spot)
Choose a container that fits your plants’ future, not just their current mood
Tiny starter plants have a way of looking innocent. Then a month later, your “cute little tomato” becomes a leafy
teenager that drinks water like it just discovered sports practice.
Size matters because bigger containers hold more potting mix, which holds more moisture and gives roots more room.
That usually means healthier plants and less frequent watering. As a practical starting point:
- Herbs, lettuce, radishes: small pots and window boxes can work well
- Carrots, beets, green onions: medium containers (deep enough for roots)
- Tomatoes, peppers, eggplant, cucumbers: large containersoften 5-gallon size or bigger
Drainage: the “please don’t drown me” feature
Your container must have drainage holes so excess water can escape. If your dream pot doesn’t have holes, you have
three choices: drill holes, use it as a decorative outer pot (with a real pot inside), or repurpose it as a storage bin.
Plants prefer not to live in a swamp.
Match the location to light
Most flowering annuals and fruiting vegetables want full sun (around 6–8+ hours). Leafy greens and
many herbs can handle partial sun. Shade plants (like some ferns and begonias) want bright, indirect light.
Watch your space for a day and note where the sun actually landsyour “sunny patio” might be sunny for exactly 47 minutes.
Bonus: think about heat, wind, and how far the hose is
Containers in full sun on concrete can heat up fast, which stresses roots. Wind can tip tall pots and dry plants out quickly.
Also, if watering your plants requires a 12-minute hike, you will mysteriously “forget” to water them. Put containers where
care is easy.
Step 2: Use Potting Mix (Not Garden Soil), and Set Up Smart Drainage
Why you should not scoop soil from your yard
Garden soil is great in the ground, but in containers it often compacts, drains poorly, and can suffocate roots. Potting mix
is formulated to stay fluffy and drain well in a pot. It’s the difference between a breathable pillow and a wet brick.
What to look for in a potting mix
A good mix typically includes ingredients that balance moisture retention and airflowoften things like compost, bark fines,
coconut coir or peat alternatives, and perlite/vermiculite. If you’re growing edibles, you can choose a mix labeled for
vegetables or raised beds (as long as it’s designed for containers and stays well-aerated).
Skip the rocks-at-the-bottom “hack”
You’ve probably heard the advice to add rocks, gravel, or broken pottery to the bottom of pots for drainage. It sounds logical,
but in most containers it doesn’t improve drainage and can even keep water sitting higher in the pot. Plus, it steals root space.
Instead, focus on having drainage holes and using a quality potting mix.
Keep soil from escaping without blocking water
If you’re worried about potting mix washing out, place a small piece of mesh screen, a coffee filter, or a bit of landscape fabric
over the holes. The goal is “hold soil, let water pass,” not “plug the hole like it owes you money.”
Step 3: Choose Plants That Will Thrive Together
Start with the “right plant, right place” rule
The easiest container garden is one where every plant wants the same thing:
similar light, similar watering needs, and similar temperature preferences.
If you mix a drought-loving succulent with a thirsty basil, one of them will be miserableand plants are terrible at hiding it.
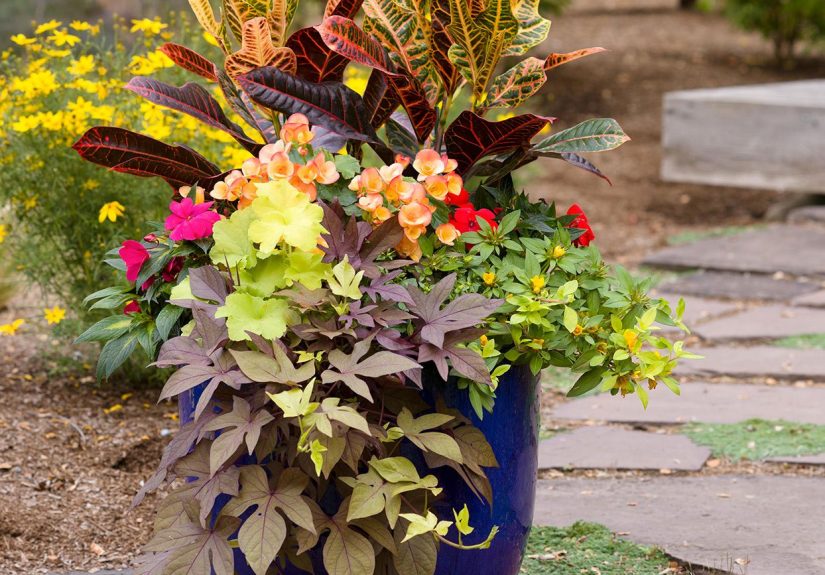
Use the thriller–filler–spiller formula (for ornamentals)
If you want a container that looks professionally designed, use:
- Thriller: a tall focal plant (ornamental grass, dracaena, tall salvia)
- Filler: bushy plants that add volume (petunias, coleus, calibrachoa)
- Spiller: trailing plants that soften edges (sweet potato vine, bacopa, creeping jenny)
Edible container combos that actually make sense
Try one of these easy pairings:
- Salad bowl pot: leaf lettuce + arugula + green onions (cool-season friendly)
- Pizza herbs pot: basil + oregano + thyme (sun-loving and not too dramatic)
- Patio pepper party: one pepper plant + low-growing basil around the edge
Want tomatoes? Give them their own big container. Tomatoes are like the lead singer in a band: talented, demanding, and they need space.
Step 4: Plant Your Container Garden the Right Way
1) Prep the pot
- Confirm drainage holes are open.
- If using a saucer, make sure the pot isn’t sitting in standing water long-term.
- Optional: add pot feet or elevate slightly for better drainage and airflow.
2) Add potting mix (but don’t pack it down like you’re stuffing a suitcase)
Fill the container about two-thirds full with potting mix. Lightly tap the pot to settle it, but avoid compacting.
Roots need air as much as they need water.
3) Arrange plants before planting
Do a quick “dry fit” by placing plants (still in their nursery pots) on top of the mix. Step back and check spacing.
This prevents the classic mistake of planting everything… then realizing your tallest plant blocks everyone else like a bodyguard.
4) Plant at the correct depth
Remove each plant gently. If roots are circling the pot, tease them loose a bit. Plant so the top of the root ball sits at about the same level
it was growing before (with a little space below the rim for watering). Then backfill and firm lightly.
5) Water thoroughly to settle everything in
Water until you see water flow out the bottom. This helps eliminate dry pockets in the mix and gives roots immediate contact with moisture.
If the potting mix shrinks and sinks a bit after the first watering, top it off.
6) Add supports early (especially for vegetables)
If you’re growing tomatoes, pole beans, cucumbers, or anything that climbs or flops, install cages or stakes now.
Adding them later can damage rootsand you’ll feel like you’re playing “Operation,” except the patient is a plant.
Step 5: Water and Fertilize Like You Mean It (But Don’t Overthink It)
Watering: the finger test beats guessing
Containers can dry out quickly, especially in summer heat or windy spots. A simple rule:
stick your finger a couple inches into the potting mix. If it feels dry, water. If it’s moist, wait.
How to water correctly
- Water deeply: go until water drains out the bottom.
- Water at the base: wetting leaves can encourage disease in some plants.
- Expect to water more in heat: full-sun containers may need daily watering during hot stretches.
Avoid frequent “sips” of water. Light watering encourages shallow roots and can concentrate salts near the surface.
Deep watering trains roots to explore the full container.
Fertilizer: containers don’t have an endless buffet
Unlike garden beds, containers have a limited amount of nutrients, and watering can leach nutrients out over time.
You have two beginner-friendly options:
- Slow-release fertilizer: mixed in at planting or applied as granules; feeds over weeks.
- Water-soluble fertilizer: mixed with water and applied on a schedule (often every 1–3 weeks for many plants).
If your potting mix contains slow-release fertilizer, you may not need to start supplemental feeding right away.
Many gardeners begin regular fertilizing a few weeks after planting, then adjust based on plant growth and color.
If leaves look pale or growth slows (and watering is consistent), your container may be asking for lunch.
A quick, practical feeding example (no PhD required)
For a mixed container of annual flowers or herbs:
- Use a slow-release fertilizer at planting or begin water-soluble feeding after a few weeks.
- Apply liquid fertilizer according to label directions, typically every couple of weeks during active growth.
- If it’s very hot and you’re watering daily, nutrients can wash out fasterso consistency matters.
Step 6: Maintain, Troubleshoot, and Keep Things Looking Great
Daily (or near-daily) habits that make a huge difference
- Check moisture: especially during hot or windy weather.
- Rotate containers: if one side always faces the sun, rotate weekly for even growth.
- Remove spent blooms: deadheading encourages many flowers to keep blooming.
- Harvest edibles often: leafy greens and herbs get bushier when you harvest regularly.
Common container garden problems (and what they usually mean)
- Wilting at midday but perky in evening: heat stress; check soil moisture and consider afternoon shade.
- Constant wilting: likely underwatering, root-bound plant, or too-small container.
- Yellow leaves: can be overwatering, poor drainage, or nutrient deficiencycheck moisture first.
- White crust on soil: fertilizer salts; flush the pot with water occasionally and avoid over-fertilizing.
- Slow growth: not enough sun, not enough nutrients, or cold temps.
Weather protection: containers are exposed
Pots heat up and cool down faster than the ground. During extreme heat, consider:
moving containers to morning sun/afternoon shade, grouping pots to reduce evaporation, and mulching the surface with
shredded bark or straw (especially for veggies). During cool nights or unexpected frost, pull pots closer to the house
or cover plants temporarily.
Keep it simple, keep it enjoyable
The best container garden is the one you’ll actually take care of. Start with a few containers, learn what your space does
(sun, shade, wind), then scale up once you’ve got the routine. Nobody wins an award for “Most Pots Purchased in April.”
Real-Life Container Gardening Experience (500+ Words of Lessons, Mistakes, and Tiny Victories)
The first time I planted a container garden, I made two classic beginner moves: (1) I picked a container because it was cute,
and (2) I assumed plants could “figure it out.” Spoiler: plants do not figure it out. They communicate exclusively through
wilting, yellowing, and silent judgment.
Here’s what experience teaches you fast: containers are a microclimate. Two pots sitting three feet apart can behave
completely differentlyone bakes in reflected heat off a wall, the other stays cooler near a railing, and the wind hits one like a
hair dryer. Once you accept that, you stop asking, “Why is this plant unhappy?” and start asking, “What is this pot experiencing
all day long?” That’s a game-changer.
My biggest upgrade was learning to treat watering like a skill, not a mood. Early on, I watered whenever I remembered, which usually
happened right after I saw drooping leaves and felt guilty. That led to chaotic cycles: bone-dry soil, emergency watering, then
accidental overwatering because I didn’t trust myself. The fix was laughably simple: I started using the finger test every morning for
a week. Not foreverjust long enough to understand how fast each pot dried out. After that, I could glance at the weather and know,
“Yep, the basil will need water tonight,” or “Nope, the shaded fern is still fine.”
The second big lesson: container size is kindness. I used to think smaller pots were easier. They’re not. Small pots dry out
faster, swing between wet and dry more dramatically, and stress plants sooner. A larger pot gives you a buffera little grace for the day
you forget to water, or the surprise hot afternoon that tries to turn your petunias into crispy confetti. When I moved my tomatoes into
bigger containers, everything got easier: fewer watering crises, sturdier plants, and fruit that actually ripened without me begging it.
Fertilizer was my “oops” chapter. The first year, I used fresh potting mix and assumed it contained magical nutrients that lasted forever.
Mid-summer, my flowers looked tired and my herbs stopped growing like they’d entered a silent protest. Once I added a consistent feeding
routine, the turnaround was obvious. Container plants are like people on a road trip: they don’t need a huge meal every hour, but they do
need snacks on schedule. Also, I learned the hard way to avoid fertilizing totally dry soildoing that can stress roots. Now I water first
(or fertilize during a normal watering), and the plants respond way better.
Finally, I discovered the joy of designing containers around real life. If you cook a lot, a “kitchen herb pot” near the door is more useful
than a complicated flower arrangement you only admire from inside. If your summers are brutally hot, part-shade greens and heat-tolerant herbs
will outperform anything that needs cool, gentle mornings. The best container gardens aren’t the fanciestthey’re the ones that match your
habits, your climate, and the amount of attention you can realistically give. In other words: build a garden that fits you, not a catalog photo.
Once you get the hang of it, container gardening becomes addicting in the best way. One pot turns into three. Three pots turn into a “small
experiment” with peppers. Suddenly you’re telling friends, “Oh, this? It’s my patio harvest.” And honestly? You’ve earned that.
Conclusion: Your 6-Step Container Garden Plan (Quick Recap)
- Pick containers and a good spot (sun, wind, access to water, and drainage holes).
- Use quality potting mix (not garden soil) and skip the rocks-at-the-bottom myth.
- Choose compatible plants with similar light and water needs.
- Plant correctly (right depth, good spacing, water in well, add supports early).
- Water and fertilize consistently (deep watering + a realistic feeding routine).
- Maintain and troubleshoot (rotate, deadhead, harvest, and protect from extremes).
Start small, learn your space, and build from there. Your future self will thank youand your plants will stop yelling in wilt.


