Table of Contents >> Show >> Hide
- Before You Start: A Quick Safety Checklist (Yes, It Matters)
- Choose Your Wax-Removal Method (Based on Your Jar Situation)
- Method 1: The Freezer Trick (Low Mess, High Satisfaction)
- Method 2: The Hot Water Float (Great for Stubborn Bottom Wax)
- Method 3: The Low-Oven Batch Clean (When You Have a Candle Jar Army)
- Method 4: The Double-Boiler “Water Bath” (Gentle Heat, Lower Crack Risk)
- Method 5: Hair Dryer or Heat Gun (For Stubborn Side Wax and Thin Residue)
- How to Remove the Wick Tab and Clean the Jar Like You Mean It
- What to Do With Leftover Wax (Don’t Waste the Good Stuff)
- How to Upcycle Candle Jars (Ideas That Look Cute on Purpose)
- 1) Bathroom organization that doesn’t scream “college dorm”
- 2) Desk and craft station organizers
- 3) A propagation jar for plant cuttings
- 4) Mini planter or succulent home (with one important tweak)
- 5) Vanity “catch-all” jars
- 6) Kitchen helpers (non-food or low-risk uses)
- 7) DIY “lantern” or fairy light holder
- 8) Reed diffuser container (a real upcycle flex)
- 9) Giftable jars (because wrapping is hard)
- Bonus: Removing Labels and Sticky Residue (Without Losing Your Mind)
- Troubleshooting: Common Problems (and the Fixes)
- Real-World “Been There” Experiences and Lessons (500+ Words)
- Conclusion
The candle is gone. The jar is cute. And the last half-inch of wax at the bottom is clinging like it pays rent.
If you’ve ever stared into an “empty” candle vessel thinking, I could totally reuse thisand then immediately
remembered the wick tab, the soot smudges, and the stubborn wax ringwelcome. You’re in the right place.
This guide walks you through safe, realistic ways to remove candle wax from glass jars (without cracking the jar,
clogging your sink, or inventing new swear words), then turns that clean container into something genuinely useful.
We’ll cover multiple wax-removal methods, how to clean fragrance and soot residue, what to do with leftover wax,
and a pile of upcycling ideas that look intentionalnot “I ran out of containers and desperation happened.”
Before You Start: A Quick Safety Checklist (Yes, It Matters)
- Stop burning early. Don’t burn candles down to the bitter glassy end. Leave a little wax (often around 1/2 inch) to prevent overheating and container damage.
- Avoid thermal shock. Don’t pour boiling water into a cold jar straight from the freezer or fridgeglass can crack.
- Don’t pour wax down the drain. Melted wax can cool inside plumbing and create a clog you’ll remember on your birthday.
- Watch the wick tab. Many candles have a small metal (or metal-look) wick sustainer at the bottom. Remove it after the wax is outdon’t microwave metal.
- Use protection. Oven mitts, a towel on the counter, and patience are your glamorous DIY accessories.
Choose Your Wax-Removal Method (Based on Your Jar Situation)
There’s no single “best” way to get wax out of a candle jar. The right method depends on:
how much wax is left, how many jars you’re cleaning, and whether the vessel is thick glass, thin glass,
decorative, painted, or has a narrow opening.
A simple decision guide
- One jar, small wax amount: Freezer method or hot water method.
- Multiple jars at once: Low-oven batch method.
- Delicate glass or “I don’t trust this jar”: Double-boiler (water bath) method.
- Stubborn wax stuck to sides: Hair dryer/heat gun for spot melting + wipe.
- Lots of fragrance residue/soot: Plan on dish soap + rubbing alcohol (or vinegar) cleanup afterward.
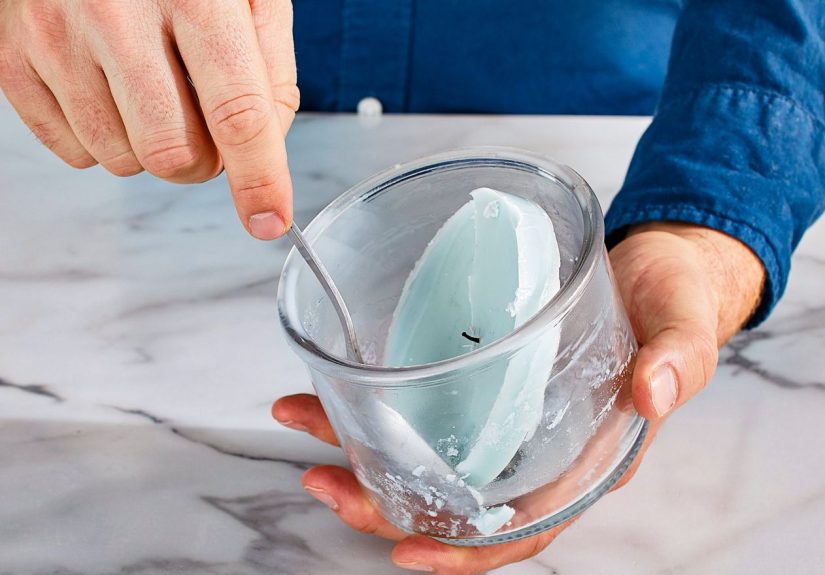
Method 1: The Freezer Trick (Low Mess, High Satisfaction)
Freezing makes wax contract and harden, which helps it separate from the glass. This is one of the cleanest methods
when you only have one or two jars and you don’t feel like playing “hot glass Olympics.”
Steps
- Let the jar cool completely (room temperature).
- Place it in the freezer for 1–3 hours.
- Remove and tap the jar gently upside down over a trash can. If the wax doesn’t fall out, use a butter knife or spoon to pry around the edgegently.
- Pop out the wax disk and remove any loose pieces.
- Wash the jar with warm, soapy water to remove residue.
Why it works (and when it doesn’t)
It works great on wax that’s thick enough to form a disk. If there’s just a thin smear, you might still need a quick
“heat and wipe” finish. Also: if your jar is narrow at the top, the wax disk may be wider than the opening and won’t
slide outuse a warm-water or gentle heating method instead.
Method 2: The Hot Water Float (Great for Stubborn Bottom Wax)
Hot water melts the wax so it floats to the top, where it cools into a removable wax “lid.” This is a favorite for jars
with thick wax at the bottomand for people who like solutions that involve standing there doing nothing.
Steps
- Place the jar on a folded towel or potholder (to protect your counter and cushion the glass).
- Heat water until very hot (near boiling). Don’t use cold jars.
- Pour hot water into the jar, leaving about 1 inch of space at the top.
- Wait 30–60 minutes as wax melts and rises. Let everything cool until the wax hardens on top.
- Lift off the wax layer and toss it in the trash (or save it for reuse).
- Wipe remaining residue with paper towel, then wash with dish soap.
Pro tips
- Don’t rush the cooling step. Trying to fish out soft wax turns your jar into a greasy science fair project.
- Never dump waxy water down the sink. Pour it into a disposable container or let it cool and discard.
Method 3: The Low-Oven Batch Clean (When You Have a Candle Jar Army)
If you’re cleaning multiple jars (or you bought candles like they’re canned goods), the oven method is efficient:
the wax melts and drains out of the jars at the same time.
Steps
- Heat the oven to a low temperature (around 200°F).
- Line a baking sheet with aluminum foil or parchment (foil is sturdier for wax).
- Place jars upside down on the sheet. If jars are tippy, nestle them slightly with crumpled foil “rings.”
- Warm for about 10–20 minutes, watching carefully.
- Remove the sheet using oven mitts. Let jars cool, then wipe and wash.
Important cautions
- Skip decorative or specialty finishes. Painted, cracked-glass, mercury-glass, or glued-on embellishments may not tolerate heat well.
- Ventilate. Warm fragrance + warm wax can smell intense. If you share walls with other humans, be kind.
Method 4: The Double-Boiler “Water Bath” (Gentle Heat, Lower Crack Risk)
This method uses indirect heat (simmering water around the jar) to gradually melt wax. It’s slower than the oven,
but it’s kinder to glassespecially if you’re nervous about temperature swings.
Steps
- Place a kitchen towel at the bottom of a pot (prevents the jar from rattling against the metal).
- Set the candle jar in the pot and add a few inches of water (not so high that it splashes into the jar).
- Simmer gently. As the wax melts, carefully pour it out into a disposable container.
- Repeat if needed, then wash the jar with soap and warm water.
Method 5: Hair Dryer or Heat Gun (For Stubborn Side Wax and Thin Residue)
This is the “precision tool” approach: apply heat where you need it, wipe, repeat. It’s ideal for that annoying wax
film that survives every other method like it’s training for a marathon.
Steps
- Place the jar on a protected surface (old towel or paper).
- Warm the wax gently with a hair dryer on low/medium (or a heat gun on a careful setting).
- Wipe softened wax with paper towel or a rag.
- Finish with warm soapy water and a final wipe with rubbing alcohol if needed.
How to Remove the Wick Tab and Clean the Jar Like You Mean It
Once wax is out, you’ll often find a wick sustainer (the metal-looking tab) stuck to the bottom.
Let the jar dry, then:
- Try a gentle pry: Use a spoon handle or a butter knife to lift the tab. Go slow so you don’t scratch or chip the glass.
- Soften the adhesive: If it’s stubborn, warm the jar slightly (hair dryer works) and try again.
- Remove leftover glue: Use warm soapy water first; if residue remains, a little rubbing alcohol can help cut it.
Cleaning soot and fragrance residue
Candle jars can hold onto soot and scent oils. For a truly clean finish:
- Wash with dish soap and hot water using a sponge or bottle brush for narrow jars.
- For stubborn grime: Sprinkle baking soda on a damp sponge and scrub gently.
- For lingering wax film: Wipe inside with rubbing alcohol on a paper towel.
- For soot smudges: Mild dish soap works; rubbing alcohol can help if soot is stubborn.
Can you use candle jars for food?
It depends. Some people reuse jars for dry goods, but fragrance oils can linger. If you plan to store food,
aim for unscented candles and deep-clean thoroughly. When in doubt, keep your upcycled jar in the “non-food” zone:
cotton rounds, pens, plant cuttings, spare change, or craft supplies.
What to Do With Leftover Wax (Don’t Waste the Good Stuff)
Wax you remove can be saved for small DIY projectsespecially if it’s clean and you separated out debris.
Here are a few realistic options:
- Wax melts: Melt and pour into silicone molds for a wax warmer (if you like the scent).
- “Franken-candle” votives: Combine similar scents and pour into a small heat-safe container with a new wick.
- Fire starters: Some people use wax with paper/cardboard or dryer lint for camping fire starters (store safely and use responsibly).
- Drawer sachet booster: A small wax piece in a breathable pouch can add scent to a drawer (again: only if you like the fragrance).
How to Upcycle Candle Jars (Ideas That Look Cute on Purpose)
1) Bathroom organization that doesn’t scream “college dorm”
- Cotton rounds and cotton balls
- Q-tips, floss picks, hair ties, bobby pins
- Makeup brushes (taller jars work best)
Style tip: Remove labels, then add a simple waterproof label or a minimal vinyl decal.
Suddenly it’s “apothecary chic” and not “I’m hoarding containers.”
2) Desk and craft station organizers
- Pens, markers, scissors
- Paper clips, push pins, binder clips
- Buttons, thread spools, beads, needles (add a pincushion lid if you’re fancy)
3) A propagation jar for plant cuttings
Clean glass + water + pothos cutting = instant “I have my life together” decor.
Wider-mouth jars make water changes easier, and clear glass lets you watch roots grow (which is weirdly satisfying).
4) Mini planter or succulent home (with one important tweak)
Many candle jars don’t have drainage holes. If you’re planting directly in the jar:
use a layer of small stones at the bottom and be conservative with watering.
Or, place a nursery pot inside the jar as a decorative sleevebest of both worlds.
5) Vanity “catch-all” jars
- Rings and earrings at night
- Loose change and keys by the door
- Travel-size items (so they stop rolling into the void)
6) Kitchen helpers (non-food or low-risk uses)
- Tea bags (if the jar is truly scent-free)
- Measuring spoons near the coffee station
- Salt cellar for finishing salt (only if fully cleaned and odor-free)
If the jar still smells like “Vanilla Cashmere Dreams,” it might not be your best salt-storage moment. Use it for
dish brushes or sponge pods instead.
7) DIY “lantern” or fairy light holder
Drop a short string of battery fairy lights into a clean jar for a cozy glow.
It’s an easy win for patios, bookshelves, or a bathroom shelf that needs a little sparkle.
8) Reed diffuser container (a real upcycle flex)
If you want the jar to keep doing fragrance duty, convert it into a reed diffuser container.
Use diffuser base oils designed for reeds, add fragrance, and insert reeds. The jar stays pretty and functional,
and you don’t have to light anything to enjoy it.
9) Giftable jars (because wrapping is hard)
Upcycled candle jars make charming gift containers for:
bath salts, sugar scrubs, homemade cookies (if scent-free), or even a small self-care kit.
Add a ribbon and pretend you planned it from the beginning.
Bonus: Removing Labels and Sticky Residue (Without Losing Your Mind)
Some candle brands use labels that peel cleanly. Others use adhesives that could survive a meteor strike.
Try this order:
- Soak the jar in hot, soapy water and peel off what you can.
- Use a baking soda + oil paste to rub off sticky residue (think “homemade goo remover”).
- For stubborn spots, an adhesive remover can helpthen wash thoroughly.
Troubleshooting: Common Problems (and the Fixes)
Problem: The wax won’t pop out after freezing
The wax layer may be too thin or stuck around the wick tab. Warm the jar slightly with a hair dryer and wipe,
or switch to hot water float method.
Problem: The jar still feels greasy
That’s usually fragrance oil or a thin wax film. Wash again with hot water and dish soap, then wipe with rubbing alcohol.
Problem: Soot smears everywhere
Use gentle cleaning first (soap and water), and avoid harsh scrubbing that spreads soot. A final wipe with rubbing alcohol
can help on glass once the bulk residue is gone.
Problem: The jar smells strongly even after washing
Some fragrance oils are clingy. Repeat a hot soapy wash, then let the jar air out for a day or two.
If the scent still won’t leave, embrace ituse the jar for non-food storage.
Real-World “Been There” Experiences and Lessons (500+ Words)
If you’ve never cleaned out a candle jar before, your first attempt can feel like a tiny home-improvement project that
somehow requires both patience and a towel you don’t care about. That’s normal. The most common experience people have is
assuming wax removal is a single-step processlike, “remove wax” is one action, like “open a door.” In reality, it’s usually
two phases: get the bulk wax out, then de-grease and de-smell the jar.
Phase one is where you learn what kind of person you are. Some people are freezer people: they love the clean “pop” of a wax disk
sliding out like a weird candle hockey puck. Others are hot-water people: they like seeing the wax float up, cool, and lift off in one
satisfying piece. And then there’s the batch-clean crowd, who look at three empty jars and think, “This is now an oven job.”
None of these approaches is morally superior, although freezer people do tend to talk about their method with the smug confidence
of someone who alphabetizes their spices.
The biggest “aha” moment tends to happen when you realize the jar is rarely the problemthe residue is.
Even after you remove visible wax, the inside can still feel slippery because of leftover fragrance oils.
That’s when dish soap becomes your best friend, and rubbing alcohol becomes your “fine, we’re doing this properly” finishing move.
It’s also when people discover the value of a bottle brush. Narrow-mouthed candle jars are cute until you’re trying to scrub the bottom
with two fingers and pure determination.
Another very relatable experience: label removal drama. Some labels peel off in one piece and you feel like the universe is smiling at you.
Other labels shred into tiny paper confetti and leave glue behind like a prank. This is where the baking soda and oil paste earns its reputation.
The first time you use it, you may doubt it will do anything (it looks like sad pancake batter), and thensurpriseyour fingers are suddenly
rolling adhesive into little gummy worms that you can wipe away. It’s gross, but also kind of… rewarding? Like power-washing videos, but for
sticky residue.
Upcycling is where the fun starts, and it often begins with a very specific moment: you place your newly cleaned jar on the counter, step back,
and think, “Okay, now what?” The easiest wins are the ones that solve daily annoyances. A jar of hair ties on the bathroom counter stops them from
migrating into every drawer. A jar by the door catches coins and keys instead of letting them multiply across surfaces. A desk jar for pens means your
best marker won’t disappear the second you need to label something. These are small changes, but they feel oddly satisfying because you’re turning
“trash” into something that actively improves your space.
The final lesson people mention again and again is this: not every jar has to become a masterpiece. It’s okay if one becomes a cotton-ball
holder and another becomes a propagation jar and a third becomes the official “random screws and tiny Allen keys” container. The point isn’t to create a
Pinterest museum; it’s to make your home a little more functional while keeping one more glass jar out of the trash. And if your jar ends up holding
paper clips while still faintly smelling like “Lavender Meadow Retreat,” honestly? That’s not a failure. That’s ambiance.
Conclusion
Removing wax from candle jars isn’t hardit just works better when you match the method to the situation.
Freeze for easy pop-out, hot water to float wax, oven for batches, a simmer bath for gentle melting, and a hair dryer for stubborn residue.
Clean the jar thoroughly, remove the wick tab, and finish with a degreasing step (soap plus a little rubbing alcohol if needed).
Then upcycle the jar into something you’ll actually usebathroom storage, desk organization, plant propagation, or a cozy little lantern.
The best part: every time you reuse a candle jar, you’re saving money, reducing waste, and upgrading your space with something that looks
intentionally curated (even if it began as a “what do I do with this?” moment over the sink).


