Table of Contents >> Show >> Hide
- Before You Start: Quick Safety + Reality Check
- Tools and Supplies Checklist
- Step 1: Confirm the Master Cylinder Is the Problem (and Not a Sneaky Cousin)
- Step 2: Prep the Vehicle and Minimize the Mess
- Step 3: Remove the Old Master Cylinder (Slow Is Smooth, Smooth Is Fast)
- Step 4: Bench Bleed the New Master Cylinder (Yes, You Really Have to)
- Step 5: Install the New Master Cylinder and Reconnect Everything
- Step 6: Bleed the Brake System and Verify a Firm Pedal
- Final Checks: Don’t Skip the “Prove It” Phase
- Troubleshooting: If the Pedal Still Feels Wrong
- FAQ
- Real-World DIY Experiences (The Kind You Only Learn by Doing)
- SEO Tags
Replacing a brake master cylinder sounds intimidating because it’s attached to the one system on your car that you really, truly want to keep “working exactly as designed.” But the job is absolutely doable for a careful DIYerwith one big caveat: if you cut corners, your brakes will snitch on you immediately (usually with a pedal that feels like stepping on a marshmallow).
This guide breaks the process into six clear steps, with practical tips, common “oops” moments to avoid, and a few sanity checks along the way. You’ll also learn why bench bleeding isn’t optional, how to keep brake fluid from redecorating your paint, and what to do if your ABS system decides it needs “special attention.”
Before You Start: Quick Safety + Reality Check
- Brakes are safety-critical. If anything feels unclear, stop and use a factory service manual or have a pro finish the job.
- Brake fluid eats paint. Cover your fenders, keep water nearby, and wipe spills immediately.
- Use the correct brake fluid. Check your owner’s manual cap/label (DOT 3, DOT 4, etc.). Don’t improvise here.
- Expect bleeding time. The install is often quick; removing all air afterward is where patience gets tested.
Tools and Supplies Checklist
- New master cylinder (correct fitment for your vehicle)
- Fresh brake fluid (correct DOT rating)
- Bench-bleed kit (often included; if not, buy one)
- Line wrench / flare-nut wrench set (highly recommended)
- Ratchet + sockets, extensions
- Turkey baster/suction pump (to remove old fluid from reservoir)
- Catch bottle + clear hose for bleeding
- Brake cleaner, shop towels, nitrile gloves, safety glasses
- Fender cover or thick towels/plastic sheeting
- Torque wrench (ideal)
- Optional but awesome: vacuum bleeder or pressure bleeder
- Optional: scan tool (some ABS systems require activation during bleeding)
Step 1: Confirm the Master Cylinder Is the Problem (and Not a Sneaky Cousin)
A master cylinder can fail externally (leaking) or internally (seals bypassing fluid), and both can feel like other brake issues. Before you replace it, do a few quick checks so you don’t throw parts at the car like confetti.
Common signs pointing to a failing master cylinder
- Pedal slowly sinks while holding steady pressure at a stoplight (especially with no visible external leaks).
- Spongy/soft pedal that doesn’t improve after proper bleeding and inspection.
- Brake fluid level drops or you see wetness around the master cylinder/booster area.
- Brake warning light triggered by low fluid or pressure imbalance (varies by vehicle).
Rule out the usual suspects
Inspect calipers/wheel cylinders, hoses, hard lines, and the proportioning/ABS unit for leaks. If you have a spongy pedal after pad/rotor work, air in the system is far more common than a sudden master-cylinder failure. That said, if the pedal sinks steadily, the master cylinder deserves serious suspicion.
Step 2: Prep the Vehicle and Minimize the Mess
Good prep turns this job from “brake fluid modern art” into a clean, controlled swap.
Do this first
- Park on level ground and set the parking brake.
- Protect paint around the master cylinder with towels/plastic. Brake fluid is ruthless.
- Clean the area around the reservoir cap and lines so dirt doesn’t fall into the system.
- Remove old fluid from the reservoir using a suction tool (leave a little so you don’t suck air through ports).
- Keep the cap and ports clean. Your brake system hates contamination more than your keyboard hates coffee.
Pro tip: Label the brake lines
Many vehicles have two lines going into the master cylinder (front/rear circuits). Mark them with tape so they go back exactly where they came from. Mixing them up can create braking imbalances or weird pedal behavior.
Step 3: Remove the Old Master Cylinder (Slow Is Smooth, Smooth Is Fast)
This is where a line wrench earns its keep. Brake line fittings can round off easily with an open-end wrenchthen you’re stuck making sad noises while ordering replacement lines.
Removal sequence that keeps you out of trouble
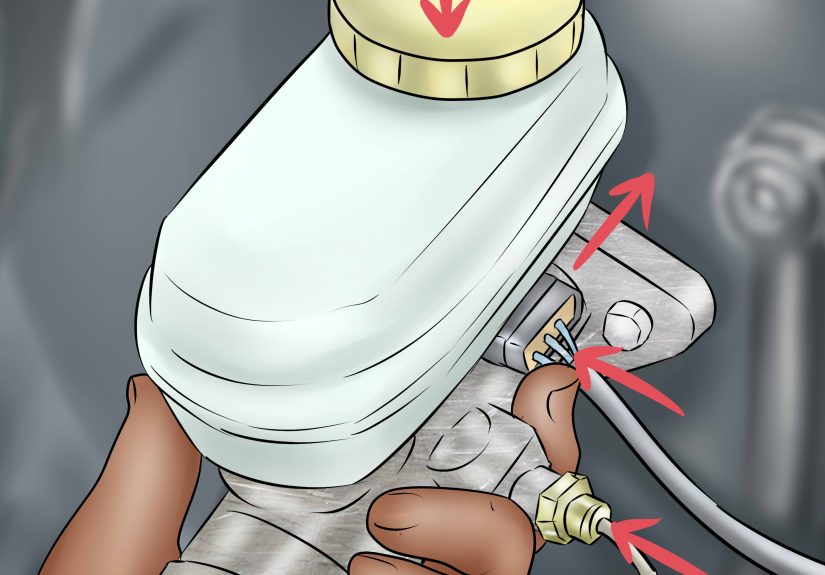
- Unplug electrical connectors (fluid level sensor, pressure sensor, etc.) if equipped.
- Crack the brake lines loose with a flare-nut wrench. Don’t fully remove them yetjust break them free.
- Remove the mounting nuts/bolts securing the master cylinder to the brake booster/firewall.
- Pull the master cylinder slightly forward and then remove the brake lines. Have towels ready to catch drips.
- Cap/plug the brake lines to reduce fluid loss and keep air/dirt out (rubber caps or clean plastic wrap + rubber band works in a pinch).
Inspect the brake booster area
If the rear seal has been leaking, you may see brake fluid where the master cylinder meets the booster. Clean it carefully. Persistent wetness can damage booster internals over time, so it’s worth checking before you bolt in the new part.
Step 4: Bench Bleed the New Master Cylinder (Yes, You Really Have to)
Bench bleeding removes trapped air inside the new master cylinder before it ever touches the car. Skipping it often leads to a long, frustrating bleeding session and a pedal that still feels wrong.
How to bench bleed (the simple, reliable way)
- Secure the master cylinder level in a vise (clamp by the mounting flange, not the bore).
- Install bench-bleed fittings into the outlet ports.
- Attach clear hoses and route them back into the reservoir openings so fluid returns into the chambers.
- Fill the reservoir with fresh brake fluid.
- Slowly stroke the piston using a screwdriver/rod. Use smooth, controlled pushesno speed runs. Watch bubbles travel up the hoses.
- Repeat until bubbles stop and each stroke feels firm and consistent.
- Keep the hoses submerged so you don’t suck air back in.
Bench-bleed reality: patience beats strength
A lot of DIYers accidentally “milkshake” the fluid by pumping too fast. That can aerate the brake fluid and create tiny bubbles that take forever to settle out. Slow strokes, brief pauses, and keeping everything level usually wins.
Step 5: Install the New Master Cylinder and Reconnect Everything
With the new unit bench-bled and ready, you’re basically doing the removal steps in reverseexcept now you’re trying not to introduce air. Think: careful, clean, and no cross-threading.
Installation steps
- Clean the mounting surface on the booster/firewall so the master cylinder sits flush.
- Position the new master cylinder onto the studs/bolt holes.
- Start mounting nuts/bolts by hand to avoid cross-threading, then snug them down evenly.
- Reconnect brake lines by hand first (critical). If they don’t thread smoothly, stop and realign. Once threaded, tighten with a line wrench.
- Reconnect electrical connectors and ensure harnesses are clipped away from heat/moving parts.
- Fill the reservoir to the proper level with fresh fluid.
Example: when line fittings don’t match perfectly
Some replacement master cylinders come with port adapters or slightly different seat styles. If a line doesn’t seat correctly, don’t force it. Compare the old and new parts carefully and use the correct adapter/fitting supplied for your specific application. A “tight enough” guess is not the vibe you want in your brake system.
Step 6: Bleed the Brake System and Verify a Firm Pedal
Once the master cylinder is installed, you still have air in the lines somewhere. Bleeding removes it so the system can build hydraulic pressure the way it was born to do: immediately and without drama.
Pick a bleeding method
- Two-person manual bleeding: classic and effective (one pumps/holds, one opens/closes bleeder).
- Gravity bleeding: slower but can help start flow with minimal equipment.
- Vacuum bleeding: fast and convenient; sometimes pulls air around threads if not sealed well.
- Pressure bleeding: very efficient; great for stubborn systems.
Typical wheel order
Many vehicles are bled from the wheel farthest from the master cylinder to the closest. However, layouts vary (especially with ABS units), so a factory service manual is the final boss here. If your calipers have two bleeders, you may need to bleed in a specified sequence.
Manual bleeding: step-by-step
- Top off the reservoir and keep it topped off during the entire process (never let it run dry).
- Attach clear hose to the bleeder screw and run it into a catch bottle.
- Pump the pedal slowly 3–5 times, then hold firm pressure.
- Open the bleeder briefly to let fluid/air out, then close it before the pedal hits the floor.
- Repeat until you see clean fluid with no bubbles, then move to the next wheel.
- Check pedal feel after each corner. A firm pedal should return as air leaves the system.
ABS note: some systems require extra steps
Many ABS-equipped vehicles bleed normally, but some require a scan tool to cycle ABS solenoids/pumps to remove trapped air. If you still have a spongy pedal after multiple correct bleeding rounds, check your service procedure for ABS bleeding requirements.
Final Checks: Don’t Skip the “Prove It” Phase
- Leak check: Look at every fitting and bleeder screw for wetness.
- Pedal test (engine off): Pedal should be firm and not slowly sink.
- Pedal test (engine on): Pedal may drop slightly with booster assist, but should still feel solid.
- Low-speed test drive: Start in an empty lot. Confirm smooth stops and no warning lights.
Troubleshooting: If the Pedal Still Feels Wrong
Spongy pedal
- Air still in system (bleed again; consider pressure bleeding)
- Bench bleeding wasn’t fully completed
- Bleeder order incorrect for your vehicle layout
- Flexible hose swelling (older hoses can balloon under pressure)
Pedal slowly sinks
- Internal leak in master cylinder (rare but possible even new)
- External leak somewhere else in the system
- ABS module or proportioning valve issue (vehicle-dependent)
Brake warning light stays on
- Low fluid level sensor unplugged or fluid still low
- Air causing pressure imbalance
- ABS codes stored (scan tool may be needed)
FAQ
Can I “bench bleed” on the vehicle?
Some people crack the lines at the master cylinder and gently work the pedal to purge air. It can work, but it’s messier, risks paint damage, and often takes longer. Bench bleeding on a workbench is usually cleaner and more reliable.
Do I need to replace the brake fluid when replacing the master cylinder?
It’s strongly recommended. Opening the system introduces moisture and contamination risk. Fresh fluid improves boiling point and braking consistency, especially if the old fluid is dark or has been in service a long time.
How long does the job take?
Removal and install can be 1–2 hours for many vehicles, but bleeding time varies wildly. Plan for extra time if ABS bleeding procedures are required.
Real-World DIY Experiences (The Kind You Only Learn by Doing)
If you read ten different “master cylinder replacement” stories, you’ll notice the same themes repeatingusually right after someone says, “This should be quick.” The job itself is straightforward, but the experience is all about controlling small variables: keeping air out, keeping fluid in, and keeping your patience intact.
One of the most common first-timer surprises is how stubborn tiny air bubbles can be. Plenty of DIYers bench bleed until they see “no bubbles,” install the cylinder, and then discover the pedal still feels slightly soft. Often, the culprit is micro-bubbles created by pumping too fast or letting the return hoses pop above the fluid line for just a second. The fix usually isn’t a new partit’s slowing down, letting the fluid settle, and repeating the bleed with calmer, smoother strokes. In brake work, “gentle and consistent” beats “fast and enthusiastic” every time.
Another frequent moment: the brake line fittings that refuse to start by hand. The temptation is realgrab the wrench and “help” it thread. But experienced DIYers will tell you that cross-threading a brake line is a one-way ticket to extra parts, extra time, and extra vocabulary. The best trick is to reposition the master cylinder slightly, get the fitting perfectly aligned, and thread it several turns by hand before ever applying a wrench. If it doesn’t go smoothly, it’s not “almost right.” It’s wrong.
Then there’s the paint situation. People know brake fluid can damage paint, but they underestimate how quickly it happensand how far a single drip can travel when it hits a dusty surface. A surprisingly effective hack is layering protection: towel + plastic sheet, and keeping a spray bottle of water handy for immediate cleanup. Many DIYers also learn to work with the reservoir cap on whenever possible, opening it only when adding fluid. Less open time means less moisture absorbed and fewer accidental splashes.
Bleeding also has its “human factors.” In the classic two-person method, communication matters more than muscle. If the person at the pedal releases before the bleeder screw is closed, you can pull air right back into the caliper. The teams that do well use simple commands: “Pump… hold… opening… closed… release.” It sounds goofy until you realize you’re running a tiny hydraulic air-evacuation choreography.
Finally, ABS can be the plot twist. Many cars bleed normally, but some trap air in the ABS hydraulic control unit and need a scan tool procedure. DIYers often discover this when they’ve bled each wheel twice, the pedal is still not right, and their optimism has started negotiating with reality. In those cases, the “experience” lesson is to look up the correct bleeding procedure for your exact vehicle before you beginso you don’t end the day with a perfectly installed master cylinder and an imperfect pedal.
The good news? When it’s done correctly, the payoff is immediate. A firm, predictable brake pedal feels like a victory lap you can press with your foot. And the next time someone says “bench bleeding is optional,” you’ll smile knowinglybecause you’ve met the bubbles, and you know their hobbies.


