Table of Contents >> Show >> Hide
- Why a Fireplace and Built In Bookshelves Are a Game-Changing Combo
- Step 1: Plan Your Fireplace Wall Like a Pro
- Step 2: Choose the Right Fireplace Type for Your Remodel
- Step 3: Don’t Skip Safety and Code Requirements
- Step 4: Build the Fireplace Wall and Frame the Built Ins
- Step 5: Design and Build the Bookshelves Around the Fireplace
- Step 6: Style the Shelves Without Making a Clutter Mountain
- Step 7: Arrange the Living Room Around the New Focal Point
- Budget, Timeline, and DIY vs. Hiring Pros
- 500-Word Experience: What You Learn When You Actually Do This Remodel
- Conclusion
There’s a special kind of magic that happens when a once-plain living room suddenly has a fireplace flickering away and wall-to-wall built-in bookshelves framing it. It’s like your home puts on its “smart and cozy” glasses. If you’ve been staring at a big blank wall thinking, “This could be epic,” a living room remodel that adds a fireplace and built in bookshelves might be exactly the glow-up your home needs.
In this guide, we’ll walk through how to plan a living room remodel centered on a fireplace and custom built ins, from picking the right fireplace type to styling those shelves so they look curated, not chaotic. We’ll mix practical steps, real-world design tips, and budget-conscious ideas so you can get that Remodelaholic-level transformation without losing your sanity (or your savings).
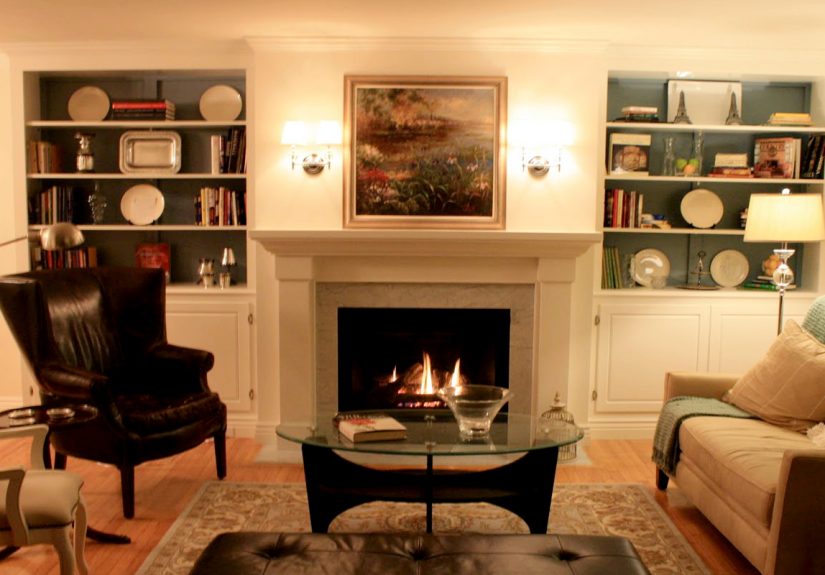
Why a Fireplace and Built In Bookshelves Are a Game-Changing Combo
A living room remodel is one of the most valuable upgrades you can make, and creating a fireplace wall with built in bookshelves hits the sweet spot between style and function. The fireplace becomes the obvious focal point, while the bookshelves give you storage, display space, and a sense of architectural character that bare drywall just can’t compete with.
Design-wise, a fireplace with built ins:
- Creates a clear focal point: The eye naturally goes to the hearth and the vertical lines of the shelves.
- Adds storage: Cabinets below can hide toys, games, electronics, and clutter.
- Boosts perceived value: Buyers love custom built in bookshelves and a well-designed fireplace wall.
- Makes the room feel finished: Instead of randomly placed furniture and a lonely TV, you get a strong central feature.
Whether your style is modern, farmhouse, traditional, or somewhere in the “Pinterest-scrolling at midnight” zone, a fireplace plus built ins is flexible enough to fit.
Step 1: Plan Your Fireplace Wall Like a Pro
Before you start swinging hammers, you need a clear plan for how your new fireplace wall is going to look and work. Think about:
Measure the Wall and Map the Layout
Grab a tape measure and sketch the wall on paper or in a simple design app. Key dimensions to note:
- Total wall width and height
- Ceiling height (especially important if you plan floor-to-ceiling shelves)
- Existing outlets, windows, or vents that might need to be moved
- Where the TV will go (above the fireplace or on a built in shelf)
Many homeowners like a symmetrical design: fireplace in the center, matching bookshelves on each side. If your room is quirky (off-center window, doorway on one side), don’t panic. Asymmetrical built ins can look very custom and high-end when done intentionally.
Decide What You Need the Built Ins to Do
Built ins around a fireplace can be more than just pretty shelves. Decide their job:
- Storage: Closed cabinets below for media gear, games, blankets, and kids’ stuff.
- Display: Open shelves for books, art, framed photos, vases, and plants.
- Media center: Space for a TV, speaker soundbar, or even a hidden media cabinet.
- Reading nook: Some designs integrate a bench or window seat beside the fireplace.
Make a quick list: “Must-haves, nice-to-haves, don’t-need.” That list will help you make smart tradeoffs when you’re finalizing measurements or shopping for materials.
Step 2: Choose the Right Fireplace Type for Your Remodel
Not all fireplaces are created equal. The best choice depends on your budget, local codes, and how much warmth you actually need.
Electric Fireplace Insert
For many remodels, an electric fireplace is the easiest option:
- Requires no chimney and often minimal venting
- Super flexible placement on an interior wall
- Some models offer “flame-only” mode so you can enjoy the look in warmer months
- Installation is often simpler and less expensive than gas or wood-burning
Electric fireplaces are especially handy when you’re building a faux fireplace wall purely for ambiance and design, not heavy-duty heating.
Gas Fireplace
If you want serious heat and a very realistic flame, a gas fireplace is a strong choice. You’ll need:
- A gas line run to the fireplace location
- Proper venting or a direct-vent unit
- Professional installation to meet building codes
Gas fireplaces tend to cost more to install than electric, but they can heat a room quickly and efficiently. They are popular in colder climates or in open-concept living spaces where you want both looks and warmth.
“Faux” Fireplace for Looks Only
Love the look of a fireplace, but not ready for wiring, gas lines, or permits? You can create a faux fireplace:
- Build a shallow mantel and surround
- Fill the opening with stacked decorative logs, candles, or LED lanterns
- Use a realistic electric log set without a built-in heater if you only want the glow
It’s a great option in apartments, mild climates, or on tight budgetsespecially when paired with beautiful built in bookshelves to sell the illusion of a real architectural feature.
Step 3: Don’t Skip Safety and Code Requirements
A fireplace may be cozy, but it’s still a heat-producing appliance. That means safety and code compliance matter just as much as the pretty marble surround you’ve been eyeing.
- Follow the manufacturer’s instructions: Each gas or electric unit has specific clearance and framing requirements. Treat those instructions as law, not suggestions.
- Check local building codes: Some locations have rules about vents, exhaust termination, gas line placement, and emissions.
- Use certified products: Look for units tested and certified by recognized safety agencies.
- Consider permits and inspections: Especially for gas or structural changes, your city may require a permit and a final inspection.
This is where it pays to bring in a licensed contractor, gas-fitter, or electrician. DIY is fantastic for framing, trim work, and painting. When it comes to gas lines and wiring, hire people who enjoy not burning your house down.
Step 4: Build the Fireplace Wall and Frame the Built Ins
Once your design and fireplace choice are locked in, it’s build time. The classic Remodelaholic-style living room remodel often follows a sequence like this:
- Open up the flooring where needed: For a flush hearth, the homeowners may remove a small section of flooring and build a recessed platform for stone or tile so it sits level with the surrounding floor.
- Frame the fireplace chase: Using lumber or metal studs, create the boxed-out area that will house the fireplace unit and any venting or wiring.
- Install the fireplace insert: The unit gets set into the frame according to the manufacturer’s clearances.
- Run electrical and/or gas: Electric fireplaces need dedicated power; gas models need both power and a gas line.
- Drywall the surround: Once everything inside is inspected, you add drywall, tape, and mud so the structure begins to look like part of the room.
With the core fireplace structure in place, you can start building out the bookcases and cabinets on each side.
Step 5: Design and Build the Bookshelves Around the Fireplace
Built in bookshelves give your remodel that customized, “this home was thoughtfully designed” feeling. There are several ways to build them:
Use Stock Cabinets as Bases
A smart hack is to use off-the-shelf kitchen or bath cabinets as the bottom portion of the built ins. They provide:
- Instant closed storage
- Perfect countertop height for display
- Factory-finished doors you can repaint to match your trim
Above the cabinets, you build custom shelves using plywood, MDF, or solid wood, trimmed out with face frames and crown molding so the whole unit looks built into the house.
Plan Proportions Carefully
Good proportions are what make built ins look “designer” instead of “weekend project gone wild.” A few guidelines:
- Align the top of the fireplace opening with a shelf or horizontal trim line.
- Keep shelf spacing consistent, or use a simple pattern (for example, tighter spacing at the top, slightly taller shelves in the middle).
- Use a continuous header or crown molding that runs across the tops of both bookcases and over the fireplace to visually unite everything.
Paint is your best friend here. Painting the fireplace surround and built ins the same color as the room’s trim creates a cohesive, custom look.
Step 6: Style the Shelves Without Making a Clutter Mountain
Once the bookshelves are up, here’s where many people freeze. Suddenly you’re staring at 20 empty shelves thinking, “So… I own three plants and four books.” The key is to style slowly and intentionally.
Follow a Simple Styling Formula
Try this loose formula for each shelf:
- Anchor with 1–2 larger objects (a stack of books, a sculpture, a basket).
- Add a medium item for height (a vase, framed photo, or plant).
- Finish with something small and textural (a candle, bead strand, or decorative box).
Mix vertical stacks of books with horizontal stacks, and leave some intentional empty space. You don’t have to fill every inch; breathing room helps your favorite pieces stand out.
Balance Both Sides of the Fireplace
The bookshelves don’t need to be perfectly symmetrical, but they should feel balanced. If you place a tall vase on the upper left side, consider a group of shorter items on the upper right side so the visual weight evens out across the whole wall.
Keep Mantel Decor Safe and Simple
On the mantel itself, keep flammable items away from direct heat. A large piece of art or a mirror, flanked by a few carefully chosen accessories, creates a classic, camera-ready focal point.
Step 7: Arrange the Living Room Around the New Focal Point
After all that work, don’t let your furniture arrangement fight for attention. The remodeled fireplace wall should be the star.
- Center your main sofa so it faces the fireplace or sits at a comfortable angle toward it.
- Create a conversation zone with a pair of chairs or a loveseat forming a U- or L-shaped layout around a coffee table.
- Coordinate the TV placement: If the TV is above the fireplace, keep seating far enough back so viewing height is comfortable. If it’s in a built in cabinet, angle seating so both the TV and fireplace are visible.
- Layer lighting: Add sconces on the built ins, table lamps near seating, and maybe LED strips or puck lights in the shelves to highlight decor.
The goal is a layout that encourages people to sit, talk, read, and actually enjoy the new fireplace and built in bookshelves instead of just walking through the room on their way to the kitchen.
Budget, Timeline, and DIY vs. Hiring Pros
Costs for a living room remodel with a fireplace and custom built ins can vary wildly. A basic electric fireplace with DIY framing and simple shelves might fit into a modest budget, while a fully custom gas fireplace with stone surround and cabinetry can run significantly higher.
To control costs:
- Use stock cabinets and trim instead of fully custom cabinetry.
- Choose MDF or paint-grade wood for built ins (then paint everything for a cohesive look).
- DIY demo, framing, and painting if you’re comfortable with tools.
- Hire pros only for the critical tasks: gas, electrical, and anything code-related.
Time-wise, a straightforward project might take a couple of weekends of solid DIY work plus waiting time for inspections or subcontractors. A more complex remodel can stretch across a few weeks. Plan for some disruption: dust, tools, and that awkward phase where your living room looks worse before it looks amazing.
500-Word Experience: What You Learn When You Actually Do This Remodel
It’s one thing to pin a dreamy “fireplace with built ins” photo. It’s another thing entirely to live through the remodel. Here are some experience-based lessons that homeowners often share after they’ve transformed their living room into a fireplace-centric showpiece.
You’ll Underestimate How Much Planning Shelves Really Need
When you sketch the wall, it’s tempting to draw a few rectangles and call them “shelves.” In real life, you’ll find yourself obsessing over shelf height, TV placement, and where to hide the Wi-Fi router. One homeowner realized halfway through that their original shelf spacing didn’t allow for tall art or oversized coffee-table books. The fix? They re-framed one section with adjustable shelf pin holes. It took extra time, but now the shelves can evolve as their style changes.
Outlets and Cables Are the Unsung Heroes
Many people wish they had added more outlets. You’ll want:
- An outlet for the fireplace insert (or dedicated circuit, if required)
- Outlets inside the cabinets for routers, streaming boxes, or hidden chargers
- Possibly a conduit or chase to run HDMI and power to a TV above the fireplace
Doing this upfront keeps you from staring at dangling cords later and wondering why you didn’t plan for that when the wall was still open.
Lighting Will Make or Break the Mood
The fire itself gives a beautiful glow, but homeowners who’ve done this remodel often rave about built in lighting. Little LED puck lights in the shelves, dimmable sconces flanking the fireplace, and warm-toned bulbs in table lamps make the room feel layered and inviting instead of flat and shadowy. If your electrician is already there, it’s worth asking for a few extra junction boxes or low-voltage lines for shelf lighting.
Dust HappensBut You Can Limit the Chaos
Any living room remodel that involves framing, drywall, and sanding gets dusty. People who’ve been there recommend:
- Sealing off adjacent rooms with plastic sheeting
- Using a shop vacuum as you work instead of waiting until the end
- Priming and painting shelves before installing them when possible
It won’t be perfectly clean, but it will be livable. Knowing it’s temporary (and that the end result is worth it) makes the process much easier mentally.
You’ll Probably Re-Think Your Decor Once the Wall Is Done
After the fireplace and built ins are complete, many homeowners say their old decor suddenly feels a little off. That’s normal. The new wall sets a higher bar for the rest of the room. A too-small rug, mismatched side tables, or a faded sofa become more obvious once the architectural backdrop looks custom and polished.
The good news is that you don’t need to replace everything at once. Start by upgrading one or two items that anchor the room, like the rug and coffee table, then slowly layer in new pillows, art, and accessories that echo the colors and textures around the fireplace.
The Room Gets Used DifferentlyIn a Good Way
One of the best “after” stories from these remodels is how people actually start using their living room more. A well-designed fireplace wall with built in bookshelves quietly invites you to sit down, grab a book, light a candle, or watch a movie in a cozy, organized space. It feels intentional rather than accidental. The living room becomes less of a pass-through and more of a destination.
That’s really the heart of a living room remodel like this. It’s not just about pretty pictures. It’s about creating a warm, functional, everyday space where your familyand your book collectioncan happily live.
Conclusion
Adding a fireplace and built in bookshelves during a living room remodel is one of the most powerful ways to upgrade your home’s style, comfort, and value. With thoughtful planning, the right fireplace choice, smart storage, and a bit of styling patience, you can turn a blank wall into the kind of focal point that looks like it has always belonged there.
Whether you go full DIY or team up with pros, remember: measure twice, follow safety codes, and leave a little breathing room on those shelves. Your future self, curled up by the fire with a good book, will be very glad you did.


