Table of Contents >> Show >> Hide
- Quick reality check: what you’re actually hanging curtains on
- 3 simple ways to hang curtains over vertical blinds
- The 13-step game plan (works with any method)
- Step 1: Decide your goal (hide the blinds, upgrade the look, or improve light control)
- Step 2: Identify your blind mount (inside-mount vs. outside-mount)
- Step 3: Check for a valance (and how it attaches)
- Step 4: Measure the width you need (and plan for “stack-back”)
- Step 5: Choose curtain fullness (so it looks intentional, not like a bedsheet)
- Step 6: Choose the curtain length (floor-kiss, skim, or puddle)
- Step 7: Pick your hardware based on weight (rod diameter, bracket type, and support)
- Step 8: Choose your install method (no-drill brackets, wall-mount, or ceiling-mount)
- Step 9: Gather tools and supplies (so you don’t “improvise” with a butter knife)
- Step 10: Mark placement (height + width) before installing anything
- Step 11: Install brackets securely (this is where “curtain confidence” is made)
- Step 12: Hang the rod and curtains (then test the slide)
- Step 13: Fine-tune the finish (the “it looks expensive” step)
- Troubleshooting: common problems (and simple fixes)
- Style tips that make vertical blinds basically disappear
- Real-world experiences: what people learn after living with curtains over vertical blinds (about )
- Conclusion
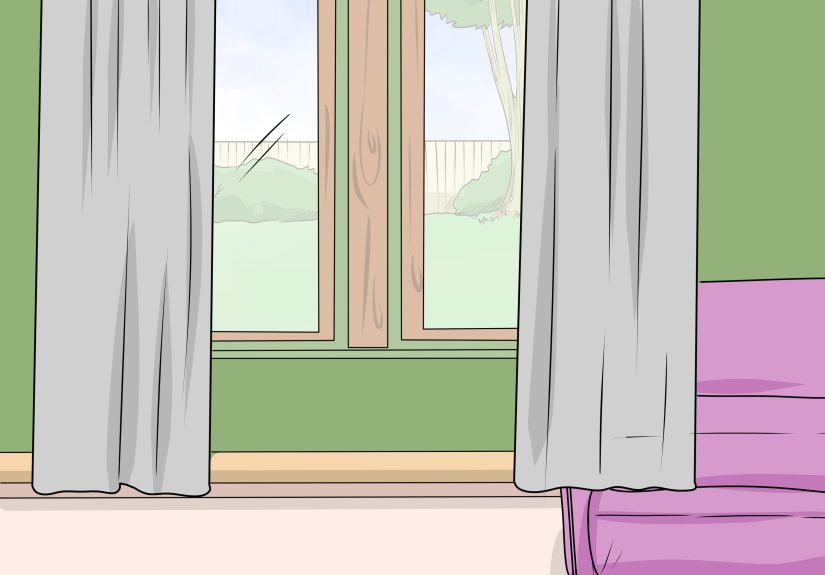
Vertical blinds are practical. They’re also the design equivalent of wearing gym shorts to a wedding: functional, but nobody’s calling it a vibe. The good news? You can hang curtains over vertical blinds without ripping everything outoften without drilling a single hole. Done right, curtains soften the look, add color, boost privacy, help with drafts, and make a sliding door or big window feel finished instead of “landlord-core.”
This guide breaks down the simplest approaches (including renter-friendly options) and then walks you through a clear, foolproof 13-step process you can follow no matter which method you choose.
Quick reality check: what you’re actually hanging curtains on
Vertical blinds usually have a headrail (the long track at the top), carriers inside that track, and hanging vanes. Some setups have a decorative valance covering the track. Your curtain plan depends on whether the blinds are mounted inside the window frame (recessed) or outside the frame (on the wall above the trim).
Inside-mount vertical blinds
The headrail sits inside the window opening. You’ll often need a curtain solution that attaches to the trim, the wall above the opening, or the ceilingbecause there may not be room for brackets that clamp onto the headrail.
Outside-mount vertical blinds
The headrail sits on the wall above the window/door trim. This is the easiest situation for “over-the-blinds” brackets that slide onto the headrail, plus it still works well for a standard curtain rod mounted above the blinds.
3 simple ways to hang curtains over vertical blinds
Method 1: No-drill “over-the-blinds” brackets (fastest, renter-friendly)
These brackets slide onto (or clamp to) the vertical blind headrail and provide a spot to rest a curtain rod. You don’t drill into the wall, and you don’t remove the blinds. If your blinds have a valance, you may need to pop it off first so the bracket can seat properly.
Best for: renters, anyone who wants a quick upgrade, and people who don’t want to patch drywall ever again.
Method 2: Mount a curtain rod above the blinds (most stable for heavy curtains)
This is the classic approach: install brackets into studs or use proper wall anchors, then hang your rod above the blind headrail. It’s strong, customizable, and ideal for thicker drapes or blackout panels.
Best for: homeowners, heavy curtains, wide sliding doors, and “I want it perfect” energy.
Method 3: Ceiling-mount a rod or curtain track (cleanest look, great for sliding doors)
If you want curtains to glide smoothly and stay out of the way of door handles, ceiling mounting can look surprisingly high-end. It also helps when the wall space above the blinds is tight.
Best for: sliding glass doors, modern rooms, and anyone who wants that “hotel drape” feel.
The 13-step game plan (works with any method)
Follow these steps in order. Think of it like a cooking recipe: you can skip steps, but that’s how you end up eating cereal for dinner while staring at a crooked curtain rod.
-
Step 1: Decide your goal (hide the blinds, upgrade the look, or improve light control)
If you mainly want style, lightweight panels or linen-look curtains work. If you want sleep, glare control, or insulation, plan for heavier drapes or layered curtains (sheers + blackout). Your “goal” determines curtain weightand curtain weight determines hardware.
-
Step 2: Identify your blind mount (inside-mount vs. outside-mount)
Peek at the headrail: is it inside the frame or mounted on the wall above the trim? This tells you whether over-the-blinds brackets are likely to fit cleanly, and how much clearance you have.
-
Step 3: Check for a valance (and how it attaches)
If there’s a plastic or fabric valance covering the track, check whether it snaps on with clips. Many no-drill bracket options need direct access to the headrail, so you may temporarily remove the valance while installing brackets, then reinstall it if it still fits.
-
Step 4: Measure the width you need (and plan for “stack-back”)
Measure the full width of the glass/trim. For a sliding door, plan extra width so the opened curtains don’t block the doorway. The space the fabric occupies when pulled open is called stack-back. If you want a clear opening, your rod should extend beyond the door far enough that the stacked fabric sits outside the walking path.
Example: For a 72-inch sliding door, many people extend the rod at least 8–12 inches on each side (and sometimes more if using thick drapes) so the curtains can fully clear the glass and avoid eating your view.
-
Step 5: Choose curtain fullness (so it looks intentional, not like a bedsheet)
A common rule: total curtain panel width should be about 2 to 2.5 times the width you’re covering for a nicely gathered look. Sheers can go fuller; heavier blackout panels may look best closer to 2x, depending on bulk.
Example: If your rod span is 84 inches, aim for ~168 to 210 inches of total panel width (combined).
-
Step 6: Choose the curtain length (floor-kiss, skim, or puddle)
For most rooms, “just kissing the floor” looks polished. If you have kids, pets, or a door people actually use, avoid dramatic puddling it can snag, drag, and collect dust like it’s training for a lint championship.
Measure from where the rod will sit (or where the no-drill bracket places the rod) down to the floor. If you’re hanging higher to make the room feel taller, you may need longer panels (often 95–108 inches, depending on ceiling height).
-
Step 7: Pick your hardware based on weight (rod diameter, bracket type, and support)
Lightweight curtains can use tension or adhesive solutions in some setups, but curtains over vertical blinds usually look best on a proper rod. For wide spans (especially sliding doors), consider a sturdier rod and a center support bracket to prevent sagging.
-
Step 8: Choose your install method (no-drill brackets, wall-mount, or ceiling-mount)
Go no-drill if you’re renting or want speed. Go wall-mount if you’re using heavy drapes. Go ceiling-mount if the wall space above the blinds is limited or you want a sleek glide.
-
Step 9: Gather tools and supplies (so you don’t “improvise” with a butter knife)
Typical basics: tape measure, pencil, level, step stool/ladder, screwdriver/drill (for mounted rods), appropriate screws/anchors (if not hitting studs), and your rod + brackets. For no-drill over-the-blinds brackets, you’ll typically just need the brackets and a compatible rod.
-
Step 10: Mark placement (height + width) before installing anything
If you’re mounting above the blinds, a common placement is 4–6 inches above the window/trim (or higher, closer to the ceiling for a taller look), and wide enough that the curtains can open without blocking the glass. Use a level. Your eyes are wonderful, but they are also liars when standing on a step stool.
-
Step 11: Install brackets securely (this is where “curtain confidence” is made)
No-drill over-the-blinds brackets: Slide/clamp onto the headrail per the bracket’s design, tighten as directed, and confirm both sides are even.
Wall-mount brackets: If you can hit studs, do it. If you can’t, use anchors rated for the load. For plaster or older walls, choose fasteners designed for that material. The goal is simple: brackets that don’t wiggle when you tug the rod.
Ceiling-mount: Follow the track/rod instructions carefully; ceiling installs can be very stable when anchored properly into joists (or with appropriate anchors for your ceiling type).
-
Step 12: Hang the rod and curtains (then test the slide)
Add rings, clips, grommet panels, or whatever header style you chose. Rings and grommets usually slide easiesthelpful for wide doors you open daily. Set the rod onto brackets and tighten set screws if your hardware has them.
Open and close the curtains several times. Make sure they clear door handles, don’t snag on the blinds, and stack back where you planned.
-
Step 13: Fine-tune the finish (the “it looks expensive” step)
Steam or iron panels if needed, adjust hems (or use iron-on hem tape for a no-sew fix), and ensure both sides hang evenly. If you’re layering sheers and blackout curtains, consider a double rod or a track + rod combo so everything moves smoothly.
Finally: step back, squint a little like an interior designer, and celebrate the fact that your vertical blinds are now background actors, not the star of the show.
Troubleshooting: common problems (and simple fixes)
“My curtains bump the blinds when I open them.”
Use brackets with more projection (distance from the wall), or move the rod slightly forward/outward. For no-drill brackets, confirm they’re fully seated and not tilting the rod toward the headrail.
“The rod sags in the middle.”
Add a center support bracket, upgrade to a thicker rod, or switch to a traverse track for very wide spans. Wide sliding doors often need that middle supportgravity is consistent like that.
“Light leaks around the top and sides.”
Raise the rod placement, extend it wider, and consider wraparound rods or layered curtains. Blackout curtains work best when they overlap the window edges and sit high enough to cover above the glass.
“I’m renting and I’m terrified of losing my deposit.”
Stick with no-drill methods: over-the-blinds brackets, trim-tap brackets (if your trim allows), or tension solutions for very light panels. Always check your lease rules and test stability before hanging heavier fabrics.
Style tips that make vertical blinds basically disappear
- Go wider than the window: It makes the opening feel larger and helps hide the blind stack on one side.
- Hang higher: Taller placement draws the eye up and makes ceilings feel bigger.
- Choose the right header: Rings or grommets glide easilygreat for daily use on sliding doors.
- Layer smartly: Sheers for daytime + blackout panels for night is the “best of both worlds” move.
Real-world experiences: what people learn after living with curtains over vertical blinds (about )
The first thing most people notice after hanging curtains over vertical blinds is how quickly the whole room changeslike you upgraded the space without upgrading your rent. It’s common to start with a purely practical goal (“I want privacy,” “I hate the way these blinds look,” “the sun is bullying my TV”) and end up surprised by how much softer and more intentional everything feels. Curtains add texture; vertical blinds add… alignment. Together, they can work, as long as the curtains get the starring role.
One very typical scenario is the sliding glass door dilemma: you want curtains because they look better, but you also want to use the door without wrestling fabric every time you step outside. That’s when people discover stack-back the hard way. If the rod doesn’t extend far enough past the opening, the curtains pile up right where you need to walk, and suddenly you’re doing a side-step shimmy to get to the patio. The fix is simpleextend the rod wider than you think you needbut it’s a lesson many learn only after living with it for a week.
Another common experience: underestimating curtain fullness. In the package, two panels look generous. On an 80-inch span, they can look like you hung two scarves and called it a day. People who love that tailored look might be fine with less fabric, but if the goal is cozy and polished, fuller panels make a huge difference. The best part is that you don’t have to buy the most expensive curtainssometimes adding one extra panel per side is what makes the setup look “designer” instead of “temporary.”
Renters often report the biggest emotional win: no-drill solutions feel like freedom. There’s something genuinely satisfying about improving your space without a weekend of patching, sanding, repainting, and pretending you’ve always owned spackle. The trade-off is that renter-friendly hardware has limits. Many people start with lightweight curtains (or sheers) while they test stability, then graduate to heavier panels once they know the brackets and rod can handle daily use. It’s a smart progressionespecially if the curtains will be opened and closed constantly.
Finally, there’s the “tiny tweak” effect. Once curtains are up, people often adjust the height a little higher, widen the rod a little more, or swap to rings for smoother gliding. These small refinements are normal. Window treatments are one of those home projects where you don’t fully know what you want until you see it in place. The best experience is when the final result feels effortless: blinds still function when needed, curtains add warmth, and the room no longer looks like it came with instructions from an office supply store.
Conclusion
Hanging curtains over vertical blinds doesn’t have to be complicated. Pick a method that matches your space (and your lease), measure carefully, hang the rod higher and wider than feels “normal,” and give your curtains enough fullness to look intentional. Whether you go with no-drill brackets, a classic wall-mounted rod, or a clean ceiling track, the payoff is the same: a room that looks more finished, feels more comfortable, and makes those vertical blinds fade quietly into the backgroundwhere they belong.


