Table of Contents >> Show >> Hide
- The Temperature That Matters Most: Internal Temperature
- The Best Oven Temperature for Beef Tenderloin (Yes, There’s More Than One)
- How to Measure Temperature (Without Lying to Yourself)
- A Foolproof Temperature Game Plan
- Specific Examples (Because Real Life Is Not a Cooking Show)
- Common Temperature Mistakes (And How to Avoid Them)
- What If I Overcook It? (Tenderloin Emergency Plan)
- FAQ: Beef Tenderloin Temperature Questions People Actually Ask
- My Real-Life Beef Tenderloin Temperature Lessons (The 500-Word “I Learned This the Hard Way” Section)
- Conclusion
Beef tenderloin is the fancy friend who shows up in a tux, expects you to handle them gently,
and will absolutely hold a grudge if you overcook them. It’s buttery-tender, lean, and
(let’s be honest) usually expensive enough that you can hear your wallet whisper,
“Please don’t wing it.”
Here’s the good news: you don’t need chef superpowers to nail it. You just need the right
temperature strategybecause with tenderloin, temperature is the difference between
“holiday showstopper” and “why is it… dry?”
The Temperature That Matters Most: Internal Temperature
When people ask for “the best temperature for beef tenderloin,” they’re usually talking about
the internal temperaturethe number on your meat thermometer that tells you when to pull it.
Oven temperature matters too (we’ll get there), but internal temp is the final boss.
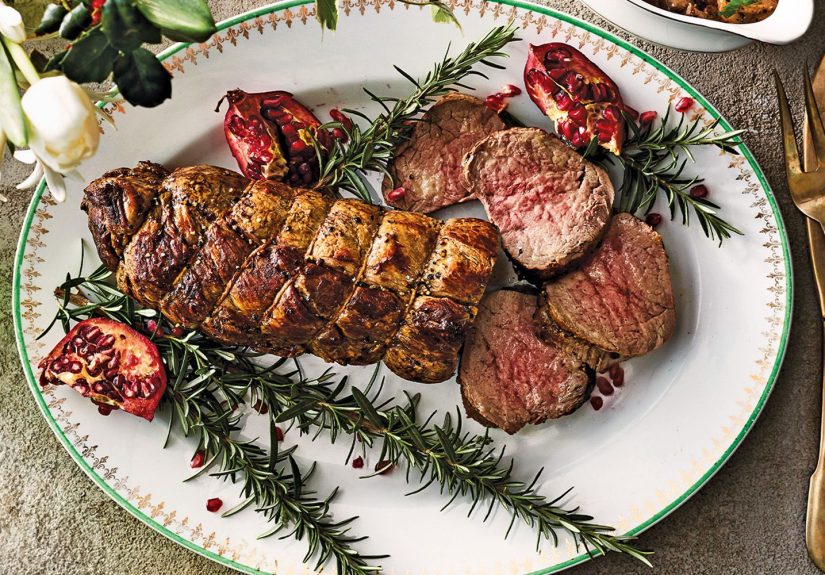
The sweet spot for most people: medium-rare
For a tenderloin that’s juicy, tender, and still feels like a luxury bite, medium-rare is the
crowd-pleasing target. That typically means serving around 130–135°F.
Because the temperature rises as it rests (carryover cooking), you usually pull it a bit earlier.
A reliable rule: pull the tenderloin 5–10°F before your final doneness,
then rest it. Big roasts and high-heat finishes tend to climb more than smaller cuts.
Beef tenderloin temperature chart (pull vs. serve)
These are practical targets for a whole tenderloin roast (or thick center-cut pieces). “Pull” is when
you remove it from heat; “Serve” is where it usually lands after resting.
- Rare: Pull 120–125°F → Serve 125–130°F (deep red center, very soft)
- Medium-rare (best balance): Pull 125–130°F → Serve 130–135°F (rosy, juicy)
- Medium: Pull 135–140°F → Serve 140–145°F (less pink, noticeably firmer)
- Medium-well: Pull 145–150°F → Serve 150–155°F (mostly brown, drier)
- Well-done: Pull 155–160°F → Serve 160°F+ (fully brown, firm; tenderloin gets dry fast)
A quick safety note (important, not scary)
Food-safety guidance for whole cuts like steaks and roasts commonly recommends cooking to
145°F and resting at least 3 minutes. If you’re cooking for someone who is pregnant,
elderly, immunocompromised, or you just prefer to follow the most conservative safety guidance,
aim for that standard and plan to boost tenderness with technique (gentle roasting, resting, slicing right,
and serving with a sauce).
For everyone else, many cooks prefer medium-rare for tenderness and juiciness. The key is using a thermometer,
handling the meat cleanly, and searing/roasting properly.
The Best Oven Temperature for Beef Tenderloin (Yes, There’s More Than One)
Here’s the twist: there isn’t one “perfect” oven temperature. The best oven temperature depends on
how you want to cook itfast and classic, or slow and ultra-even.
Method 1: Classic roasthot start, then finish
This method is popular because it’s straightforward and gives you a nice crust without taking all day.
You’re basically saying: “Let’s brown the outside, then gently bring the inside to perfection.”
- Option A (simple): Roast at 425°F until it hits your pull temperature.
- Option B (two-stage): Start hot (450–500°F) briefly, then reduce (325–350°F) to finish more gently.
When does this shine? When you want a traditional roast vibe, a browned exterior, and a predictable workflow.
It’s also great when you’re juggling sides and you don’t want to babysit a long cook.
Method 2: Reverse searlow-and-slow, then a fast finish
Reverse sear is tenderloin’s best friend because it’s lean and easy to overcook. Low heat cooks it more evenly,
so you don’t end up with a thick gray “overdone ring” around the edges.
- Roast at 200–250°F until the center reaches your pull temperature (often 118–125°F, depending on your finish).
- Then sear quickly in a very hot pan or 450–500°F oven just to brown the outside.
When does this shine? When you care most about edge-to-edge pink, maximum tenderness, and stress-free timing.
Bonus: the low roast gives you a wider “window” so you’re less likely to overshoot.
Method 3: Grill or smokerindirect heat, then sear
Grilling a whole tenderloin is basically outdoor reverse sear. Use indirect heat to cook evenly,
then finish with a sear over direct heat. This is also an easy way to add a subtle smoky flavor
without turning the tenderloin into a bonfire story.
How to Measure Temperature (Without Lying to Yourself)
Tenderloin is one of those cuts where guessing is a bad hobby. A thermometer isn’t “extra.”
It’s the difference between “nailed it” and “we’re ordering pizza.”
Thermometer tips that actually work
- Probe placement: Insert into the thickest center of the roast.
- Avoid the pan: If the tip touches the pan, you’re measuring metal, not meat.
- Check more than one spot: Especially if the roast has a skinny tail end. The center is your main reference.
- Use the right tool: Instant-read for quick checks; leave-in probe for hands-free accuracy.
Pro move: if your tenderloin has a thin “tail,” tuck it under and tie it with kitchen twine. That keeps the roast
a more even thickness so the ends don’t overcook while the center catches up.
A Foolproof Temperature Game Plan
Below is a flexible approach that works whether you’re cooking a full tenderloin roast or a center-cut piece.
The temperatures stay the sameyou just adjust time.
Step 1: Season early (if you can)
Salt the tenderloin at least 45–60 minutes before cooking (or overnight, uncovered in the fridge).
This “dry brine” helps seasoning penetrate and improves browning. If you’re short on time, season right before cooking
just don’t skimp.
Step 2: Choose your method based on your priorities
- Want classic roast + crust? Roast around 425°F (or do hot-then-lower).
- Want the most even doneness? Reverse sear at 200–250°F, then sear hard at the end.
- Want smoke flavor? Cook indirectly on the grill/smoker, then sear.
Step 3: Pull temperature targets (practical and realistic)
If you want medium-rare, aim to pull at 125–130°F. If you’re reverse searing and plan a strong final sear,
you can pull closer to the lower end (around 120–125°F) because the finish can add a few degrees.
Step 4: Rest like you mean it
Resting isn’t optionalit’s the moment the roast relaxes, juices redistribute, and carryover cooking finishes the job.
Tent loosely with foil and rest 10–20 minutes. (Very large roasts or certain recipes rest longer; the key is
not slicing immediately just because everyone is hovering.)
Specific Examples (Because Real Life Is Not a Cooking Show)
Example 1: 2.5 lb center-cut tenderloin, reverse sear (ultra-even)
- Salt the meat (ideally 1–24 hours ahead). Tie for even thickness.
- Roast at 225°F with a probe thermometer until the center hits 120–125°F.
- Rest 10 minutes.
- Sear in a ripping-hot skillet (or 500°F oven) just until brownedabout 1–2 minutes per side in a pan.
- Rest another 5–10 minutes if needed, then slice.
Result: rosy, tender slices with minimal overcooked edgesexactly what tenderloin dreams about at night.
Example 2: 4 lb whole tenderloin, classic roast (holiday-friendly)
- Trim and remove silverskin if needed. Tie every 1.5–2 inches.
- Sear in a hot pan until browned, or start in a hot oven briefly.
- Roast at 425°F (or reduce to 325–350°F after the initial crust forms).
- Start checking early; pull at 125–130°F for medium-rare.
- Rest 15–20 minutes, then slice thickly.
The big lesson: time-per-pound varies wildly based on shape, starting temperature, oven accuracy, and whether you seared.
The thermometer is your truth serum.
Common Temperature Mistakes (And How to Avoid Them)
Mistake 1: Cooking to the “serve” temp in the oven
If you cook tenderloin until it reads 135°F in the oven, it may climb to 140–145°F while restinghello medium (or beyond).
Instead, pull early and let carryover do the last bit of work.
Mistake 2: Slicing too soon
Slice immediately and the juices run out like they’re late for an appointment. Rest it, then slice. Your cutting board will be calmer,
and your meat will be juicier.
Mistake 3: Ignoring the “tail” end
Tenderloins often taper. If you don’t tuck and tie the tail, you’ll get overcooked end pieces. Tuck it under, tie it,
and pretend you meant to be that organized.
What If I Overcook It? (Tenderloin Emergency Plan)
First: breathe. Second: don’t announce it like it’s a crime scene. Here’s how to recover:
- Slice thicker: Thicker slices feel juicier and soften the “firm” impression.
- Serve with sauce: Horseradish cream, red wine pan sauce, chimichurri, or herb butter can rescue texture and boost flavor.
- Don’t keep reheating: Heat slices gently (low oven, brief warm-up) rather than blasting them again.
If it’s undercooked, you’re in even better shape: return it to a low oven (around 275–300°F) for a few minutes and recheck.
Small increments win.
FAQ: Beef Tenderloin Temperature Questions People Actually Ask
Is 135°F the best temperature for beef tenderloin?
135°F is a popular “serve” temperature for medium-rare, but many cooks prefer pulling earlier (125–130°F)
so it rests up into that range without overshooting.
What’s the best temperature for filet mignon?
Filet mignon is tenderloin steak. The same doneness temps apply. Medium-rare (serve around 130–135°F) is still the
most common “best” answer for tenderness and juiciness.
Should I cook tenderloin at 350°F or 425°F?
Both can work. 425°F cooks faster and helps browning; 350°F is gentler and can reduce the risk of overcooking.
If you’re nervous, go lower and rely on a thermometer. If you want maximum even doneness, consider reverse sear at 200–250°F.
How long does it take?
It depends (annoying but true). Shape, oven accuracy, whether you seared, and starting temperature all change timing.
Use time estimates as a loose planning tool, not the finish line. Start checking earlier than you think you need to.
My Real-Life Beef Tenderloin Temperature Lessons (The 500-Word “I Learned This the Hard Way” Section)
The first time I cooked beef tenderloin for a “big moment” dinner, I treated it like a normal roast: I guessed the time,
I trusted the oven dial like it was a licensed professional, and I kept opening the door to “check on it,” which is basically
the culinary version of tapping a fish tank and wondering why the fish look annoyed. I aimed for medium-rare, but my definition
of medium-rare was apparently “somewhere between hope and denial.”
When I finally checked with a thermometerlate in the game because I was trying to be chillthe center was already past where
I wanted it. I did the classic move: I told myself, “It’ll be fine, it’s resting,” as if resting reverses time. Spoiler: resting
is not a magic undo button. It’s more like the credits rolling. Things are still happening, and you don’t get to change the plot.
That experience taught me the number-one rule of tenderloin: you cook it to temperature, not to time. Ever since then,
I build the entire meal around the thermometer instead of forcing the tenderloin to match my side dishes’ schedule. If the sides
are ready early, they can wait. The tenderloin should not be bullied.
My second big lesson was carryover cooking. I used to pull meat “at the target,” which sounds logical until you remember that heat
doesn’t stop moving just because you moved the roast to a cutting board. With tenderloin, that extra 5–10 degrees can be the difference
between rosy and “why is it kind of firm?” Now, if I want that perfect medium-rare slice, I pull it earlier and let the rest do the
final shaping.
The third lesson was about shape. Tenderloin tapers, and the thin end will cook faster than the center. The first time I got a
beautiful medium-rare middle, I also got an end piece that looked like it had volunteered to be well-done. Tucking and tying the tail
fixed that immediately. It’s such a small step, but it makes the roast behave like one piece instead of three different doneness zones
pretending to be a team.
And finally, I learned that tenderness is not just temperatureit’s the whole routine: salting early for deeper seasoning, cooking evenly,
resting long enough, and slicing across the grain with a sharp knife. When all of that lines up, beef tenderloin feels like it was designed
for celebrations. When it doesn’t, it’s still edible… but it’s not the “wow” you paid for.
These days, I keep it simple: pick a method (classic roast or reverse sear), trust the thermometer, pull early, rest patiently, and slice like
I’m trying to impress someone. Because I am. Even if it’s just me and a plate quietly judging my life choices.
Conclusion
The best temperature for beef tenderloin depends on what you mean by “best,” but for most tables the answer is clear:
medium-rareserve around 130–135°F, and pull earlier (usually 125–130°F) so resting finishes the job.
Choose an oven approach that matches your style: classic roasting for simplicity and crust, or reverse sear for the most even doneness.
Either way, a thermometer turns an expensive cut into a predictable win.


