Table of Contents >> Show >> Hide
- Why Winterizing on a Budget Is Totally Worth It
- 1. Seal Drafty Windows with Plastic Film Kits
- 2. Add Weatherstripping to Doors for Instant Draft Control
- 3. Use Caulk to Seal Cracks, Gaps, and Tiny Air Leaks
- 4. Block Door Drafts with Stoppers or DIY “Draft Snakes”
- 5. Insulate Outlets and Switches on Exterior Walls
- 6. Wrap Exposed Pipes and Protect Your Plumbing
- 7. Reverse Ceiling Fans to Push Warm Air Down (Free!)
- 8. Swap or Clean Furnace Filters for Better Efficiency
- 9. Layer Windows with Budget-Friendly Curtains and Rods
- 10. Roll Out Rugs and Mats on Cold Floors
- 11. Use Smart Thermostat Habits (Even Without Smart Tech)
- Putting It All Together: Layer Your Defenses Against the Cold
- Real-Life Experiences: What Budget Winterizing Actually Feels Like
Winter has a way of sneaking up on you. One day you’re enjoying cool, crisp fall air, and the next you’re
wondering why your living room feels like the inside of a freezerand why your heating bill suddenly looks
like a car payment. The good news? You don’t need a massive renovation budget to winterize your home.
With a handful of smart, low-cost upgrades and a little DIY spirit, you can keep the cold out, the heat in,
and your wallet relatively calm.
Most of the winterizing projects below cost well under $50, many are under $20, and a few are absolutely
free. Think of them as “cozy upgrades” that pay you back all season long in comfort and lower utility bills.
Why Winterizing on a Budget Is Totally Worth It
Small drafts and tiny gaps can have a surprisingly big impact on your comfort and your heating bill. Warm
air loves to escape through windows, doors, outlets, and even tiny cracks you barely notice. When that
happens, your heating system works harder, using more energy and costing you more money.
Simple fixeslike weatherstripping, caulking, and window filmcan often be done in an afternoon with basic
tools. They’re low-cost, low-skill projects that deliver big returns, especially if you live in an older
or drafty home. Let’s walk through 11 budget-friendly winter home upgrades you can start right away.
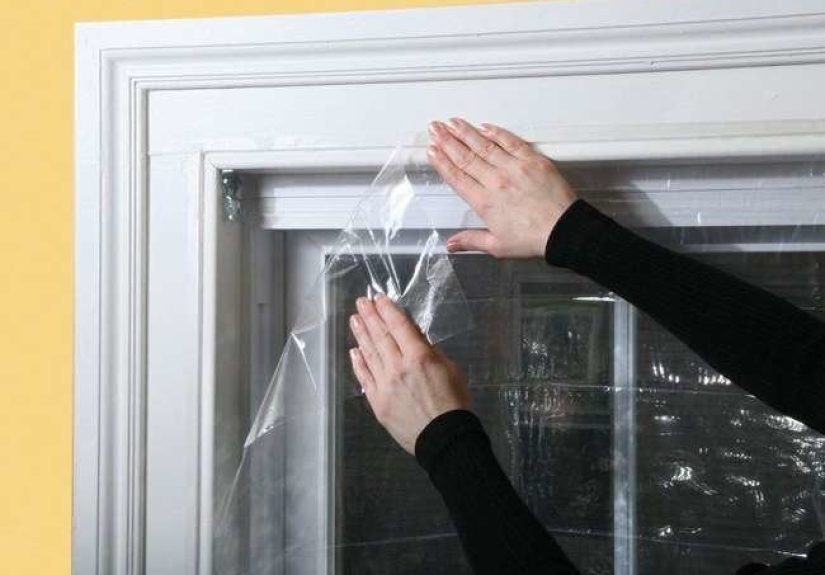
1. Seal Drafty Windows with Plastic Film Kits
If your windows are older, single-pane, or just a bit leaky, a clear plastic window insulation kit is one
of the cheapest and most effective upgrades you can make. Most kits cost under $20 and come with a roll of
clear film and double-sided tape. You apply the tape around the inside of the window frame, stick the film
over it, and then use a hair dryer to shrink the film taut.
The film creates an invisible barrier that traps a layer of airessentially turning your basic window into a
low-budget version of double glazing. It helps cut drafts, reduces condensation, and keeps rooms noticeably
warmer without blocking natural light or your view. It’s especially helpful in bedrooms, basements, and any
north-facing rooms that always feel chilly.
Bonus: If you have pets or kids, look for “max strength” or thicker kits that resist punctures and last
through the season.
2. Add Weatherstripping to Doors for Instant Draft Control
Exterior doors are notorious for sneaky drafts, especially along the sides and top of the frame. A simple
roll of self-adhesive foam or rubber weatherstrippingusually under $15can make a huge difference.
To do it right, stand near the door on a cold or windy day and feel for air movement. You can also use the
“flashlight test”: have someone shine a light from the outside at night; if you see light around the frame,
air can get through too. Cut pieces of weatherstripping to length, peel off the backing, and press it into
place along the door jamb.
The result? A door that closes snugly, keeps warm air in and cold air out, and makes your entryway feel less
like a breezeway.
3. Use Caulk to Seal Cracks, Gaps, and Tiny Air Leaks
Caulk is one of those unglamorous products that quietly saves you money. A single tubeoften under $10can
seal multiple small gaps around window frames, baseboards, trim, and where pipes or cables penetrate walls.
Look for cracks where you see daylight or feel cold air. Common trouble spots include:
- Window and door casings
- Gaps where the wall meets the floor
- Cracks around plumbing and electrical penetrations
Use paintable interior caulk for indoor applications and an exterior-grade caulk outdoors. Cut the tip at a
tiny angle, run a thin bead along the gap, and smooth it with a damp finger or caulk tool. It’s a simple,
budget-friendly way to plug the little leaks that add up to big heat loss.
4. Block Door Drafts with Stoppers or DIY “Draft Snakes”
That icy river of air slinking in under your door? Time to block it. Door draft stoppers (also called draft
snakes) are long, weighted tubes you place along the bottom of the door to stop cold air in its tracks.
You can buy them for $10–$25 or make your own by filling a fabric tube, old leggings, or even a rolled-up
towel with rice, dried beans, or sand.
For doors leading directly outside, look for double-sided stoppers that slide under the door and cover both
sides at once. They’re especially helpful for drafty apartment doors, basement entries, or doors that open
to unheated garages.
5. Insulate Outlets and Switches on Exterior Walls
It sounds wild, but the tiny gaps around outlets and light switches on exterior walls can leak a surprising
amount of cold air. Fortunately, the fix is both cheap and easy: foam outlet and switch gaskets.
For under $10, you can buy a multipack of precut foam inserts. Turn off power to the circuit (safety first),
remove the cover plate, place the foam gasket over the device, and screw the cover back on. If you want extra
protection, add child-safety plug caps to unused outlets to block airflow.
It’s a low-visibility upgrade you’ll forget aboutuntil you realize those walls don’t feel quite so icy
anymore.
6. Wrap Exposed Pipes and Protect Your Plumbing
Frozen pipes are the kind of winter surprise nobody wants. Insulating exposed pipes in unheated areas (like
garages, crawl spaces, and basements) is an inexpensive way to prevent freezing and reduce heat loss from
hot-water lines.
Foam pipe insulation sleeves usually cost a couple of dollars per length. Just measure your pipes, cut the
sleeves to size, and snap them around the pipes. For extra cold climates, add pipe wrap or tape in problem
areas and keep cabinet doors open on extra-cold nights so warm room air can circulate around sink pipes.
While you’re at it, consider an insulating blanket for your water heater if it’s older and not already
insulated. Some blankets hover around the $40–$50 range and can help reduce standby heat loss.
7. Reverse Ceiling Fans to Push Warm Air Down (Free!)
Here’s one of the easiest winter “upgrades” you can makeand it costs nothing. Most ceiling fans have a small
switch on the motor housing that reverses the direction of the blades. In summer, you usually run the fan
counterclockwise to create a cooling breeze. In winter, flip the switch so the blades spin clockwise at a low
speed.
This gently pushes warm air that’s risen to the ceiling back down into the room, making it feel warmer at the
temperature you’re already heating to. That means you may be able to nudge your thermostat down a degree or
two and still feel comfortable.
Pro tip: Dust the blades before you reverse them. Nobody wants a blizzard of fan fluff.
8. Swap or Clean Furnace Filters for Better Efficiency
Your heating system can’t do its best work if it’s trying to breathe through a clogged filter. Dirty filters
restrict airflow, make rooms feel unevenly heated, and force the system to run longer to reach the same
temperature.
Most disposable filters cost $10–$30, depending on size and type. Check the recommended replacement interval
(often every 1–3 months in winter), and set a reminder in your phone. If you have a reusable filter, give it
a thorough cleaning according to the manufacturer’s instructions.
A fresh filter supports better air quality, more consistent heating, and potentially lower energy useall for
the price of a takeout lunch.
9. Layer Windows with Budget-Friendly Curtains and Rods
Curtains aren’t just for looks; they’re also excellent insulation. Heavy or thermal curtains can help block
drafts and add a cozy layer of warmth around windows. You don’t have to splurge on designer drapesa simple
double curtain rod and lined panels from a big-box store can still help a lot.
For a budget approach:
- Use inexpensive blackout or thermal panels in bedrooms and living spaces.
- Close curtains at night to trap warmth inside.
- Open them during sunny days to let free solar heat do its thing.
If you’re renting or dealing with odd-sized windows, tension rods and inexpensive ready-made panels can
deliver a noticeable comfort upgrade without damaging walls.
10. Roll Out Rugs and Mats on Cold Floors
If your feet are cold, the rest of you never quite feels warm. Bare floorsespecially tile, concrete, and
uninsulated hardwoodcan radiate cold into a room. Throw rugs and thick mats act as insulation for your feet
and help reduce heat loss through the floor surface.
Look for:
- Area rugs in living rooms and bedrooms
- Runner rugs in drafty hallways
- Non-slip mats in kitchens and bathrooms
You don’t need to buy luxury wool rugs; budget-friendly synthetic rugs or washable mats can still make a
big comfort difference. Plus, they instantly make a room feel cozier and more inviting.
11. Use Smart Thermostat Habits (Even Without Smart Tech)
A programmable or smart thermostat can be a fantastic upgrade, but even if you’re not ready to buy new
hardware, small habit shifts cost nothing and still help control heating costs.
Consider these thermostat strategies:
- Lower the setting by 1–2°F and layer up with cozy clothes and blankets.
- Lower the heat slightly at night and use a warm comforter or flannel sheets.
- Turn the heat down a bit when you’re away for the day (but not so low pipes risk freezing).
If you’re ready for a small investment, some basic, non-Wi-Fi programmable thermostats are often under $50
and allow you to set “set-it-and-forget-it” schedules so the temperature automatically adjusts when you’re
asleep or out of the house.
Putting It All Together: Layer Your Defenses Against the Cold
The real magic of budget winterizing isn’t in any single productit’s in layering several small improvements
together. Sealing windows, tightening up doors, insulating pipes, and adjusting ceiling fans can turn a
drafty space into a warm, comfortable home without major construction or major spending.
Start with the worst offenders: that one icy room, the door that whistles on windy nights, or the window
that fogs with condensation. Tackle one or two simple projects each weekend, and by the time the coldest
days roll in, your home will be readycozy, efficient, and just a bit smug about its new energy-saving
superpowers.
Real-Life Experiences: What Budget Winterizing Actually Feels Like
It’s one thing to read a checklist and another to live through your first truly draft-free winter. People who
have tried these low-cost fixes tend to describe the same “aha” moments: the day a previously freezing room
suddenly becomes usable, or the month when the utility bill comes in lower than expected.
For example, many homeowners start with plastic window film feeling skeptical. It looks too simple to make a
difference. But once the film is in place and they stand near the window on a cold morning, they notice
something: no more icy breeze. The glass still feels cold, but the air in the room doesn’t. Rooms that were
once “off-limits” in Januarylike a home office or sunroomsuddenly become comfortable enough for working,
reading, or hanging out.
Another common story involves ceiling fans. A lot of people don’t realize fans have a reverse switch at all.
They turn it on by accident while cleaning, or discover it while changing a light bulb. Once they intentionally
flip the fan to run clockwise in winter and let it run on low, they notice the “temperature bubble” at ceiling
height slowly drifting down. That stuffy warm air that used to hang above their heads is finally where it
belongsat the couch level.
Renters often rely heavily on reversible, non-permanent fixes like draft stoppers, outlet gaskets, and rugs.
One renter might place a long draft snake at the base of an apartment door that faces a chilly hallway. Another
stacks thick rugs over creaky old floors to make a studio apartment feel less like a cold box. These upgrades
usually don’t require landlord approval, and they move with you if you relocate.
Caulking and weatherstripping can feel intimidating the first time, but most people find it’s easier than it
looks. The key is to start smallmaybe with one leaky window or one drafty door. After seeing how much more
solid and quiet the space feels, confidence grows. The next weekend, they’re tackling another door, sealing a
baseboard gap, or insulating pipes in the basement. Each small project adds up to a noticeable improvement.
There’s also the emotional side of winterizing. When you actively improve your home, you feel more in control
of the season. Instead of just cranking the thermostat and hoping for the best, you’re intentionally shaping
how your home handles cold and wind. That sense of agency matters, especially during long winters when the
dark and cold can feel overwhelming.
Finally, many people say the best part of budget winterizing is the way it changes daily comfort. Stepping
onto a warm rug, placing your hand near a window and feeling still air instead of a draft, opening a cabinet
under the sink and not worrying about frozen pipesall of these small wins make winter feel less harsh. When
your home is snug and efficient, staying in on a snowy day feels less like hibernation and more like a
deliberate, cozy choice.
So if you’re staring down another winter with rising energy costs and chilly rooms, don’t underestimate the
power of these under-$50 upgrades. They’re small projects with big impact, and they’ll keep paying dividends in
comfort and savings long after the snow melts.


