Table of Contents >> Show >> Hide
- What Makes a Deck Makeover “Dreamy” (Not Just “New”)?
- 1) The “Just Stain It” Transformation (That Looks Like a Whole New Deck)
- 2) The Resurfaced Deck: Same Bones, Brand-New Walkway
- 3) The Two-Tone “Designer Deck” (Without Designer-Price Drama)
- 4) The Privacy Upgrade: From Fishbowl to Backyard Hideaway
- 5) The Shade Solution: Pergola, Sail Shade, or Roof Extension
- 6) The Built-In Bench Makeover: Seating That Never “Needs to be Put Away”
- 7) The Railing Refresh: Safety Gets a Style Upgrade
- 8) The Lighting Makeover: From “Phone Flashlight Chic” to Cozy Glow
- 9) The Outdoor Rug + Furniture “Soft Landing” Makeover
- 10) The Planter-Edge Makeover: Greenery That Feels Built In
- 11) The “Outdoor Kitchen Lite” Makeover (Grill Station + Counter Space)
- 12) The Under-Deck Bonus Room: Dry Space Where Rain Used to Win
- 13) The Step-and-Stair Makeover: The Small Fix That Changes Everything
- 14) The “Outdoor Living Room” Makeover: Zones, Not Just Boards
- Deck Makeover Checklist: The Order That Saves Your Sanity
- Conclusion: Your Deck’s “After” Should Match Your Life
- Real-World Experiences From Deck Makeovers (The Stuff People Wish They Knew)
A deck makeover is basically a glow-up for the most underappreciated “room” in your house: the one outside.
And the best ones aren’t just prettierthey’re smarter. They fix the stuff that quietly ruins outdoor time:
wobbly rails, splintery boards, zero shade, furniture that looks like it survived three hurricanes, and that
one corner where mosquitoes hold weekly staff meetings.
This list rounds up 14 dreamy before-and-after deck makeovers you can copy (or remix) at any
budget levelplus the real-life lessons people learn after they’ve lived through sanding dust, surprise
lumber prices, and the emotional rollercoaster of choosing “the right brown.”
What Makes a Deck Makeover “Dreamy” (Not Just “New”)?
The most satisfying transformations usually follow the same formula:
make it safe (structure + rails), make it comfortable (shade + seating),
and make it feel intentional (lighting + zones + color).
If your deck is more than about 30 inches above the ground, guardrails are typically required, and common
residential guidance calls for guards at least 36 inches highso the “dreamy” part should never come at the
expense of the “nobody falls off” part.
1) The “Just Stain It” Transformation (That Looks Like a Whole New Deck)
Before
- Gray, weathered boards that feel rough under bare feet
- Patchy color from old finish and sun damage
- A vibe best described as “abandoned picnic table”
After
- Deep, even stain that brings wood grain back to life
- Clean edges and refreshed railings
- A sealed surface that’s easier to sweep and maintain
Makeover tip: The magic is in prep: clean thoroughly, let the deck dry, and apply stain in long, even passes while keeping a wet edge.
2) The Resurfaced Deck: Same Bones, Brand-New Walkway
Before
- Structure is OK, but boards are splintering or bowed
- Stairs feel “interesting” in the worst way
- You’re tired of staining season being a personality trait
After
- New deck boards (often composite) on the existing frame
- Smoother, more consistent surface
- Less routine maintenance compared to traditional wood finishes
Makeover tip: Resurfacing is a sweet spot when the framing is solidinspect carefully before you commit.
3) The Two-Tone “Designer Deck” (Without Designer-Price Drama)
Before
- A big, flat rectangle with no visual structure
- Everything blends into a single color blob
After
- A contrasting border or inlay that defines the footprint
- Built-in “zones” for dining vs. lounging
- Instant “this was planned” energy
Makeover tip: Use two complementary tonesone for the field, one for the perimeterso the pattern looks intentional, not accidental.
4) The Privacy Upgrade: From Fishbowl to Backyard Hideaway
Before
- Neighbors can practically rate your grill technique
- Wind funnels through, and the space feels exposed
After
- Privacy wall, slatted screen, tall planters, or vine-friendly trellis
- More intimate seating area that feels like an outdoor room
- Bonus: a backdrop for lights, plants, and décor
Makeover tip: Mix “solid” privacy with greenery so it doesn’t feel like you built a deck-sized bunker.
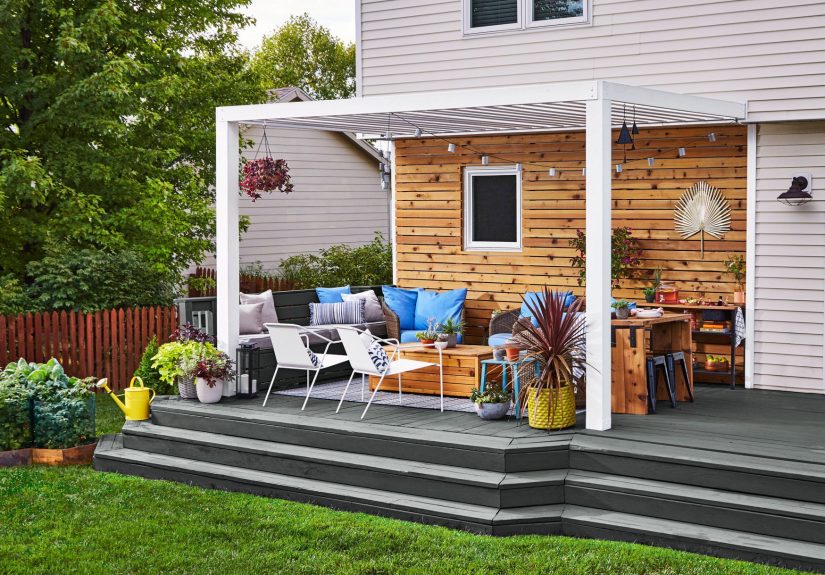
5) The Shade Solution: Pergola, Sail Shade, or Roof Extension
Before
- Beautiful deck… usable for 12 minutes at noon
- Umbrellas that behave like parachutes in a breeze
After
- Pergola with slats, shade fabric, or climbing plants
- Sail shade for a modern look with flexible coverage
- Comfort that lasts beyond “early morning or never”
Makeover tip: Add shade first if you’re always avoiding your deckcomfort upgrades make every other improvement feel worth it.
6) The Built-In Bench Makeover: Seating That Never “Needs to be Put Away”
Before
- Random chairs that don’t match or fit the space
- Traffic flow feels cramped during gatherings
After
- Built-in bench seating along the perimeter
- Room for storage under lids or lift-up seats
- A “wrapped” layout that feels custom
Makeover tip: Built-ins can double as a subtle “guard” along edgesjust ensure any code/safety requirements are still met.
7) The Railing Refresh: Safety Gets a Style Upgrade
Before
- Loose rails, chunky spindles, or dated design
- “Don’t lean on that” becomes a regular sentence
After
- Sturdier railing system that matches the home’s style
- Cleaner sightlines (metal balusters, cable, or sleek profiles)
- Confidence when kids, pets, or clumsy adults show up
Makeover tip: Check local requirementsmany places follow a 36-inch minimum guard height for residential decks, and rules can vary by location.
8) The Lighting Makeover: From “Phone Flashlight Chic” to Cozy Glow
Before
- One harsh backdoor light that attracts every bug in the zip code
- Stairs that disappear after sunset
After
- Step lights or post-cap lights for safer movement
- String lights or sconces for warm ambiance
- Deck becomes an evening hangout, not a daytime-only zone
Makeover tip: Layer lighting: safety (steps) + task (grill) + mood (overhead glow).
9) The Outdoor Rug + Furniture “Soft Landing” Makeover
Before
- Hard surfaces everywhere, no comfort cues
- Furniture looks temporaryor mysteriously damp
After
- Weather-friendly rug that defines the seating zone
- Furniture scaled to the deck (not the showroom)
- Textiles (pillows, throws) that make it feel like a room
Makeover tip: A deck can look “finished” with décor even before you tackle bigger projectsstart where your feet and your butt go first.
10) The Planter-Edge Makeover: Greenery That Feels Built In
Before
- Deck edges feel stark and exposed
- Potted plants look like a last-minute grocery run
After
- Planter boxes integrated into corners or railings
- Herbs near dining, taller plants near seating for softness
- A lush “garden room” effect without a full landscape overhaul
Makeover tip: Mix heights: trailing, medium, and tall plants create depth and privacy without blocking airflow.
11) The “Outdoor Kitchen Lite” Makeover (Grill Station + Counter Space)
Before
- Grill parked wherever it fits
- No prep space, no storage, constant trips inside
After
- A dedicated grill zone with a small counter or cart
- Storage for tools, trays, and the sauce collection you swear isn’t excessive
- Entertaining feels smooth instead of chaotic
Makeover tip: A compact station can deliver a huge upgradethink “coffee bar,” but for burgers.
12) The Under-Deck Bonus Room: Dry Space Where Rain Used to Win
Before
- Water dripping through boards makes the area below unusable
- Storage bins become accidental kiddie pools
After
- Under-deck drainage channels water away
- Option to add a ceiling finish, lighting, and even a fan
- A whole new hangout or storage zone under an upper deck
Makeover tip: If your deck is elevated, under-deck drainage can double your “usable outdoor” footprint without expanding the deck itself.
13) The Step-and-Stair Makeover: The Small Fix That Changes Everything
Before
- Uneven steps, sketchy handrail, slippery treads
- Guests tiptoe like they’re defusing a bomb
After
- Rebuilt or reinforced stairs with consistent rise/run
- Grippy treads or coatings for wet weather
- Handrails that feel sturdy and comfortable
Makeover tip: If you only fix one thing, fix the path people walk onnothing ruins a party like “careful on the stairs.”
14) The “Outdoor Living Room” Makeover: Zones, Not Just Boards
Before
- Deck exists… but it’s not used
- No purpose, no flow, no reason to linger
After
- Clearly defined zones (dining, lounging, cooking, reading corner)
- Lighting + shade + décor that make it feel like a destination
- A space that competes with your couchin a good way
Makeover tip: The dreamiest decks aren’t the biggestthey’re the ones with a plan.
Deck Makeover Checklist: The Order That Saves Your Sanity
- Safety first: structural checks, fasteners, railings, stairs.
- Surface second: replace boards or refinish (clean, repair, stain/seal).
- Comfort third: shade, seating, privacy, wind protection.
- Finish last: lighting, rugs, planters, décor, storage.
If you’re refinishing: don’t skip prep. Cleaning, drying, and applying stain thoughtfully is what turns a
weekend project into a “wow” moment. Also, plan around weatherwood and finishes are not fans of surprise rain.
Conclusion: Your Deck’s “After” Should Match Your Life
The best before-and-after deck makeovers don’t chase trendsthey solve real problems.
Maybe your dream is a shaded lounge for iced coffee. Maybe it’s a safer set of stairs and a railing you can
actually lean on. Maybe it’s finally having enough light to see your plate after 7 p.m.
Start with what makes your deck annoying right now, then upgrade in layers. A stain refresh can be
transformational. Resurfacing can feel like a rebuild without starting from scratch. And once you add comfort
(shade, privacy, lighting), the deck stops being “outside” and starts being your favorite room.
Real-World Experiences From Deck Makeovers (The Stuff People Wish They Knew)
Deck makeovers look effortless in glossy before-and-after photos, but the lived experience usually includes
at least one of the following: a surprise hardware run, a weather forecast you refresh like it’s a sports score,
and a deep philosophical debate about whether “cedar tone” is warm or just… orange. Here are the most common
lessons homeowners and DIYers share after the sawdust settles.
Prep is not optionalit’s the makeover. When people say “staining took a weekend,” what they often
mean is “staining took two hours and preparation took the rest of my natural life.” Cleaning, scrubbing,
repairing rough boards, and letting the deck dry properly is what keeps the finish from looking blotchy or failing early.
The “after” you want is smooth, even colorno lap marks, no sticky spots, no mystery patches that absorb stain like a sponge.
Weather is the project manager you didn’t hire. Refinishing needs a window of dry time before and after application.
People who try to squeeze staining into a questionable forecast often end up with debris stuck in the finish,
uneven sheen, or a redo they didn’t budget for emotionally. If your deck is shaded or surrounded by trees, drying can take longer.
It’s not being dramaticwood holds moisture, and moisture loves to ruin a good plan.
“We’ll just swap the furniture” is a valid strategy. Not every makeover needs new boards.
Many decks feel brand-new after they get better seating, an outdoor rug, and layered lighting.
A big reason: furniture creates purpose. Once you have a defined lounging zone, suddenly you use the space.
And once you use the space, you’re motivated to upgrade the surface later. It’s the reverse of what people expect,
but it worksespecially if your deck is structurally sound and the finish is merely tired.
Privacy changes how long you stay outside. People are often surprised by how much a simple screen,
tall planters, or a slatted wall improves comfort. It’s not about blocking every neighbor forever; it’s about reducing
the “I feel watched” vibe so you relax. The best privacy solutions usually mix structure and greenerysolid enough to feel
cozy, soft enough to feel welcoming.
Lighting is the secret sauce for the “dreamy” part. If you’ve ever looked at a deck in daylight and thought,
“It’s fine,” then seen it at night with warm string lights and step lighting and thought, “Wait, who lives here, a magazine editor?”
that’s the power of lighting. Safety lighting (steps) prevents tumbles. Ambient lighting makes you linger.
And practical task lighting near the grill prevents the classic “is this chicken cooked or just… optimistic?” moment.
Don’t ignore the code/safety basics. A dreamy deck is one you can use confidently.
Many people discoverlatethat old railings are loose or outdated, and that guardrails matter more once you’ve got guests,
kids, or pets using the space. Fixing rails and stairs isn’t the most glamorous upgrade, but it’s the one that turns a deck into
an actual gathering spot instead of a “look, don’t touch” platform.
Finally: plan your deck like a room, not a platform. The most successful makeovers define zones,
add comfort features first (shade, seating), and then polish with color and décor. When you treat the deck like a living room
with sunshine, the “after” stops being just a surface and becomes a lifestyle upgradewhich is a fancy way of saying:
you’ll actually use it.


