Table of Contents >> Show >> Hide
- Jump to
- Why No-Bake Bars Are the MVP of Easy Desserts
- The Simple Formula Behind Almost Every Great No-Bake Bar
- Pro Tips for No-Bake Bars That Slice Like a Dream
- 14 Easy No-Bake Bars That Come Together Fast
- 1) Peanut Butter Chocolate “Cup” Bars
- 2) Chocolate Oat Layer Bars
- 3) Scotcheroos-Style Butterscotch Bars
- 4) No-Bake S’mores Bars
- 5) Rocky Road Fudge Bars
- 6) Chewy Trail-Mix Granola Bars
- 7) Chocolate-Date Energy Bars
- 8) Lemon Cheesecake Bars (No Bake)
- 9) Key Lime Pie Bars
- 10) Berry Pudding “Icebox” Bars
- 11) Orange Creamsicle Bars
- 12) Chocolate-Almond Oat Bars
- 13) Mango-Chili Freezer Bars (Mangonada-Inspired)
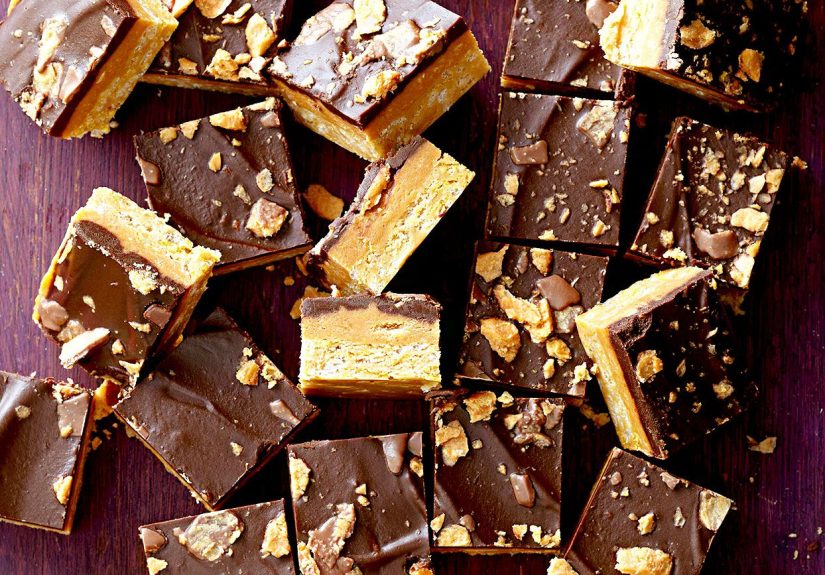
- 14) Salted Pretzel Caramel Crunch Bars
- Troubleshooting + Storage: Keep Your No-Bake Bars Perfect
- Real-Life Lessons From the No-Bake Bar Trenches ( of Experience)
- Wrap-Up
Some days you want dessert, not a full-blown relationship with your oven. No-bake bars are the
sweet, low-commitment answer: mix, press, chill, slice, brag. They’re perfect for hot days,
last-minute parties, bake sales, lunchboxes, and those “I need chocolate but I also need my
life together” moments.
The best part? “Ready in a snap” doesn’t always mean “ready in 60 seconds”it means the
hands-on work is fast. Most of these take 10–20 minutes to assemble, then the fridge or
freezer does the heavy lifting while you do… literally anything else.
Why No-Bake Bars Are the MVP of Easy Desserts
No-bake dessert bars hit a rare sweet spot: minimal equipment, mostly pantry ingredients, and
ridiculously good payoff. When you skip baking, you also skip the usual stressorsno rising,
no overbrowning, no “Is my oven lying to me again?” drama. You trade that for one simple job:
getting the bar to set.
And setting is easy when you understand the structure. Once you learn the patternbase + binder
+ chillno-bake bar recipes become more like a template you can remix forever. (Like a playlist,
but edible.)
The Simple Formula Behind Almost Every Great No-Bake Bar
1) The Base: Crunch, crumble, or chew
This is your foundation. Popular choices: crushed graham crackers, cookie crumbs, oats, puffed
cereal, pretzels, chopped nuts, or a mix. The base gives texture and keeps the bars from feeling
like sweet paste (a risk in the no-bake lifestyle).
2) The Binder: What makes it hold together
Your binder is the glue. The usual suspects are nut butter, melted butter/coconut oil, honey or
maple syrup, sweetened condensed milk, melted marshmallows, or cream cheese in cheesecake-style
bars. Pick one based on the vibe you want:
- Honey/maple + nut butter: chewy, snacky, granola-bar energy
- Butter + powdered sugar + nut butter: candy-bar richness
- Marshmallow + butter: classic cereal-bar chew
- Cream cheese + whipped topping: fluffy, chilled dessert bars
3) The Flavor: Where you make it yours
Cocoa powder, vanilla, espresso, citrus zest, cinnamon, chopped candy, toasted coconut, freeze-dried
fruit, jam swirlsthis is where your bars go from “fine” to “who made these and are they single?”
4) The Set Strategy: Fridge vs. freezer
Most bars set in the refrigerator in 1–3 hours. If you’re in a hurry, the freezer can speed things
up (20–45 minutes), but don’t forget them for three days unless you enjoy chiseling dessert.
Pro Tips for No-Bake Bars That Slice Like a Dream
- Line the pan with parchment and leave overhang “handles” for easy lifting.
- Press firmly with the bottom of a measuring cup. Loose bars crumble.
- Salt matters. A pinch makes chocolate taste more chocolatey.
- Warm your knife under hot water, wipe dry, slice. Repeat for cleaner edges.
- Chill before topping when layeringso the layers don’t mingle like awkward strangers.
14 Easy No-Bake Bars That Come Together Fast
Each idea below is designed for quick assembly with everyday ingredients. Chill times vary, but the
hands-on work stays refreshingly short.
1) Peanut Butter Chocolate “Cup” Bars
Best for: Reese’s fans, potlucks, and “I need something foolproof.”
What you’ll need: graham cracker crumbs (or crushed vanilla wafers), peanut butter, melted butter, powdered sugar, chocolate chips, a tiny pinch of salt.
How it comes together: Mix crumbs + butter + peanut butter + powdered sugar into a thick dough, press into a lined pan, top with melted chocolate (optionally with a spoonful of peanut butter swirled in), chill until firm.
Snap upgrade: Add flaky sea salt on top so people think you’re fancy on purpose.
2) Chocolate Oat Layer Bars
Best for: chewy texture and that classic cocoa + peanut butter combo.
What you’ll need: oats, butter, brown sugar, cocoa powder, peanut butter, vanilla, chocolate chips (optional).
How it comes together: Warm butter + sugar + cocoa until smooth, stir in oats and vanilla. Press half into a pan, spread a peanut-butter layer, top with remaining oat mixture, then chill. (If you like, melt chocolate chips over the top for extra drama.)
Make it yours: Swap peanut butter for almond butter or sunflower seed butter.
3) Scotcheroos-Style Butterscotch Bars
Best for: nostalgic bake-sale energy without turning on the oven.
What you’ll need: puffed rice cereal, peanut butter, honey or light corn syrup, sugar, chocolate chips, butterscotch chips.
How it comes together: Warm peanut butter + sweetener + sugar just until smooth, fold in cereal, press into pan, top with melted chocolate-butterscotch mixture, chill and slice.
Pro move: A pinch of salt in the topping makes the flavor pop.
4) No-Bake S’mores Bars
Best for: kids, summer parties, and people who love sprinkles “for texture.”
What you’ll need: graham crackers, mini marshmallows, butter, chocolate chips.
How it comes together: Melt butter + marshmallows into a gooey base, stir in graham pieces, press into a pan, pour melted chocolate over top, and chill.
Fast finish: Crush a few extra grahams on top so it looks like you planned it.
5) Rocky Road Fudge Bars
Best for: chocolate lovers who want chewy + crunchy in one bite.
What you’ll need: chocolate chips, sweetened condensed milk (or a quick fudge base), mini marshmallows, chopped nuts (or pretzels if you prefer), vanilla.
How it comes together: Melt chocolate + condensed milk, fold in marshmallows and mix-ins, press into pan, chill until sliceable.
Swap tip: Use sunflower seed butter and skip nuts for a more allergy-friendly version.
6) Chewy Trail-Mix Granola Bars
Best for: snack prep and “grab-and-go” breakfasts that feel like dessert.
What you’ll need: oats, puffed cereal or chopped nuts, dried fruit, seeds, nut butter, honey/maple, vanilla, salt.
How it comes together: Warm nut butter + honey just enough to stir, combine with dry ingredients, press tightly, chill. Keep chocolate chips for after the mixture cools slightly so they don’t melt into sadness.
Flavor ideas: cranberry + orange zest, cherry + almond, or coconut + dark chocolate.
7) Chocolate-Date Energy Bars
Best for: a “healthier” bar that still tastes like a treat.
What you’ll need: dates, oats, cashews/almonds (or seeds), cocoa, a little coconut oil, vanilla, salt.
How it comes together: Pulse nuts + oats, add dates and flavorings, then press into a pan. Top with melted chocolate if you want them to feel more like candy bars than hiking fuel.
Texture trick: Don’t over-processyou want tiny date pieces for a better bite.
8) Lemon Cheesecake Bars (No Bake)
Best for: bright, tangy dessert bars when chocolate feels too serious.
What you’ll need: graham cracker crust (crumbs + butter), cream cheese, powdered sugar, lemon zest/juice, whipped topping or whipped cream.
How it comes together: Press crust, whip filling until smooth and fluffy, spread, chill. Top with lemon zest, crushed cookies, or a thin layer of lemon curd if you’re feeling extra.
Speed option: Freeze 25–30 minutes for quicker slicing.
9) Key Lime Pie Bars
Best for: that classic “pie” vibe in a hand-held square.
What you’ll need: graham cracker crust, cream cheese, key lime juice (or regular lime), sweetened condensed milk, lime zest.
How it comes together: Mix filling until silky, pour over crust, chill until firm. Add extra zest for a punchier citrus smell the moment you lift the lid.
Make it prettier: Dot whipped cream on top right before serving.
10) Berry Pudding “Icebox” Bars
Best for: summer gatherings and people who love creamy layered desserts.
What you’ll need: graham cracker crust, instant vanilla pudding mix, heavy cream or milk (depending on the pudding), fresh berries.
How it comes together: Press crust, whip pudding layer thick, spread, pile berries on top. Chill long enough for clean squares.
Shortcut win: Use a mix of berries so it looks like you tried harder than you did.
11) Orange Creamsicle Bars
Best for: a retro, bright flavor that tastes like childhood summers.
What you’ll need: graham cracker crust, cream cheese, whipped topping, orange gelatin mix (or orange zest + a little juice), vanilla pudding (optional for structure).
How it comes together: Make a fluffy orange-vanilla filling, spread over crust, chill until sliceable. The flavor should be “sunshine,” not “cough drop,” so go easy on extracts.
12) Chocolate-Almond Oat Bars
Best for: an oat bar that’s rich but still snack-friendly.
What you’ll need: oats, almond butter, honey, butter or coconut oil, chopped chocolate, raisins or dried cherries, salt.
How it comes together: Warm almond butter + honey + fat just until loose, stir in oats and mix-ins, press, chill. Chocolate melts slightly and helps bindaka, delicious structural engineering.
13) Mango-Chili Freezer Bars (Mangonada-Inspired)
Best for: a bold, fruity bar that wakes up your taste buds.
What you’ll need: cookie crust (Maria cookies or grahams), mango puree, lime juice/zest, a creamy element (like sweetened condensed milk or whipped cream/cream cheese blend), chili-lime seasoning (optional).
How it comes together: Press crust, spread mango-lime filling, freeze until firm enough to slice. Dust lightly with chili-lime seasoning for that sweet-tangy-heat combo.
Serving tip: Let sit 3–5 minutes at room temp for easier cutting.
14) Salted Pretzel Caramel Crunch Bars
Best for: salty-sweet lovers who want maximum crunch.
What you’ll need: crushed pretzels, melted butter, brown sugar or caramel sauce, peanut butter (optional), chocolate for a top layer.
How it comes together: Mix pretzels + butter + a sticky sweetener, press firmly, chill, then top with chocolate. The key is pressing hard so the pretzels behave.
Finishing touch: Flaky salt. Always flaky salt.
Troubleshooting + Storage: Keep Your No-Bake Bars Perfect
Why won’t my bars set?
- Not enough binder: Add a spoonful more nut butter, honey, or melted chocolate next time.
- Too many dry mix-ins: Oats and cereal vary. If it looks crumbly before chilling, it’ll be crumbly after.
- Warm kitchen: Chill longer, or use the freezer briefly to speed things up.
How long do no-bake bars last?
Most no-bake dessert bars keep well in an airtight container in the refrigerator for 3–7 days,
depending on dairy and fruit. Many freeze beautifully for 1–2 monthswrap tightly, then thaw in
the fridge for best texture.
How do I cut clean squares?
Chill fully, warm the knife, wipe between cuts, and don’t rush. No-bake bars reward patience the
way cats reward affection: selectively, but meaningfully.
Real-Life Lessons From the No-Bake Bar Trenches ( of Experience)
After you make a few batches of no-bake bars, you start noticing patternsmostly about how
ingredients behave when they’re not being “helped” by heat. In baked desserts, the oven sets
structure through eggs, flour, and the magic of evaporation. In no-bake land, structure is a
team effort between fats, sugars, and chilling time, and they all have opinions.
Lesson one: pressing is not optional. The difference between “cute bar squares”
and “crumbly snack gravel” is often how firmly you compact the mixture. The first time you
press a cereal-based bar, it’ll feel like you’re being dramatic. You’re not. You’re building a
tiny edible retaining wall. Use the bottom of a sturdy measuring cup, press into the corners,
and keep going until the surface looks smooth and obedient.
Lesson two: chill time is an ingredient. It’s tempting to treat the fridge like
a suggestion, especially when you’re excited (or hungry). But no-bake bars change personality
as they cool: melted chocolate goes from glossy to snappy, nut butter firms up, and syrup-based
bars become sliceable instead of sticky. If you cut too early, you’ll think the recipe failed.
If you wait, you’ll think you’re a genius. Same barsdifferent timeline.
Lesson three: salt makes everything taste more “done”. In a no-bake bar, you
don’t get browning or toasted aromas unless you add them intentionally. A small pinch of salt
sharpens chocolate, balances sweet binders like honey and condensed milk, and makes nut butter
taste deeper. If you want people to say, “What’s in these?” (in a good way), salt is usually
the answeralong with vanilla and maybe a little espresso powder.
Lesson four: texture variety is your best friend. The bars people rave about
tend to have at least two textures: chewy + crunchy, creamy + crisp, or fudgy + snappy. That’s
why pretzels work so well with caramel, why oats pair nicely with chocolate, and why a smooth
cheesecake layer feels extra luxurious over a crumbly crust. If a batch tastes a little flat,
you can often rescue the next one by adding something crunchy (toasted nuts, cereal, pretzels)
or something bright (citrus zest, tart berries, a jam swirl).
Lesson five: your pan size changes everything. Thicker bars need longer to set,
and thin bars can turn hard fastespecially in the freezer. If you’re switching from an 8×8 to
a 9×13, expect thinner layers and quicker chilling. That’s not a problem; it’s a strategy. Use
a larger pan when you want party-ready squares that chill fast, and a smaller pan when you want
tall, bakery-style bars that feel indulgent.
And finally, the big emotional takeaway: no-bake bars are forgiving. You can swap nut butters,
change mix-ins, and adjust sweetness without wrecking the whole project. Once you get the
base-binder-set rhythm down, you’ll stop looking for “the” perfect recipe and start making
bars the way you make playlists: based on mood, cravings, and what’s already in the pantry.
Which is, honestly, the most relaxing kind of dessert confidence.


