Table of Contents >> Show >> Hide
- Start with the “no-new-bins” reset
- Go vertical (because your desk is not a storage unit)
- Paper without piles
- Cable management that doesn’t look like spaghetti
- Drawer and small-item upgrades
- Habits that keep your desk organized
- Desk organization “recipes” for real-life setups
- Conclusion: make it easy to stay tidy
- Experience Notes: what usually works in the real world (about )
If your desk looks like a paper avalanche had a baby with a charging-cable octopus, you’re not alone. The good news: you don’t need a $600 “productivity system” (or a label maker that costs more than your chair) to get a clean, functional workspace. You need a few smart zones, some simple storage, and habits that stop clutter from respawning overnight.
These desk organization ideas are built around a simple flow: capture (inbox), process (do, file, or toss), store (homes for tools and supplies), and maintain (tiny resets). That’s the difference between a desk that looks neat for one photo and a workspace that stays usable on a random Tuesday.
Below are 23 easy desk organization ideas you can tackle in an afternoonwhether you work from a home office, a tiny dorm desk, or a corporate cubicle. Let’s make your desk feel like a tool againnot a junk drawer with Wi-Fi.
Start with the “no-new-bins” reset
1. Clear the surface like you’re moving out
Set a 10-minute timer. Remove everything from your desktopyes, even the “important” pilesand wipe it down. This step is pure psychology: when the surface is empty, you can decide what earns a spot on it. Bonus: crumbs disappear, and your mouse stops skating over mystery grit.
2. Sort into four quick piles: Keep, Relocate, Trash, Digitize
As you empty the desk, sort fast. “Keep” means daily use. “Relocate” means it belongs somewhere else (kitchen scissors, anyone?). “Trash” is obvious. “Digitize” is paper you need, but not on your deskscan it, snap a phone photo, or save it to a trusted cloud folder.
3. Give your desk three zones: Work, Tools, Drop
Most clutter happens because everything tries to live everywhere. Make a simple map: the center is your work zone (keyboard, writing space). One side is your tools zone (pens, stapler, notepad). The last corner becomes a small drop zone for “in-process” itemsso they don’t colonize the whole desk.
4. Keep only “today stuff” within arm’s reach
Arm’s reach is premium desk real estate. Limit it to what you use every day: your computer, one notebook, one pen cup, and maybe a water bottle. Weekly or monthly items (extra paper, spare chargers, backup sticky notes) go in a drawer, cabinet, or nearby binnot on the desktop stage.
Go vertical (because your desk is not a storage unit)
5. Add a monitor riser that doubles as storage
Raising your monitor can improve comfort while creating space underneath for a keyboard, notebook, or small bins. Choose a riser with a shelf or drawers, or DIY one with a sturdy platform. The rule: the riser is for things you touch dailynot a secret attic for random cables.
6. Use a vertical file holder for active papers
Horizontal piles turn into paper lasagna. A vertical file holder (or magazine rack) keeps current projects upright and visible without spreading across your work zone. Limit yourself to 3–5 slots: “To Review,” “To Sign,” “To File,” “Reference,” and “Outgoing.”
7. Hang a pegboard or wall grid above the desk
If your desk is small, the wall is your best employee. A pegboard or grid can hold headphones, scissors, tape, sticky notes, and even a small shelf for your webcam or a plant. Keep it flexible: hooks can move when your workflow changes.
8. Install one floating shelf for “not-daily” gear
A single shelf just above eye level is perfect for books you grab weekly, a printer, or labeled boxes. This keeps bulky items off the desk while staying close enough to be useful. Think “parking garage,” not “storage warehouse.”
Paper without piles
9. Set up an inbox–outbox system
Paper chaos usually isn’t “too much paper,” it’s “no decision pipeline.” Use two trays or two folders: Inbox = anything you haven’t processed; Outbox = items ready to mail, scan, file, or hand to someone else. No loose paper lives outside these two homes.
10. Create a “File-It Friday” mini routine
Once a week, spend 10 minutes filing or shredding what’s in your inbox. This is how you keep paper from multiplying like rabbits with printers. If you hate filing, keep it ridiculously simple: one folder per major category (Finances, Medical, Home, Work, School).
11. Keep a shred/recycle option within one swivel
If shredding or recycling is inconvenient, paper will pile up. Place a small shredder near your desk or keep a “To Shred” envelope in a drawer, and keep a recycling bin close. The goal is to make the right choice easier than the lazy choice.
12. Use a clipboard or project folder for in-progress checklists
For ongoing taskslike a class syllabus, a client checklist, or a weekly content planuse one clipboard or one project folder. It keeps the paper you truly need in one place and stops sticky notes from turning your monitor into a detective’s crime wall.
Cable management that doesn’t look like spaghetti
13. Label both ends of every cable
Unlabeled cords are why you unplug the wrong thing and suddenly your meeting disappears. Use small labels, masking tape, or color bands on both ends (device end and power end). Example: “LAPTOP,” “MONITOR,” “RING LIGHT,” “PRINTER.” Five minutes now saves future “Which one is which?” drama.
14. Mount a power strip under the desk
Get the power strip off the floor. An under-desk mount or cable tray keeps cords tucked away and reduces dust and trip hazards. It’s especially helpful for standing desks, where slack and movement can turn cables into a tug-of-war.
15. Use adhesive cable clips along the back edge
Cable clips guide your charger, headphone cord, and USB cable exactly where you want themso they don’t slither off the desk every time you stand up. Place them along the back edge or underside, leaving enough slack to plug in comfortably.
16. Make a “charging station” with one multi-port hub
Instead of five chargers in five outlets, use a quality USB hub or charging station. Park your phone, earbuds, and watch in one spoton a small tray or in a drawer cubby. The win isn’t just tidiness; it’s knowing where things are when you’re already late.
Drawer and small-item upgrades
17. Add drawer dividers (or DIY with small boxes)
Drawers become junk drawers when they’re one big empty cave. Use adjustable dividers, small trays, or repurposed boxes (phone boxes are MVPs) to create sections: writing tools, sticky notes, charging gear, and “weird small things.” If it doesn’t fit a section, it doesn’t belong there.
18. Store duplicates away from the desk
Keep one of each essential on the desktop or top drawer: one stapler, one tape roll, one set of highlighters. Backups live elsewhere. Duplicates feel “prepared,” but they usually create clutter and decision fatigue.
19. Corral tiny items with a catchall dish
Paperclips, USB dongles, spare keys, and spare change all need a tiny home. A shallow dish works better than a deep box because you can see what’s inside. Keep it near your tools zone so micro-items stop scattering across your work zone.
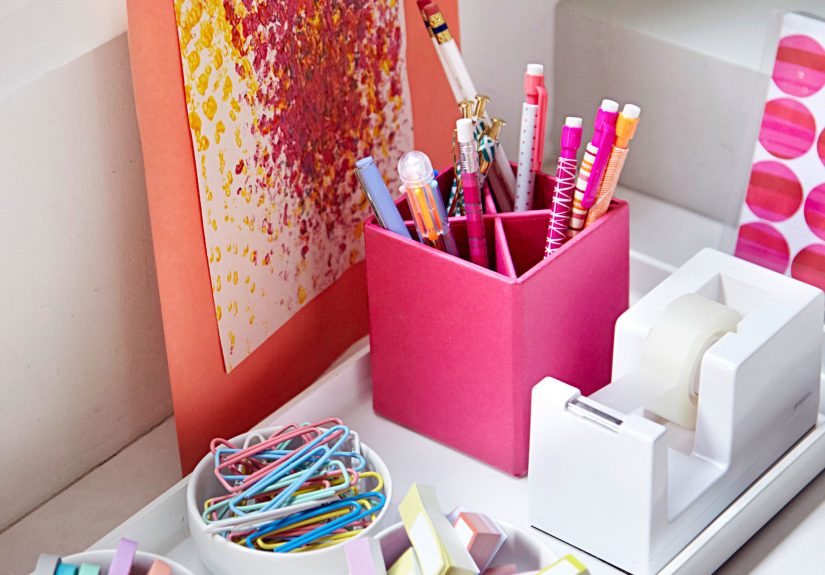
20. Keep a single tool cupand nothing else loose
A pen cup is fine. Six pen cups is a cry for help. Limit yourself to one cup (or one small caddy) for daily tools: 2–3 favorite pens, a marker, scissors, and maybe a ruler. Everything else goes in a drawer, or it gets politely thanked and donated.
Habits that keep your desk organized
21. Do a two-minute desk reset at the end of the day
Before you log off, put tools back, toss trash, and return papers to the inbox/outbox. This tiny routine prevents “tomorrow you” from starting the day stressed and already behind. Two minutes is less time than doom-scrolling one more video.
22. Use the “one in, one out” rule for desk items
Every new notebook, gadget, or pen set needs to replace something. This keeps your system stable and stops your desk from slowly becoming a retail display. If you truly need the new thing, greatmake room for it on purpose.
23. Keep a weekly maintenance checklist (short enough to actually do)
Create a recurring list: wipe the surface, empty the inbox, toss dead pens, untangle cords, restock one item (like printer paper). Keep it in your task app or as a sticky note inside a drawerso it stays visible without living on your desktop.
Desk organization “recipes” for real-life setups
Small desk or dorm: prioritize vertical storage (a wall grid or shelf) and keep your desktop to just the essentials. A vertical file holder and an under-desk hook for headphones can free surprising space.
Shared desk (hot desk or family workspace): use a portable caddy for daily tools and a slim folder for papers. When you’re done, your “kit” leaves with youso the desk resets itself.
Standing desk: cable management is non-negotiable. Use an under-desk tray and leave enough slack for movement. A monitor riser and a single charging station help keep the top surface clear, even when you switch between sitting and standing.
Conclusion: make it easy to stay tidy
The best desk organization ideas don’t rely on motivationthey rely on friction. When filing is easier than piling, cords have a path, and every tool has a home, your desk stays clean almost by accident. Start with the reset, pick 5–7 ideas that fit your space, and build one small habit (the two-minute reset is the cheat code). Your future self will thank youand your coffee will finally have somewhere safe to land.
Experience Notes: what usually works in the real world (about )
Here’s the part most picture-perfect desk tours skip: the mess usually isn’t a “storage problem.” It’s a decision backlog. Unopened mail, loose receipts, three notebooks with one page each, random adapters you’re “pretty sure” you needthose are all postponed choices. When you’re busy, your desk becomes the holding tank for decisions you didn’t have time (or energy) to finish.
In day-to-day life, the biggest win comes from giving those decisions a simple path. That’s why an inbox/outbox beats a pretty pile every time. If a paper shows up, it has only two options: it goes into the inbox because it needs action, or it goes into the outbox because it’s ready to leave your desk (file, shred, scan, mail, hand off). Once you set that rule, paper stops “floating,” and your desktop stops becoming a landfill.
Another pattern: people try to solve clutter by buying organizers first. It feels productivelike you’re taking control with a cart and a coupon code. But “container first” often turns into “same chaos, upgraded materials.” The approach that tends to stick is boring (which is why it works): edit first, then buy only what fits what’s left. If you keep five pens, you don’t need a 48-slot pen tower. If you keep one notebook, you don’t need a bookshelf pretending to be a desk.
Cables feel complicated, so they get ignored until they become a vine system. The reality is you can get most of the benefit with two small moves: label both ends and route cords along the back edge. For example, a simple label that says “MONITOR” on both ends prevents the classic move where you unplug your display and accidentally kill your laptop charger mid-call. A few adhesive clips keep your phone cable from slithering off the desk every time you stand up. Once cords stop migrating, adding an under-desk cable tray or mounting the power strip feels quick and satisfying instead of overwhelmingbecause you’re tidying the last 20%, not wrestling 100%.
Small items are where desks go to die. Paperclips, USB dongles, spare keys, hair ties, sticky notes, and that one SIM eject tool you keep “just in case” will scatter unless you give them a tiny home. In practice, one shallow catchall dish works better than a deep box, because you can actually see what’s inside. Drawer dividers help too, but even a few repurposed boxes (phone boxes, gift boxes, takeout trays) can create sections that stop the “junk drawer spiral.”
It also helps to admit that many desks aren’t just desks. In a lot of homes, the same surface is a workstation at 9 a.m., a homework station at 4 p.m., and a hobby bench after dinner. If your system requires a 12-step teardown to make the desk usable for the next person, it won’t happen on a busy Tuesday. The setups that survive real life are the simplest ones: one tool cup, one paper system, one charging spot, and one “in-process” corner. Everything else lives off the surface.
Finally, maintenance beats makeovers. A deep clean feels amazing, but it’s a once-in-a-while event. A two-minute reset is what keeps your desk from sliding back into chaos. Put tools back, put papers in the right tray, toss trash, and you’re done. The next morning, you start with a clear work zone instead of negotiating with yesterday’s leftovers. It’s the closest thing desk organization has to a cheat codeand it doesn’t cost a dime.


