Table of Contents >> Show >> Hide
- Why Thread Bracelets Never Really Go Out of Style
- What You Need Before You Start
- Way 1: Make a Classic Braided Thread Bracelet
- Way 2: Make a Candy Stripe Friendship Bracelet
- Way 3: Make a Chevron Thread Bracelet
- Common Mistakes When Making Thread Bracelets
- Creative Ways to Personalize Thread Bracelets
- Which Thread Bracelet Should You Try First?
- The Real Experience of Making Thread Bracelets
- Final Thoughts
If you have a few strands of thread, a pair of scissors, and the attention span to survive at least one snack break, you can make a bracelet. That is the beauty of thread bracelets: they are inexpensive, portable, wildly customizable, and somehow still feel magical even when your “studio” is just a kitchen table with a coffee mug sitting on one corner of the floss.
Whether you call them thread bracelets, string bracelets, or friendship bracelets, the appeal is the same. They are simple enough for beginners, creative enough for people who swear they are “not crafty,” and sentimental enough to turn a few knots into a gift someone actually keeps. Better yet, learning how to make bracelets out of thread does not require fancy supplies. Embroidery floss, tape, and patience will get you surprisingly far.
In this guide, you will learn three easy ways to make bracelets out of thread: a classic braided bracelet, a candy stripe bracelet, and a chevron bracelet. These are the kinds of designs that teach the fundamentals while still looking cute enough to wear in public, which is always the dream.
Why Thread Bracelets Never Really Go Out of Style
Thread bracelets have been around for ages because they check every box. They are lightweight, colorful, low-cost, and easy to personalize. You can make one in school colors, favorite colors, summer colors, or that mysterious combination you choose at 11:30 p.m. and somehow defend with your whole chest the next morning.
They also work for almost any age. Kids can learn basic braids. Teens can master friendship bracelet patterns. Adults can pretend they are making them “for the children” and then quietly keep the nicest one for themselves. No judgment here.
What You Need Before You Start
Basic supplies
- Embroidery floss or craft thread
- Sharp scissors
- Tape, a clipboard, or a safety pin to hold the strands in place
- A ruler or measuring tape
- Optional: beads, charms, buttons, or a sliding-knot closure
Best thread for bracelets
If you are wondering what kind of thread works best, start with embroidery floss. It is thin but sturdy, easy to knot, and available in enough colors to make your craft drawer look like a tiny rainbow exploded. Cotton embroidery floss is especially beginner-friendly because it is soft, flexible, and easy to separate or combine depending on the thickness you want.
A smart setup
Before you begin, secure the top of your strands with tape or clip them to a clipboard. This keeps your work from sliding around like it is trying to escape responsibility. Good tension makes a huge difference, especially with knot-based bracelet patterns.
Way 1: Make a Classic Braided Thread Bracelet
A braided bracelet is the easiest place to start. If you can braid hair, cords, or a loaf of challah, you already understand the basic idea. This method is quick, beginner-friendly, and great for making simple DIY thread bracelets in batches.
What you need
- 3, 6, or 9 strands of embroidery floss
- Scissors
- Tape or clipboard
How to do it
- Cut your thread. For a single-wrap bracelet, strands in the 18- to 24-inch range usually work well for a simple braid, depending on wrist size and how long you want the ties.
- Gather the strands and tie an overhand knot near one end, leaving a few inches for tying the bracelet later.
- Secure the knotted end to your table or clipboard.
- Separate the strands into three equal sections.
- Braid from left to center, right to center, and repeat until the bracelet reaches the right length.
- Tie another overhand knot at the end and trim the tails evenly or leave them loose for a tassel effect.
Why this method works
The braided bracelet is ideal for beginners because it teaches thread control without requiring you to memorize knot directions. It is also easy to customize. Use three colors for a clean striped look, or double up each section with multiple strands for a chunkier bracelet that looks more substantial.
Easy upgrades
Add a bead to each tie end, mix thick and thin strands, or create a two-wrap version for a layered look. You can even braid with metallic thread for a bracelet that says, “Yes, I came prepared to shimmer.”
Way 2: Make a Candy Stripe Friendship Bracelet
If the braid is the warm-up, the candy stripe friendship bracelet is the first real boss level. The good news is that it still uses a very simple technique. This pattern is made with repeated forward knots, which makes it one of the best friendship bracelet designs for beginners.
Why beginners love it
The candy stripe bracelet creates diagonal lines that look much more impressive than the process actually is. It is basically the craft equivalent of learning one excellent joke and using it at every party.
What you need
- 4 or more strands of embroidery floss
- Tape, clipboard, or safety pin
- Scissors
How to make it
- Cut each strand to about 30 to 36 inches for a beginner bracelet.
- Line up the strands and tie them together with an overhand knot, leaving a tail at the top.
- Secure the knot to your work surface.
- Arrange the strands in the color order you want from left to right.
- Take the far-left strand and tie a forward knot around the strand next to it.
- Continue using that same working strand to make forward knots across every strand until it reaches the far right.
- Now take the new far-left strand and repeat the process.
- Keep going until the bracelet is long enough to fit your wrist.
What is a forward knot?
A forward knot is made by creating a shape that looks a bit like the number four, looping the left strand over and around the strand beside it, then repeating that hitch a second time. Two hitches make the full knot. Once you get the rhythm, the pattern becomes wonderfully repetitive in the best possible way.
Pro tip
Keep your knot tension consistent. If one row is loose and the next is tight, your bracelet can start looking wavy instead of crisp. Not tragic, but maybe not the bold diagonal masterpiece you were picturing either.
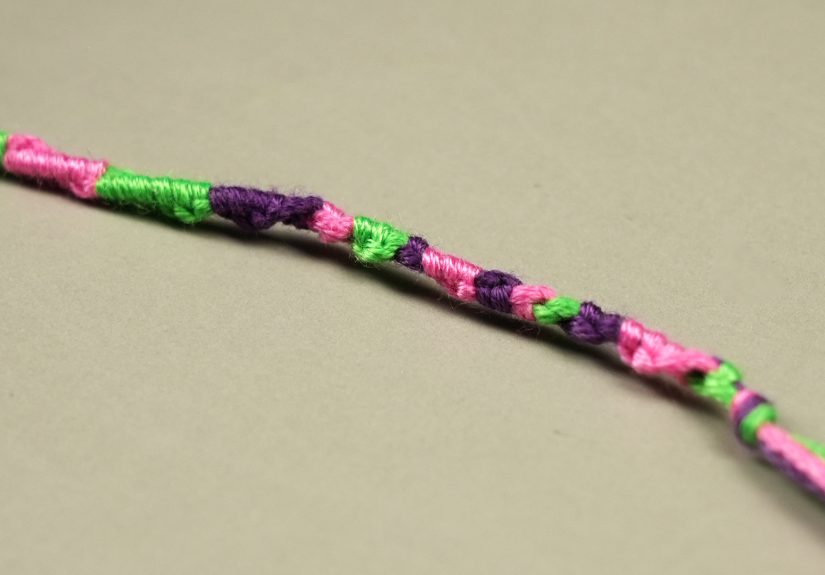
Way 3: Make a Chevron Thread Bracelet
The chevron bracelet pattern is a classic for a reason. It creates a repeating V shape that looks polished, symmetrical, and slightly more advanced. In reality, it is still built from basic moves. Once you understand forward knots and backward knots, you can make a chevron bracelet without summoning the crafting gods.
What makes chevron different
Unlike a candy stripe bracelet, which travels in one direction, a chevron bracelet is made by working from both sides toward the center. The color order mirrors itself, which is what creates the V-shaped design.
What you need
- Two strands of each color you want to use
- Embroidery floss
- Scissors
- Tape, clipboard, or safety pin
How to make it
- Cut your strands. Many makers use longer lengths for chevron bracelets because knotting shortens the bracelet more than braiding does.
- Fold the strands in half and tie a knot near the fold if you want a loop start.
- Arrange the strands so the color order mirrors itself, such as A-B-C-D-D-C-B-A.
- Secure the strands.
- Take the far-left strand and make forward knots across the strands toward the center.
- Take the far-right matching strand and make backward knots across the strands toward the center.
- When the two matching center strands meet, knot them together to complete the point of the V.
- Repeat with the new outer strands until the bracelet is the right length.
Why it looks so good
The mirrored color placement does most of the visual heavy lifting. That is excellent news for beginners because it means a bracelet can look highly intentional even while you are still whispering, “Wait, left or right?” every few minutes.
Common Mistakes When Making Thread Bracelets
Using thread that is too short
Knot-based bracelets eat up more length than most people expect. When in doubt, cut extra. Excess thread is mildly annoying. Running out when you are three rows from the finish line is character-building in the worst way.
Pulling knots too tight
Tight knots are good. Aggressively strangled knots are not. Over-tightening can warp the pattern and make the bracelet stiff. Aim for even tension, not a wrestling match.
Ignoring color order
In candy stripe and chevron bracelets, color placement matters. Lay out your strands carefully before you begin. A two-minute setup saves a lot of dramatic staring later.
Creative Ways to Personalize Thread Bracelets
- Add alphabet beads for initials or short words
- Use ombré floss for a softer gradient look
- Mix thread with tiny metallic beads
- Add a button closure for a vintage feel
- Use a sliding knot to make the bracelet adjustable
- Stack braided, candy stripe, and chevron bracelets together for a layered wrist set
Which Thread Bracelet Should You Try First?
If you are brand new, start with the braided thread bracelet. It is fast, forgiving, and satisfying. If you want a bracelet that introduces classic friendship bracelet technique, go for the candy stripe bracelet. If you are ready for something with more structure and visual payoff, make the chevron bracelet.
The best part is that each one builds on the last. Learn the braid, then the forward knot, then the chevron layout. By the time you finish your third bracelet, you will not just know how to make bracelets out of thread. You will have enough confidence to start making your own variations too.
The Real Experience of Making Thread Bracelets
Making thread bracelets is one of those crafts that sneaks up on you. At first, it seems almost too simple. You cut some floss, tie a knot, tape it down, and think, “All right, this is cute.” Then ten minutes later, you are emotionally invested in whether the coral strand is behaving properly, and suddenly this tiny bracelet has become your entire personality for the afternoon.
That is part of what makes the experience so enjoyable. It is small-scale, but it feels meaningful. A thread bracelet does not require a huge budget, a dedicated craft room, or a shopping trip that ends with you accidentally buying twelve things you absolutely did not need. It just asks you to sit down, use your hands, and pay attention. In a world that is constantly pinging, buzzing, and demanding a password reset, that is weirdly refreshing.
There is also a rhythm to bracelet-making that is almost meditative. Braiding feels calm and steady. Candy stripe knotting has that satisfying repetition that makes time blur a little. Chevron patterns demand just enough focus to keep your brain engaged without tipping into frustration. It is one of the rare hobbies where you can feel both relaxed and productive at the same time. Honestly, that is a great deal.
And then there is the color part, which might be the most fun of all. Choosing thread colors sounds simple until you realize it is basically creative chaos with consequences. You start out thinking you will make a tasteful bracelet in muted shades, and somehow you end up pairing neon orange with sky blue and calling it “bold.” The good news is that thread is forgiving. Even combinations that sound questionable on paper often look cheerful once they are knotted together.
Making bracelets also has a social side that many crafts do not. You can trade them, gift them, or make matching sets for friends, siblings, classmates, or teammates. They work as party crafts, road-trip activities, camp projects, and rainy-day boredom busters. They are handmade without feeling overly serious. A thread bracelet says, “I made this for you,” which lands somewhere between sweet and cool. That is a nice place to be.
Of course, the experience is not always flawlessly glamorous. Sometimes the strands tangle into a tiny textile crime scene. Sometimes you realize halfway through that your color order is off. Sometimes you confidently tie what you believe is a backward knot only to discover you have invented a new and completely unhelpful knot category. But that is part of the charm. Thread bracelets are low-stakes enough that mistakes feel funny instead of catastrophic.
In the end, that may be why so many people come back to them. They are simple, portable, expressive, and genuinely fun to make. You finish with something wearable, personal, and far more charming than its humble materials would suggest. Not bad for a handful of thread and a little patience.
Final Thoughts
If you want a craft that is affordable, relaxing, and actually wearable, thread bracelets are hard to beat. Start with a braid, move on to a candy stripe, and graduate to a chevron. With each bracelet, your tension improves, your speed gets better, and your color choices become either more refined or more delightfully unhinged. Both outcomes are valid.
So grab your embroidery floss, claim a corner of the table, and make something bright. The bracelet may be small, but the satisfaction is not.