Table of Contents >> Show >> Hide
- Before You Start: A 5-Minute Prep That Saves Your Shirt
- Method 1: Heat From the Back + Peel (Best for Many HTV Designs)
- Method 2: Solvent/Adhesive Remover From the Inside (The “Save the Jersey” Approach)
- Method 3: Freeze + Crack + Lift (Surprisingly Useful for Patches and Thick Transfers)
- Aftercare: Getting Rid of the “Glue Ghost” and Saving the Fabric
- Fabric Cheat Sheet: What Usually Works Best
- Troubleshooting: When the Transfer Won’t Quit
- Wrap-Up: Pick the Right Method, Then Let Patience Do the Heavy Lifting
- Experience Section (Added): What People Commonly Learn After Removing Iron-on Transfers
Iron-on transfers are a lot like glitter: they seem harmless when you invite them into your life, and then they refuse to leave.
Maybe it’s a heat transfer vinyl (HTV) logo that went on crooked, a jersey number you regret, or a “fun” craft night that turned into a “why is this fused
to my favorite hoodie?” situation. The good news: most iron-on transfers can be removed (or at least improved) if you use the right method for the right fabric.
Below are three reliable, real-world ways to remove an iron-on transfer from clothingplus fabric-specific tips, troubleshooting, and a longer
“what people learn the hard way” experience section at the end. You’ll get better results if you go slow, work from the inside of the garment,
and treat this like a careful repair job… not a wrestling match.
Before You Start: A 5-Minute Prep That Saves Your Shirt
1) Figure out what you’re removing
- Heat Transfer Vinyl (HTV)/Iron-on vinyl: Feels slightly rubbery or plastic-like. Often used for Cricut/Silhouette crafts, team names, and numbers.
- Iron-on patch: Thicker, sometimes embroidered, with glue on the back.
- Printable iron-on transfer paper: Looks like an image “printed” onto a film; can act differently than standard HTV.
2) Check the care label and do a quick colorfast test
If the tag says dry clean only, or the garment is silk, wool, rayon/viscose, acetate, velvet, leather, or suede,
skip straight to a professional cleaner. For everything else, test your chosen method on an inside seam first.
A “test spot” is boringuntil it saves you from turning navy fabric into a surprise tie-dye project.
3) Gather a small “transfer removal kit”
- Iron or mini heat press (or a hair dryer as a backup)
- Parchment paper or a thin cotton pressing cloth
- Tweezers (the craft kind) or a plastic scraper/old gift card
- Clean white cloths or paper towels
- Rubbing alcohol (isopropyl) and/or an adhesive remover made for HTV
- Optional: acetone-based nail polish remover (use carefully)
- Laundry detergent for a final wash
Method 1: Heat From the Back + Peel (Best for Many HTV Designs)
This is the “melt the adhesive, then lift” method. It works especially well when the transfer is HTV and the fabric can tolerate moderate-to-high heat
(think cotton tees, cotton blends, many sweatshirts). The trick is heating the adhesive side through the fabric, not cooking the vinyl face
until it becomes one with your shirt.
Step-by-step
- Turn the garment inside out. Lay it flat on an ironing board or a towel-covered surface.
- Place parchment paper between layers (so you don’t accidentally heat-seal the front to the backyes, that can happen).
-
Press from the inside.
Set the iron to a heat level the fabric can handle (often “cotton” for sturdy cotton garments). Keep steam off.
Press over the design area for 15–30 seconds. - Check an edge. Flip the garment right-side out and use tweezers to lift a corner. If it lifts cleanly, keep going. If it fights you, reheat from the back.
- Peel slowly while warm. Work in small sections. If the vinyl tears, reheat and continue.
- Stop if you smell scorching. That’s your cue to lower the heat, shorten the press time, or switch methods.
Why it works
Many iron-on vinyls use a heat-activated adhesive. Heating from the inside softens that adhesive so the vinyl can release. Heating from the outside can also work,
but it increases the chance of melting the vinyl face and smearing adhesive.
Best for / Avoid
- Best for: Cotton tees, cotton sweatshirts, many cotton-poly blends, newer HTV applications.
- Avoid or use caution: Delicate synthetics that warp easily, stretchy performance knits, anything labeled “low heat only.”
Quick example
You ironed “BRIDE” on five shirts… and one says “BIRD.” (It happens.) Heat-from-the-back lets you remove the wrong letters without flattening the entire shirt.
Work one letter at a time so you don’t loosen the parts you want to keep.
Method 2: Solvent/Adhesive Remover From the Inside (The “Save the Jersey” Approach)
When heat alone won’t do itor you’re dealing with stubborn adhesivesolvents can break down the glue so the transfer releases.
This is the method used in many decorating shops to remove lettering mistakes.
Your safest starting point is usually rubbing alcohol on sturdier fabrics. For tougher jobs, there are commercial
vinyl letter remover products designed for HTV. Acetone (often found in nail polish remover) can work too, but it’s stronger and can damage or discolor some fabricsso it’s strictly a “test first, tiny amounts, good ventilation” tool.
Safety first (non-negotiable)
- Work in a well-ventilated area (open windows, fan running).
- Wear gloves if using a strong remover or acetone.
- Keep solvents away from flames/heat sources and away from kids/pets.
- Do a spot test on an inside seam to check colorfastness.
Step-by-step (works for rubbing alcohol, many vinyl removers, and careful acetone use)
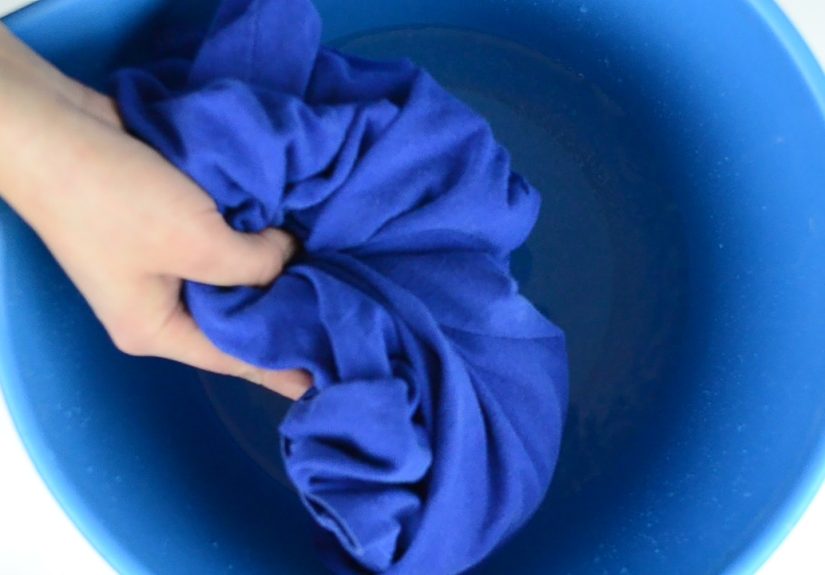
- Turn the garment inside out. You want to treat the adhesive through the fabric backing.
- Place a towel under the area to catch drips and protect your surface.
- Apply solvent to the inside. Dampen a clean white cloth (don’t soak the whole garment).
- Let it work briefly. Wait 10–30 seconds (or follow the product label directions for vinyl removers).
- Gently stretch the fabric. This helps the adhesive bond release.
- Peel from the front. Use tweezers to lift an edge and peel slowly. Reapply solvent as needed.
- Remove residue. Rub remaining sticky spots with a clean cloth and a small amount of alcohol/adhesive remover.
- Wash promptly. Launder the garment according to the care label to remove remaining solvent and loosened adhesive.
When to choose which solvent
- Rubbing alcohol: Great for loosening many adhesives and cleaning sticky residue. Often a solid first attempt.
- HTV/vinyl letter remover products: Designed specifically for removing heat-applied vinyl and adhesive residue; commonly used by decorators.
- Acetone: Effective on some adhesives, but higher risk. Use only if the fabric tolerates it and you’ve tested it.
Quick example
A team jersey has the wrong number applied. Heat alone may lift the vinyl but leave gummy adhesive behind. A letter-remover solvent (applied from the inside)
can release the number more cleanly, then alcohol can tidy up residue before a wash.
Method 3: Freeze + Crack + Lift (Surprisingly Useful for Patches and Thick Transfers)
Cold can make certain adhesives brittle. This method is especially handy for iron-on patches and thicker designs where you can get an edge lifted.
It’s not magic for every fabric-transfer combo, but when it works, it feels like you unlocked a secret level.
Step-by-step
- Put the garment in a sealed bag (to protect it from freezer smells and moisture).
- Freeze for 1–3 hours (or longer for thick patches).
- Remove and work quickly. While the adhesive is cold and brittle, use tweezers or a plastic scraper to lift a corner.
- Peel or gently scrape. Don’t gouge the fabricaim for slow lifting and small progress.
- Clean residue. If sticky glue remains, use rubbing alcohol or a fabric-safe adhesive remover, then wash.
Best for / Avoid
- Best for: Patches, thick vinyl, stubborn edge lifting, synthetic fibers that don’t love high heat.
- Avoid: Very delicate fabrics that snag easily when scraped.
Aftercare: Getting Rid of the “Glue Ghost” and Saving the Fabric
Removing the transfer is step one. Step two is making sure you don’t bake leftover adhesive into the fabric forever. These finishing moves matter:
- Don’t machine-dry until residue is gone. Heat can set adhesive and make it harder to remove.
- Pretreat sticky spots. A small amount of rubbing alcohol on a cloth can help lift remaining tackiness before washing.
- Wash inside out. Use your normal detergent and follow the care label.
- Expect a faint “shadow” sometimes. Some transfers compress fibers or slightly change dye appearance. That’s not always removable.
Fabric Cheat Sheet: What Usually Works Best
Cotton and cotton blends
Usually the easiest: try Method 1 first, then finish with Method 2 for residue.
Polyester, performance shirts, stretchy knits
Use lower heat and shorter pressing times. If the fabric gets shiny or warps, switch to Method 3 or a careful Method 2 approach
(spot test is mandatory).
Delicates (silk, wool, rayon/viscose, lace)
Strong solvents and high heat can damage these quickly. Consider a professional cleaner. If you attempt anything at home, keep it gentle, minimal, and tested.
Troubleshooting: When the Transfer Won’t Quit
Problem: The vinyl lifts, but the adhesive stays
That’s common. Use rubbing alcohol on a cloth and rub gently, then wash. For stubborn adhesive, a product made for HTV residue may help.
Problem: The area looks darker or “pressed” after removal
Some transfers flatten fibers or slightly change the surface texture. Washing can help, and a light steam (if the fabric allows) can “fluff” fibers back up,
but a perfect match isn’t always possible.
Problem: The fabric is scorching or getting shiny
Lower the heat and shorten the press time. Add a pressing cloth. If it’s a performance fabric, stop using high heat and switch methods.
Problem: You only need to remove one letter without disturbing the rest
Work in tiny sections. Use inside-out solvent application and keep your solvent confined to the problem spot. Tweezers and patience beat brute force every time.
Wrap-Up: Pick the Right Method, Then Let Patience Do the Heavy Lifting
If you remember nothing else, remember this: the fastest way to ruin a shirt is to rush. Start with heat-from-the-back for many HTV designs,
move to solvent-based removal for stubborn adhesive, and use the freezer trick when heat isn’t your friend. Test first, ventilate when using solvents,
and always finish with a proper wash.
Experience Section (Added): What People Commonly Learn After Removing Iron-on Transfers
People usually try to remove an iron-on transfer for one of three reasons: it’s crooked, it’s cracked, or it’s embarrassing in a way that felt hilarious at 11:47 p.m.
during a craft spree. And while the three methods above are the “how,” the experience of doing it teaches a few consistent lessons you’ll see again and again.
First: most mistakes get worse when you fight them from the front. A common experience is grabbing the edge of a vinyl decal and yankingonly to
tear the vinyl into tiny confetti strips while leaving the adhesive perfectly intact on the shirt. That’s why so many successful removals happen inside-out.
When you heat or treat the adhesive side through the fabric, you’re persuading the bond to let go instead of trying to rip it off like a Band-Aid made of plastic.
Second: there’s usually a “right moment” to peel. People who get clean removals often describe a sweet spot: the vinyl edge starts to wrinkle slightly,
the adhesive feels soft, and the piece lifts with steady resistance. Peel too early and nothing moves; peel too late and the adhesive cools back down and grips again.
This is why working in small sections is so effective. You’re basically timing the removalpress, lift, peel, repeatrather than trying to remove an entire graphic
in one dramatic tug.
Third: residue is normal, and it’s not a moral failing. Plenty of people remove the transfer and then panic because the shirt feels sticky or looks dull.
That sticky film is usually leftover adhesive, and it often responds well to gentle solvent work and a wash. Experienced crafters keep a “two-phase” mindset:
phase one removes the vinyl; phase two removes the adhesive. Treating it like two separate tasks helps you stay calmand keeps you from overheating the fabric
out of frustration.
Fourth: thrift-store transfers behave like they’ve been training for this moment. A frequent real-life scenario is buying a great shirt secondhand,
then realizing it has a faded sports logo or an old event graphic. Older transfers can be more brittle, the adhesive may have cured for years, and the fabric underneath
might be slightly compressed or a different shade. People who succeed tend to start with the least aggressive method, then escalate. They’ll try the freezer trick or
gentle heat first, and only reach for stronger adhesive removers when they’ve tested the fabric and accepted that “perfectly invisible” may not be on the menu.
Fifth: sometimes the best “removal” is strategic redesign. This is the experience nobody wants to admit at first: the transfer comes off, but the shirt
still shows a faint outline, or the fabric’s texture looks different where the graphic used to be. Many people end up getting creativeadding a small patch, placing a
new (better) design over the area, or turning the shirt into a sleep tee. In other words, they treat the shirt like a living document: edit, revise, and keep moving.
The win isn’t always “as if it never happened.” Sometimes the win is “it’s wearable again, and I’m not thinking about that crooked decal every time I leave the house.”
In the end, removing an iron-on transfer is a mix of method and mindset. The method helps you lift the vinyl. The mindset helps you go slow, test first, and accept
that fabricslike humanssometimes keep a tiny memory of what they’ve been through. Luckily, most of that memory washes out.