Table of Contents >> Show >> Hide
- Before You Start: What Flowers Dye Best?
- 1. Dye Flowers with Food Coloring and Water
- 2. Create Rainbow Flowers with the Split-Stem Method
- 3. Dip-Dye Flower Heads for Quick Color
- 4. Use Floral Spray Color for Bold, Even Coverage
- 5. Tint Flowers with Natural Color Sources
- How to Make Dyed Flowers Last Longer
- Color Ideas for Different Occasions
- Troubleshooting: Why Did My Flowers Not Change Color?
- Important Safety Notes
- Real-Life Experiences: What You Learn After Dyeing Flowers More Than Once
- Conclusion
- SEO Tags
Flowers are already nature’s confetti, but sometimes you want a bouquet that looks like it was invited to a neon birthday party, a pastel wedding, or a science fair with excellent taste. That is where learning how to dye flowers comes in. Whether you want blue carnations for a baby shower, rainbow roses for a dramatic centerpiece, or soft blush daisies for a handmade gift, flower dyeing lets you customize blooms without needing a greenhouse, a florist license, or a magic wand.
The best part? There is more than one way to do it. Some methods use the flower’s own drinking system to pull color through the stem. Others color the petals from the outside with sprays, dips, or artistic touches. Each technique creates a different effect, so the “right” method depends on your flowers, your timeline, and how brave you feel around food coloring. Spoiler: white shirts and blue dye are not friends.
In this guide, you will learn five practical ways to dye flowers at home or for small events, including food coloring absorption, split-stem rainbow dyeing, dip dyeing, floral spray coloring, and natural tinting for soft, earthy results. You will also get troubleshooting tips, flower recommendations, safety notes, and real-world experience advice so your bouquet looks intentionalnot like it survived a craft-table accident.
Before You Start: What Flowers Dye Best?
Not all flowers accept dye equally. White or very pale flowers are the easiest to color because the dye does not have to compete with strong natural pigments. Think of white petals like a blank canvas. Red roses, purple irises, or orange marigolds already have their own opinions, and they are not always willing to negotiate.
Best Flowers for Dyeing
For absorption methods, choose fresh, light-colored flowers with strong stems and open or semi-open petals. Some reliable options include:
- White carnations
- White roses
- White chrysanthemums
- Daisies
- Baby’s breath
- Hydrangeas
- Tulips
- Queen Anne’s lace
Carnations are especially popular because their ruffled petals show color beautifully. Baby’s breath is excellent for creating colorful filler flowers, while chrysanthemums and daisies can produce cheerful, high-contrast results.
Basic Supplies You May Need
Depending on the dyeing method you choose, gather a few simple tools before you begin:
- Fresh white or pale flowers
- Clean glass jars, cups, or bud vases
- Food coloring, floral dye, or natural color concentrate
- Sharp scissors, floral snips, or a clean knife
- Room-temperature water
- Paper towels or newspaper
- Disposable gloves
- Floral spray paint, if using the spray method
- A protected work surface
Always start with clean containers. Bacteria in dirty vases can clog stems and shorten the life of your flowers. A fresh angled stem cut also helps the flower absorb water more efficiently. If your flower cannot drink well, it cannot dye well. A dehydrated flower is basically a tiny diva with no energy for transformation.
1. Dye Flowers with Food Coloring and Water
This is the classic method most people remember from school science projects, and for good reason: it works, it is inexpensive, and it teaches you a little plant biology while making your kitchen look like a flower laboratory.
The method relies on capillary action and transpiration. In plain English, cut flowers continue to pull water up through their stems. When the water contains dye, the color travels upward and appears in the petals. The result is usually soft at first, then stronger after several hours or overnight.
How to Do It
- Choose white or pale flowers, such as carnations, daisies, or chrysanthemums.
- Fill a clean jar with about half a cup to one cup of room-temperature water.
- Add 15 to 30 drops of food coloring. Use more dye for a deeper shade.
- Stir the water until the color is evenly mixed.
- Cut the flower stem at a 45-degree angle.
- Place the flower in the dyed water immediately.
- Leave it for several hours or overnight, checking the color as it develops.
Blue, red, green, and purple food coloring usually show well on white flowers. Yellow can be pretty but subtle, especially on cream-colored petals. For stronger color, use more dye and less water. The mixture should look bold in the cupalmost too bold. Pale water usually leads to pale results.
Best Uses
This method is perfect for kids’ crafts, classroom activities, casual home décor, party centerpieces, and low-cost experiments. It works beautifully when you want a natural-looking color change that appears from within the flower rather than sitting on top of the petals.
Pro Tips
Use freshly cut stems and avoid flowers that are already wilting. Remove leaves that would sit below the waterline, because submerged leaves encourage bacteria. If the color is not showing after a few hours, re-cut the stem and increase the dye concentration. Some flowers are slow sippers, so give them time before accusing them of being lazy.
2. Create Rainbow Flowers with the Split-Stem Method
If regular dyed flowers are fun, rainbow flowers are the dramatic cousin who arrives wearing sequins. The split-stem method lets one flower absorb multiple colors at the same time. Each section of the stem drinks from a different cup of dyed water, sending separate colors into different parts of the bloom.
This method is commonly used for rainbow roses, but it can also work with carnations, chrysanthemums, and other sturdy white flowers. Roses can be a little fussy, so beginners may have better luck practicing with carnations first.
How to Do It
- Choose a fresh white flower with a firm, long stem.
- Prepare two to four small cups of water, each with a different food coloring shade.
- Use a sharp knife to carefully split the bottom of the stem into two, three, or four sections.
- Place each split section into a different cup of colored water.
- Support the flower so the stem pieces do not snap.
- Let the flower sit for 12 to 48 hours while the colors develop.
The stem split should be long enough to reach separate cups but not so long that the stem becomes fragile. Two colors are easier than four, especially for your first attempt. Try red and blue, yellow and green, or pink and purple for a softer look.
Best Uses
Rainbow flowers are ideal for birthday parties, pride-themed arrangements, science demonstrations, whimsical gifts, and photo-friendly centerpieces. They are not always perfectly symmetrical, but that is part of the charm. Each flower becomes its own tiny watercolor painting.
Common Mistakes
The most common mistake is splitting the stem too aggressively. If the stem collapses, the flower will struggle to absorb water. Another issue is using flowers that are too old. A tired flower will not pull dye efficiently, and no amount of motivational speaking will help. Start with fresh blooms that still look firm and hydrated.
3. Dip-Dye Flower Heads for Quick Color
Dip dyeing colors the outside of the petals instead of relying on the stem to absorb dye. This is faster than the food coloring method and gives you more control over where the color lands. It is especially useful when you want tinted petal edges, ombré effects, or a bold color for an event happening soon.
Professional floral suppliers often use specialty floral dyes for this technique, but small DIY projects can be tested carefully with diluted food coloring or craft-safe colorants. The key is to avoid soaking delicate flowers too long. Petals are beautiful, but they are not waterproof armor.
How to Do It
- Prepare a small bowl with dye solution.
- Protect your work surface with newspaper or paper towels.
- Hold the flower upside down or sideways by the stem.
- Dip only the petal tips or selected areas into the dye.
- Lift the flower and let extra liquid drip off.
- Place the flower upright in a vase to dry.
For an ombré look, dip the petal tips briefly, let them dry, then dip again slightly less deeply for stronger color at the edges. You can also dip just one side of the flower for an artsy, asymmetrical effect.
Best Flowers for Dip Dyeing
Sturdier blooms work best. Try carnations, roses, chrysanthemums, orchids, or hydrangea clusters. Very delicate flowers may bruise, droop, or develop water spots. Always test one flower before dyeing the whole bouquet. Think of it as the floral version of trying one chip before committing to the entire salsa jar.
Best Uses
Dip dyeing is excellent for wedding décor, themed parties, handmade corsages, photo shoots, and floral crafts where you want visible artistic color. It is also useful when absorption dyeing would take too long.
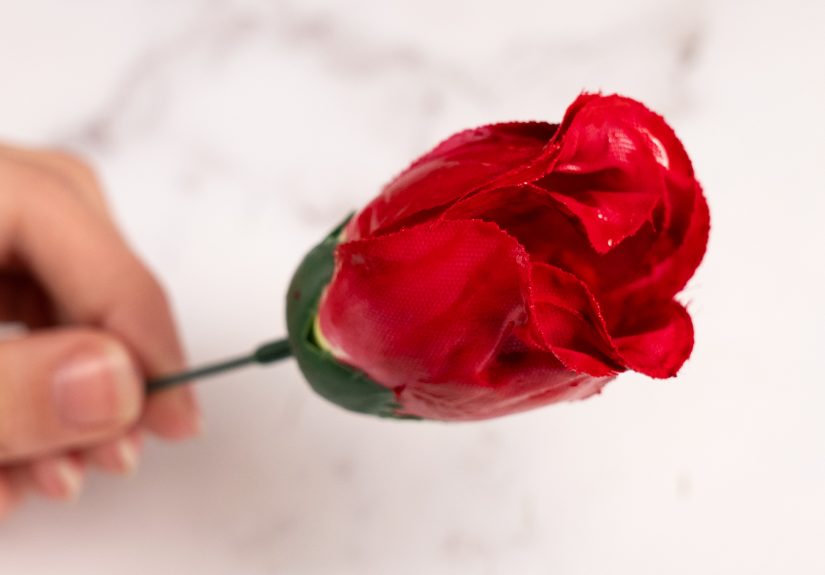
4. Use Floral Spray Color for Bold, Even Coverage
Floral spray color is the go-to method when you need fast, vivid, consistent results. Unlike regular household spray paint, floral sprays are designed for fresh and dried botanical materials. They are commonly used by florists to enhance, shift, or completely transform flower colors.
This method works on fresh flowers, dried flowers, leaves, branches, seed pods, and decorative grasses. It is also one of the best options for dark flowers because you are applying color to the surface rather than asking the flower to absorb dye internally.
How to Do It
- Work in a well-ventilated area and protect the surface underneath.
- Shake the floral spray according to the product directions.
- Hold the can several inches away from the flower.
- Apply a light mist rather than one heavy coat.
- Rotate the flower and spray from different angles.
- Let the flower dry before arranging it.
Light coats are the secret. Heavy spraying can make petals look stiff or artificial. A gentle mist gives a more professional finish and helps preserve petal texture. You can layer colors, add metallic accents, or spray only the tips for a modern design.
Best Uses
Use floral spray when you need dramatic color, event consistency, metallic finishes, seasonal arrangements, or color correction. It is helpful for Halloween black roses, holiday gold eucalyptus, pastel wedding filler, or bold party bouquets.
Safety Tips
Use floral spray in a ventilated area, follow the label directions, and keep it away from food surfaces. Once flowers are sprayed or chemically dyed, treat them as decorative only. Do not use them as edible cake toppers, drink garnishes, or salad decorations. A blue rose on a cupcake may look magical, but unless it was grown and prepared specifically for food use, it belongs beside the dessertnot in it.
5. Tint Flowers with Natural Color Sources
Natural flower dyeing is softer, subtler, and a little more unpredictable. Instead of bottled food coloring or commercial floral dye, you use concentrated color from plant-based ingredients such as beet juice, turmeric, hibiscus tea, red cabbage, berries, or spinach. The results are usually gentle rather than neon, which makes this method lovely for rustic arrangements, nature-inspired crafts, and soft seasonal décor.
Natural dyes may not produce the same intensity as synthetic colorants, but they can create beautiful antique tones: dusty pink from beet, golden yellow from turmeric, lavender-gray from cabbage, or muted red from hibiscus. Results depend on the flower type, dye strength, water pH, and soaking time.
How to Do It
- Make a strong natural dye by simmering or steeping the color source in water.
- Strain the liquid and let it cool completely.
- Pour the dye into a clean jar.
- Cut the flower stems at an angle.
- Place white or pale flowers into the natural dye.
- Let them sit for several hours or overnight.
For a more concentrated dye, simmer the liquid down until the color deepens. Just make sure it is cool before adding flowers. Hot dye can damage stems and petals. Flowers enjoy water; they do not enjoy soup.
Best Uses
Natural tinting is best for soft decorative projects, eco-style crafts, botanical experiments, and muted arrangements. It is not the best choice when you need bright, exact, repeatable colors. If your event color is “electric turquoise with a hint of mermaid,” use floral dye or spray instead.
How to Make Dyed Flowers Last Longer
Dyeing flowers is only half the mission. Keeping them fresh is the other half. Dyed flowers can last several days or longer with proper care, but they still need clean water, trimmed stems, and a cool location.
Use a Clean Vase
Always start with a clean container. Dirty vases can introduce bacteria that block stems and make flowers wilt faster. Wash jars and vases with warm, soapy water before using them.
Re-Cut the Stems
Cut stems at a 45-degree angle before placing flowers into dye or fresh water. This increases the surface area for absorption and helps prevent the stem from sitting flat against the bottom of the vase.
Remove Lower Leaves
Any leaves below the waterline should be removed. Leaves left underwater decay quickly and cloud the water, which is bad news for vase life and even worse news for your nose.
Keep Flowers Cool
Place dyed flowers away from direct sunlight, heating vents, hot windows, and ripening fruit. Heat speeds wilting, while some fruits release ethylene gas that can shorten flower life.
Refresh Water Regularly
If your flowers are finished dyeing and you want to display them, move them to clean water with floral preservative. Change the water every couple of days or sooner if it becomes cloudy.
Color Ideas for Different Occasions
For Weddings
Try blush pink roses, pale blue hydrangeas, champagne carnations, or lavender baby’s breath. Soft colors look elegant and photograph well.
For Birthday Parties
Use rainbow carnations, bright daisies, or colorful baby’s breath in mason jars. Kids love seeing flowers change color, and adults secretly do too.
For Holidays
Use red and green flowers for Christmas, orange and black for Halloween, pastels for Easter, or metallic floral spray for New Year’s arrangements.
For Science Projects
Compare how different flowers absorb dye. Test carnations, daisies, roses, and chrysanthemums in separate jars with the same dye concentration. Record how long each flower takes to show color.
Troubleshooting: Why Did My Flowers Not Change Color?
If your flowers are not changing color, do not panic. Flower dyeing can be simple, but it is not always instant. Here are the most common problems and fixes.
The Dye Is Too Weak
Use more food coloring or floral dye. The water should look dark and saturated, not lightly tinted.
The Flowers Are Too Dark
Dye shows best on white or pale petals. Dark flowers will not reveal absorbed color clearly.
The Stems Are Clogged
Re-cut the stems and place them back into fresh dye solution. Stems can seal or clog after cutting.
The Flowers Are Too Old
Older flowers absorb water more slowly. Use fresh blooms that are not drooping or browning.
The Room Is Too Cold
Flowers may absorb water more slowly in very cool conditions. Room temperature usually works well for dyeing.
Important Safety Notes
Dyed flowers should generally be treated as decorative, not edible. Even if you use food coloring, flowers from florists, nurseries, roadsides, or garden centers may have been treated with pesticides or preservatives that are not meant for eating. If you need edible flowers, use only flowers grown specifically for culinary use and verify that they are safe, pesticide-free, and properly handled.
When using floral sprays or commercial dyes, read and follow all product directions. Work in a ventilated area, wear gloves when needed, and protect tables, counters, and clothing. Dye has a special talent for finding the one surface you forgot to cover.
Real-Life Experiences: What You Learn After Dyeing Flowers More Than Once
The first time you dye flowers, you may expect instant results. You place a white carnation in blue water, stare at it for seven minutes, and wonder why science has personally betrayed you. The truth is that absorption dyeing takes patience. Some flowers show color within a couple of hours, especially along the petal edges and veins. Others need overnight to look truly transformed. The waiting is part of the fun, even if it makes you check the vase like it owes you money.
One useful lesson is that stronger dye almost always works better than a timid mixture. Many beginners add a few drops of food coloring to a full vase of water and end up with flowers that look vaguely “emotionally blue” rather than actually blue. A concentrated dye bath gives the petals something noticeable to absorb. If you want dramatic color, make the water dark. You can always shorten the dyeing time, but you cannot make weak dye perform miracles.
Another experience-based tip is to test one flower before dyeing the whole bunch. Flowers can vary even within the same bouquet. One carnation may drink quickly, while the one beside it acts like it is on a hydration strike. Testing helps you see how the petals respond, how long the color takes, and whether the final shade matches your plan. This is especially important for events. Nobody wants to discover two hours before a party that “soft lavender” has become “mysterious gray with swamp undertones.”
Split-stem rainbow flowers are gorgeous, but they require gentle hands. The stem can tear if you rush, and once it breaks too high, the flower may droop. Start with two colors before trying four. Use narrow cups or small bud vases so each stem section can sit comfortably in its own color. If the cups keep sliding around, tape them together or place them inside a tray. Stability is not glamorous, but neither is a rainbow rose face-down on the counter.
Dip dyeing teaches you that less is often more. A quick dip can create elegant tinted edges, while a long soak may leave petals soggy or blotchy. The best results often come from dipping lightly, letting the bloom dry, and repeating if needed. This layered approach gives you more control. It is the floral equivalent of adding seasoning slowly instead of dumping in the whole salt shaker.
Floral spray is the fastest method, but it also rewards restraint. A heavy coat can flatten the natural beauty of petals. Light misting from multiple angles looks more refined and keeps the flower from appearing plastic. Metallic sprays can be stunning on leaves, branches, seed pods, and dried flowers, but they should be used thoughtfully on fresh blooms. A little shimmer says “celebration.” Too much says “disco broccoli.”
Natural dyes are charming because they feel organic and handmade, but they are not always predictable. Beet may lean pink, red cabbage may shift depending on acidity, and turmeric can create strong yellow stains. Natural color is ideal when you want a soft, earthy effect, not when you need exact color matching. If you are decorating for a wedding or branded event, test early and keep notes.
The biggest practical lesson is this: dyeing flowers is both a craft and an experiment. Use fresh flowers, clean tools, concentrated color, and patience. Accept small surprises. Sometimes the prettiest bloom is the one that does something unexpected, like turning pale blue at the edges and violet near the center. That tiny imperfection can make the arrangement feel alive, personal, and far more interesting than anything mass-produced.
Conclusion
Learning how to dye flowers opens up a playful world of custom color. You can use food coloring and water for a simple science-style transformation, split stems for rainbow effects, dip dye for artistic petal edges, floral spray for fast professional color, or natural dyes for soft botanical tones. Each method has its own personality, from gentle and subtle to bold and theatrical.
For the best results, start with fresh white or pale flowers, use clean containers, cut stems at an angle, and choose the dyeing technique that matches your goal. Food coloring is great for beginners. Split stems are perfect for rainbow drama. Dip dyeing gives creative control. Floral spray delivers instant impact. Natural dyes bring earthy charm. With a little testing and a sense of humor, you can turn ordinary flowers into custom blooms that look like they were made just for your table, party, gift, or photo shoot.


