Table of Contents >> Show >> Hide
- Why Painted Animals on Rocks Look So Real (It’s Not Magic, It’s Strategy)
- Meet the Rock-Whisperers: Artists Who Make Stones Feel Like Wildlife
- The Materials That Make a Difference (Without Turning Your Kitchen into a Chemistry Lab)
- How Artists Paint Fur, Feathers, and Scales on a Curved Rock
- 30 Pics: Animal Rock Painting Gallery (With Captions + Alt Text Placeholders)
- Before You Paint (Or Hide) Rocks: A Quick Reality Check on Nature + Rules
- Want to Try It? A Beginner-Friendly Plan That Doesn’t Assume You Have Superpowers
- Bonus: of Real-World Rock Painting “Experience” (The Fun Parts and the Sneaky Hard Parts)
Somewhere out there, a rock is minding its own businessbeing gray, being lumpy, being extremely good at not paying taxeswhen an artist picks it up and says, “Congrats. You’re a raccoon now.”
Rock painting has been a craft-kid classic for ages, but a handful of artists have taken it from “cute ladybug on a pebble” to “why is that owl staring into my soul?” The trick isn’t just talent (though, yes, that helps). It’s the partnership between shape and subject: the stone’s curves become a turtle’s shell, a river rock’s ridge becomes a fox’s shoulder line, and a perfectly round pebble becomes a suspiciously realistic frog face that makes you check your hand for slime. (No slime. Just vibes.)
In this deep dive, we’ll break down why animal rock paintings look so unbelievably lifelike, what tools make the biggest difference, how artists “read” a stone like a tiny sculpture, andbecause we’re keeping our promisesserve up a gallery of 30 “pics” worth of animal-rock inspiration, complete with captions and ready-to-use alt text placeholders for web publishing.
Why Painted Animals on Rocks Look So Real (It’s Not Magic, It’s Strategy)
A flat canvas starts at zero. A rock starts at… let’s call it “already 40% sculpture.” That built-in 3D form is the secret sauce. When an artist uses the stone’s natural bulges and dips, the painting gains instant volume. Your brain loves this, because it’s basically being handed a shortcut: the highlight on a curved surface reads as glossy fur; the shadow in a crevice reads as an eye socket; a ridge reads as a brow bone.
The best animal rock paintings also lean into micro-contrasttiny shifts in warm and cool tones that suggest depth without heavy outlines. Fur isn’t painted as “brown,” it’s painted as “brown-with-a-little-ash-gray-and-a-whisper-of-honey-and-just-one-rebellious white hair for realism.” Feathers get thin directional strokes, and scales get repeated shapes with slightly different values so they feel alive, not stamped.
The “Stone-First” Mindset
Many rock-painting artists don’t start with an animal in mind. They start with a rock that already suggests somethingan oval that feels like a sleeping cat, a teardrop pebble that begs to become a bird head, a dome that practically yells “turtle.” When the subject is chosen to fit the stone, the final result feels inevitable, like the animal was hiding there the whole time.
Meet the Rock-Whisperers: Artists Who Make Stones Feel Like Wildlife
The modern wave of ultra-real animal rock painting is often associated with artists who treat stones as tiny sculptures and paint with the patience of a watchmaker. One widely shared example is Japanese stone artist Akie Nakata, known for transforming small rocks into animals with startling realismoften using the rock’s shape as the animal’s body and building lifelike eyes, fur, and texture through careful layering.
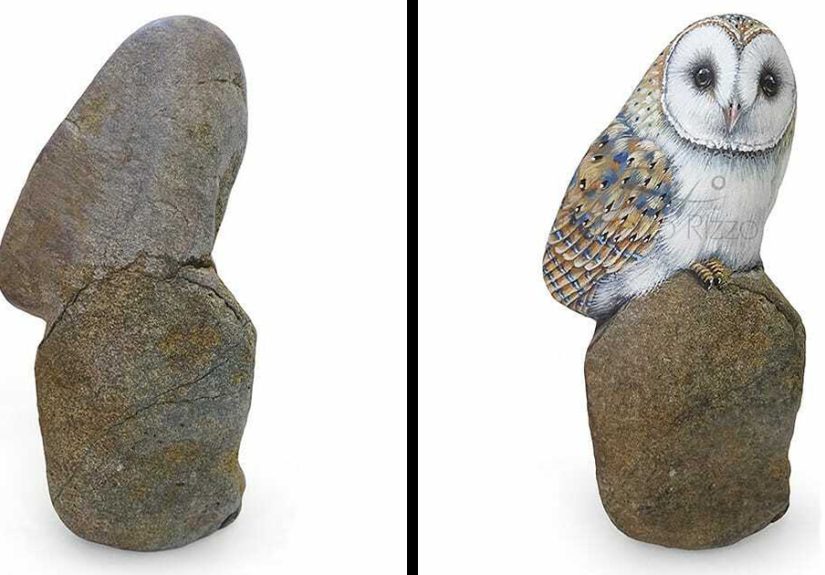
Another frequently featured name in the genre is Roberto Rizzo, whose rock paintings often emphasize realistic animal portraits that wrap around the stone’s curves, making the rock feel like a miniature, handheld creature rather than a flat image.
What They All Have in Common
- They choose the stone like casting directors choose actors: the shape matters as much as the paint.
- They obsess over eyes: a tiny highlight can turn “paint” into “presence.”
- They paint texture in layers: base color, mid-tones, shadows, then detailnever all at once.
- They respect the rock’s edges: a hard boundary often looks fake; a feathered transition looks natural.
The Materials That Make a Difference (Without Turning Your Kitchen into a Chemistry Lab)
Paint: Acrylic Is the Workhorse
Acrylic paint is popular for rock art because it’s versatile, fast-drying, and builds in layers without much drama. Many artists also use acrylic gouache (a matte, opaque acrylic), paint pens for linework, or a mix of brush painting and fine-tip detailing.
If your rocks will live outdoors, look for outdoor/multi-surface acrylics designed to handle weather and sun better than standard craft paint. If they’ll stay inside, standard acrylics are usually finejust protect them from constant handling.
Prep: Clean, Dry, and (Sometimes) Prime
Rocks can be dusty, oily, or weirdly gritty. A good wash and a full dry helps paint stick. If you want brighter colors or smoother coverage, a primer such as gesso can help create a paint-friendly surface, especially on dark or porous stones.
Seal: The “Don’t Let My Art Melt in the Rain” Step
Sealing is where hobbyists and pros start sounding like weather forecasters. The goal is simple: protect pigment from moisture, scuffs, and UV fading. Many people use clear acrylic sprays or brush-on sealers. If you’re using sprays, do it in a well-ventilated area and follow the label. Light coats usually look better than one heavy coat (which can cloud, drip, or pool like a sad little clear-coat swamp).
For extra UV protection, some varnishes include UV stabilizers meant to reduce sun damage over time. Nothing makes paint immortal, but good finishing choices can keep colors crisp longer.
How Artists Paint Fur, Feathers, and Scales on a Curved Rock
1) Start with the “Big Read”
Before any paint touches stone, skilled artists rotate the rock and identify the “front,” the natural silhouette, and where major features will sit. A bump might become a shoulder. A dip might become the shadow under a jaw. If the stone has a natural “lean,” they might choose an animal that naturally poses that waysleeping, crouching, perched, curled.
2) Block In Large Shapes
Realism is built on boring foundations. First comes the base coat and the general value map: where the darkest darks live, where the light hits, where the mid-tones connect everything. If you get this right, details become icingnot a rescue mission.
3) Layer Texture with Direction
Texture looks real when strokes follow anatomy. Fur strokes radiate from the nose and whisker pads, swirl around cheeks, and change direction at joints. Feathers overlap in rows. Scales repeat, but not perfectlynature loves patterns, but it also loves chaos.
4) Finish with Eyes (Yes, Really)
Eyes can make or break the illusion. A realistic eye usually has a dark pupil, a softer iris, a sharp highlight, and a subtle shadow from the eyelid. Even on a tiny rock, that highlight is the “spark” that convinces your brain there’s life inside.
30 Pics: Animal Rock Painting Gallery (With Captions + Alt Text Placeholders)
Below are 30 “pics” in web-ready format. Replace each src with your actual image file path. Captions are written to match the style of realistic animal rock art: shape-forward, detail-rich, and a little bit “how is this a rock?”


Before You Paint (Or Hide) Rocks: A Quick Reality Check on Nature + Rules
Painted rocks can be sweet gifts, fun keepsakes, or community craft projectsbut they can also become a problem when left in protected natural areas. Many parks and conservation groups emphasize Leave No Trace principles, and some parks treat painting or leaving altered natural objects as a form of vandalism or littering. Translation: if a place is protected, “leave it as you found it” usually means don’t add acrylic wildlife to the ecosystem.
- Don’t take rocks from protected areas (parks, preserves, archaeological sites).
- Don’t leave painted rocks in national parks or places that prohibit them.
- If you gift or “hide” rocks, do it only where it’s explicitly allowed and environmentally appropriate.
The most responsible approach is simple: treat painted rocks as art objectskeep them, gift them, or display them in planters and indoor spacesrather than scattering them in wild places.
Want to Try It? A Beginner-Friendly Plan That Doesn’t Assume You Have Superpowers
Step 1: Pick the Right Rock
Smooth river rocks are beginner-friendly because paint glides and details read cleanly. Look for a shape that already suggests an animal: round for frogs, domed for turtles, long for sleeping cats, triangular for wolf profiles. The rock is your co-artistchoose one that’s cooperating.
Step 2: Clean + Dry Completely
Wash with water, scrub off grit, and let it dry fully. Painting on a damp rock is like putting makeup on a wet dog: technically possible, emotionally confusing, and rarely a good idea.
Step 3: Prime (Optional, but Helpful)
A light primer coat can help paint adhere and pop, especially on dark stones. If you’re doing realism, a smoother base often means easier blending later.
Step 4: Sketch Lightly
Use a pencil or a light paint marker to map out where eyes, nose, and major shapes go. Keep it simple: big shapes first, details later.
Step 5: Paint in Layers
- Base coat: large color areas.
- Shadows: under the chin, around eyes, under belly areas.
- Mid-tones: unify transitions so it doesn’t look like a cutout.
- Details: fur strokes, whiskers, feather edges, scale patterns.
- Highlights: tiny bright accents that add “life.”
Step 6: Seal (Especially if It’ll Be Handled)
Let paint dry completely, then seal. Follow product directions carefully, especially for sprays (ventilation, temperature, and light coats matter). If your rock is meant to be a handled keepsake, a durable protective finish helps preserve detail.
Bonus: of Real-World Rock Painting “Experience” (The Fun Parts and the Sneaky Hard Parts)
People who fall in love with animal rock painting usually describe the same moment of realization: the rock isn’t a blank surfaceit’s a character auditioning for a role. The first time you find a stone that already looks like a curled fox or a sleepy cat, it’s weirdly thrilling. You’ll rotate it in your hand like you’re inspecting a tiny sculpture, noticing how one side feels like a shoulder and another side naturally slopes into what could be a snout. That “aha” is half the hobby: you’re not forcing an image onto a rock; you’re discovering the animal that fits it.
Then comes the part nobody posts: the rock’s shape is also the reason it’s hard. Curves distort proportions. A face that looks perfect from straight on can go slightly alien when it wraps around the edge. Beginners often learn quickly to place the “main view” on the flattest area and let details fade softly as they turn cornersbecause harsh outlines around a curve can scream “sticker,” not “creature.” Many painters end up doing a few dry runs with a light sketch, stepping back, turning the rock, and adjusting placement until the anatomy feels believable from multiple angles.
The most satisfying experience is building texture in layers. Fur, for example, teaches patience in a sneaky way. If you try to paint every hair at once, the rock becomes a scribble festival. But when you lay down a base color, then add a darker pass for depth, then a mid-tone to blend, and finally a few lighter strands for highlight, it suddenly “clicks.” You can almost feel the animal emergeespecially when you add tiny touches like a whisker shadow or a soft pink inner ear. It’s the art version of making a sandwich: the bread seems boring until you add the filling, and then suddenly the whole thing is delicious and you want to brag about it.
Sealing is its own learning curve. Many hobbyists have a “my first sealer fail” story: a heavy coat that dripped, a humid day that caused clouding, or a rock that stuck to the surface it was drying on like a prank. The common lesson is gentle: light coats, proper dry time, and following the product instructions matter. Once someone experiences a good sealsmooth finish, colors popping, details protectedthere’s a little satisfaction in knowing the rock can be handled, gifted, and displayed without the art rubbing away.
The best part, though, is how personal animal rocks can be. A pet portrait on a stone feels like a tiny memorial you can hold. A turtle rock becomes a desk “worry stone” that’s actually soothing to touch. A fox pebble becomes a gift that says, “I saw this rock and thought of you,” which is honestly a very specific kind of affection. And yesat some point, you will look at a random pebble on the ground and think, “That would make a great owl.” That’s how you know you’re in deep.


