Table of Contents >> Show >> Hide
- Quick Design Plan (So You Don’t Build a Console for a TV You Don’t Own)
- Materials and Tools
- Cut List (Example for a 66" W × 30" H × 18" D Console)
- Step-by-Step Build
- Step 1: Plan your openings (the “measure twice” part)
- Step 2: Break down the plywood
- Step 3: Drill pocket holes and dry fit
- Step 4: Assemble the main box
- Step 5: Install shelves (and leave room for cords)
- Step 6: Add the top structural panel
- Step 7: Build and attach the face frame
- Step 8: Choose your doors (hinged or sliding)
- Step 9: Cable management (make it look like an adult lives here)
- Step 10: Build the top
- Step 11: Sanding and finishing (the part that makes it look expensive)
- Customization Ideas That Make It Yours
- Troubleshooting (Because Wood Has Opinions)
- How Much Does It Cost and How Long Does It Take?
- of Real-World “Experience” (What Builders Commonly Learn the Hard Way)
- Conclusion
A farmhouse TV console is basically the Swiss Army knife of furniture: it hides the cord chaos, stores the “important” things
(remotes, games, that one cable you refuse to throw away), and looks good doing it. Call it a farmhouse media console,
a farmhouse TV stand, or a sideboardeither way, it’s a sturdy, low-profile workhorse that can live in the living room
or show up in the dining room like, “I also hold plates now.”
This guide walks you through building a clean, classic farmhouse console with a solid top, roomy storage, and practical details
like adjustable shelves and cable pass-throughs. It’s designed to be beginner-friendly (pocket holes and plywood are your friends),
but still looks like you paid “custom furniture” money. Spoiler: you didn’t.
Quick Design Plan (So You Don’t Build a Console for a TV You Don’t Own)
Before you cut a single board, decide how you’ll use the piece. A console that works for a wall-mounted TV can be slimmer and lower,
while a sideboard often wants a little more height and enclosed storage.
Recommended starting dimensions (adjust to your space)
- Overall size: 66″ W × 30″ H × 18″ D (a popular “fits-most-living-rooms” footprint)
- Depth tip: 15–20″ deep works for most TV bases and components; measure your TV feet/stand to be sure.
- Width tip: A console typically looks best when it’s wider than the TV (give yourself visual breathing room).
- Height tip: Many console-style TV stands land in the high-20s to mid-30s inches tallcomfortable for viewing and storage.
Farmhouse style choices (pick your flavor)
- Classic farmhouse: painted base + stained wood top, simple Shaker-ish doors, black pulls
- Barn door moment: sliding doors (mini hardware) or faux barn-door fronts on hinges
- Modern farmhouse: flatter faces, fewer trims, clean lines, warmer stain
- Rustic: thicker top, distressed edges, wire-brush texture, heavier hardware
Materials and Tools
Lumber and sheet goods
- 3/4″ plywood (one 4’×8′ sheet is often enough for a 66″ console carcass, depending on layout)
- 1×2 boards (face frame and trim)
- 1×3 or 1×4 boards (base rails, door frames, or decorative trim)
- 1×6 boards (for a plank-style top) or a glued-up panel
- 1/4″ plywood (optional back panel)
- 2×2s (optional legs if you want chunkier corners)
Hardware and supplies
- Pocket-hole screws (commonly 1-1/4″ for 3/4″ materialtest on scrap first)
- Wood glue
- Brad nails (optional, for trim)
- Handles/pulls
- European hinges or standard concealed hinges (if using hinged doors)
- Mini sliding barn-door hardware (optional)
- Cable grommets (commonly 1-1/2″ to 2″ pass-through sizes)
- Sandpaper (80/120/180/220 grit range is a solid lineup)
- Primer + paint, and/or stain + topcoat (polycrylic/polyurethane)
Tools
- Table saw or circular saw with a straightedge guide
- Miter saw (helpful for trim and face frame)
- Pocket-hole jig + drill/driver
- Clamps (more clamps = fewer regrets)
- Orbital sander
- Measuring tape, square, pencil
- Safety gear: eye protection, hearing protection, and a dust mask/respirator
Safety note: Power tools are not the place to freestyle. If you’re a teen DIYer, build with a parent/guardian’s help,
especially for saw cuts and drilling. Ten fingers is a great number to keep forever.
Cut List (Example for a 66″ W × 30″ H × 18″ D Console)
This is a practical “starter” cut list to help you visualize parts. Because plywood thickness and design choices vary,
treat these as example dimensions. Always measure your actual plywood and confirm your openings
before you cut everything.
Carcass (3/4″ plywood)
- Top panel (under the solid top): 66″ × 18″
- Bottom panel: 66″ × 18″
- Sides (2): 28-1/2″ × 18″ (height depends on your base/top build-up)
- Vertical dividers (2): 28-1/2″ × 18″ (creates left/center/right sections)
- Center shelf (1–2): ~24″ × 16–18″ (adjust depth if leaving cord space)
- Side shelves (2): sized to your cabinet openings (optional adjustable)
Face frame + base (1×2 and/or 1×3)
- Face frame stiles (vertical pieces): 28-1/2″ tall (quantity depends on openings)
- Face frame rails (horizontal pieces): cut to match width of each opening
- Base rails: run the width and depth you prefer (often slightly inset)
Top (1×6 planks or panel)
- Planks (enough to reach 18″ depth): typically 3–4 planks at 66″ length
- Optional overhang: 1/2″–1″ on the front and sides looks polished
Step-by-Step Build
Step 1: Plan your openings (the “measure twice” part)
Decide what goes inside. A cable box or game console needs airflow and clearance; a sideboard might need taller cabinet space.
Sketch three zones: left cabinet, center media, right cabinet. If you want
adjustable shelves, plan pin holes now (and feel smug later).
Step 2: Break down the plywood
Cut your large panels first: bottom, sides, dividers, and the top panel (the structural one under the decorative top).
Keep everything squarethis is where a straightedge guide or table saw pays off.
Step 3: Drill pocket holes and dry fit
Drill pocket holes along the ends of your bottom panel and shelves, and along dividers where needed. Then dry fit the carcass:
bottom + sides + dividers. If something looks off now, it will look very off after glue. Dry fitting is basically future-you insurance.
Step 4: Assemble the main box
Glue and screw the sides to the bottom panel, then add dividers. Use a square to keep corners true.
Clamp while fastening to prevent shifting. If your console starts to “lean,” don’t panicloosen, square, clamp, re-tighten.
Step 5: Install shelves (and leave room for cords)
Add your center shelf(s). Many DIY builders leave a small gap behind shelves for cordsespecially if you don’t want
a back panel. If you’re adding side cabinet shelves, you can:
- Fixed shelves: simplest and strongest
- Adjustable shelves: drill shelf-pin holes for flexibility
Step 6: Add the top structural panel
This panel locks the cabinet square and provides a solid surface for attaching the decorative top.
Glue and screw it down, keeping edges flush.
Step 7: Build and attach the face frame
A face frame instantly makes plywood look “furniture.” Cut 1×2 stiles and rails to frame each opening.
Assemble the frame with pocket holes (or glue/brads), then attach it to the carcass with glue and brad nails or screws.
Keep reveals consistent so doors align nicely.
Step 8: Choose your doors (hinged or sliding)
Option A: Hinged doors (simpler, very sideboard-friendly)
- Build Shaker-style doors with 1×3 frames and a plywood center panel, or use a full plywood slab with trim
- Install concealed hinges for a clean look
- Add magnetic catches if needed
Option B: Sliding “barn” doors (farmhouse drama, in a good way)
- Use mini sliding hardware sized for cabinets
- Make doors that cover one opening at a time (so you can slide left/right)
- Consider a simple bottom guide to keep doors from swinging
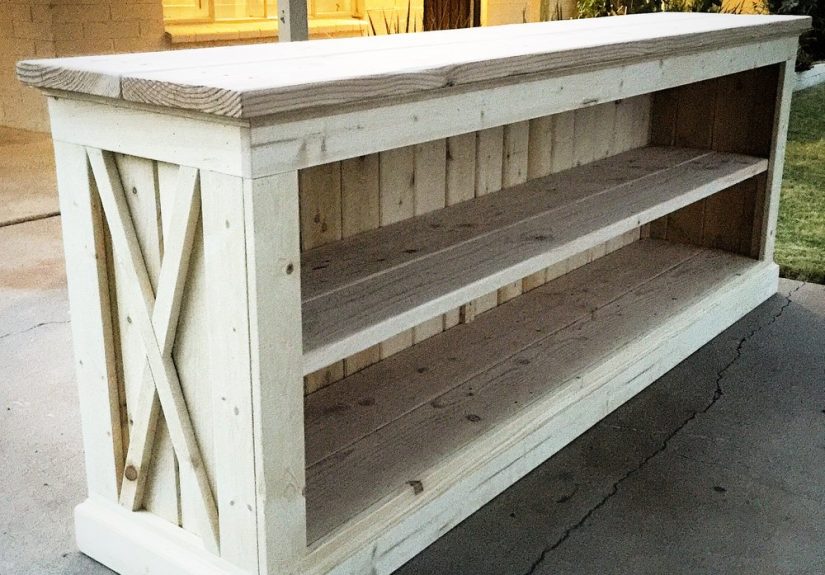
Farmhouse door style tip: You can fake a barn door look by adding diagonal “X” trim to a flat door.
It’s the woodworking equivalent of putting on a flannel shirt and instantly feeling rustic.
Step 9: Cable management (make it look like an adult lives here)
Drill cable pass-through holes in the back of each section. A hole saw makes quick work of this.
Add grommets for a finished look and fewer cable-scuffs. If you add a 1/4″ plywood back, cut openings where cords need to pass.
Step 10: Build the top
For a farmhouse top, plank style is popular: cut 1×6 boards to length, drill pocket holes along the underside edges,
glue the seams, and clamp flat while fastening. If you want a cleaner look, use a pre-made panel or edge-glued board.
Attach the finished top to the console from underneath using screws through the top structural panel.
Add a small overhang for a furniture-grade look.
Step 11: Sanding and finishing (the part that makes it look expensive)
Start with 80 grit only if you need to flatten seams or remove milling marks. Otherwise, begin at 120, then move to 180.
For many finishes, 180–220 is a sweet spot. Always wipe off dust before finishing.
- Painted base: prime, sand lightly, then paint 2 coats
- Stained top: test stain on scrap; consider conditioner for pine to reduce blotchiness
- Topcoat: protect the surface (especially if it’s doubling as a sideboard)
Classic farmhouse finish combo: warm stained top + crisp white/cream/soft gray base + matte black hardware.
It’s popular because it works. Like sweatpants. But for your living room.
Customization Ideas That Make It Yours
Make it fit your TV (and your wall)
- Go longer: Stretch to 72–84″ wide for big walls and big TVs
- Go lower: A slightly lower height can look sleek with wall-mounted TVs
- Go deeper: If your TV legs are wide or you want a beefier top presence
Upgrade the interior
- Add a power strip inside with a cord exit hole
- Use adjustable shelves for game consoles and accessories
- Add soft-close hinges if you enjoy living luxuriously
Farmhouse style “extras”
- Shiplap-style door panels (thin boards or grooves)
- Wire mesh inserts for ventilation and texture
- Decorative feet or a thicker base trim
- Distressed corners (lightly) for a timeworn vibe
Troubleshooting (Because Wood Has Opinions)
“My cabinet isn’t square.”
Check diagonals corner-to-corner. If the numbers don’t match, clamp diagonally until they do, then secure the back or top panel.
The fastest way to square a box is often to lock it with a panel.
“My doors don’t align.”
Slightly uneven face frames or hinge placement usually cause this. Adjust hinges first (most concealed hinges have adjustment screws),
then plane/sand edges if needed. Also confirm your console is level on the floor.
“My stain looks blotchy.”
Pine can absorb stain unevenly. Test on scrap, sand consistently, and consider a conditioner or a gel stain for more control.
Wipe excess stain evenly and don’t let puddles sit like tiny paint lakes.
How Much Does It Cost and How Long Does It Take?
Costs vary wildly based on wood choice, hardware, and finish. A plywood-and-pine build is often far less than buying a comparable
solid-wood console. If you add sliding hardware and premium pulls, expect the “hardware line item” to get spicy.
- Typical build time: a weekend for the build + extra day for finishing (because paint and stain need patience)
- Difficulty: beginner-to-intermediate (mostly straight cuts, pocket holes, and careful layout)
of Real-World “Experience” (What Builders Commonly Learn the Hard Way)
Here’s the honest part: building a farmhouse TV console/sideboard is rarely difficult because of one giant challenge. It’s usually
a bunch of small “oops” moments that add uplike a sitcom where the main character is a slightly crooked shelf. The good news?
Most of these mistakes are predictable, which means you can dodge them like a pro.
First, DIYers often discover that plywood is both a miracle and a menace. It’s flat, stable, and strong, but it also loves to
splinter on crosscuts if your blade is dull or you rush. Many builders get smoother results by using painter’s tape on cut lines,
supporting the sheet well, and making sure the “good face” is oriented correctly for their saw (so tear-out happens on the hidden side).
It’s the woodworking version of taking a flattering selfie anglesame person, better result.
Next, there’s the “square box” lesson. People commonly assume that if they cut everything to the right size, the console will magically
assemble square. Wood does not respect optimism. Clamps, a carpenter’s square, and checking diagonals are what actually keep the cabinet
from turning into a subtle parallelogram. A back panel (even a partial one) is a secret weapon here because it locks the shape in place.
If you’re building without a back for ventilation, adding a top structural panel and careful face-frame attachment becomes even more important.
Another classic experience: doors are where confidence goes to be humbled. Hinged doors seem simple until you install them and realize
the reveal is uneven, or the hinge screws pulled slightly off line. Builders who have the smoothest experience usually do two things:
they label every door and hinge location during dry fit, and they install hardware after finishing (or at least after sanding),
so they’re not fighting paint buildup and alignment at the same time. With sliding doors, the biggest “aha” moment is planning clearance:
the doors need space to pass each other, and handles can’t crash into the frame. A little mock-up with scrap wood can save a lot of
dramatic sighing later.
Finally, nearly everyone learns that finishing is half the furniture. A console can be structurally perfect and still look “DIY”
if the seams aren’t filled, the sanding is inconsistent, or the stain is rushed. The builders who end up with that “store-bought” look
usually test stain on offcuts, sand in a consistent progression, wipe dust carefully, and let finishes cure fully before loading the top
with a TV, a soundbar, and emotional support décor. The punchline is that patience is the fanciest tool in the shopannoying, but true.
If you take nothing else from these shared builder experiences, take this: slow down in the measuring and finishing steps.
Woodworking rewards calm energy. And if you do end up with one tiny flaw? Congratulationsyou’ve officially made something real.
Mass-produced furniture doesn’t have “character,” it has shipping damage. Yours has a backstory.
Conclusion
A farmhouse TV console/sideboard is one of the most satisfying builds because it’s practical every single day: it organizes clutter,
cleans up cords, and anchors a room with warm, timeless style. Start with a solid plan, build square, keep your openings practical for your gear,
and don’t rush the finish. When you’re done, you’ll have a piece that looks custombecause it is.


