Table of Contents >> Show >> Hide
- What You’re Actually Building
- Why Xenon Is So Popular in Spectroscopy
- Choose the Right Xenon Lamp Type
- The Core Parts of a Xenon Spectroscopy Build
- How to Design the Optical Path
- Assembly Strategy That Makes Sense
- Calibration, Stability, and Real Performance
- Common Mistakes to Avoid
- Safety: The Part That Is Not Optional
- Is Building a Xenon Lamp System Worth It?
- Bench Notes: What the Experience of Building One Is Really Like
- Conclusion
- SEO Tags
If you hear the phrase building a xenon lamp for spectroscopy and immediately picture a heroic scientist in a garage hand-forging a quartz bulb while thunder crashes outside, let’s gently set that movie script aside. In the real world, nobody sane “builds” the xenon arc tube itself from scratch. What researchers and advanced hobbyists actually build is a spectroscopy-ready xenon light source system: a commercial xenon lamp integrated with the right housing, igniter, power electronics, optics, cooling, safety controls, and calibration workflow.
That distinction matters. A xenon source can be magnificent for spectroscopy because it is bright, broadband, and unusually useful across the UV-visible range. It can also be hot, temperamental, high-voltage, and surprisingly committed to ruining your afternoon if you treat it like a desk lamp with ambition. The trick is not brute force. It is system design.
This guide walks through what it really takes to build a usable xenon lamp setup for spectroscopy, why xenon is often chosen over other light sources, which parts matter most, how to think about optical alignment and stability, and where people usually go wrong. By the end, you should have a practical, reality-based understanding of how to assemble a xenon spectroscopy source that performs like laboratory equipment instead of a science-fair flamethrower.
What You’re Actually Building
A working xenon spectroscopy source is best understood as a chain of subsystems. The lamp is only one link. A practical setup typically includes a xenon short-arc lamp or xenon flash lamp, a compatible power supply, an igniter, a lamp housing, cooling, beam-shaping optics, a path into a monochromator or fiber/light guide, and some way to verify output and wavelength accuracy. In other words, the “lamp” is really a spectroscopy illumination platform.
That is why successful builds start with architecture, not shopping addiction. Before buying anything, decide what kind of spectroscopy you are doing. Absorbance? Reflectance? Fluorescence excitation? UV-heavy measurements? Visible-only work? A broadband xenon source can cover a lot of ground, but the surrounding optics and detectors determine whether that coverage is useful or just impressive on paper.
For most projects, the goal is not maximum brightness at all costs. The goal is stable, repeatable, measurable light. Spectroscopy loves control. Raw intensity is fun for exactly six seconds, then stray light, heating, noise, and drift arrive like uninvited relatives.
Why Xenon Is So Popular in Spectroscopy
Xenon lamps are widely used because they offer a broad spectrum with strong UV-visible performance and high radiance from a compact arc. That makes them attractive when you need one source to cover a large wavelength range without constantly swapping lamps, filters, or your patience. In many instrument designs, xenon gives you a near-solar, broadband profile that works well for absorption, fluorescence, source scanning, and general UV-Vis work.
Compared with tungsten-halogen sources, xenon is much stronger in the UV. Compared with mercury lamps, xenon is smoother for scanned measurements because you are not living at the mercy of a handful of bright emission lines. That smoother output makes it easier to build a source for monochromator-based systems, ratio measurements, and broadband spectral scans where dramatic line spikes are more nuisance than feature.
There is one important caveat: xenon is not perfectly smooth. Near-IR regions can show stronger xenon lines, and certain calibration workflows should not assume the lamp behaves like an ideal continuum. If your work depends on precision wavelength assignment or line-free behavior, you still need calibration standards and a healthy suspicion of “looks close enough.” Spectroscopy, unlike social media, notices details.
Choose the Right Xenon Lamp Type
Short-Arc Xenon Lamp
If you are building a classic bench source for a monochromator, cuvette setup, fluorescence excitation path, or broadband illumination train, a short-arc xenon lamp is usually the main event. The small arc size creates high brightness, which helps when coupling light into slits, fiber systems, or focused sample regions. It is the better choice when you want continuous illumination and high surface brightness.
Xenon Flash Lamp
A xenon flash lamp is common in commercial UV-Vis instruments because it fires only during measurement, which reduces warm-up concerns and extends lamp life. Flash sources can be excellent for compact instrument designs, automated measurement, and lower-maintenance systems. They are not always the best fit for a custom bench setup that needs steady optical alignment and continuous output feeding external optics.
Ozone-Free vs. UV-Enhanced
This is where design gets practical fast. If you need deeper UV performance, a UV-enhanced xenon lamp may be attractive. If you prefer easier lab handling and fewer ventilation headaches, an ozone-free lamp is often the saner choice. Deep UV capability sounds glamorous until ozone generation joins the conversation and everyone suddenly becomes an amateur ventilation engineer.
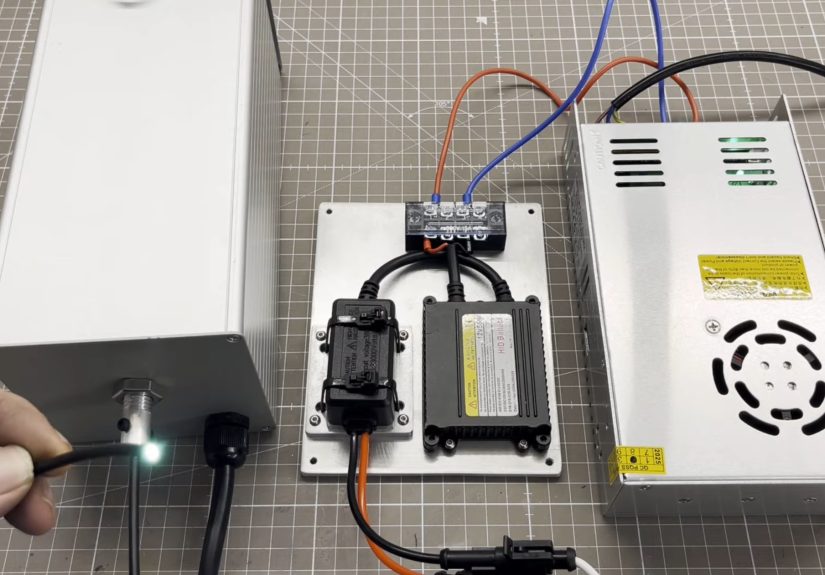
The Core Parts of a Xenon Spectroscopy Build
1. Lamp and Power Supply
Always match the xenon lamp to a compatible power supply. This is not a place for improvisation, bargain-bin heroics, or “the connector looked emotionally compatible.” Xenon lamps require controlled operation and high-voltage ignition. The power supply must support the lamp’s operating requirements, ignition behavior, interlocks, and safe shutdown. In serious systems, interlocks are not decorative. They are the reason the lamp does not energize when a housing door is open.
2. Lamp Housing
A proper lamp housing does several jobs at once: it physically secures the lamp, contains dangerous light and voltage, manages heat, supports alignment, and often includes the igniter. Good housings also provide cooling and safety shutoff features. This is why building a xenon system usually means buying or adapting a real housing instead of stuffing a lamp into a metal box and calling it innovation.
3. Cooling
Xenon lamps run hot. Not “pleasant mug of tea” hot. More like “please respect thermodynamics” hot. Airflow, thermal sensors, and adequate spacing matter. In higher-power systems, IR management becomes crucial because heat can degrade optics, drift your setup, and quietly cook anything downstream that was expecting light but not a personal sauna.
4. Optics
Your optical train determines whether the source is useful. Typical builds include a reflector, condenser optics, focusing optics, shutters, filters, and either direct coupling into a monochromator slit or coupling through a fiber or liquid light guide. A short-arc source is especially attractive because the small emitting region couples efficiently into slits and focused paths. That efficiency is one reason xenon shows up so often in serious spectroscopy hardware.
5. Monochromator or Spectrometer Interface
Broadband light is not enough. You need a way to isolate wavelength bands or analyze transmitted light. That usually means pairing the source with a monochromator, spectrograph, or spectrometer. Think of the xenon lamp as the orchestra and the monochromator as the conductor. Without wavelength selection, everyone is playing at once and the data turns into polite chaos.
How to Design the Optical Path
The most common beginner mistake is treating optics as accessories instead of the actual point of the build. Your source should be designed around the measurement path. Start by asking where the light needs to go and in what form. A cuvette absorbance setup wants a stable, well-defined beam. A fluorescence excitation setup wants high intensity at selected wavelengths and strict stray-light control. A reflectance build may need fiber delivery, specific spot size, and careful angle management.
In many xenon systems, the lamp output is collected by a reflector and condenser, then directed into either a slit or a guide. If you are feeding a monochromator, the source image at the entrance slit matters enormously. Too large, and you waste light and blur resolution. Too small, and you underfill the system and lose throughput. There is a delicate balance between brightness, slit width, spectral resolution, and signal-to-noise. This is where “just make it brighter” stops working.
IR management also deserves respect. If your experiment does not need infrared energy, use filtering or thermal management to reduce unwanted heating. Otherwise, your sample may respond more to temperature than to wavelength, which is a deeply unhelpful outcome when you are trying to do spectroscopy rather than accidental cooking.
Assembly Strategy That Makes Sense
Start with a Commercial Lamp Module
The smartest build is usually a hybrid build. Use a commercially made xenon lamp and housing, then customize the optical path, mounting, coupling, and measurement workflow around it. That gives you the performance advantages of xenon without pretending you should reinvent high-pressure lamp manufacturing between lunch and dinner.
Build a Rigid Mechanical Base
Mount everything on a stable baseplate or optical breadboard. Mechanical drift creates optical drift. Optical drift creates unstable measurements. Unstable measurements create existential dread and long nights staring at graphs that look like they were drawn during an earthquake.
Protect the Beam Path
Use beam tubes, housings, covers, or enclosures wherever practical. This reduces ambient light pickup, limits accidental UV exposure, and helps with repeatability. Open-beam builds look cool right up until they become impossible to use consistently.
Plan for Maintenance
Lamp replacement, alignment checks, and cleaning access should be part of the design from day one. If changing a lamp requires dismantling half the setup and bargaining with gravity, the setup is not finished. It is merely decorative.
Calibration, Stability, and Real Performance
A xenon source is only as good as its calibration discipline. For spectroscopy, you care about wavelength accuracy, irradiance stability, repeatability, and baseline behavior. That means checking your monochromator or instrument response with known standards, not assuming the system is accurate because the beam looks expensive.
Warm-up behavior depends on the source type. Flash-lamp instruments can offer fast startup and long service life, while continuous arc sources may need stabilization time and more attention to alignment and output drift. If you are using a short-arc lamp, monitor stability over time and do not trust the first few minutes of operation for critical measurements unless the system was designed and validated for that.
A reference channel or routine baseline measurement is worth its weight in sanity. Even a great xenon source can show variation due to optics, lamp age, thermal effects, or contamination. The best spectroscopy setups assume drift is possible and design around it.
Common Mistakes to Avoid
Mistake one: choosing a xenon source because it is bright, without checking whether the detector, optics, and wavelength range actually match the application.
Mistake two: ignoring housing, shielding, and interlocks. The lamp is not the entire product. The safe operating envelope is the product.
Mistake three: skipping ventilation or ozone planning when using UV-enhanced lamps. “I’ll just crack a window” is not a professional control strategy.
Mistake four: underestimating stray light. Spectroscopy measurements are often limited by optical cleanliness and geometry, not by the headline power of the lamp.
Mistake five: building for flexibility without building for alignment. Adjustable everything sounds wonderful until nothing stays where you put it.
Safety: The Part That Is Not Optional
Xenon systems combine several hazards in one very confident package: high pressure, high voltage, UV radiation, intense visible light, infrared output, and heat. That means safe design is part of performance design. Use grounded equipment, enclosed housings, proper interlocks, controlled airflow, eye protection rated for the relevant wavelengths, and procedures that prevent anyone from staring into the beam or servicing the unit while energized.
If your lamp option generates ozone, treat that as a real lab hazard, not a quirky personality trait. Use appropriate ventilation or ozone-removal measures. Also remember that reflective surfaces can redirect harmful light in surprisingly rude ways. A beam that misses the sample but finds a polished tool is still a problem.
The bottom line is simple: the best xenon lamp build is one that produces trustworthy spectra and does not try to maim the operator. Both goals matter. In fact, one strongly improves the other.
Is Building a Xenon Lamp System Worth It?
Yes, if you define the project correctly. Building a xenon spectroscopy source assembly can be absolutely worthwhile when you need custom geometry, unusual sample access, specialized coupling, a tailored monochromator path, or a research setup that commercial benchtop instruments cannot provide. It gives you flexibility, serviceability, and a deeper understanding of your measurement chain.
No, if your secret plan is to save money by reinventing a certified commercial source from raw parts and optimism. For routine UV-Vis work, a complete instrument is often the better deal. For custom optical work, though, a modular xenon source can be a beautiful solution.
The smartest approach is to borrow reliability from commercial lamp technology and invest your creativity in the mechanical and optical integration around it. That is where real performance gains usually live.
Bench Notes: What the Experience of Building One Is Really Like
The experience of building a xenon lamp system for spectroscopy is equal parts engineering, patience, and mild emotional bargaining with photons. On paper, the project looks straightforward: lamp, housing, optics, detector, done. On the bench, it quickly becomes clear that every “small detail” is actually the detail. The first time you energize a properly integrated xenon source and see that crisp, intense beam land where it is supposed to, it feels like a tiny scientific victory parade. The first time the alignment shifts by a hair and your signal drops in a way that makes no immediate sense, you discover just how tiny a “tiny shift” can be.
One of the most memorable parts of the process is learning how physical the whole system is. Spectroscopy can sound abstract when described in textbooks: absorbance, emission, throughput, baseline correction. But a xenon source reminds you that optical science is also about hardware with heat, weight, airflow, mounting holes, cable routing, and the stubborn reality that one loose fastener can impersonate a data problem for hours. You do not merely “measure spectra.” You build an environment in which spectra can happen honestly.
There is also a psychological shift that happens as the project matures. Early on, most people chase brightness. The beam looks gorgeous, so the instinct is to celebrate. Later, you start caring more about repeatability than spectacle. The truly satisfying moment is not when the setup looks impressive in a dark room. It is when today’s measurement matches yesterday’s baseline closely enough that you trust the instrument instead of negotiating with it. That is a different kind of joy. Less cinematic, more professional, and much better for your blood pressure.
Another common experience is realizing how much good engineering hides inside commercial lab gear. After wrestling with thermal drift, alignment sensitivity, stray light, and cable management, you gain sudden respect for every boring-looking black instrument box in a spectroscopy lab. Boring is beautiful. Boring means somebody already solved the exciting problems. A home-built or custom-built xenon system can absolutely perform well, but it teaches humility fast. Even simple conveniences like interlocks, shutters, and service access begin to look less like accessories and more like evidence of civilization.
And then there is the final reward: when the build stops feeling like a project and starts feeling like a tool. That transition is hard to fake. The lamp turns on, the output stabilizes, the optics stay put, the calibration makes sense, and you stop fussing with the hardware long enough to do actual spectroscopy. That is the point at which the entire effort pays off. You are no longer “working on the source.” The source is working for you. In lab life, that is as close to a standing ovation as hardware usually gets.
Conclusion
Building a xenon lamp for spectroscopy is not really about manufacturing a lamp. It is about creating a stable, safe, broadband optical source around a xenon lamp that already knows how to be a lamp. The real work is in selecting the right lamp type, housing it properly, managing power and heat, shaping the beam intelligently, calibrating the system honestly, and respecting the hazards the whole time.
Done well, a xenon source gives you serious UV-Vis capability, flexible optical integration, and the kind of bright, broadband performance that makes spectroscopy feel less like compromise and more like control. Done badly, it gives you drift, glare, noise, ozone, and a dramatic cautionary tale. Aim for the first outcome. Your data will thank you.


