Table of Contents >> Show >> Hide
- What Makes These Bars “Crème Brûlée” (and Not Just Cheesecake With Sugar)
- Quick Snapshot
- Ingredients
- Equipment You’ll Want (and Why)
- Step-by-Step: How to Make Creme Brulee Cheesecake Bars
- Option A: Torch Method (Recommended)
- Option B: Broiler Method (Works, But Watch Closely)
- Flavor Variations (Because You’re Allowed to Have Fun)
- Troubleshooting: Common Problems and Fixes
- Serving Ideas (Little Details, Big “Wow”)
- Storage and Make-Ahead Tips
- Experience Notes: What It’s Actually Like to Make These Bars ( of Real-Kitchen Wisdom)
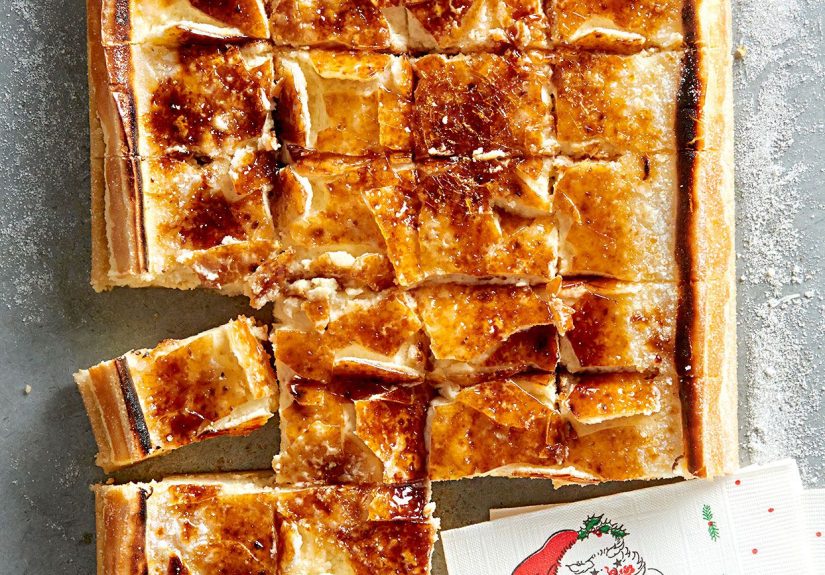
If crème brûlée and cheesecake had a very fancy, very delicious baby, it would look exactly like these
creme brulee cheesecake bars: a buttery cookie crust, a thick vanilla cheesecake layer, and that
signature glassy “tap-tap-crack” sugar top that makes everyone at the table suddenly quiet (dessert ASMR is real).
These bars are party-friendly, make-ahead friendly, andmost importantlyfork-to-mouth friendly.
This recipe is built around what works consistently in home ovens: a firm crust, a creamy filling that sets without
turning into scrambled eggs, and a brûlée topping you can torch right before serving so it stays crisp instead of
melting into sticky sadness. Let’s bake like we mean it.
What Makes These Bars “Crème Brûlée” (and Not Just Cheesecake With Sugar)
The hallmark of crème brûlée is the caramelized sugar shell: thin, evenly melted sugar that hardens into a
crackly layer. Cheesecake bars add a stable base and a sliceable, shareable format. The trick is timing: cheesecake
needs chilling time, while brûlée needs last-minute heat. Combine them, and you get a dessert that looks dramatic,
but is totally doable.
Quick Snapshot
- Skill level: Intermediate (but very learnable)
- Pan: 9×13-inch metal baking pan (recommended)
- Total time: About 1 hour active + chilling (at least 6 hours, overnight best)
- Yield: 20–24 bars (depending on how generous you feel)
- Best tool for topping: Kitchen torch (broiler works in a pinch)
Ingredients
For the crust
- 2 cups graham cracker crumbs (about 11–13 full sheets), finely crushed
- 1/4 cup granulated sugar
- 10 tablespoons unsalted butter, melted
- 1/4 teaspoon kosher salt
For the cheesecake filling
- 32 ounces full-fat cream cheese, softened to room temperature
- 1 cup granulated sugar
- 1/4 cup sour cream (or heavy cream for extra richness)
- 1 tablespoon pure vanilla extract
- 1/4 teaspoon kosher salt
- 4 large eggs, room temperature
- Optional but helpful: 1 tablespoon cornstarch (for slightly firmer, cleaner-cut bars)
- Optional flavor boost: 1 teaspoon lemon zest (keeps sweetness balanced)
For the brûlée topping
- 1/3 to 1/2 cup granulated sugar or superfine sugar (use less for a thinner crackle, more for a thicker shell)
Equipment You’ll Want (and Why)
- Parchment paper: Makes a “sling” so you can lift the slab out cleanly.
- Stand mixer or hand mixer: For smooth batter (but don’t overmix).
- 9×13-inch metal pan: Bakes evenly and is safer for broiling than glass.
- Kitchen torch: The easiest way to caramelize sugar without overheating the cheesecake.
- Rimmed sheet pan: Helpful for moving bars to/from the oven (and for broiler method).
- Sharp knife + hot water: For clean slices.
Step-by-Step: How to Make Creme Brulee Cheesecake Bars
1) Prep the pan
Preheat oven to 325°F. Line a 9×13-inch metal baking pan with parchment paper, leaving overhang on
the long sides. Lightly grease the parchment and exposed sides (a quick spray is fine).
2) Make (and pre-bake) the crust
In a bowl, mix graham crumbs, sugar, melted butter, and salt until the texture feels like damp sand and holds when
pinched. Press firmly into the bottom of the panuse the bottom of a measuring cup to compact it like you’re
flattening tiny cookie boulders.
Bake the crust for 8–10 minutes, then set it aside to cool while you make the filling. Pre-baking
helps the crust stay crisp under the creamy layer.
3) Mix the cheesecake filling (smooth, not foamy)
In a large bowl, beat the softened cream cheese on medium-low until smooth. Add sugar and beat until combined.
Scrape down the bowl. Mix in sour cream, vanilla, salt, and optional cornstarch/lemon zest.
Add eggs one at a time, mixing on low just until each disappears into the batter. Overmixing whips
in air, and air likes to become bubbles, and bubbles like to become cracks. (We’re going for “luxury custard vibes,”
not “cheesecake soufflé.”)
4) Bake until set around the edges, slightly wiggly in the center
Pour filling over the warm-to-cool crust and smooth the top. Bake for 35–45 minutes, or until the
edges look set and the center still has a gentle jiggle when you nudge the pan. The top should look dry and smooth,
not browned.
5) Cool slowly (your best anti-crack insurance)
Turn off the oven, crack the door, and let the pan sit inside for about 45–60 minutes. Then remove
to the counter and cool to room temperature. Cover and refrigerate at least 6 hours, preferably
overnight, until fully chilled and firm.
6) Lift, slice, then brûlée (best crunch strategy)
Use the parchment overhang to lift the chilled slab out of the pan. Place on a cutting board. For clean slices, dip
a sharp knife in hot water, wipe dry, and cut. Repeat the dip-and-wipe between cuts.
You have two good options for the brûlée topping:
Option A: Torch Method (Recommended)
How to torch the sugar like a pro
- Place bars on a heat-safe surface (a metal sheet pan is ideal).
- Sprinkle a thin, even layer of sugar over each bar (or brûlée the slab before slicingsee note below).
-
Hold the flame about 2–3 inches above the sugar and move in slow, steady passes until the sugar
melts, bubbles, and turns deep amber in spots. - Let sit 1–2 minutes to harden into a crackly shell.
Best practice: Brûlée after slicing so every bar gets its own perfect glass top and you
don’t shatter the sugar while cutting. If you’re serving to a crowd and want drama, brûlée the whole slab and slice
carefullyjust expect a little crackle chaos (still delicious).
Option B: Broiler Method (Works, But Watch Closely)
Broiler steps (fast, intense heat)
- Use a broiler-safe setup: place bars on a rimmed metal sheet pan.
- Sprinkle sugar evenly over the bars.
- Broil on an upper rack for 1–3 minutes, rotating as needed for even browning.
- Remove immediately once caramelized and let the sugar harden.
Important: Broilers are no-joke hot and can scorch sugar in seconds. Stay there, eyes on the prize.
Also avoid putting questionable “oven-safe” glass or coated pans under direct broiler heatuse metal when possible.
Flavor Variations (Because You’re Allowed to Have Fun)
1) Vanilla bean version
Swap vanilla extract for scraped vanilla bean (or add 1 teaspoon vanilla bean paste). You’ll get those signature
speckles and a more “classic brûlée” aroma.
2) Espresso brûlée bars
Dissolve 1–2 teaspoons espresso powder in the sour cream before mixing. Coffee makes vanilla taste louder (in a good
way).
3) Citrus twist
Add orange zest or lemon zest to the batter. Citrus keeps rich desserts from feeling heavy.
4) Cookie crust remix
Use crushed vanilla wafers or Biscoff cookies instead of graham crackers. You’ll still get a sturdy crust, but with
a different flavor personality.
Troubleshooting: Common Problems and Fixes
My cheesecake cracked
Usually from overbaking or cooling too quickly. The good news: you’re literally going to cover it with caramelized
sugar. Consider it a feature, not a flaw.
My bars are too soft to slice
They likely need more chill time. Refrigerate overnight. If you’re on a schedule, freeze the slab for 20–30 minutes
before slicing (then torch right after).
The sugar burned instead of melting smoothly
Torch was too close or you lingered in one spot. Keep the flame moving and aim for a thin, even sugar layer.
Superfine sugar melts faster and more evenly than coarse crystals.
The crust is soggy
Pre-bake the crust and press it firmly. Also make sure the bars are fully chilled before slicing; warm cheesecake is
basically delicious pudding and will soften everything it touches.
Serving Ideas (Little Details, Big “Wow”)
- Fresh berries: Strawberries, raspberries, or blueberries cut the richness.
- A tiny pinch of flaky salt: On the brûlée top right after torching (trust me).
- Whipped cream: Optional, but socially acceptable at all times.
- Holiday upgrade: Add a cinnamon-stick stir to your coffee and serve these bars like a legend.
Storage and Make-Ahead Tips
Refrigerator
Store bars (without brûlée topping) covered in the fridge for up to 4–5 days. For the best crackly
top, caramelize sugar right before serving.
Freezer
Freeze sliced bars (without brûlée) in a single layer, then wrap well. Freeze up to 1–2 months.
Thaw overnight in the fridge. Torch the sugar after thawing.
Why brûlée is last-minute magic
Caramelized sugar hates humidity. If you brûlée too early, the top can soften over time. If you torch right before
serving, you get that crisp “crack” every single time.
Experience Notes: What It’s Actually Like to Make These Bars ( of Real-Kitchen Wisdom)
The first time you make creme brulee cheesecake bars, you’ll probably notice two things immediately: (1) cheesecake
batter is wildly tempting, and (2) patience is a main ingredient they forgot to list. The batter comes together fast,
but the chilling is where the magic happens. If you try to slice early, the bars will look fine for five seconds,
then slowly lean like they’re doing a dramatic fainting scene. It’s not youit’s physics. Cheesecake firms as it
cools, and overnight chilling turns “soft-set custard” into “clean bar you can actually pick up.”
The crust is also a personality test. If you lightly press the crumbs in, the crust may crumble when you lift the
bars. If you press firmly, it behaves like a supportive best friend. A measuring cup bottom is the easiest tool for
compacting; you’ll feel the texture change from loose sand to a cohesive layer. That little extra pressure pays off
when you’re slicing perfect squares.
Mixing the batter is where many home bakers accidentally go full cardio. Cheesecake doesn’t want to be whipped like
frosting. It wants to be mixed until smooth, then left alone. Overmixing adds air, and air expands in the oven. When
it cools, it contracts. That’s the crack story in one sentence. Low speed is your friend, and scraping the bowl is
your secret weapon. Smooth batter comes from thorough scraping, not higher speed.
Cooling is another “trust the process” moment. The temptation is to pull the pan out immediately because you want it
done. But sudden temperature changes are what cause dramalike cracks, sinking centers, and edges that separate from
the pan. Leaving the bars in the turned-off oven with the door cracked feels unnecessary until you compare results.
The slow cool is a cheat code for a prettier top. And even if you get a crack, remember: you’re about to cover it
with caramelized sugar like a glamorous edible Band-Aid.
Then there’s the torch. The torch is the fun part. The torch makes you feel like you own a tiny dessert flamethrower,
because… you do. The first time you brûlée, you might hover in one spot and scorch a patch. That’s normal. The trick
is to keep the flame moving in gentle passes, like you’re painting with heat. You’ll see the sugar go from grainy to
glossy, then bubbly, then amber. The moment it hardens is ridiculously satisfying.
Finally, slicing and brûlée order matters. If you brûlée the whole slab first, slicing can shatter the sugar top into
a crackly mosaic (still delicious, just less tidy). If you slice first and brûlée each bar, every piece gets a
pristine, glassy lid. For parties, that “individual brûlée” method is the one that makes people gasp like you hired
a pastry chef. You didn’t. You just chilled overnight and used fire responsibly.


