Table of Contents >> Show >> Hide
- Why Barn Wood and Mason Jars Work So Well Together
- Tools and Materials You’ll Need
- Step-by-Step: How to Build a Barn Wood Mason Jar Holder
- Design Variations You Can Try
- Common Mistakes (and How to Avoid Them)
- Care, Maintenance, and Safety Tips
- Real-Life Experiences with DIY Barn Wood Mason Jar Holders
If you’ve ever scrolled Hometalk or Pinterest and thought, “I could totally
make that,” this DIY barn wood mason jar holder is your moment. It’s rustic,
charming, and just the right level of crafty: simple enough for beginners,
but polished enough that your guests will assume you bought it from a
pricey farmhouse boutique.
In this guide, we’ll walk through how to turn a scrap of barn wood (or any
weathered board) and a few mason jars into a functional piece of wall art.
Use it as a floral display, a candle holder, bathroom organizer, or
kitchen storagethe same basic build works for all of them. Grab your
safety glasses and your favorite playlist; let’s make something Joanna
Gaines would absolutely nod approvingly at.
Why Barn Wood and Mason Jars Work So Well Together
Barn wood and mason jars are the ultimate farmhouse power couple. The wood
brings texture, age, and character; the glass jars add sparkle and
versatility. Together, they create an easy, high-impact accent that works
in nearly any room:
- Farmhouse aesthetic: Weathered boards and canning jars
instantly signal cozy, lived-in style. - Budget-friendly: Salvaged wood and inexpensive jars
cost a fraction of store-bought wall sconces or organizers. - Highly customizable: Change the stain, paint, number
of jars, or hardware to match your decor. - Multi-purpose: The same project can be a vase, candle
holder, bathroom caddy, desk organizer, or herb planter.
Plus, barn wood mason jar projects are forgiving. A knot in the wood? It
just looks more rustic. A little uneven staining? Call it “distressed” and
carry on.
Tools and Materials You’ll Need
Exact sizes and hardware can vary, but here’s a reliable list to build one
classic wall-mounted barn wood mason jar holder with one to three jars:
Wood and Mason Jars
- 1 piece of barn wood or reclaimed board (about 5–8 inches wide and
16–24 inches tall, depending on how many jars you want) - 1–3 mason jars (pint or quart size work best for wall decor)
Hardware and Finishes
- Hose clamps, cup hooks, or small chains with screw eyes (to hold or
hang the jars) - Wood screws (for attaching hardware)
- Wall-hanging hardware (D-rings, keyhole brackets, or a sturdy sawtooth
hanger) - Optional: wood stain, clear sealer, or whitewash paint for finishing
the board
Tools
- Tape measure and pencil
- Sandpaper or sanding block (80–220 grit)
- Drill with bits (for pilot holes and attaching screws)
- Screwdriver or drill driver
- Safety glasses and dust mask (for sanding and drilling)
- Paintbrush or rag (for stain/finish)
- Level (for straight installation on the wall)
If you don’t have authentic barn wood, don’t panic. A standard pine board
from the home center can be aged with stain, paint, or a combination of
sanding and dry-brushing to mimic that weathered look.
Step-by-Step: How to Build a Barn Wood Mason Jar Holder
1. Choose and Prep Your Barn Wood
Start by inspecting your wood. Look for loose splinters, nails, or staples.
Remove any metal hardware and brush off dirt with a stiff brush. Lightly
sand the surface and edges so nobody gets a surprise splinter when they
reach for a flower or cotton ball.
If the wood is extremely rough or flaky, spend extra time smoothing itbut
don’t overdo it. You want to keep the weathered character; just tame the
“ouch” factor.
2. Decide on Layout and Jar Spacing
Lay the board flat and place your mason jars where you think they’ll look
best. For a single jar, center it horizontally and position it in the
middle or upper third of the board. For multiple jars, divide the board
into equal sections and mark the centers.
Use a tape measure to confirm that spacing is even. Eyeballing it can work,
but it’s amazing how one slightly crooked jar will haunt you every time you
walk past the piece.
3. Stain, Paint, or Whitewash the Wood
At this point, decide whether you want:
- Raw rustic: Leave the wood as-is for a truly salvaged,
aged-barn look. - Stained farmhouse: Apply a coat of wood stain (weathered
gray, walnut, or oak tones are popular). Wipe off excess and let it dry
completely. - Chippy white: Add a thin coat of white or cream paint,
then lightly sand the edges and high spots for a distressed finish.
Seal with a clear topcoat if the holder will be in a humid bathroom or
porch. For purely decorative indoor use, many DIYers skip the sealer and
embrace the raw feel.
4. Attach Hardware for the Jars
There are three popular ways to secure mason jars to barn wood:
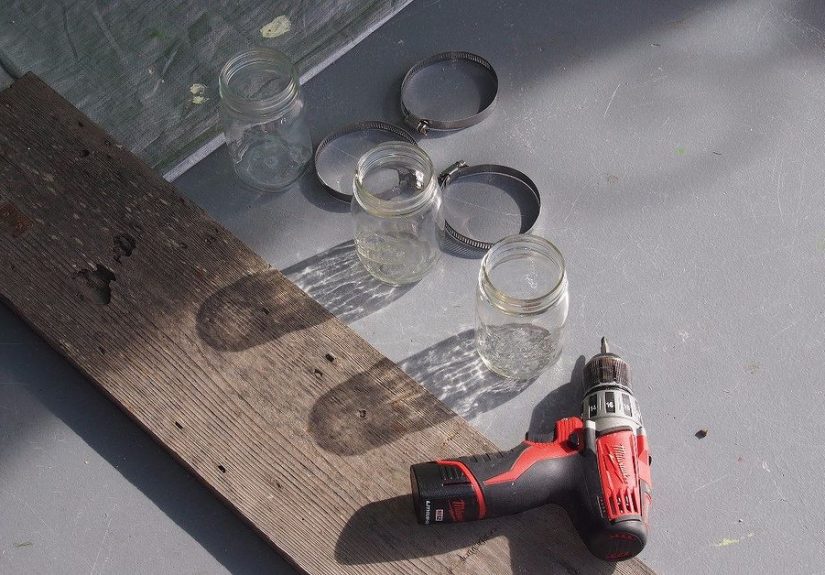
Option A: Hose Clamp Holder
- Open a metal hose clamp wide enough to fit around the jar.
- Hold the clamp where you want the jar to sit and mark a small screw hole
through the clamp band. - Pre-drill a pilot hole in the wood.
- Use a short wood screw to secure the clamp to the board.
- Slide the jar into the clamp and tighten until snug.
This method is very secure and especially good for bathroom storage or
kitchen organizers where jars may be bumped frequently.
Option B: Hook and Chain
- Screw a small cup hook or decorative hook into the wood at your marked
spot. - Attach a short length of chain to the jar lid or a special hanging lid
insert. - Hang the chain from the hook so the jar suspends in front of the
board.
This version looks especially charming for candle holders. Use battery
tealights if the jar hangs close to the wood.
Option C: Twine and Hooks
- Wrap sturdy twine or jute around the neck of the jar several times,
tying a tight knot. - Create a loop of twine for hanging.
- Screw a hook or nail into the board and hang the jar by the loop.
Twine adds an extra rustic touch and is easy to adjust if you want jars to
hang at slightly different heights.
5. Install Hanging Hardware on the Back
Before filling your jars, flip the board over and attach your wall-hanging
hardware:
- Use D-rings and wire for heavier multi-jar holders.
- Use a sawtooth hanger for a lightweight, single-jar
board. - If you’re mounting directly into studs, you can screw the board right
into the wall through the front and hide the screw heads with decorative
plugs or by placing them behind jars.
Make sure hardware is centered so the holder doesn’t lean like it’s trying
to make a break for it.
6. Fill and Style Your Mason Jars
Here’s where the personality kicks in. Depending on where your barn wood
mason jar holder lives, try:
- Entryway: Faux eucalyptus, dried lavender, or seasonal
flowers plus a jar for keys. - Bathroom: Cotton balls, makeup brushes, toothbrushes,
or bath salts. - Kitchen: Wooden spoons, fresh herbs, or measuring
spoons. - Outdoor porch: LED candles, fairy lights, or a small
jar of citronella oil with a wick (use extreme caution with real flame).
Step back, adjust the jars so they hang straight, and admire your handiwork.
You just turned scrap wood and canning jars into designer-style decor.
Design Variations You Can Try
Once you’ve built a basic barn wood mason jar holder, you may find yourself
planning one for every room. Here are some fun variations:
- Three-jar bathroom organizer: Line three jars in a row
on a wider boardone for toothbrushes, one for cotton rounds, one for
q-tips. - Double-candle sconces: Use two vertical boards with a
single hanging jar on each side of a mirror for a balanced look. - Layered “gate” design: Build a backer from several
narrow slats and add a horizontal “crossbar” piece for extra farmhouse
charm. - Chalkboard label strip: Paint a small rectangle of
chalkboard paint on the board under each jar to label spices, craft
supplies, or bathroom items. - Seasonal swap-outs: Keep the holder on the wall year
round and simply change the jar contentsspring florals, summer shells,
fall leaves, winter greenery and mini ornaments.
Common Mistakes (and How to Avoid Them)
Even simple projects have a few “ask me how I know” moments. Here are
pitfalls to dodge:
- Jars too close together: Leave at least 3–4 inches
between jars so they don’t look cramped or bump when you remove them. - Weak wall anchors: If you’re not hitting a stud, use
proper drywall anchors rated for the total weight of the board plus
filled jars. - Over-tightening hose clamps: Cranking down too hard
can stress the glass. Tighten just enough to keep the jar secure. - Skipping pilot holes: Pre-drilling keeps wood from
splitting, especially with old, dry barn wood. - Real candles too close to wood: Always leave plenty of
clearance above the flame or skip open flames entirely and use battery
candles instead.
Care, Maintenance, and Safety Tips
Barn wood mason jar holders are pretty low-maintenance, but a few habits
will keep them looking great:
- Dust the board and jars regularly with a soft cloth or feather duster.
- Wash jars as neededespecially in the bathroom or kitchen where steam
and splatters happen. - Check hardware every few months to make sure screws and hooks haven’t
loosened. - If you used stain or paint, touch up any worn spots to maintain the
look you like. - For candle versions, stick to LED candles if kids, pets, or curtains
are anywhere nearby.
With a little care, your barn wood mason jar holder will age gracefully,
just like the old barn it probably came from.
Real-Life Experiences with DIY Barn Wood Mason Jar Holders
The first time I made a barn wood mason jar holder, I was convinced it
would be a quick “30-minute” project. Two hours, three misplaced screws,
and one slightly crooked jar later, I had learned more than any tutorial
could have told me. The good news? Even with the tiny imperfections, the
finished piece looked charminglike something that had lived in the farmhouse
for decades.
One of the biggest lessons was about wood selection. I grabbed the most
beat-up plank in the pile, thinking “more character!” It did have character,
but it also had a dramatic bow down the center. Once I hung it on the wall,
the jars leaned like they were trying to slide off to the left. Now I still
choose boards with knots and texture, but I sight down the length and make
sure they aren’t warped. Rustic is adorable; warped is just annoying.
Hardware choice was another learning curve. For my first holder, I used
tiny decorative hooks meant for light picture frames and then hung full
quart jars filled with stones and candles. When I bumped one jar while
cleaning, the hook groaned in a way that made me picture the evening ending
with shattered glass and a dramatic retelling. I swapped the hooks for
sturdier cup hooks and wall anchors, and the entire piece instantly felt
sturdier and safer. Now, I always oversize the hardware a bitit’s cheap
insurance.
I also discovered how transformative finish choices can be. One holder
I made used a darker walnut stain, paired with clear jars and white faux
hydrangeas. It read more “modern rustic” and looked perfect in a neutral
living room. Another time, I dry-brushed white paint over rough barn wood
and paired it with blue-tinted jars and simple greenery; that one had a
coastal farmhouse vibe that worked beautifully in a bathroom. Same basic
build, totally different moods just from finish and styling.
My favorite experience, though, was making mason jar holders as gifts.
They’re incredibly easy to personalize. For a friend who loves gardening, I
filled the jars with packets of herb seeds, plant markers, and a small pair
of pruning shears. For a new homeowner, I used neutral stain, added a tiny
house-shaped charm tied around one jar with twine, and filled the jars with
tea lights and matches. People love that the gift is both decorative and
usefuland that it’s something you clearly made with your own hands.
If you’re nervous about tools, start with a smaller version: a single jar
on a short board, hung by twine on a simple hook. You’ll get comfortable
with measuring, drilling pilot holes, and attaching hardware on a small
scale. After that, scaling up to a three-jar bathroom organizer or a pair
of candle sconces feels totally manageable.
Over time, you’ll probably find your own signature touches: maybe you
always wrap the jar necks in jute, or you stencil a favorite word (“gather,”
“wash,” or “bloom”) onto the board. That’s the fun of DIYyour barn wood
mason jar holder doesn’t have to look exactly like the inspiration photos on
Hometalk. It just has to work for your space, your style, and your life.
So if you’ve been saving that scrap of weathered wood “for something
someday,” consider this your sign. Grab a few mason jars, charge the drill,
and turn that board into a piece that earns compliments every time someone
walks in the room.
sources: