Table of Contents >> Show >> Hide
- Why a Vertical Pallet Garden Deserves a Spot at Home
- Step 1: Choose a Safe, Solid Pallet
- Step 2: Gather Supplies and Plan Your Layout
- Step 3: Prep and Paint the Pallet
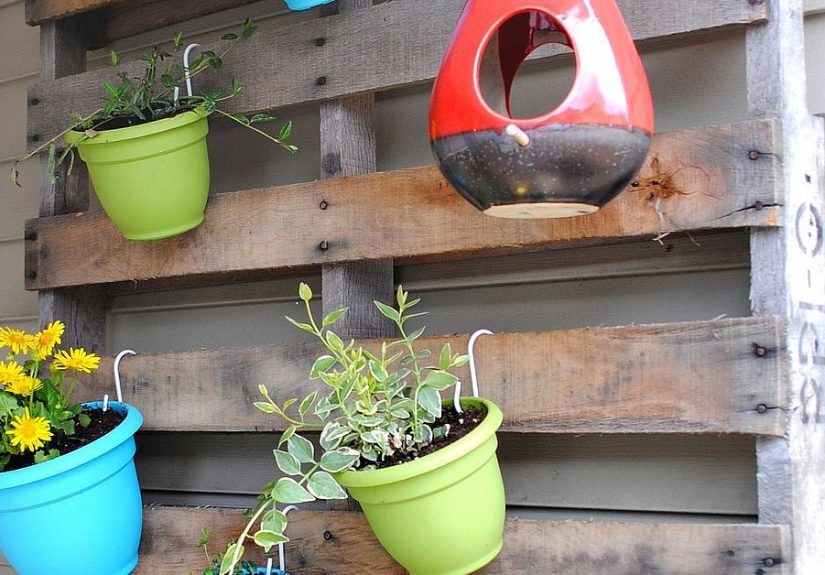
- Step 4: Attach Those Colorful Pots Like a Pro
- Step 5: Fill, Plant, and Water
- Styling Ideas for a Show-Stopping Pallet Garden
- Ongoing Care and Common Mistakes to Avoid
- Real-Life Vertical Pallet Garden Experiences
If your porch, patio, or balcony looks more “concrete jungle” than lush oasis, a vertical pallet garden is about to become your new favorite DIY. One wooden pallet, a handful of colorful pots, and a free afternoon can turn a dull wall into a living rainbow of herbs, flowers, and trailing greens.
This project is budget-friendly, beginner-friendly, and renter-friendly. You’re upcycling a pallet, saving floor space, and adding serious curb appeal all at once. Think of it as a plant gallery wallonly instead of artwork, you get basil, petunias, and maybe even a few strawberries.
Inspired by the popular “DIY: Vertical Pallet Garden with Colorful Pots” project on Hometalk, this guide walks you through choosing a safe pallet, prepping it, attaching colorful pots, and picking the right plants. We’ll also cover watering, maintenance, and real-life lessons gardeners have learned (sometimes the hard way) so you don’t repeat their mistakes.
Why a Vertical Pallet Garden Deserves a Spot at Home
Vertical gardening has exploded in popularity because it lets you grow more in less space. Gardeners with tiny balconies or narrow side yards use walls, railings, and fences to create vertical green spaces instead of relying on traditional in-ground beds.
A vertical pallet garden with colorful pots offers several perks:
- Space-saving magic: Perfect for small patios, balconies, rental homes, or awkward side yards where standard beds won’t fit.
- Budget-friendly: Many pallets are free or very cheap, and you can use inexpensive plastic or metal pots for your plants.
- Flexible design: Swap out pots by season, move them around, and experiment with different plant combos without redesigning the whole garden.
- Instant color: Even if your plants are small, bright pots and a painted pallet give you an immediate style upgrade.
Step 1: Choose a Safe, Solid Pallet
Not all pallets are created equal. Before you start painting anything, you need to choose a pallet that’s both sturdy and safe for growing plantsespecially if you’re planting herbs or veggies.
Check the Pallet Stamp
Most pallets carry a small stamp indicating how the wood was treated. Safety guidelines from garden and extension experts recommend:
- Look for “HT” (Heat Treated): This means the pallet was heat-treated, not chemically fumigated. HT pallets are considered safe for garden use.
- Avoid “MB” (Methyl Bromide): MB indicates chemical fumigation with methyl bromide, which can leave harmful residues. Skip these for any project, especially edible gardens.
- Ignore “DB” (Debarked): This just means the wood was debarked and has nothing to do with chemical safety.
Inspect for Cleanliness and Stability
Even if your pallet is HT-stamped, visually inspect it:
- Avoid pallets with obvious oil, paint, or chemical stains.
- Look for rot, cracked boards, or loose nails that could make the structure unstable.
- Choose a pallet with reasonably even boards to make attaching pots easier.
Used pallets are often available for free behind local stores or on marketplace sitesjust make sure you ask for permission before taking them.
Step 2: Gather Supplies and Plan Your Layout
Once you’ve scored a good pallet, it’s time to gather supplies. The exact hardware can vary, but a typical vertical pallet garden with colorful pots uses the following:
- 1 sturdy, heat-treated wooden pallet
- 8–16 colorful outdoor pots (plastic or metal, with drainage holes)
- Heavy-duty hose clamps or metal brackets (one per pot) or strong zip ties
- Outdoor screws and wall anchors (if mounting to a wall or fence)
- Drill with appropriate bits
- Sandpaper or an orbital sander
- Exterior paint or stain + brush or roller (optional but highly recommended)
- Landscape fabric or weed barrier (if you plan to add soil pockets)
- High-quality potting mix for containers
- Slow-release, balanced fertilizer suitable for container plants
- Your choice of plants (more on this in a minute)
Sketch Your Pot Layout
Before you drill a single hole, hold a few pots up against the pallet. Play with spacing so pots don’t block each other and trailing plants have room to spill over. A common layout is:
- 3–4 pots per row
- 3–4 rows spaced evenly from top to bottom
- Extra room on the top board for longer or taller plants
Use a pencil or painter’s tape to mark where each pot will sit and where you’ll drill for clamps or screws. This quick step avoids awkward, crooked rows later.
Step 3: Prep and Paint the Pallet
Pallets are built for hauling cargo, not necessarily for looking pretty. A bit of prep work makes your pallet safer to handle and more durable outdoors.
Sand the Rough Spots
Use sandpaper or a sander to smooth splinters and rough edges. Focus on areas you’ll touch oftenlike board edges and the sides where pots will sit.
Paint or Stain for Style and Protection
Coat the pallet with exterior-rated paint or stain. You can:
- Paint the entire pallet in a bold color for a modern look.
- Use a neutral (white, gray, black) and let the colorful pots steal the show.
- Stain the wood for a rustic, farmhouse vibe.
A weather-resistant finish helps protect the wood from moisture and sun, extending the life of your vertical garden. Leave the back unfinished if it will sit close to a wall to help the wood breathe.
Create Space for Airflow and Drainage
Vertical gardens benefit from good airflow and drainage to prevent soggy roots and mildew. Modern vertical gardening guides recommend leaving a small gap between the pallet and the wall or fence to let water drain and air circulate. You can do this with simple spacers or mounting blocks at the top and bottom.
Step 4: Attach Those Colorful Pots Like a Pro
Now for the fun part: turning your pallet into a pot-holding superstar.
- Pre-drill holes: At each marked pot location, pre-drill holes for screws. If you’re using hose clamps, you’ll screw the clamp to the pallet first, then cinch it around the pot.
- Attach clamps or brackets: Screw hose clamps, metal brackets, or heavy-duty hooks onto the pallet. Make sure they’re snug and aligned so pots sit level.
- Test with empty pots: Pop an empty pot into each holder and gently tug to make sure everything is secure.
- Mount the pallet: If you’re hanging it on a wall or fence, use outdoor-rated screws and anchors that match your surface (brick, siding, wood, etc.). For renters, resting the pallet against a wall and anchoring with a couple of discreet brackets at the top often works well.
Always mount the pallet before filling pots with soil and plantstrust your back on this one.
Step 5: Fill, Plant, and Water
Vertical pallets don’t offer as much soil depth as large containers, so plant choice matters. Gardening resources suggest focusing on shallow-rooted plants that thrive in containers.
Best Plants for a Vertical Pallet Garden
Some great choices include:
- Herbs: Basil, thyme, oregano, parsley, cilantro, chives, mint (in its own pot, because it’s a little wild), and dill.
- Leafy greens: Lettuce, spinach, kale, and arugula, which grow happily in shallow containers.
- Flowers for color: Petunias, pansies, sweet alyssum, marigolds, and violas add bright, trailing blooms and attract pollinators.
- Succulents: Ideal for sunny, dry spots; they’re low-maintenance and look stunning in modern, colorful pots.
Skip very deep-rooted or woody plants (like large rosemary shrubs or big perennials) unless you have extra-large pots and strong support.
Use the Right Potting Mix
Fill each pot with high-quality potting mix designed for containersnot heavy garden soil. Container mixes drain faster, which is crucial in vertical setups where water can settle in lower pots.
Mix in a slow-release fertilizer at planting time, following the label instructions. This gives your plants a steady nutrient supply without constant feeding.
Watering a Vertical Pallet Garden
Watering is where many vertical gardens succeedor fail. Gravity works against you, so you want consistent moisture without drowning the lower pots.
- Check daily in hot weather: Containers dry out faster than in-ground beds, and vertical pots can dry out fastest of all.
- Water from the top row down: Water the top pots first and let excess trickle into the rows below, then lightly top off lower pots if needed.
- Consider simple drip irrigation: For bigger setups, many gardeners run a small drip line or soaker hose across each row, controlled by a timer. This gives more even moisture and saves time.
- Ensure drainage: Every pot must have drainage holes. If water pools at the bottom row, raise the pallet slightly or add a tray filled with gravel to catch drips without leaving pots standing in water.
Styling Ideas for a Show-Stopping Pallet Garden
This is where your inner designer gets to play. A vertical pallet garden is basically a living feature wall, so treat it like decor.
Pick a Color Story
Some popular approaches:
- Rainbow bright: Each pot a different bold colorturquoise, coral, yellow, limepaired with simple green herbs and trailing ivy.
- Modern monochrome: All-white or black pots on a stained pallet, filled with contrasting flowers and silvery foliage.
- Seasonal switch-outs: Soft pastels with pansies and violas in spring, vibrant petunias and trailing sweet potato vine in summer, then hardy mums, kale, and pansies for fall.
Mix Textures and Heights
Combine upright plants (like small grasses or vertical flowers) with trailing varieties that spill over the edges. Vertical gardening experts highlight using upright plants for structure and trailing ones for softness and movementyour pallet becomes more dynamic and lush.
Ongoing Care and Common Mistakes to Avoid
A vertical pallet garden is fairly low-maintenance once it’s established, but a few habits will keep it thriving:
- Rotate or refresh plants seasonally: Swap tired annuals for fresh ones, or replace cool-weather greens with heat-tolerant herbs when the season changes.
- Prune regularly: Trim leggy stems and spent flowers to encourage new growth and prevent plants from shading each other too much.
- Watch for pests and disease: Check leaves and stems while you water. Vertical spacing helps with airflow, but crowded pots can still harbor pests if ignored.
- Don’t overload the pallet: Wet soil is heavy. Make sure your mounting hardware and the pallet itself can handle the combined weight of soil, pots, and plants.
The biggest mistake beginners report is underestimating water needs. A quick finger teststick your finger about an inch into the soilis still one of the simplest and most reliable ways to know when to water.
Real-Life Vertical Pallet Garden Experiences
Gardeners who’ve built vertical pallet gardens often share the same story arc: excitement, a few surprises, a couple of “oops” moments, and then a steady payoff of color and fresh herbs.
Many beginners start with a small pallet leaning against a balcony wall. At first, they cram every pot with a different planttomatoes, peppers, herbs, flowers, even a strawberry or two. Within a month, it becomes clear that some plants are happier than others. The shallow pots dry quickly, and those big, hungry plants like tomatoes struggle, while herbs and lettuces quietly thrive. After a bit of rearranging, people often settle on a simpler lineup: basil, thyme, parsley, and a few rows of flowers for color. The lesson? Start with plants that are known to love container life and don’t be afraid to edit your plant list.
Another common experience involves color. At first, the focus is on bloomsgardeners pick bright flowers and ignore the pots. But once they see a project like the “Vertical Pallet Garden with Colorful Pots” on Hometalk, the lightbulb goes off: the pots themselves are part of the design. People begin spray-painting old plastic pots in coordinated palettes, or they mix thrift-store finds in mismatched colors that somehow still feel cohesive. The vibrant containers keep the garden cheerful even during times when plants are between blooming cycles.
Families often discover that a vertical pallet garden becomes a quiet little activity center. Kids love helping choose pot colors and planting easy, fast-growing seeds like lettuce or nasturtiums. Because the pallet is at eye level for most children, they can actually see new leaves unfolding and flowers opening without bending down. It turns into a built-in science project: Which plants grow fastest? Which ones attract the most bees or butterflies? That sense of daily change keeps kidsand honestly, adultsengaged all season long.
Renter experiences are especially telling. People who don’t want to invest in permanent landscaping appreciate that a pallet garden is basically “take-out decor.” They can mount it with removable hardware or lean it securely against a wall, then disassemble it when they move. They pack the pots separately, load the pallet into a moving truck, and re-create the same vertical garden at their new placesometimes in a completely different layout. The project becomes less of a one-time DIY and more of a portable tradition that follows them from home to home.
On the maintenance side, many gardeners admit they underestimated both the weight and the watering needs of a fully planted pallet. The first year, some people mount it too high and end up balancing on a chair to water the top row. After one or two wobbly watering sessions, they either move the pallet lower or invest in a simple hose attachment or drip line. They also learn to lighten the load by using smaller pots on higher rows and reserving larger, heavier containers for the bottom. Once those adjustments are made, the daily care feels more like a calm ritual than a chore.
There’s also the social factor. A colorful pallet garden facing the street or a shared courtyard tends to attract commentsnearly everyone has a question or a compliment. Neighbors ask what plants you’re growing, or they confess they’ve always wanted to try a pallet project but didn’t know where to start. More than a few vertical gardens have inspired copycat versions next door, turning once-bare fences into living walls of herbs and flowers.
Over time, most gardeners say that a vertical pallet garden gives them confidence to tackle other DIY projects. If they can transform a beat-up pallet and a few cheap pots into something beautiful and useful, suddenly building a raised bed or expanding into more container gardens doesn’t feel so intimidating. The project is simple enough for beginners, but the payoffdaily color, fresh herbs, and that satisfying “I made this” feelingis big enough to hook people on gardening for good.
So if you’ve been staring at a blank wall or boring balcony railing, consider that your invitation. A pallet, a drill, and some colorful pots might be all that stands between you and your new favorite view.