Table of Contents >> Show >> Hide
- What Does It Mean to Open a Car Headlight?
- Tools You May Need
- Safety First: Do These Things Before Opening a Headlight
- Method 1: Open the Headlight from the Back to Replace a Bulb
- Method 2: Remove the Headlight Assembly from the Car
- Method 3: Open a Sealed Headlight Lens
- How to Clean and Repair the Inside of a Headlight
- How to Reseal a Headlight After Opening It
- Common Mistakes to Avoid
- When You Should Not Open a Headlight Yourself
- Troubleshooting After Opening a Headlight
- Real-World Experience: Easy Ways to Open a Headlight Without Losing Your Mind
- Conclusion
Opening a car headlight sounds simple until you are standing in front of the engine bay with a flashlight in your mouth, three plastic clips in your hand, and the growing suspicion that the vehicle was designed by someone who dislikes humans. The good news? Most headlight jobs are manageable at home if you understand what “open a headlight” actually means.
For some drivers, it means opening the hood and reaching the bulb from the back of the headlight housing. For others, it means removing the entire headlight assembly from the car. And for custom lighting fans, it may mean separating the clear lens from the headlight housing so they can repair moisture leaks, repaint inner trim, install projectors, or reseal the unit. Each job has a different difficulty level, different tools, and a very different chance of making you say words your neighbors should not hear.
This guide explains the easy ways to open a headlight of a car, including safe bulb access, headlight assembly removal, and lens separation using controlled heat. It also covers common mistakes, resealing tips, and real-world experience to help you avoid broken tabs, melted plastic, and the classic DIY tragedy known as “I made it worse.”
What Does It Mean to Open a Car Headlight?
Before grabbing tools, identify which type of “opening” you need. Car headlights are not all built the same, and modern assemblies can include halogen bulbs, HID capsules, LED modules, daytime running lights, turn signals, wiring harnesses, vents, rubber caps, leveling motors, and sealed lenses. That is a lot of drama packed into one shiny plastic eyeball.
1. Opening the Back Cover to Replace a Bulb
This is the easiest version. You open the hood, find the rear of the headlight housing, remove a dust cap or access cover, unplug the connector, twist or unclip the bulb, and replace it. Many cars allow this without removing the whole headlight assembly, although some engine bays are so tight you may wonder if the engineers had doll hands.
2. Removing the Headlight Assembly
Some vehicles require the headlight assembly to be removed before you can reach bulbs, repair wiring, replace a cracked housing, or clean moisture. This usually involves removing bolts, clips, trim pieces, grille parts, or even part of the front bumper cover. It sounds intimidating, but with patience and the right socket, it is often straightforward.
3. Separating the Lens from the Housing
This is the most advanced meaning of opening a headlight. The clear outer lens is sealed to the rear housing with butyl rubber, silicone, or a tougher adhesive often called permaseal. To separate the lens, you usually soften the sealant with an oven or heat gun, then carefully pry the lens away. This is common for custom headlight retrofits, condensation repairs, or resealing projects.
Tools You May Need
You do not need a professional repair shop to open many headlights, but you do need the right tools. Trying to remove a modern headlight with one rusty screwdriver and heroic optimism is how clips get snapped and weekends disappear.
- Owner’s manual or vehicle-specific repair guide
- Safety gloves and safety glasses
- Socket set, usually including 8 mm, 10 mm, and 12 mm sockets
- Phillips and flathead screwdrivers
- Plastic trim removal tools
- Needle-nose pliers
- Painter’s tape or masking tape
- Microfiber cloths
- Heat gun or household oven for sealed lens work
- Butyl headlight sealant for resealing
- Rubbing alcohol or plastic-safe cleaner
- Small containers or labeled bags for screws and clips
Safety First: Do These Things Before Opening a Headlight
Headlights involve glass bulbs, sharp plastic edges, wiring, hot components, and fragile tabs. Before you begin, park the car on a flat surface, turn off the engine, remove the key, set the parking brake, and allow the lights to cool. A halogen bulb can get extremely hot during use, and touching it too soon is a quick way to turn a simple repair into a finger barbecue.
If you are working around wiring or removing the entire headlight assembly, disconnecting the negative battery terminal is a smart precaution. This reduces the chance of short circuits, accidental light activation, or electrical surprises. For HID headlights, be especially cautious because these systems can use high voltage. If you are not sure what type of headlight system you have, check the owner’s manual or consult a professional.
Also, avoid touching the glass part of halogen bulbs with bare fingers. Skin oils can create hot spots on the bulb glass and shorten bulb life. Use gloves or hold the bulb by its base. Your future self will appreciate not replacing the same bulb again next week.
Method 1: Open the Headlight from the Back to Replace a Bulb
This is the easiest and most common way to open a headlight of a car. It is ideal when your low beam, high beam, or turn signal bulb has burned out and the lens or housing is still in good shape.
Step 1: Open the Hood and Locate the Headlight Housing
Stand in front of the vehicle and open the hood. Look behind the headlight lens inside the engine bay. You should see the rear of the headlight housing, wiring connectors, and possibly a round rubber or plastic dust cap. On some vehicles, the battery, air intake box, coolant reservoir, or washer fluid neck may block access.
Step 2: Remove the Dust Cap or Rear Cover
Many headlights use a rear cap to keep dust and moisture out. Twist it counterclockwise or release its tabs, depending on the design. Set it somewhere clean. If the cap has a rubber seal, inspect it. A cracked, pinched, or missing seal can allow moisture into the headlight.
Step 3: Disconnect the Wiring Connector
Press the locking tab and pull the connector straight back. Do not yank the wires. If the connector is stuck, wiggle it gently. A tiny flathead screwdriver can help release a stubborn tab, but be gentle. Plastic electrical connectors become brittle with age, heat, and years of engine bay misery.
Step 4: Remove the Old Bulb
Most bulbs either twist out or are held by a spring clip. If it is a twist-lock style, rotate the bulb counterclockwise until the tabs line up, then pull it straight out. If it uses a clip, release the clip carefully and remember how it sits. Taking a quick photo before removing parts is a brilliant move. Your phone is not just for snacks and questionable group chats.
Step 5: Install the New Bulb
Compare the old and new bulbs to confirm they match. Insert the new bulb without touching the glass. Lock it in place, reconnect the wiring, reinstall the dust cap, and test the light before closing everything. If one bulb failed because of age, consider replacing the other side too so both headlights have similar brightness and color.
Method 2: Remove the Headlight Assembly from the Car
If you cannot reach the bulb from behind, or if you need to replace the entire headlight assembly, you may need to remove the housing. This method is common on vehicles where the bumper cover overlaps the headlight mounting bolts.
Step 1: Protect the Paint
Apply painter’s tape around the headlight edges, bumper seam, and nearby fender area. This helps prevent scratches while you remove clips or slide the headlight forward. It takes two minutes and can save you from staring at a fresh scratch every time you walk past the car.
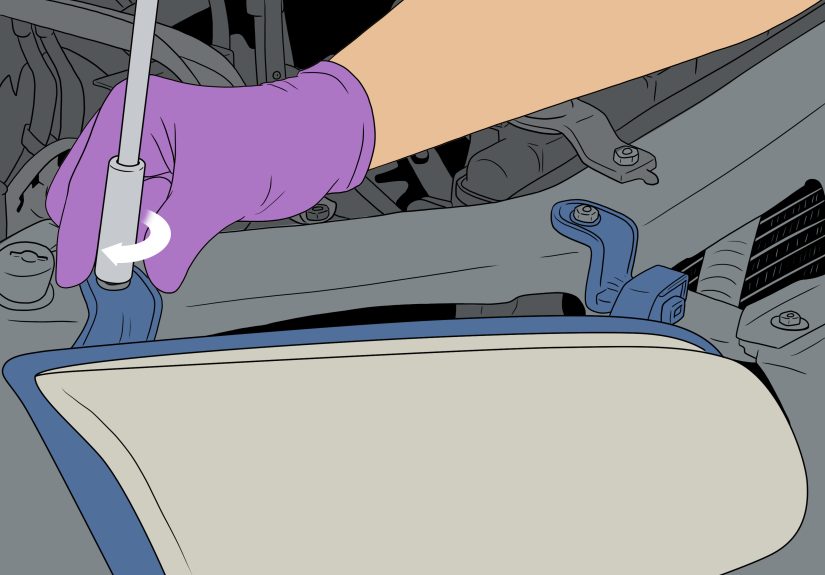
Step 2: Remove Visible Bolts and Clips
Open the hood and look for bolts along the top of the headlight. Most are 10 mm, though your car may have different sizes. Remove the bolts and place them in a labeled container. If plastic push clips are present, lift the center pin first, then remove the clip body. Do not pry like you are opening a paint can unless you enjoy buying replacement clips.
Step 3: Check the Grille, Fender Liner, and Bumper Cover
Some headlights have hidden fasteners behind the grille, under the bumper, or inside the wheel well. Turn the front wheels for better access to fender liner screws. You may only need to loosen one side of the bumper cover rather than remove the entire bumper. However, on many cars, full bumper cover removal makes the job easier and safer.
Step 4: Pull the Headlight Assembly Forward
Once all fasteners are removed, hold the headlight with both hands and pull it straight forward. If it does not move, stop and search for another bolt or tab. Headlights do not usually require brute force. If you are pulling hard enough to make gym noises, something is probably still attached.
Step 5: Disconnect the Wiring Harnesses
Disconnect each connector one at a time. Some assemblies have separate plugs for the low beam, high beam, turn signal, side marker, daytime running light, and leveling motor. Mark connectors with tape if needed. After the headlight is free, place it on a towel or cardboard to avoid scratching the lens.
Method 3: Open a Sealed Headlight Lens
Separating the clear lens from the headlight housing is useful for custom lighting, cleaning internal haze, replacing broken projector parts, repairing condensation, or resealing a leak. This method requires patience because the lens is bonded to the housing with sealant. Heat softens the sealant so the lens can be separated without cracking the plastic.
Important warning: Not every headlight should be opened at home. Some LED and HID assemblies are expensive, complex, and sensitive to heat. If your car has adaptive headlights, laser lighting, built-in control modules, or calibration systems, professional service may be the better choice. A failed DIY job can cost far more than the original repair.
Step 1: Remove the Headlight Assembly
You cannot safely open a sealed lens while the headlight is still mounted on the vehicle. Remove the assembly first, disconnect all wiring, and take out bulbs, rubber caps, brackets, screws, and removable electronics. Anything that can melt, warp, or trap heat should come off before heating the housing.
Step 2: Identify the Sealant Type
Butyl rubber is soft, flexible, and usually easier to open. It becomes sticky and pliable when warmed. Permaseal is harder, more stubborn, and often requires more heat, more time, and more careful cutting or prying. If the sealant feels rubbery and stretches like black chewing gum, you may be dealing with butyl. If it feels rigid and fights back like it has a personal grudge, it may be permaseal.
Step 3: Use the Oven Method Carefully
For many butyl-sealed headlights, DIYers use an oven set around 200°F to 250°F for about 10 to 15 minutes. Place the headlight on a baking tray covered with cardboard or a towel, keeping the lens away from direct metal contact. Do not let the headlight touch heating elements, and never leave it unattended. The goal is to soften the sealant, not roast the headlight like a Thanksgiving side dish.
After heating, wear gloves and start at a corner. Use plastic pry tools to lift the lens while releasing any tabs around the housing. Work slowly around the perimeter. If the sealant cools and becomes stiff, return the assembly to the oven for a few more minutes rather than forcing it.
Step 4: Use the Heat Gun Method for More Control
A heat gun gives you localized control and is helpful for large or oddly shaped headlights. Move the heat gun continuously around the seam. Do not hold it too close or in one spot, because plastic can bubble, warp, or discolor. Warm a small section, pry gently, release tabs, and continue around the headlight.
The heat gun method takes longer, but it may reduce the risk of overheating internal pieces. It is especially useful when you only need to loosen one stubborn section after using the oven method.
How to Clean and Repair the Inside of a Headlight
Once the lens is open, avoid touching reflector bowls or chrome-like surfaces with your fingers. These coatings can scratch easily and may not tolerate harsh cleaners. Use a clean microfiber cloth, compressed air, or plastic-safe cleaner only where appropriate. If you are removing old sealant, pull out as much as possible from the channel, especially if it is dirty, brittle, or uneven.
If your goal is to fix condensation, inspect the lens, housing, vents, bulb seals, and rear caps. Moisture may come from a cracked lens, blocked vent, missing dust cap, damaged rubber gasket, or a poor seal between the lens and housing. Simply drying the headlight without fixing the leak is like mopping the floor while the faucet is still running. Impressive effort, questionable strategy.
How to Reseal a Headlight After Opening It
Resealing is just as important as opening. A poorly resealed headlight can fog up, leak, corrode connectors, or ruin bulbs. Use automotive-grade butyl headlight sealant, not random household caulk. Lay the butyl evenly in the housing channel, warm it slightly, and press the lens back into place. Reinstall all screws, clips, and tabs.
Many DIYers reheat the assembled headlight for a few minutes after placing the lens back on. This helps the butyl settle and bond. Then clamp the lens gently or press around the perimeter until the seal cools. Do not overdo the pressure; cracked plastic is not a souvenir anyone wants.
After resealing, check for gaps. Reinstall bulbs and caps, then test all lights before mounting the headlight back on the car. If possible, let the assembly sit overnight and inspect it for fogging or separation before final installation.
Common Mistakes to Avoid
The first common mistake is skipping research for your specific vehicle. Headlight designs vary wildly. A method that works on a pickup truck may not work on a compact sedan, and a 2012 model may differ from a 2013 redesign. Always check a vehicle-specific guide before removing hidden fasteners.
The second mistake is using too much force. If a headlight assembly will not come out, there is probably another bolt, clip, bracket, or bumper tab holding it. Forcing it can break mounting points, and broken mounting points can cause poor headlight aim or annoying vibration.
The third mistake is overheating the sealed lens. Plastic headlights can warp if exposed to too much heat. Start low, heat gradually, and keep checking the housing. If the plastic smells strongly, looks shiny in a bad way, or begins to deform, stop immediately.
The fourth mistake is resealing with the wrong material. Silicone may seem convenient, but it can be messy, difficult to reopen, and less ideal than proper butyl for many headlight applications. A clean butyl seal is usually easier to work with and better for future service.
When You Should Not Open a Headlight Yourself
DIY headlight work is satisfying, but it is not always the smartest choice. Avoid opening a headlight yourself if the assembly is under warranty, if it contains expensive adaptive lighting technology, if replacement parts are unavailable, or if the housing is severely cracked. Also reconsider if you do not have a safe place to work, proper tools, or enough time to finish the job without rushing.
If the headlight is cloudy only on the outside, you may not need to open it at all. Many plastic lenses can be restored with sanding, polishing, and UV-protective coating. If the problem is a burned-out bulb, opening the rear cover may be enough. Save sealed-lens separation for problems that actually require it.
Troubleshooting After Opening a Headlight
The Light Does Not Turn On
Check the bulb orientation, connector, fuse, and ground wire. Make sure the connector clicked into place. If you replaced only the bulb, compare the part number with the old one.
The Headlight Fogs Again
Inspect the rear dust caps, vent tubes, lens seam, and bulb seals. A blocked vent can trap moisture, while a poor seal can let water enter. If you see large droplets or puddling, that is more serious than normal light condensation.
The Beam Pattern Looks Wrong
Make sure the bulb is fully seated. A bulb installed slightly crooked can scatter light and reduce visibility. If you removed the whole assembly, check headlight aim after reinstalling it.
The Lens Will Not Separate
You may have permaseal or hidden screws. Recheck for clips and fasteners. Use heat gradually, work in small sections, and avoid forcing the lens. Some permaseal headlights are simply better left to experienced retrofitters.
Real-World Experience: Easy Ways to Open a Headlight Without Losing Your Mind
After working through different headlight jobs, one lesson becomes clear: the easiest method is usually the one that respects the vehicle’s design instead of fighting it. On an older sedan, replacing a bulb may take five minutes. You open the hood, twist off the dust cap, unplug the connector, swap the bulb, and feel like a certified genius. On a newer crossover, the same job may require removing an air box, loosening a fender liner, or taking off part of the bumper. That does not mean the job is impossible; it means the car wants a little ceremony before revealing its secrets.
One useful experience is to photograph everything before removing it. Take pictures of bolt locations, wiring connectors, clips, and the bulb position. When reassembly time comes, those photos become your personal repair manual. This is especially helpful if the job gets interrupted. Nothing humbles a confident DIYer faster than returning after lunch and staring at six similar screws with absolutely no memory of where they belong.
Another practical lesson is that plastic clips deserve kindness. Many headlight and bumper clips become brittle over time, especially in hot climates or on older cars. Instead of attacking them with a metal screwdriver, use trim tools and work slowly. If a clip breaks, replace it rather than leaving the bumper loose. A missing clip may not seem important until the bumper starts buzzing on the highway like an angry kazoo.
When opening a sealed lens, patience matters more than strength. The first instinct is to pry harder when the lens does not move. The better move is to add controlled heat and continue slowly. Butyl sealant will usually soften and stretch when warm. If it gets stiff again, reheat it. The process can feel repetitive, but repetition is cheaper than cracking a lens.
Resealing is where many beginners rush. They celebrate when the lens comes off, do the repair, slap everything back together, and then wonder why the headlight fogs the next morning. A good seal requires clean channels, even butyl placement, firm seating, and a careful inspection around the entire perimeter. If the old sealant is contaminated with dirt or broken into uneven chunks, replace it. Moisture always finds the lazy spot.
Finally, test before final reassembly. Connect the headlight, check low beam, high beam, turn signal, side marker, daytime running light, and any LED accents before bolting everything down. If something is wrong, it is much easier to fix while the bumper is still loose. This one habit can save you from the special sadness of fully reinstalling a bumper only to discover one unplugged connector hiding behind it.
Note: If your headlight uses HID, LED, adaptive, or laser lighting technology, check the owner’s manual and consider professional help before opening the sealed housing. Some modern headlights are expensive, electronically complex, and sensitive to heat or improper handling.
Conclusion
Opening a car headlight can be simple or surprisingly involved, depending on your goal. If you only need to replace a bulb, start with the rear access cover behind the headlight housing. If the bulb or housing is blocked, remove the headlight assembly carefully by taking out the proper bolts, clips, grille pieces, or bumper cover sections. If you need to separate the lens from the housing, use controlled heat, gentle prying, and proper resealing materials.
The best approach is to move slowly, protect the paint, organize fasteners, avoid touching bulb glass, and test everything before final assembly. A headlight is more than a plastic shell with a bright thing inside; it is a safety component that affects nighttime visibility, glare, and your ability to avoid raccoons with questionable road-crossing judgment. Do it carefully, and your car will look better, shine brighter, and stop winking at traffic like it has a secret.


