Table of Contents >> Show >> Hide
- What Was the Arduino Walkie-Talkie Supposed to Do?
- The Main Failure: It Talked, But It Sounded Terrible
- Why the Breadboard Was Not the Only Problem
- The Op-Amp Suspect: When Gain Becomes Pain
- The Arduino ADC: Tiny Ears With Rules
- The nRF24L01: Fast Enough, But Not Forgiving
- Debugging the Right Way: Divide the Beast
- Why a “Working” Circuit Can Still Be a Bad Circuit
- How to Build a Better Arduino Walkie-Talkie
- What This Failure Teaches Makers
- Experience Notes: What This Kind of Failure Feels Like in Real Life
- Conclusion: The Best Fails Make Better Builders
- SEO Tags
Every maker eventually builds a project that looks brilliant on paper, behaves politely on the breadboard, and then transforms into a gremlin the moment anyone says, “Let’s make a PCB.” That is the beautiful tragedy behind Fail Of The Week: The Arduino Walkie That Won’t Talkie, a DIY radio project where the concept was simple: build an Arduino walkie-talkie that could send voice wirelessly. The reality? It talked, technically. It just sounded like a robot gargling through a kazoo in a tunnel.
The project is especially interesting because it was not a total failure. The Arduino boards ran. The nRF24L01 radio modules linked up. The microphone captured sound. The speaker produced audio. The problem was quality: the output was heavily distorted, noisy, and difficult to understand. In maker terms, this is the most annoying kind of failure. Nothing is completely dead, so nothing is obvious. The circuit sits there blinking innocently while your sanity files a resignation letter.
This article breaks down what likely went wrong, why Arduino audio projects are trickier than beginner tutorials make them look, and what this “walkie that won’t talkie” teaches anyone building wireless audio with Arduino, nRF24L01 modules, op-amps, microphones, and tiny speakers.
What Was the Arduino Walkie-Talkie Supposed to Do?
The core idea was practical and very maker-friendly: create a low-cost wireless intercom system, originally inspired by the kind of headset riders might use to talk while traveling together. Instead of buying commercial gear, the project used familiar hobby parts: Arduino-compatible microcontrollers, nRF24L01 2.4 GHz radio modules, a condenser microphone, an amplifier stage, and a speaker output.
On the surface, this sounds reasonable. The nRF24L01 is cheap, popular, and capable of fast data transmission for small embedded projects. Arduino boards are easy to program, widely supported, and loved by anyone who has ever wanted to turn coffee, panic, and jumper wires into a functioning device. Add a microphone on one end, a speaker on the other, and you have a homemade walkie-talkie. What could possibly go wrong?
As it turns out, audio could go wrong. Audio is where electronics stops being polite and starts asking uncomfortable questions about gain, clipping, sampling rate, power noise, signal bias, filtering, timing, bandwidth, and whether your breadboard is secretly an antenna farm.
The Main Failure: It Talked, But It Sounded Terrible
The most important detail is that the radio link itself was not the obvious villain. The modules connected. Data moved. Sound came out. That means the failure was probably not a simple “wrong wire, wrong library, no communication” situation. Instead, the project entered the swampy middle ground of distorted Arduino audio.
Distortion in a DIY walkie-talkie can come from several places. The microphone signal may be too weak, too strong, badly biased, or amplified poorly. The op-amp may clip the waveform before the Arduino ever sees it. The analog-to-digital converter may sample a messy signal. The software may transmit audio at a rate that is acceptable for speech but unforgiving of bad front-end design. The speaker output may add its own rough edges, especially if PWM audio is not filtered well.
That is why this project became such a useful failure. It reminds us that a wireless audio project is not one project. It is four projects wearing one trench coat: an analog microphone circuit, a digital sampling system, a radio data link, and an audio playback circuit.
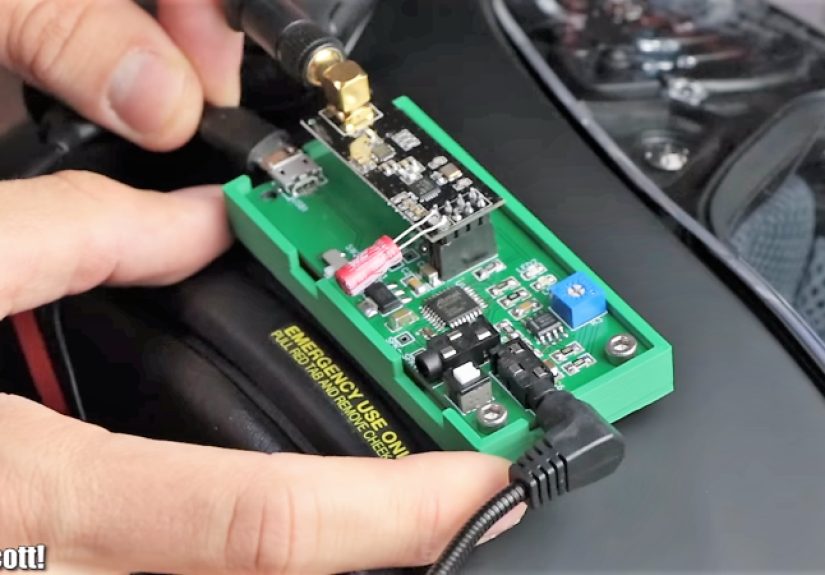
Why the Breadboard Was Not the Only Problem
One tempting explanation was the breadboard. Breadboards are wonderful for quick tests, but they are not famous for clean analog audio. Long jumper wires add resistance, capacitance, noise pickup, and emotional damage. When a project has a “rat’s nest” layout, blaming the breadboard feels natural.
So the design moved toward a PCB. That sounds logical: shorter traces, cleaner layout, fewer flaky jumper wires, and a more professional build. Unfortunately, the PCB version reportedly sounded even worse. This is the plot twist every maker fears. You spend time turning chaos into a board, only to discover that you have manufactured your mistake with solder mask and confidence.
The lesson is not “never make a PCB.” The lesson is never freeze an unproven analog problem into copper. Before designing a board, each part of the signal chain should be tested separately. Feed a known audio signal into the amplifier. Scope the op-amp output. Confirm the Arduino ADC sees a clean waveform. Test radio packets with dummy data. Test speaker output with generated tones. Only then should the PCB dragon be summoned.
The Op-Amp Suspect: When Gain Becomes Pain
One of the likely trouble spots was the microphone amplifier stage. Small electret microphones produce tiny signals, so they need amplification before an Arduino can sample them effectively. But “more gain” is not always better. Too much gain can slam the waveform into the voltage rails, clipping the tops and bottoms until speech becomes crunchy electronic oatmeal.
This is especially relevant when using older general-purpose op-amps such as the LM358 in low-voltage audio projects. The LM358 is useful, cheap, and common, but it is not a magical rail-to-rail audio fairy. Depending on supply voltage and circuit design, it may not swing cleanly across the full input or output range. If the microphone signal is biased poorly or amplified too aggressively, distortion can happen before the Arduino has any chance to rescue it.
A better approach is to design the microphone stage around the ADC’s needs. For a 5V Arduino input, silence should sit around the middle of the ADC range, not near ground. Normal speech should create a waveform large enough to measure but not so large that it clips. A dedicated microphone amplifier module, adjustable gain, or a modern rail-to-rail op-amp can make life much easier.
The Arduino ADC: Tiny Ears With Rules
Most classic Arduino boards use a 10-bit analog-to-digital converter. That means the incoming analog signal is represented by values from 0 to 1023. For knobs, light sensors, and temperature readings, that is plenty. For voice audio, it is workable but limited. You are asking a small microcontroller to capture a constantly changing waveform fast enough to sound like speech instead of haunted furniture.
A 16 kHz sampling rate can be acceptable for rough speech, but only if the analog signal is well behaved. If high-frequency noise gets into the ADC, it can fold back into the audible range as aliasing. If the signal clips, the ADC will faithfully preserve the clipping. If the input floats, buzzes, or rides on noisy power, the Arduino does not politely ignore that mess. It digitizes the mess and sends it to your speaker with enthusiasm.
This is where filtering matters. A low-pass filter before the ADC can reduce high-frequency junk. Proper biasing keeps the waveform centered. Decoupling capacitors help stabilize power. Good grounding keeps digital noise away from sensitive audio paths. These are not glamorous upgrades. Nobody posts a dramatic thumbnail holding a resistor and shouting, “This changed everything!” But in audio circuits, quiet details often win.
The nRF24L01: Fast Enough, But Not Forgiving
The nRF24L01 module is popular because it is affordable and surprisingly capable. It can handle data rates suitable for many sensor, control, and hobby wireless projects. Libraries such as RF24 and RF24Audio make it possible to stream simple audio between Arduino boards. That does not mean every circuit using it will automatically sound good.
Radio modules are picky about power. The nRF24L01 runs at 3.3V, and many builders discover that the Arduino’s onboard 3.3V pin is not always the happiest supply for wireless modules, especially with clones, long wires, or higher-power variants. A weak or noisy supply can cause dropouts, failed communication, or strange behavior that looks like a software bug wearing a hardware costume.
For reliable results, many builders add a decoupling capacitor near the module’s power pins and, when necessary, use a dedicated 3.3V regulator. Short wires, solid ground connections, and careful SPI wiring also matter. In an Arduino walkie-talkie, however, radio reliability is only one piece. A clean radio link can still transmit ugly audio perfectly.
Debugging the Right Way: Divide the Beast
The biggest takeaway from the Arduino walkie-talkie failure is not about one resistor, one op-amp, or one module. It is about debugging strategy. When a complex project fails, the worst move is to stare at the whole thing and whisper, “Why are you like this?” The better move is to break the system into blocks.
Block 1: Microphone and Preamp
Start by testing the microphone amplifier alone. Speak into the mic and view the output on an oscilloscope if possible. Without a scope, even recording the signal into another device or using Arduino serial output carefully can reveal whether the signal is centered, responsive, and not clipping. If the waveform is already distorted here, the radio is innocent. Apologize to the radio.
Block 2: ADC and Sampling
Next, feed a clean test signal into the Arduino analog input. Use a simple tone or a controlled microphone module. Confirm that the ADC values move smoothly and stay within range. If the values keep smashing into 0 or 1023, the input is clipping. If the readings dance wildly during silence, noise or grounding may be the problem.
Block 3: Radio Data Transfer
Then test the nRF24L01 modules using simple packets before audio. Send numbers, text, or test patterns. Make sure both modules share the same address, channel, data rate, and library configuration. This avoids the classic maker comedy where the transmitter is shouting on one channel while the receiver is calmly listening to another.
Block 4: Output Audio
Finally, test playback. PWM audio through a speaker can sound rough without filtering or amplification. A tiny microcontroller pin is not a proper speaker driver. Use an amplifier stage where needed, filter the output, and test with known audio data before blaming the microphone.
Why a “Working” Circuit Can Still Be a Bad Circuit
One of the sneakiest traps in electronics is the difference between function and performance. A circuit can function and still be terrible. A walkie-talkie that passes distorted voice from one unit to another is technically alive. But if the voice is unintelligible, the user experience is still a fail.
This is common in Arduino audio projects. Tutorials often prove the concept: sound enters here, data goes there, noise exits the speaker. But practical voice communication requires more than concept proof. It needs intelligibility, stable volume, low noise, acceptable latency, and predictable behavior when the speaker is close to the microphone.
That last point matters. Walkie-talkies must manage feedback. If the speaker output leaks back into the microphone, the system can squeal, buzz, or transmit its own noise. Push-to-talk helps because only one side transmits at a time. A squelch function can also prevent constant transmission of background hiss. In software, even a simple threshold can reduce unnecessary noise, although it must be tuned carefully so quiet speech is not chopped off like a bad haircut.
How to Build a Better Arduino Walkie-Talkie
A better version of this project would begin with modest expectations. The goal should be understandable speech, not podcast-quality audio. Start with two Arduino boards, two nRF24L01 modules, a known-good RF24Audio example, and stable 3.3V power. Get basic audio streaming working before modifying hardware.
For the microphone stage, use an adjustable microphone amplifier designed for microcontroller inputs. Keep the output biased around mid-supply. Set gain conservatively. Loud speech should not clip. Add a simple low-pass filter before the ADC to reduce aliasing. Keep analog wiring short and away from SPI lines, radio modules, and PWM outputs.
For the radio stage, mount the decoupling capacitor close to the nRF24L01 power pins. Use a clean regulator when the Arduino supply is questionable. Make sure CE, CSN, MOSI, MISO, and SCK are wired correctly. Choose a data rate and channel that balance reliability with bandwidth. Lower data rates can improve range and robustness, but audio needs enough throughput to avoid sounding like it was faxed through a potato.
For the output stage, do not expect an Arduino pin to drive a speaker properly. Use an audio amplifier. Add filtering to smooth PWM output. Keep the speaker physically separated from the microphone during testing. Use headphones for initial debugging if feedback becomes a problem.
What This Failure Teaches Makers
The Arduino walkie that would not talkie is a perfect failure because it is relatable. It was not caused by laziness or lack of imagination. It came from the messy borderland where digital convenience meets analog reality. The microcontroller did its job. The radio did enough of its job. The problem was that voice audio is unforgiving.
It also teaches humility. Many makers have had the same experience: the project seems “basically done,” then one small analog detail drags it into the swamp. A resistor value is too aggressive. A supply rail is noisy. The gain is wrong. A filter is missing. The layout couples digital noise into audio. Suddenly, a weekend project becomes a detective novel written by an electrical engineer with a grudge.
But that is why fail posts are valuable. Perfect projects are inspiring, but failed projects are educational. They show the decision points, assumptions, shortcuts, and hidden traps. A polished tutorial says, “Connect this wire.” A good failure says, “Here is why that wire ruined my afternoon.”
Experience Notes: What This Kind of Failure Feels Like in Real Life
If you have ever built an Arduino audio project, this story probably feels painfully familiar. The first hour is pure optimism. You plug in the microphone module, upload the sketch, open the serial monitor, and see numbers moving. Excellent. The circuit has ears. Then you connect the radio modules and send a test packet. Excellent again. The circuit has a tiny invisible mailman. At this point, you start imagining the finished enclosure, the dramatic demo video, and perhaps a small parade in your honor.
Then you connect the speaker.
Instead of clear voice, you hear buzzing, clicking, humming, or a shredded version of your own speech that sounds like it came from a submarine with dental problems. You try speaking louder. Bad idea. Now it clips harder. You whisper. The noise stays. You move the wires around. The sound changes, which is both helpful and deeply rude. You add a capacitor because someone on a forum said capacitors fix nRF24L01 problems. Sometimes it helps the radio. Sometimes it does nothing for the audio. Sometimes you add three capacitors and begin calling it “power conditioning” because that sounds better than “panic sprinkles.”
The real breakthrough usually comes when you stop treating the project like one object. The microphone circuit becomes its own assignment. The Arduino ADC becomes its own assignment. The RF link becomes its own assignment. The speaker output becomes its own assignment. Suddenly, the mystery shrinks. Maybe the radio is fine. Maybe the microphone amplifier is clipping before the signal reaches A0. Maybe the speaker amplifier is picking up PWM noise. Maybe your ground wiring looks like modern art and behaves like a noise antenna.
One especially useful experience is testing with known signals. Instead of shouting into a microphone and guessing, feed the Arduino a controlled tone. Instead of streaming live audio first, transmit simple values. Instead of driving a speaker immediately, inspect the output or use a small amplifier board. Each known-good test removes one ghost from the machine.
Another lesson is to resist the PCB too early. A custom board feels like progress because it is neat, permanent, and makes your project look less like a spaghetti dinner. But a PCB does not fix a bad circuit. It preserves it. If the breadboard version has unexplained distortion, the PCB version may simply deliver that distortion with better trace geometry and more expensive regret.
The best mindset is to treat failure as instrumentation. Every ugly sound is information. A clipped voice says something about gain. A periodic buzz says something about power, PWM, sampling, or interference. Dropouts say something about radio reliability. Feedback says something about acoustic design. The project is talking to you, even if the walkie-talkie is not talking to anyone else.
Conclusion: The Best Fails Make Better Builders
Fail Of The Week: The Arduino Walkie That Won’t Talkie is not just a funny title. It is a reminder that DIY electronics fails are often more useful than instant success. This Arduino walkie-talkie brought together all the classic troublemakers: sensitive audio input, limited ADC resolution, RF modules that demand clean power, op-amps that can clip, PWM output that needs filtering, and the eternal temptation to blame the breadboard before proving the circuit.
The fix is not one magic part. The fix is method. Test each block. Control the signal. Reduce gain before it clips. Filter before sampling. Stabilize the radio supply. Use a real speaker amplifier. Keep analog and digital noise from becoming roommates. Most importantly, do not promote a prototype to PCB royalty until it has earned the crown.
In the end, the Arduino walkie that won’t talkie deserves a place in the maker hall of fame. Not because it failed, but because it failed loudly enough for everyone else to learn from it. And honestly, if your project is going to sound like a distressed toaster, it might as well teach a good lesson while doing it.
SEO Tags
Note: This article is written as original editorial content based on real Arduino, nRF24L01, RF24Audio, microphone amplifier, ADC, PWM audio, and maker troubleshooting knowledge. Always follow local radio regulations and test electronic projects safely.


