Table of Contents >> Show >> Hide
- Why This Entryway Cabinet Works (Even in Real Life)
- Project Snapshot
- Materials and Cut List
- Tools You’ll Want
- Build Steps
- 1) Choose lumber like you mean it
- 2) Cut the two end panels and mark the arch
- 3) Cut the shelves, back, and top
- 4) Rout the decorative edges
- 5) Drill pocket holes and assemble the case
- 6) Fit and install the cubby dividers
- 7) Attach the top
- 8) Add the cove molding
- 9) Install the key rail and plan your hooks
- 10) Fill, sand, and finish
- 11) Hang it safely with a French cleat
- Customization Ideas (Because Every Entryway Has Its Own Personality)
- Troubleshooting: Common “Oops” Moments
- Conclusion
- Build Experiences (The 500-Word “Real Life” Part)
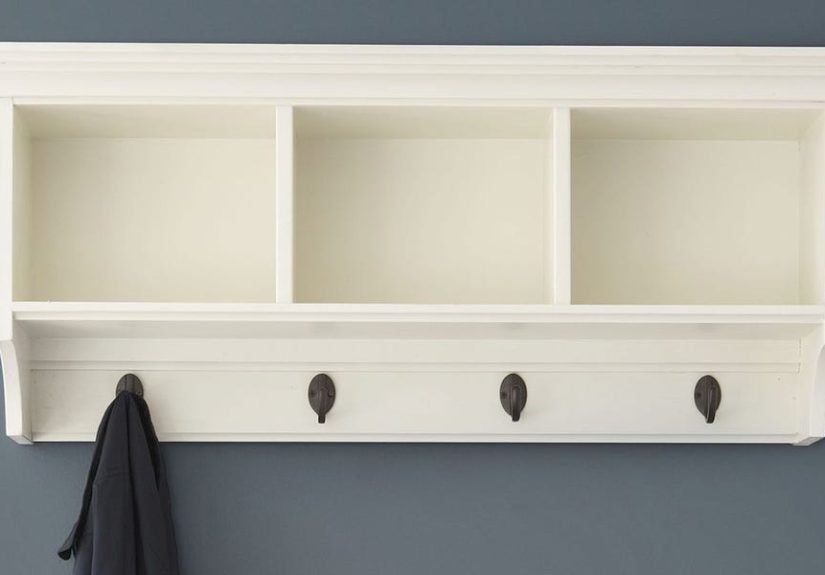
You can have the coolest shoes, the fanciest key fob, and a “this is definitely my adult life” tote bag… but if you can’t find your keys, your whole morning turns into a scavenger hunt with consequences. Enter: the Hall Monitora wall-mounted entryway cabinet that politely (but firmly) tells your stuff to get in line.
This project is a sweet spot for DIYers: it looks custom, it doesn’t require building a full mudroom, and it can realistically be built over a weekend. You’ll end up with three cubbies for daily grab-and-go items, a rail for keys, and space underneath for coat hooks. In other words: less “Where is my stuff?” and more “Look at me leaving the house like a functional person.”
Why This Entryway Cabinet Works (Even in Real Life)
A lot of entryway storage fails for one simple reason: it asks you to be someone you’re not. Tiny trays overflow. Open baskets become black holes. Hooks multiply into chaos. The Hall Monitor fixes that by giving each category its own home:
- Cubbies = sunglasses, gloves, dog leash, wallet, mail, school notes
- Key rail = keys that don’t wander off like they’re training for the Olympics
- Hooks below = coats, bags, hatsstuff that needs to hang, not huddle
Project Snapshot
- Skill level: Confident beginner to intermediate (straight cuts + basic joinery)
- Time: 1 weekend (build day + finish/hang day)
- Mounting: French cleat into wall studs for strength and easy leveling
- Material: Pine boards/panels + cove molding + standard fasteners
Materials and Cut List
The original build uses pine. You can absolutely swap in poplar (great for paint) or cabinet-grade plywood (stable and clean), but pine keeps it affordable and readily available at most big-box home improvement stores.
| Part | Qty | Thickness | Width | Length | Notes |
|---|---|---|---|---|---|
| Shelves (A) | 2 | 3/4" | 7 5/8" | 36 1/2" | Upper + lower shelf |
| Ends (B) | 2 | 3/4" | 9 1/4" | 16" | Includes decorative arch cutout |
| Dividers (C) | 2 | 3/4" | 7 3/8" | 8 13/16" (fit-to-length) | Measure in place for perfect fit |
| Back (D) | 1 | 3/4" | 16" | 36 1/2" | Also supports mounting |
| Top (E) | 1 | 3/4" | 11 1/4" | 42" | Overhang adds “built-in” look |
| Front Cove Molding (F) | 1 | 5/8" | 1 5/8" | 40 1/2" | Trim for the front of top |
| End Cove Molding (G) | 2 | 5/8" | 1 5/8" | 10 3/8" | Trim for each side of top |
| French Cleat (H) | 2 | 3/4" | 4" | 36 3/8" | Rip with a 45° bevel to create mating cleats |
| Key Rail (I) | 1 | 3/4" | 1 1/2" | 36 1/2" | Mount inside; add screw hooks if desired |
Miscellaneous supplies
- Wood glue
- 1 1/4" coarse-thread pocket screws (case assembly)
- 1 1/2" brads (18-ga) or 4d finish nails (dividers/top)
- 3/4" brads or headless pins (23-ga) for molding
- 1 1/4" drywall screws (key rail + cleat to back)
- 3" screws for wall studs (cleat to studs)
- Wood filler, sandpaper (100–120 grit + finer as needed)
- Primer + paint (or conditioner + stain + topcoat)
- Coat hooks + optional screw hooks for keys
Tools You’ll Want
- Miter saw or circular saw with a straightedge guide
- Jigsaw (for the decorative arch)
- Router with a 3/8" radius cove bit (for the soft decorative edge)
- Pocket hole jig + drill/driver
- Brad nailer (nice-to-have) or hammer + finish nails
- Orbital sander + sanding block
- Level, stud finder, tape measure, square
- Clamps (they’re basically extra hands that don’t complain)
Build Steps
1) Choose lumber like you mean it
Before you cut anything, pick straight boards/panels. Sight down the length in the store. Avoid pieces with twist, big cups, or dramatic bows. Pine is friendly for beginnersbut it’s also a little dramatic (knots, dents, and blotchy stain), so your finishing plan matters.
2) Cut the two end panels and mark the arch
Start with the end pieces (B). After cutting them to size, mark the decorative arch at the bottom. You can freehand a gentle curve, trace a bucket, or use a flexible ruler. The only “rule” is symmetry: clamp both end pieces together and sand them flush after cutting so they match perfectly.
Cut the arch with a jigsaw, staying just outside your line. Clean it up with sanding. This is the part that makes the project look “designed,” not “assembled.”
3) Cut the shelves, back, and top
Cut shelves (A), back (D), and top (E) to the dimensions above. Keep track of which shelf will be the bottom: it gets more attention later (decorative edge). If you’re using solid pine panels, take a moment to label the “best face” of each board so your visible surfaces look intentional.
4) Rout the decorative edges
Using a router with a 3/8" radius cove bit, cut a decorative edge on the bottom shelf, the key rail, and the back piece. This small detail is doing a lot of heavy liftingit softens the look and makes the cabinet feel finished.
Router tip: make multiple light passes instead of one deep pass. Your router (and your nerves) will thank you.
5) Drill pocket holes and assemble the case
Pocket hole joinery makes this cabinet approachable because it gives strong mechanical fastening without complex dadoes. Drill pocket holes on the inside faces so they’ll be hidden after assembly.
- Drill pocket holes in each shelf (A) where they’ll attach to the ends (B).
- Attach shelves to ends using glue + 1 1/4" coarse-thread pocket screws.
- Drill pocket holes in the back (D), then attach it to the ends (B).
Check for square by measuring corner-to-corner diagonally. If the diagonals match, you’re square. If not, gently clamp and adjust before things fully set.
6) Fit and install the cubby dividers
Here’s the trick that saves you from frustration: the dividers (C) are best cut to fit. Hold each divider between the shelves, mark the exact length, then cut. This accounts for tiny real-world variations.
Slide each divider into place and fasten through the shelves into the divider with 1 1/2" brads (or finish nails). Add glue for extra stiffness.
7) Attach the top
Position the top (E) so the back edge lines up with the back of the ends, then nail/screw it into the ends. The overhang creates a furniture-like profile and gives the cabinet a little “architecture.”
8) Add the cove molding
Cut the front cove molding (F) and the two end pieces (G) with clean miters. Dry-fit firstmolding is where tiny gaps like to show up and wave at you. Once fit, attach with pins/brads. Fill nail holes after installation.
9) Install the key rail and plan your hooks
Fit the key rail (I) inside the case. Drive 1 1/4" screws through the back into the rail. Then decide on hardware:
- Coat hooks: space them evenly under the cabinet (and consider backpacksthose need breathing room).
- Key hooks: screw hooks on the rail keep keys in the “approved zone.”
10) Fill, sand, and finish
Set nail heads (if needed), apply wood filler, and sand smooth. A simple sanding progression for paint is often enough: 100–120 grit to flatten, then 150–180 to refine.
If you’re painting (recommended for pine)
- Spot-prime knots with a shellac-based primer so they don’t bleed through later.
- Prime the whole piece (often two coats makes pine behave).
- Finish with a durable topcoat paint (semi-gloss is easy to wipe clean in an entryway).
If you’re staining
- Use a wood conditioner or a washcoat approach to reduce blotchiness.
- Test your stain on an offcut firstpine loves surprises, and not the fun kind.
- Topcoat with polyurethane for durability (entryways are high-traffic zones).
11) Hang it safely with a French cleat
A French cleat is perfect here because it’s strong, spreads load across studs, and lets you level the cabinet without heroic balancing acts. You’ll have two mating cleat pieces (H): one attaches to the cabinet, the other to the wall.
- Rip the cleat stock with a 45° bevel to create two matching angles.
- Attach one cleat to the back of the cabinet (bevel facing down toward the wall).
- Find wall studs and attach the wall cleat level using 3" screws into studs.
- Hang the cabinet by seating the beveled cleats together.
- Extra safety: add a discreet screw through the cabinet back into a stud near the bottom to prevent lift-off.
Customization Ideas (Because Every Entryway Has Its Own Personality)
- Make it wider: add another cubby bay (just keep the cleat spanning multiple studs).
- Add a charging cubby: drill a cable hole in one cubby and mount a power strip behind.
- Upgrade the look: add a simple face frame to the front edge for a more “built-in” feel.
- Go plywood: cabinet-grade plywood reduces seasonal movement and can look very crisp with edge banding.
- Label it: tiny tags under each cubby can be surprisingly life-changing in busy households.
Troubleshooting: Common “Oops” Moments
- My cabinet isn’t square: clamp diagonally and re-check before fastening everything permanently.
- Divider gaps: cut dividers to fit in place (and don’t be shy with a sanding block).
- Visible pocket holes: keep them on the inside faces; fill any that still show in awkward angles.
- Knot stains bleeding through paint: spot prime knots with shellac-based primer, then recoat.
- Wobbly wall mount: confirm screws hit studs, not just drywall.
Conclusion
The Hall Monitor entryway cabinet is one of those projects that pays you back daily. It doesn’t just store stuffit prevents the slow creep of entryway clutter from taking over your entire home. Build it once, hang it securely, and enjoy the small miracle of knowing where your keys are on a Monday morning.
Build Experiences (The 500-Word “Real Life” Part)
Even a simple entryway cabinet project has its own rhythmand if you’ve built furniture before, you’ll recognize the pattern: confidence, sawdust, a brief moment of doubt, then victory (usually with paint on your elbow).
The first “experience” most DIYers have with this build is realizing how much the ends set the tone. The arch is small, but it’s the design detail your eye notices immediately. This is where patience wins. When you cut the curve with a jigsaw, it’s normal to feel like the line is drifting. That’s okay. The secret is leaving a little extra and sanding to perfection afterward. And if you clamp both ends together and sand them as a pair, you get matching arches that look intentionallike you meant to do that the whole time.
Next comes the oddly satisfying part: building an “open box” that starts to feel like real furniture. Pocket hole joinery is a morale booster here. You drill, you drive, and suddenly you’ve got structure. The key experience is learning to check for square early. If the case is even a little out of square, the dividers will tattletale on you later. A quick diagonal measurement can save you from the “why is this divider gap bigger on one side?” spiral.
Installing the dividers tends to be the moment where DIYers level up. The plan’s fit-to-length approach is a very real-world move. Lumber varies. Small measurement errors happen. So holding the divider in place, marking it, and trimming to fit feels like woodworking wisdom being passed down in real time. It’s also where you learn that a sanding block is not a “finishing tool”it’s a “making things actually fit” tool.
Finishing is where entryway reality enters the chat. An entryway cabinet will get touched, bumped, and occasionally assaulted by a backpack zipper. If you paint, the experience is usually: “This looks amazing,” followed by “Oh wow, pine knots are trying to ghost-write my finish.” The smart move is knot-spot-priming before full priming so your final coat stays crisp. If you stain, the experience is more like a science fair: test pieces, conditioner, careful timing, and a new appreciation for why painters keep saying, “Just paint pine.”
Then there’s the hanging dayarguably the most satisfying moment. A French cleat makes the installation feel less like wrestling and more like docking a spaceship. You level the wall cleat, hit studs confidently, and the cabinet settles into place with a reassuring “yep, that’s not going anywhere.” A lot of people add one extra screw near the bottom into a stud for peace of mind, and that’s the kind of small detail that lets you walk past the cabinet laterloaded with coats, keys, and lifewithout a single worried glance.
The best part of the whole experience isn’t the build photos (though, yes, take them). It’s the tiny daily win: you walk in, hang your stuff, and the entryway stays calm. The Hall Monitor isn’t just a cabinetit’s a routine that looks good on your wall.


