Table of Contents >> Show >> Hide
- What Is an HDMI-to-USB Capture Device?
- Why Raspberry Pi Users Need One
- Best Raspberry Pi Use Cases for an HDMI Capture Dongle
- What to Look For When Buying One
- How to Use an HDMI-to-USB Capture Device With Raspberry Pi
- Common Problems and Fixes
- What an HDMI Capture Device Does Not Do
- A Smart Raspberry Pi Field Kit
- Experience Notes: What Heavy Raspberry Pi Users Learn the Hard Way
- Conclusion: Small Dongle, Big Raspberry Pi Energy
If you use Raspberry Pi boards often enough, you eventually build a strange little survival kit: spare microSD cards, a questionable number of USB-C cables, a tiny screwdriver that always disappears, and at least one adapter you bought at midnight because “this will definitely fix it.” Add one more hero to that kit: an HDMI-to-USB capture device.
It is small, cheap, and deeply unglamorous. It may look like something that fell out of a bargain-bin webcam. Yet for heavy Raspberry Pi users, an HDMI-to-USB capture device can be the difference between calmly fixing a boot problem and carrying a full-size monitor across the room like you are moving furniture for a very demanding hamster.
The idea is simple. Instead of plugging your Raspberry Pi into a monitor, you plug the Pi’s HDMI output into a capture dongle. Then the dongle connects by USB to your laptop, tablet, or another computer, where the Pi’s video output appears like a webcam feed. Open OBS Studio, VLC, QuickTime, a camera app, or a USB camera viewer, and there it is: your Raspberry Pi desktop, boot console, error message, or blinking login prompt.
For people who only set up one Raspberry Pi every few years, this may feel like overkill. For people who flash images, test hats, build kiosks, revive headless servers, debug networking, and casually say things like “I’ll just SSH into it,” this little dongle quickly becomes a favorite tool.
What Is an HDMI-to-USB Capture Device?
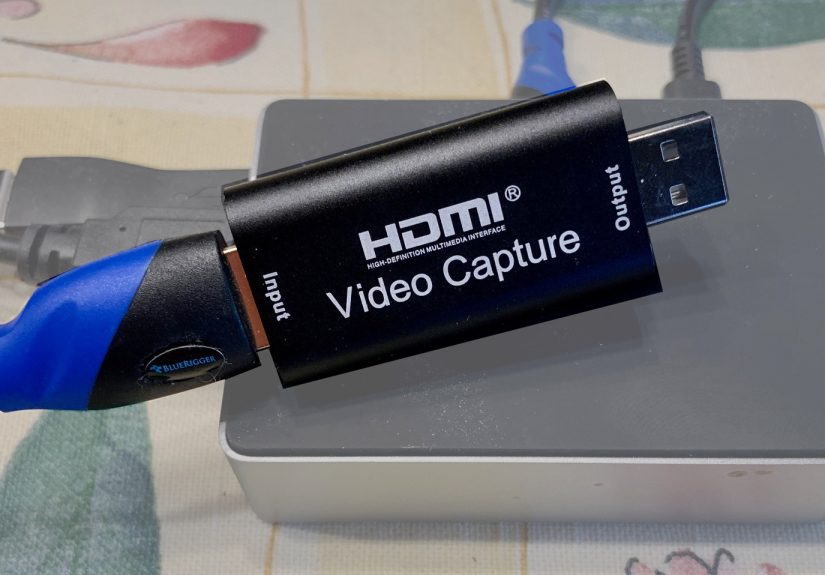
An HDMI-to-USB capture device takes HDMI video from one device and sends it to another device over USB as a video input. In everyday terms, it makes your Raspberry Pi appear to your computer like a webcam. The Pi is not sending video through USB directly; the capture dongle is converting the HDMI signal into a format the host computer can understand.
Many basic capture dongles support 1080p input and output a compressed video stream over USB. Higher-end models may support 4K input, 1080p60 capture, lower latency, better color handling, HDMI passthrough, or more reliable driverless operation. For Raspberry Pi troubleshooting, you usually do not need a Hollywood-grade capture box. You need something dependable enough to show a terminal, desktop, setup wizard, or panic-inducing boot message without requiring a second desk.
Why UVC Support Matters
The magic word to look for is UVC, short for USB Video Class. A UVC-compatible capture device behaves like a standard USB camera, which means it usually works without special drivers on Windows, macOS, Linux, and many Android devices. That matters because a debugging tool should not need its own debugging ritual.
When a capture device is UVC-compatible, common apps can often see it as a video source. OBS Studio can add it as a video capture device. Linux systems can often expose it through video device interfaces. macOS may show it as a camera input after permissions are granted. Android tablets and phones may use USB camera viewer apps, assuming the device supports USB OTG and provides enough power.
In other words, UVC is the difference between “plug it in and look at the Pi” and “install this driver from a page last updated when skinny jeans were still considered a personality.”
Why Raspberry Pi Users Need One
Raspberry Pi boards are famously flexible. That flexibility also means they end up in awkward places: behind TVs, inside cabinets, on robot platforms, in network closets, under 3D printers, and in project boxes with exactly 2 millimeters of clearance. When something goes wrong, the first question is usually: “Can I see what it is doing?”
SSH, VNC, Raspberry Pi Connect, and other remote access options are excellent once the operating system is booted, configured, and connected to the network. But those tools cannot help if Wi-Fi credentials are wrong, the system is stuck before networking starts, the desktop resolution is broken, or the Pi is waiting at a first-boot prompt. That is when physical video output still wins.
It Turns Your Laptop Into a Portable Monitor
Most laptops have HDMI output, not HDMI input. That port is for sending your laptop screen to a monitor, not for receiving video from a Raspberry Pi. A capture device solves that gap. The Pi connects to the capture dongle, the dongle connects to the laptop, and the laptop displays the Pi’s output through software.
This is especially useful if your main monitor is mounted, busy, or located in another room. It is also helpful when you are working at a kitchen table, school desk, makerspace bench, or field site where a spare HDMI display is not waiting around like a loyal golden retriever.
It Makes Headless Setup Less Mysterious
Headless Raspberry Pi setup is wonderful when everything works. Raspberry Pi Imager can configure user credentials, Wi-Fi, SSH, and remote access before first boot. But headless setup can still fail for ordinary reasons: wrong Wi-Fi password, unsupported network band, typo in hostname, missing SSH option, weak power supply, or an image that did not write correctly.
Without a screen, those failures feel like shouting into a cave. With an HDMI-to-USB capture device, you can watch the boot process, see whether the system reaches the login prompt, confirm whether the desktop starts, and catch error messages that would otherwise remain hidden. It does not replace good headless habits; it gives you a flashlight for the moments when those habits are not enough.
Best Raspberry Pi Use Cases for an HDMI Capture Dongle
1. Debugging First Boot
First boot is where many Raspberry Pi mysteries begin. The board powers on. The LED blinks. Nothing appears on the network. You try to ping it. Your router does not list it. You start bargaining with the tiny computer like it owes you rent.
A capture device lets you see whether the Pi is actually booting. You might find that the image is expanding the filesystem, the system is waiting for input, the display resolution is unsupported, or the boot process is failing because of a corrupt card. Seeing the screen saves time because it turns guessing into observing.
2. Recovering From Network Problems
Many Raspberry Pi projects are managed remotely. That is fine until networking breaks. Maybe Wi-Fi credentials changed. Maybe NetworkManager is not behaving. Maybe a static IP setting was entered incorrectly. Maybe your Pi is connected to the one Ethernet cable in the house that looks fine but has chosen emotional collapse.
With HDMI capture, you can log in locally and fix network configuration without finding a separate monitor. Connect a keyboard directly to the Pi or use whatever local input setup your project supports. Even if you mostly work through SSH, the ability to view the local console is a safety net.
3. Recording Tutorials and Project Demos
If you create Raspberry Pi tutorials, an HDMI capture dongle is more than a troubleshooting tool. It is a clean way to record setup screens, command-line output, desktop demos, retro gaming builds, kiosk interfaces, and project walkthroughs.
Screen recording inside the Pi is possible, but it adds load and may not capture early boot events. Capturing HDMI externally keeps the Pi focused on being the Pi. Your laptop handles recording, streaming, screenshots, and overlays. OBS Studio is especially useful here because it can combine the Pi’s HDMI output with your microphone, webcam, browser notes, and other sources.
4. Working With Multiple Raspberry Pi Boards
Heavy Raspberry Pi users rarely have only one board. There is the reliable Pi 4, the shiny Pi 5, the older Pi 3 that still deserves respect, a Pi Zero hiding in a drawer, and a board that nobody remembers buying but everyone agrees “might be useful.”
A capture dongle makes board-hopping easier. You can move one HDMI input from board to board while keeping your laptop as the viewing station. Pair it with a compact keyboard, a known-good power supply, and labeled cables, and you have a small diagnostic bench that fits in a backpack.
5. Field Repairs and Portable Builds
Raspberry Pi boards often leave the desk. They run dashboards, camera rigs, robots, sensors, art installations, environmental monitors, digital signs, and school projects. When a project fails outside your normal workspace, a full monitor is a terrible travel companion. It is fragile, bulky, and always needs the power outlet you cannot find.
A capture dongle weighs almost nothing. Add a short HDMI cable or the correct micro-HDMI adapter, and you can inspect the Pi using a laptop or compatible tablet. For field work, that is gold. It lets you check boot status, adjust display settings, and verify the interface without unpacking half a lab.
What to Look For When Buying One
Driverless UVC Operation
Choose a capture device that clearly advertises UVC support or driverless webcam-style operation. If it requires proprietary software just to show video, it may still work, but it is less convenient across different computers and operating systems.
1080p Support Is Usually Enough
For Raspberry Pi troubleshooting, 1080p capture is usually plenty. You are reading terminals, setup screens, logs, and desktop windows. A basic 1080p dongle can handle that well enough. For polished video production, low-latency interaction, or high-resolution recording, consider a better capture card with stronger specifications.
Mind the HDMI Connector
Different Raspberry Pi models use different HDMI connectors. Raspberry Pi 4 and Raspberry Pi 5 use micro-HDMI. Raspberry Pi Zero models use mini-HDMI. Older full-size boards use standard HDMI. Keep the right cable or adapter in your kit, and label it if necessary. Future you will be grateful. Future you is also the person who once tried to plug a micro-HDMI cable into a mini-HDMI port, so be kind.
USB Bandwidth and Power
Cheap capture devices often work over USB 2.0, usually by compressing video. Better devices may require USB 3.0 for higher frame rates or resolutions. If you use a tablet or phone as the display, power delivery can become tricky because the mobile device must recognize and power the capture dongle. A powered USB hub or USB-C hub can make the setup more stable.
Latency Expectations
HDMI capture introduces latency. For typing commands, changing settings, and watching boot output, that delay is usually acceptable. For fast gaming, precise mouse movement, or real-time control, it can feel mushy. If you need near-instant interaction, a real monitor or a low-latency capture solution is better.
How to Use an HDMI-to-USB Capture Device With Raspberry Pi
Basic Setup
- Power off the Raspberry Pi.
- Connect the Pi’s HDMI output to the HDMI input of the capture device.
- Plug the capture device into your laptop, desktop, tablet, or compatible phone.
- Open OBS Studio, VLC, QuickTime, Camera, Cheese, or another app that can display USB camera input.
- Select the capture device as the video source.
- Power on the Raspberry Pi and watch the output.
If the screen is black, do not immediately blame the Pi. Check the HDMI cable, confirm the correct HDMI port on the Raspberry Pi, try a different USB port, close other apps that may be using the capture device, and verify that the capture device appears in the operating system’s camera or video input list.
Using OBS Studio
OBS Studio is a favorite because it is flexible and free. Add a new video capture source, select the HDMI capture device, and set the resolution and frame rate. If the image looks stretched, choose a standard resolution such as 1920×1080 or 1280×720. For recording tutorials, add audio sources, text labels, and scene transitions. For basic troubleshooting, keep it simple: full-screen preview and no fuss.
Using a Tablet as a Pi Screen
Some Android tablets and phones can display the capture feed through USB camera apps. This can turn a tablet into a portable Raspberry Pi monitor. You will usually need the correct USB adapter, OTG support, and enough power for the dongle. It is not as elegant as a dedicated portable monitor, but it is wonderfully compact.
Common Problems and Fixes
Black Screen
A black screen can mean the Pi is not outputting HDMI, the capture device is not recognized, the app selected the wrong source, or the HDMI cable is bad. Try booting the Pi with the capture device already connected. Raspberry Pi firmware reads display information during boot, so having the HDMI device present from the start can help the Pi choose a usable mode.
Wrong Resolution
Some capture dongles report display capabilities in ways that cause the Raspberry Pi to choose a less-than-ideal resolution. If the image is cropped, blurry, or oddly scaled, set a standard desktop resolution from Raspberry Pi OS after you regain access. For persistent display problems, Raspberry Pi’s configuration tools and display settings can help force or adjust the output mode.
No Audio
Many capture devices can carry HDMI audio, but software settings vary. Check whether your capture app has a separate audio input for the dongle. Also confirm Raspberry Pi audio output settings. For troubleshooting, video matters most, but for demos and media projects, audio routing deserves a test before recording anything important.
Device Not Detected
If your computer does not detect the capture dongle, try another USB port, avoid overloaded hubs, grant camera permissions on macOS or Windows, and close apps that may already be using the device. On Linux, tools that list video devices can confirm whether the system sees the capture hardware.
What an HDMI Capture Device Does Not Do
An HDMI-to-USB capture dongle is not the same as a full keyboard-video-mouse system. It gives you video. It does not automatically send keyboard and mouse input back to the Raspberry Pi. You still need a keyboard, SSH, serial console, USB gadget setup, Bluetooth input, or another method to control the Pi.
It also should not be used to bypass protected video. Many capture devices will not display HDCP-protected content, and that is expected. For Raspberry Pi work, this is rarely an issue because you are capturing your own board’s output, not protected commercial media.
Finally, cheap capture dongles are not precision instruments. Some run warm. Some have inconsistent firmware. Some compress video aggressively. Some have odd color or scaling quirks. Buy from a seller with clear specifications, test the device before you need it, and keep a known-good HDMI cable with it.
A Smart Raspberry Pi Field Kit
If Raspberry Pi boards are part of your regular workflow, build a small field kit around the capture device. Include a micro-HDMI-to-HDMI cable, a mini-HDMI adapter for Pi Zero boards, a short standard HDMI cable, a USB-A to USB-C adapter, a compact keyboard, and a reliable power supply. Add a spare microSD card with Raspberry Pi OS, plus one card reserved for testing.
This kit can live in a pouch and travel with your laptop. It makes you faster at diagnosing problems and less dependent on whatever display happens to be nearby. It also reduces the comedy of crawling behind a TV while holding a Pi, a power cable, and the last remaining shred of your patience.
Experience Notes: What Heavy Raspberry Pi Users Learn the Hard Way
After enough Raspberry Pi projects, you learn that the most annoying problems are rarely dramatic. They are tiny, practical, and slightly ridiculous. A Pi boots perfectly on your desk, then refuses to appear on the network at the installation site. A kiosk image works until it meets a different display. A fresh SD card seems dead, but the board is actually waiting at a prompt. A classroom project fails because the monitor is already being used by another group. These are not glamorous failures, but they steal time like professional thieves.
An HDMI-to-USB capture device helps because it gives you immediate visibility. That visibility changes the mood of troubleshooting. Without video, you are guessing. With video, you are reading. Maybe the Pi says it cannot mount a partition. Maybe it is stuck resizing the filesystem. Maybe it booted fine, but the hostname is not what you expected. Maybe the desktop is running, but the network icon is quietly judging your Wi-Fi password. The dongle does not fix the problem by itself, but it lets you stop inventing theories.
The best experience comes from testing the whole chain before the emergency. Plug the capture device into your usual laptop. Confirm which app works best. Save an OBS scene named “Pi Capture” so you do not have to rebuild it later. Test 1080p and 720p. Check whether audio appears. Try your micro-HDMI cable with both HDMI ports on a Raspberry Pi 4 or Pi 5. Then put the dongle and the cable in the same pouch. A capture device without the correct HDMI adapter is just a tiny reminder that planning is important.
Another lesson: short cables are your friends. A compact HDMI lead and a short USB extension make the setup cleaner and reduce strain on the Pi’s small HDMI connector. Raspberry Pi boards are tough little machines, but dangling a rigid adapter from a micro-HDMI port is asking for sadness. Use flexible cables when possible, especially on a crowded bench.
It is also worth keeping expectations realistic. Cheap capture dongles are wonderful for terminals, boot screens, dashboards, and quick recordings. They are less wonderful for color-critical video, ultra-low-latency control, or high-end streaming. That is fine. A pocket flashlight does not need to be a stadium lighting rig. Its job is to help you see what is happening right now.
For makers, teachers, repair techs, and Raspberry Pi hobbyists, the capture dongle becomes one of those tools that feels unnecessary until the first time it saves an afternoon. After that, it earns a permanent spot next to the spare SD cards. Not because it is fancy. Because it is useful, and useful always wins.
Conclusion: Small Dongle, Big Raspberry Pi Energy
An HDMI-to-USB capture device is not the flashiest Raspberry Pi accessory. It will not make your robot faster, your server cooler, or your cable management less embarrassing. But it solves a real problem: seeing what your Raspberry Pi is doing when remote access is unavailable, unreliable, or not yet configured.
For heavy Raspberry Pi users, that is a big deal. It means easier first-boot setup, faster troubleshooting, cleaner tutorials, better field repairs, and fewer trips to borrow a monitor. Keep one in your kit, test it before you need it, and pair it with the right HDMI adapters. The next time a headless Pi decides to become mysteriously silent, you will have a way to make it talk.


