Table of Contents >> Show >> Hide
- What Is a Regular Heptagon?
- The Important Truth Before You Start
- Tools You Will Need
- How to Construct a Regular Heptagon in 8 Straightforward Steps
- A Fast Accuracy Check
- Useful Heptagon Formulas for Drawing and Design
- Example: Constructing a Heptagon with a 10 cm Radius
- An Alternative Practical Method
- Common Mistakes That Can Distort the Shape
- Why the Heptagon Feels Harder Than Other Regular Polygons
- Where a Regular Heptagon Can Be Useful
- Hands-On Experiences: What Drawing a Heptagon Actually Teaches You
- Conclusion
- SEO Tags
If circles, polygons, and precision tools make you oddly happy, the regular heptagon is your kind of trouble. It looks elegant, feels mysterious, and refuses to be as cooperative as a hexagon or an octagon. A seven-sided figure should be simple, right? Geometry laughs softly in the background.
Still, you can absolutely draw a clean, accurate regular heptagon for schoolwork, design layouts, woodworking plans, technical sketches, or pure mathematical bragging rights. In this guide, you will learn what makes a regular heptagon special, why it has a reputation for being tricky, and how to construct one in eight straightforward steps using practical drafting tools.
What Is a Regular Heptagon?
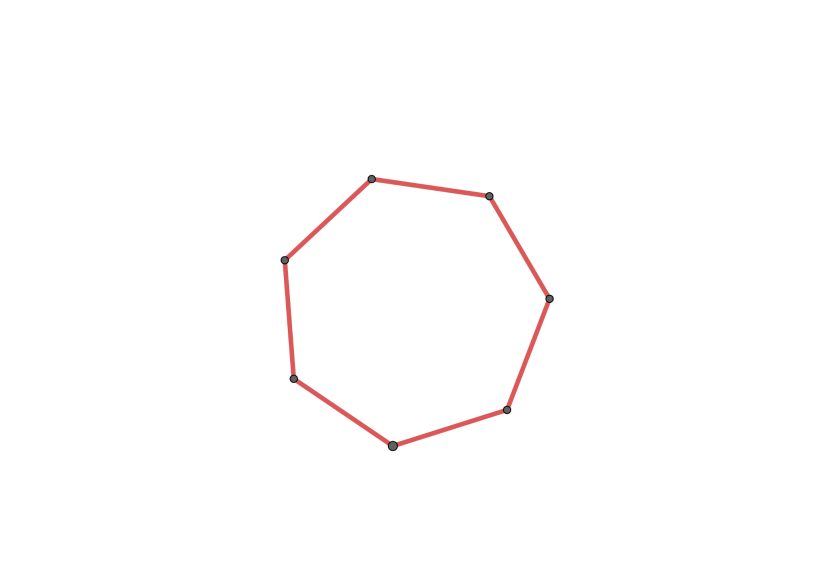
A regular heptagon is a seven-sided polygon with all sides equal and all interior angles equal. That means it is both equilateral and equiangular. In plain English, every side matches, every corner matches, and the whole shape looks balanced around a center point.
Before you start drawing, it helps to know the numbers that run the show:
- Number of sides: 7
- Sum of interior angles: 900 degrees
- Each interior angle: about 128.57 degrees
- Each exterior angle: about 51.43 degrees
- Central angle between two neighboring vertices: about 51.43 degrees
That last number matters the most for construction. Since a full circle is 360 degrees, dividing the circle into seven equal arcs gives 360 ÷ 7 = 51.428571… degrees per step. And yes, that repeating decimal is the exact reason this shape likes to test your patience.
The Important Truth Before You Start
Here is the geometry plot twist: an exact regular heptagon cannot be constructed using only a classical unmarked straightedge and compass. That is one reason the shape has fascinated mathematicians for centuries. So if you were hoping for the same neat ancient construction used for a hexagon, the heptagon politely says, “Not today.”
But do not let that ruin the fun. In practical drawing, architecture, illustration, shop work, and classroom geometry, a highly accurate heptagon is more than enough. The method below uses a ruler, compass, and protractor to produce a clean regular heptagon that looks right, measures well, and behaves exactly as most readers need it to.
Tools You Will Need
Gather these before you begin:
- A pencil with a sharp point
- An eraser
- A compass
- A ruler or straightedge
- A protractor
- Paper with enough room for a full circle
If you want extra accuracy, use thin drafting lines first and darken the final edges only after the shape closes neatly.
How to Construct a Regular Heptagon in 8 Straightforward Steps
Step 1: Draw a Circle
Open your compass to whatever radius you want for the heptagon. Place the compass point on the paper and draw a full circle. Mark the center as O. This circle is your circumcircle, which means all seven vertices of the heptagon will sit on it.
Step 2: Draw a Starting Radius
Use your ruler to draw one radius from the center to the circle. Label the point where it touches the circle as A. This gives you the first vertex and a clean reference direction for measuring the rest of the points.
Step 3: Find the Central Angle
Calculate the central angle by dividing 360 degrees by 7. The result is approximately 51.43 degrees. That angle represents the spacing between one vertex and the next around the circle.
If your protractor is not perfect to the hundredth, that is normal. Aim for 51.4 degrees and work carefully. Precision matters, but perfection is not required for a practical construction.
Step 4: Mark the Second Vertex
Place the center of your protractor on point O. Line up the zero mark with radius OA. Make a small mark on the circle at 51.43 degrees. Label that point B. You now have two vertices of the future heptagon.
Step 5: Continue Marking Equal Angles
Keep using the same central angle to mark additional points on the circle. The next angles from the original radius will be about:
- 102.86 degrees
- 154.29 degrees
- 205.71 degrees
- 257.14 degrees
- 308.57 degrees
Label the points C, D, E, F, and G. You should now have seven evenly spaced points around the circle: A through G.
Step 6: Check the Spacing Before Connecting
Before drawing the sides, take a breath and inspect the points. They should look evenly distributed around the circle. If one point seems noticeably off, erase that mark and remeasure before moving on. This tiny pause can save you from a lopsided almost-heptagon, which is one of geometry’s less glamorous inventions.
Step 7: Connect Consecutive Vertices
Use your ruler to connect the points in order: A-B-C-D-E-F-G-A. Draw lightly at first. Once all seven sides are in place, your regular heptagon should appear inside the circle like a confident seven-sided crown.
Step 8: Darken the Final Shape and Clean Up
When you are happy with the symmetry, darken the edges of the heptagon. Erase extra construction marks if needed, but leave the center and circle visible if your teacher, client, or future self might want to see how the figure was built. Congratulations: you have constructed a practical regular heptagon in eight straightforward steps.
A Fast Accuracy Check
Want to make sure the shape is behaving? Try these quick checks:
- All seven sides should measure nearly the same.
- Each corner should look equal.
- The shape should sit evenly inside the circle.
- The last side from G back to A should close without a dramatic gap.
If the final side is slightly too long or too short, the issue is usually angle rounding, not bad luck from the geometry gods.
Useful Heptagon Formulas for Drawing and Design
Even if you are mainly drawing the shape, a few formulas make the process easier.
Side Length from Radius
If the circle radius is R, the side length s of the regular heptagon is:
s = 2R sin(π/7)
This is helpful if you want to check your drawing after marking the points on the circle.
Apothem from Radius
The apothem, which is the distance from the center to the midpoint of a side, is:
a = R cos(π/7)
Perimeter
P = 7s
Area
You can find the area with:
Area = 1/2 × apothem × perimeter
Or, if you know the radius:
Area = (7/2)R² sin(2π/7)
Example: Constructing a Heptagon with a 10 cm Radius
Let’s make the math real. Suppose your circle has a radius of 10 cm.
- Central angle = 360 ÷ 7 ≈ 51.43 degrees
- Side length ≈ 2 × 10 × sin(π/7) ≈ 8.68 cm
- Perimeter ≈ 7 × 8.68 ≈ 60.74 cm
- Apothem ≈ 10 × cos(π/7) ≈ 9.01 cm
- Area ≈ 1/2 × 60.74 × 9.01 ≈ 273.64 square cm
So once you finish drawing the seven points on the circle and connect them, each side should measure close to 8.68 cm. If one side suddenly decides to become 9.4 cm, something drifted during measurement.
An Alternative Practical Method
Some people prefer working from side length instead of angle. If you already know the radius of the circle, calculate the side length using the formula above, set your compass to that length, and step that chord around the circle as accurately as possible.
This method can work well, but it is less forgiving if your compass shifts even slightly. With a heptagon, tiny errors stack up fast. By the time you reach the seventh side, the last gap may expose every little wobble you thought no one would notice.
That is why the protractor method is often the easiest, clearest, and most beginner-friendly approach for a regular heptagon.
Common Mistakes That Can Distort the Shape
Rounding the Angle Too Roughly
Using 51 degrees instead of 51.43 degrees may not seem dramatic, but across seven steps it creates visible error. Use the most accurate angle your tools allow.
Moving the Protractor Slightly Off Center
If the protractor center is not exactly on point O, your vertex marks will drift. This is one of the most common reasons a heptagon ends up looking “almost right.”
Connecting Points Too Early
Draw all seven points first. Then inspect. Then connect. Rushing into the side lines too early is like frosting a cake before checking whether the cake exists.
Using Thick Pencil Marks
Heavy marks make precise intersections harder to read. Light, sharp lines win every time.
Assuming It Is an Exact Classical Construction
For practical work, your result can be excellent. But if the discussion is about strict Euclidean construction with only a compass and unmarked straightedge, the regular heptagon is a different story.
Why the Heptagon Feels Harder Than Other Regular Polygons
A triangle, square, hexagon, and even an octagon feel friendlier because their constructions fit neatly with familiar angles and classical geometric methods. The heptagon does not give you that convenience. Seven refuses to divide a circle into tidy whole-number angles, and that makes the geometry less cooperative.
That stubbornness is exactly what makes the shape interesting. The regular heptagon sits in a sweet spot between simple classroom polygon and deeper mathematical idea. It is accessible enough to draw, but complex enough to teach an important lesson: not every beautiful shape is classically easy.
Where a Regular Heptagon Can Be Useful
A well-drawn heptagon can be useful in more places than you might expect. It appears in:
- Math classes and geometry demonstrations
- Decorative patterns and graphic design
- Woodworking and craft layout experiments
- Logo development and icon design
- Technical drawing practice
- Art projects that need unusual but balanced symmetry
Because the shape is less common than pentagons and hexagons, it also has a visual freshness. A clean heptagon tends to look intentional, a little unexpected, and surprisingly sophisticated.
Hands-On Experiences: What Drawing a Heptagon Actually Teaches You
One of the most memorable things about constructing a regular heptagon is that it changes the way you think about precision. At first, the assignment can feel easy. Draw a circle, divide it into seven, connect the points, done. But the moment you start measuring, the shape reminds you that geometry is full of tiny decisions that matter. A line that is one hair too thick, a protractor that is one millimeter off center, or an angle rounded a little too casually can change the whole result. The heptagon is like that strict coach who notices your foot placement before you even know you have feet.
Students often discover this the first time they try to close the figure and the last side refuses to behave. The gap is not usually huge. It is just enough to make you squint, sigh, and pretend maybe the paper moved. That moment is actually useful. It teaches that mathematical drawing is not only about formulas. It is also about discipline, sequencing, and tool control. A regular heptagon rewards patience more than speed.
People who work in design or shop settings notice something similar. When you sketch a heptagon for a sign, tile pattern, paper model, or decorative panel, the figure forces you to slow down and trust the process. You cannot really bluff your way through it. A square lets you get sloppy and still look respectable. A heptagon does not. It exposes small errors with almost theatrical flair.
There is also a surprisingly satisfying side to the experience. Once the points are placed correctly and the seven edges connect cleanly, the shape feels earned. It looks balanced, but not obvious. It has the symmetry of a regular polygon without the overfamiliar feel of a hexagon. That makes the finished figure especially satisfying in classroom notebooks, technical sketches, and art compositions. It looks like you know something interesting, because honestly, you do.
Another useful experience comes from comparing methods. If you try the protractor method first and then experiment with side-length stepping or digital drawing software, you start to understand the difference between theoretical geometry and practical construction. You also see why mathematicians care so much about the phrase “exact construction.” In everyday use, an accurate approximation may be perfect. In pure geometry, “close enough” is a different category. The heptagon makes that distinction feel real instead of abstract.
In the end, constructing a regular heptagon is more than a drafting exercise. It is a lesson in accuracy, humility, and visual reasoning. It shows that beautiful forms can come from careful repetition, not guesswork. And perhaps best of all, it gives you one of those rare math experiences where the final drawing actually looks impressive enough to earn a second glance. Not bad for seven sides and a stubborn decimal.
Conclusion
If you want to construct a regular heptagon, the smartest approach is to treat it as a practical drawing problem, not a mythical one-step classical miracle. Start with a circle, use the central angle of about 51.43 degrees, mark seven evenly spaced points, and connect them carefully. That method is clear, accurate, and realistic for most readers.
The regular heptagon may not be the easiest polygon in the geometry family, but it is one of the most rewarding. It combines elegant symmetry with just enough mathematical attitude to keep things interesting. And once you understand how it works, drawing one stops feeling mysterious and starts feeling deliciously precise.