Table of Contents >> Show >> Hide
- What Is a Swiffer WetJet?
- What Comes in a Swiffer WetJet Starter Kit?
- Before You Start: Quick Preparation Tips
- How to Assemble a Swiffer WetJet Step by Step
- Step 1: Unbox and Identify the Parts
- Step 2: Connect the Handle Sections
- Step 3: Attach the Handle to the Mop Body
- Step 4: Open the Battery Compartment
- Step 5: Insert the Batteries Correctly
- Step 6: Insert the Cleaning Solution Bottle
- Step 7: Attach a Fresh WetJet Pad
- Step 8: Prime the Spray System
- Step 9: Start Mopping in Small Sections
- Common Assembly Mistakes and How to Avoid Them
- Troubleshooting: What If Your Swiffer WetJet Does Not Spray?
- How to Use the Swiffer WetJet After Assembly
- Best Places to Use a Swiffer WetJet
- Safety and Storage Tips
- When Should You Replace WetJet Pads and Solution?
- Extra Experience: Real-Life Tips for Assembling and Using a Swiffer WetJet
- Conclusion
Opening a brand-new Swiffer WetJet box should feel exciting, not like you accidentally signed up for a tiny engineering exam. The good news? Assembling a Swiffer WetJet is simple once you know what each part does, where the batteries hide, how the solution bottle locks in, and which side of the cleaning pad faces the floor. The even better news? You do not need a toolbox, a YouTube rabbit hole, or a dramatic sigh worthy of a home improvement montage.
This step-by-step guide walks you through how to assemble a Swiffer WetJet from the moment you open the box to the first satisfying spray across your floor. We will cover what comes in the starter kit, how to connect the handle, how to insert the batteries, how to attach the cleaning solution bottle, how to apply the mopping pad, and how to troubleshoot common first-use problems. By the end, your WetJet should be ready to glide across sealed floors like it has somewhere important to be.
What Is a Swiffer WetJet?
The Swiffer WetJet is an all-in-one spray mop designed for quick cleaning on sealed, finished hard floors. Instead of dragging out a mop bucket, wringing out water, and wondering whether the floor is cleaner or just wetter, the WetJet uses a built-in spray system, a pre-mixed cleaning solution, and disposable absorbent pads. Press the button on the handle, the dual-nozzle sprayer releases cleaner in front of the mop head, and the pad absorbs dirt and grime as you wipe.
It is commonly used on sealed hardwood, laminate, vinyl, ceramic tile, and other finished floors. However, it should not be used on unfinished, oiled, or waxed wood; unsealed tile; or carpeted floors. Those surfaces can be sensitive to moisture or cleaning solution. When in doubt, test a small hidden area first. Your floor deserves a trial run, not a surprise makeover.
What Comes in a Swiffer WetJet Starter Kit?
The exact contents may vary slightly depending on the version or retailer, but a typical Swiffer WetJet starter kit includes:
- One Swiffer WetJet mop body or power mop base
- Handle or pole sections that snap together
- One bottle of Swiffer WetJet cleaning solution
- Disposable WetJet mopping pads
- AA batteries, usually included in the starter kit
- A quick-start instruction sheet
Before you assemble anything, lay all the parts on the floor or a table. This helps you confirm nothing is missing. It also prevents the classic “where did that little piece go?” shuffle, which usually ends with someone blaming the dog, the couch, or gravity.
Before You Start: Quick Preparation Tips
Choose the Right Floor
Use the Swiffer WetJet only on sealed, finished hard floors. It is suitable for many sealed wood, laminate, and tile surfaces, but it is not designed for carpet, unfinished wood, waxed wood, oiled wood, or non-sealed tile. If your floor has a special finish, check the flooring manufacturer’s care instructions before spraying cleaner on it.
Clear the Area
Move lightweight chairs, trash cans, pet bowls, and small rugs out of the way. The WetJet is made for quick cleaning, but it still works better when it is not playing obstacle-course champion around your kitchen island.
Sweep or Vacuum First
For the best results, remove loose crumbs, dust, pet hair, and grit before mopping. A WetJet pad can pick up grime, but it is not a bulldozer. Sweeping first helps prevent streaks and keeps tiny debris from being pushed around.
How to Assemble a Swiffer WetJet Step by Step
Step 1: Unbox and Identify the Parts
Open the Swiffer WetJet package and remove everything carefully. You should see the mop head, handle sections, cleaning solution bottle, mopping pads, and batteries. Some kits place the batteries inside or near the pad package, so check the packaging before assuming they are missing. They are small, sneaky, and apparently fond of hiding in cardboard.
Lay the pieces out in order. The mop head is the flat base that touches the floor. The handle sections are the long pieces that create the upright pole. The cleaning solution bottle will attach near the lower part of the handle, above the mop head. The mopping pad attaches to the underside of the mop head.
Step 2: Connect the Handle Sections
Most Swiffer WetJet models use handle sections that snap together. Align the ends of the poles and push them together until you hear or feel a click. That click matters because it tells you the pieces are locked securely. If the handle feels loose, separate the sections and reconnect them, making sure the notches line up properly.
Do not force the handle sections at odd angles. They are designed to slide and snap together smoothly. If something feels wrong, rotate the piece and try again. Assembly should feel more like snapping together a pen than wrestling a tent pole in a windstorm.
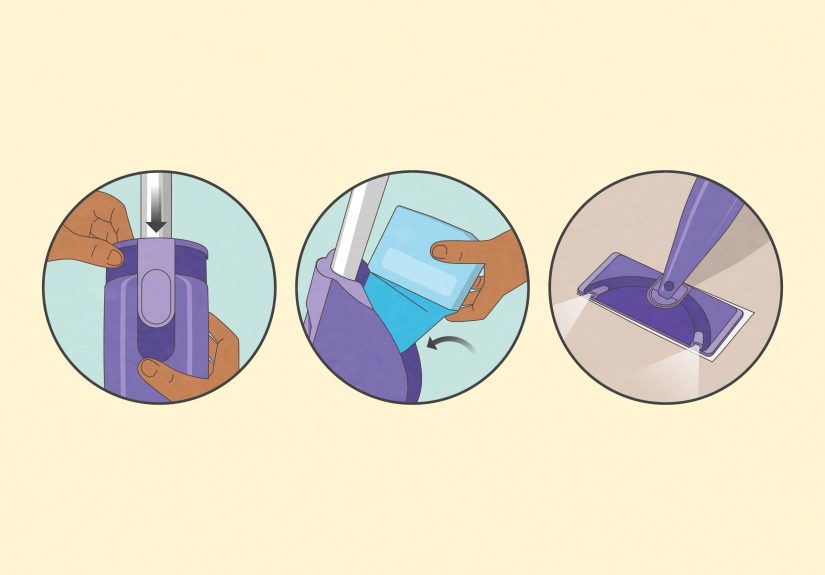
Step 3: Attach the Handle to the Mop Body
Once the handle sections are connected, attach the full handle to the mop base. Insert the bottom of the handle into the opening on the WetJet body. Push down firmly until it clicks into place. The handle should stand upright and feel stable.
Check the connection by gently moving the handle forward and backward. A little movement at the swivel head is normal because the WetJet is designed to maneuver around furniture and corners. However, the pole itself should not wobble where it connects to the body.
Step 4: Open the Battery Compartment
The Swiffer WetJet uses batteries to power the spray mechanism. On many models, the battery compartment is located on the front or upper area of the mop body. Look for a small battery door or plastic cover with an arrow or grip markings.
Open the compartment carefully. Depending on the model, you may need to slide, press, or pull the cover. Do not use a knife or sharp tool unless absolutely necessary, and even then, be gentle. The goal is to open the battery door, not audition for a household repair disaster.
Step 5: Insert the Batteries Correctly
Insert the included AA batteries according to the plus and minus symbols inside the battery compartment. Battery direction is one of the most common reasons a new WetJet does not spray. If the mop does not respond later, this is the first place to check.
After inserting the batteries, close the compartment securely. Make sure the cover snaps back into place. A loose battery cover may interrupt contact and cause inconsistent spraying.
Step 6: Insert the Cleaning Solution Bottle
Remove the cap or seal from the Swiffer WetJet cleaning solution bottle if required by your kit. Turn the bottle upside down and align it with the bottle slot on the mop body. Push it firmly into place until it clicks or seats securely. The bottle is designed to fit in one direction, so if it does not slide in smoothly, rotate it and try again.
Do not squeeze the bottle while inserting it. The WetJet system is designed to draw solution automatically when you press the spray button. Once installed, the bottle can usually stay in the mop between uses. Store extra refill bottles upright to help prevent leaks.
Step 7: Attach a Fresh WetJet Pad
Turn the mop head over or lift it slightly so you can see the underside. Take one WetJet cleaning pad and position it with the printed or strip side facing down toward the floor. The softer attachment side should face the mop head. Press the pad firmly onto the bottom of the mop head so it sticks evenly.
Make sure the pad is centered. If it is crooked, one edge may drag or fold while you mop. A properly attached pad should cover the mop head and remain flat during cleaning.
Step 8: Prime the Spray System
Now hold the WetJet upright and press the spray button on the handle. On the first use, it may take several seconds for the solution to move through the system. Hold the button for a few seconds and watch the nozzles near the mop head. You should see cleaning solution spray onto the floor in front of the pad.
If nothing sprays immediately, do not panic. New mops sometimes need a moment to prime. Check that the batteries are installed correctly, the solution bottle is fully inserted, and the battery compartment is closed. Then press the button again for up to about 10 seconds.
Step 9: Start Mopping in Small Sections
Spray a small area, then mop over it using smooth forward-and-back strokes. Avoid soaking the floor. The WetJet is designed for controlled spraying, not indoor puddle creation. For sticky spots, spray the area, wait a few seconds, and wipe again with gentle pressure.
Work your way across the room in sections. For kitchens, start near the far corner and move toward the exit so you do not trap yourself on a wet floor. It is a small planning detail, but it keeps you from doing that awkward tiptoe dance across freshly cleaned tile.
Common Assembly Mistakes and How to Avoid Them
Mistake 1: Installing the Pad Upside Down
The cleaning strips or textured side should face the floor. If the attachment side faces downward, the pad will not clean properly and may slide around. Think of the pad like a tiny cleaning sandwich: the working side goes where the mess is.
Mistake 2: Forgetting the Batteries
The WetJet is not a manual spray bottle. If the batteries are missing, weak, or facing the wrong direction, the mop will not spray. If you press the button and hear nothing, check the batteries first.
Mistake 3: Not Fully Seating the Solution Bottle
If the motor runs but no cleaner comes out, the bottle may not be locked in. Remove it and push it back in firmly until it is fully seated. A loose bottle can stop the solution from feeding into the sprayer.
Mistake 4: Using the Wrong Refills
Swiffer WetJet devices are designed to work with Swiffer WetJet solution bottles and pads. Using incompatible bottles, homemade refills, or off-brand pads may cause leaks, clogging, poor fit, or floor damage. It may also void product support. Saving money is nice; turning your mop into a leaky science project is less nice.
Troubleshooting: What If Your Swiffer WetJet Does Not Spray?
If your newly assembled Swiffer WetJet does not spray, use this quick checklist before deciding the mop has betrayed you:
- Check the batteries: Make sure they are fresh and installed in the correct direction.
- Listen for the motor: If you hear no sound, the battery connection may be the issue.
- Check the solution bottle: Make sure it is fully inserted and locked into place.
- Prime the system: Hold the spray button for several seconds on first use.
- Inspect the nozzles: Make sure they are not blocked by packaging, dried solution, or debris.
- Replace weak batteries: If the spray is uneven or only one nozzle works, fresh batteries may help.
In many cases, a non-spraying WetJet is caused by one of three simple things: batteries facing the wrong way, a bottle that is not fully seated, or a system that has not been primed yet. Translation: the mop is usually not broken; it is just being dramatic.
How to Use the Swiffer WetJet After Assembly
Use Light, Even Sprays
Press the button briefly to mist the floor ahead of the mop. You do not need to hold it down constantly. Too much liquid can leave streaks, slow drying, or create residue, especially on sealed wood or laminate. A little solution goes a long way.
Change Pads When They Get Dirty
A WetJet pad is designed to absorb and trap dirt. Once it becomes saturated or visibly dirty, replace it with a fresh one. Continuing to mop with a dirty pad can push grime around instead of removing it. That is not cleaning; that is relocating the problem.
Let Floors Dry Before Heavy Traffic
Swiffer WetJet solution is made to dry quickly, but it is still wise to let the floor dry before kids, pets, or sock-footed adults charge through the room. Dry floors are safer and less likely to show footprints.
Best Places to Use a Swiffer WetJet
The WetJet is especially useful in rooms where small messes happen often. In the kitchen, it can handle cooking splatters, sticky footprints, and mysterious crumbs that appear five minutes after sweeping. In bathrooms, it can help refresh sealed tile floors. In entryways, it can clean light dirt tracked in from shoes. In laundry rooms, it can wipe up detergent drips and dust.
For large, heavily soiled floors, you may still need a deeper cleaning method from time to time. The WetJet shines as a fast maintenance tool. It is excellent for keeping floors presentable between full cleanings, especially when guests are coming and your floor looks like it has been hosting a crumb convention.
Safety and Storage Tips
Store the Swiffer WetJet upright in a closet, pantry, laundry room, or utility area. Keep cleaning solution and unused pads out of reach of children and pets. Used pads should be thrown away after cleaning, especially if they have collected food residue, pet hair, or bathroom grime.
If you have pets, avoid letting them chew on unused or used pads. Also keep cleaning bottles closed and stored properly. When used as directed, the WetJet is a convenient household cleaning tool, but like any cleaner, it should be handled with common sense. Common sense is basically the best cleaning accessory no one puts on the box.
When Should You Replace WetJet Pads and Solution?
Replace the pad whenever it looks dirty, feels saturated, or stops gliding smoothly. One pad may clean a small room or two under normal conditions, but the actual coverage depends on how dirty the floor is. A lightly dusty hallway is not the same challenge as a kitchen after pancake morning.
Replace the solution bottle when it is empty or when you want to switch to a different Swiffer WetJet formula. Some formulas are designed for multi-surface cleaning, while others are made specifically for wood floors. Match the cleaner to your floor type whenever possible.
Extra Experience: Real-Life Tips for Assembling and Using a Swiffer WetJet
After assembling a Swiffer WetJet a few times, you learn that the process is easy, but a handful of small habits make everything smoother. The first practical tip is to slow down during unboxing. Many people tear into the package, toss the cardboard aside, and then realize the batteries were tucked into the packaging. Before throwing anything away, check every sleeve, insert, and pad bundle. It takes ten extra seconds and can save you from making a completely unnecessary trip to the junk drawer.
Another helpful experience is to assemble the mop near the room where you will use it first. If you build it in the living room, then carry it to the kitchen, then realize the pad is still on the counter, you have created a tiny household parade. Set everything on the kitchen floor or laundry room floor, snap the pole together, install the batteries, load the bottle, attach the pad, and test the spray right there. Simple assembly feels even simpler when all the parts are within arm’s reach.
The cleaning pad is also worth a closer look. New users sometimes press it on lightly, assuming it will hold. It usually does, but pressing firmly across the entire pad helps it attach evenly. Focus on the corners and edges. If the pad lifts during cleaning, it can bunch up under the mop head and make the WetJet feel clumsy. A flat pad gives you better contact with the floor and a cleaner-looking finish.
When testing the spray for the first time, aim the mop toward a safe section of sealed floor, not toward a wall, cabinet, rug, pet bed, or your own shoes. The dual nozzles spray forward, and while the mist is controlled, it still lands where the mop is pointed. This sounds obvious until someone gives their baseboard a surprise spritz. A short test spray is enough to confirm that the motor and bottle are working.
For everyday cleaning, less solution is usually better than more. Many streaks happen because people overspray. Press the button briefly, mop the area, and only spray again if the floor needs it. On sticky spots, give the cleaner a few seconds to loosen the mess before wiping. This works better than attacking the spot with twenty rapid sprays and the determination of a cartoon character scrubbing a submarine deck.
One more real-world tip: keep extra pads near the mop. If replacement pads are stored in a different room, people tend to keep using the dirty pad longer than they should. Store refills in the same closet or cabinet as the WetJet so changing pads becomes automatic. The same goes for batteries. A fresh pair of AA batteries nearby can quickly solve a weak spray issue.
Finally, treat the WetJet as a quick-clean specialist, not a miracle wand. It is fantastic for daily messes, light grime, and maintenance cleaning. For heavy mud, construction dust, sticky spills that have aged like bad decisions, or grout that needs serious scrubbing, pre-clean the mess or use a deeper cleaning method. The WetJet performs best when it is used regularly, with fresh pads, the right solution, and a floor that has already been swept or vacuumed.
Conclusion
Assembling a Swiffer WetJet is refreshingly straightforward: snap the handle together, attach it to the mop body, insert the batteries, lock in the cleaning solution bottle, press on a fresh pad, and test the spray. Once it is ready, the WetJet becomes a handy tool for quick floor cleaning on sealed, finished hard surfaces. The key is to use the right pads and solution, avoid over-spraying, and change pads when they get dirty.
Whether you are cleaning kitchen spills, bathroom tile, entryway dust, or the mysterious trail of crumbs that appears after every snack, the Swiffer WetJet can make floor care faster and less fussy. It will not fold your laundry or explain why socks vanish in the dryer, but it can help keep your floors looking clean with very little setup.
Note: This guide is based on current manufacturer-style setup instructions, common Swiffer WetJet starter kit details, product safety guidance, and practical floor-cleaning best practices. Always follow the instructions included with your specific Swiffer WetJet model and check your flooring manufacturer’s care recommendations before using any cleaning solution.


