Table of Contents >> Show >> Hide
- What Does It Mean to Blanch Almonds?
- Why Blanch Almonds at Home?
- Ingredients and Tools You Need
- How to Blanch Almonds: 8 Steps
- How to Use Blanched Almonds
- Common Mistakes to Avoid
- How to Store Blanched Almonds
- Can You Make Almond Flour from Blanched Almonds?
- Blanched Almonds vs. Natural Almonds
- Helpful Experience Notes from the Kitchen
- Conclusion
Blanching almonds sounds like something a pastry chef does while wearing a spotless white jacket and casually saying words like “ganache.” In reality, it is one of the easiest kitchen skills you can learn. If you can boil water without turning your kitchen into a steam-powered mystery novel, you can blanch almonds.
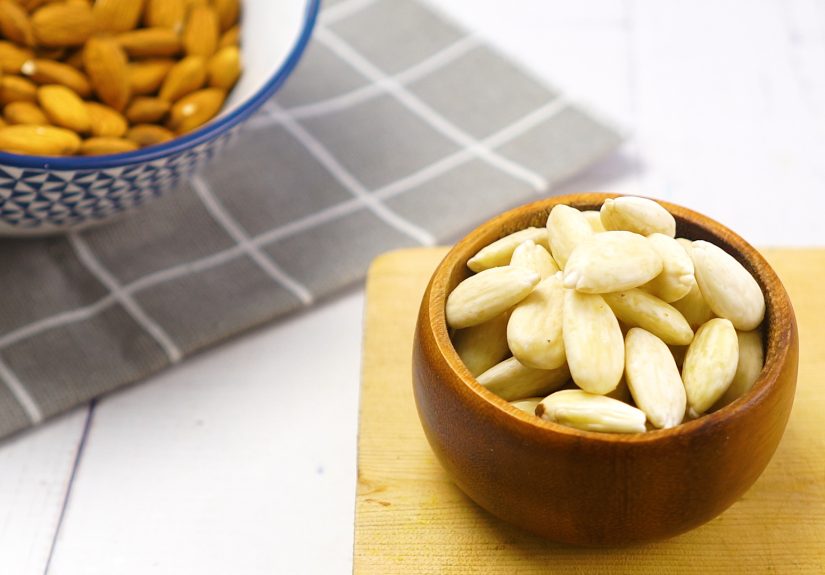
Blanched almonds are simply almonds with their brown skins removed. That thin skin is perfectly edible, but it can add a slightly bitter flavor, a darker color, and a rougher texture to recipes that are supposed to be smooth, pale, and delicate. Think homemade almond flour, marzipan, almond paste, macarons, creamy sauces, baked goods, and elegant desserts where little brown flecks are not invited to the party.
The good news? You do not need special equipment, expensive ingredients, or a culinary degree. You need raw almonds, boiling water, cold water, a strainer, and a few minutes. The skins slip off so satisfyingly that you may briefly wonder why all kitchen tasks cannot be this cooperative.
In this guide, you will learn exactly how to blanch almonds in 8 simple steps, how to dry and store them properly, when to use them, and how to avoid the most common mistakes. By the end, you will have smooth, skinless almonds ready for baking, blending, slicing, grinding, or snacking like a person who has their pantry life together.
What Does It Mean to Blanch Almonds?
To blanch almonds means to briefly expose raw almonds to boiling water so the skins loosen. After that, the almonds are cooled, drained, and peeled. The process does not cook the almonds all the way through. It only softens the outer skin enough so it can slide off with gentle pressure.
This is why timing matters. Leave almonds in boiling water for about one minute, and the skins loosen beautifully. Leave them in too long, and the almonds can begin to soften more than you want. They will still be usable, but they may not have the firm texture you need for slicing, grinding, or making fine almond flour.
Blanching is especially helpful when a recipe depends on appearance and texture. A pale almond cake, smooth almond paste, or homemade marzipan looks cleaner and tastes more refined when made with blanched almonds. Raw almonds with skins are great for snacking, but blanched almonds are the polished cousin who shows up to brunch in linen.
Why Blanch Almonds at Home?
You can buy blanched almonds at many grocery stores, but learning how to blanch almonds at home gives you more control. Store-bought blanched almonds may be more expensive, and you may not always find them when you need them. Raw almonds, on the other hand, are easier to keep on hand.
Blanching almonds yourself also allows you to make only the amount you need. If your recipe calls for half a cup, you do not have to buy a whole bag of specialty almonds and then wonder what to do with the leftovers. Homemade blanching is fast, affordable, and oddly satisfying. It is the kitchen equivalent of peeling a sticker off cleanly on the first try.
Ingredients and Tools You Need
Ingredients
- 1 cup raw almonds
- 3 to 4 cups water
- Cold water for rinsing or an ice bath
Tools
- Small saucepan or pot
- Colander or fine-mesh strainer
- Mixing bowl
- Clean kitchen towel or paper towels
- Baking sheet, if drying a larger batch
Use raw, unsalted almonds for the best results. Roasted almonds are not ideal for blanching because their texture and flavor have already changed. Salted almonds can work in a pinch, but they may affect the flavor of delicate recipes. For baking, raw almonds are the safest choice.
How to Blanch Almonds: 8 Steps
Step 1: Measure the Almonds
Start by measuring the amount of raw almonds you need. One cup is a convenient batch size, especially if you are learning the method for the first time. You can blanch more or less, but avoid overcrowding the pot. The almonds should have enough room to be fully surrounded by boiling water.
If you are blanching almonds for almond flour, almond paste, or a baking recipe, measure slightly more than the recipe requires. A few almonds may escape across the counter during peeling. Almonds are small, smooth, and apparently training for the Olympics.
Step 2: Bring Water to a Boil
Fill a small pot with enough water to cover the almonds by at least an inch. Bring the water to a full boil over medium-high to high heat. You want the water actively bubbling before the almonds go in.
Do not add the almonds too early while the water is still warming up. The goal is quick contact with boiling water, not a slow spa treatment. A short, hot blanch loosens the skins without making the almonds mushy.
Step 3: Add the Almonds
Carefully add the raw almonds to the boiling water. Stir once to make sure they are fully submerged. The water may briefly stop boiling when the almonds go in, which is normal. Keep the heat on and let the almonds sit in the hot water.
This is not the moment to wander off and check your phone, because one minute moves surprisingly fast in almond time. Stay near the pot and keep an eye on the clock.
Step 4: Boil for About One Minute
Let the almonds boil for about 60 seconds. This is the sweet spot. The skins should loosen, but the almonds should not become soft. If you are working with very fresh almonds or a slightly larger batch, you may need a few extra seconds, but do not go far beyond that.
A good sign is that the skins start to look slightly wrinkled. That means the hot water has done its job. Congratulations: the almonds are now emotionally ready to let go of their skins.
Step 5: Drain Immediately
Pour the almonds into a colander or fine-mesh strainer right away. Draining immediately stops them from sitting in hot water too long. This step is important if you want almonds that remain firm and easy to work with.
Be careful with the steam and boiling water. Pour slowly, keep your face away from the steam, and use oven mitts if your pot handles get hot. Blanching almonds is easy, but hot water still deserves respect.
Step 6: Rinse with Cold Water
Run cold water over the drained almonds until they are cool enough to handle. You can also transfer them to a bowl of ice water for a minute. The cold water stops the heating process and makes the almonds easier to peel.
Do not skip this step. If the almonds stay warm for too long, they may continue softening. Cold water also helps the skin separate more cleanly from the almond underneath.
Step 7: Slip Off the Skins
Now for the fun part. Hold one almond between your thumb and index finger and gently squeeze. The almond should slide right out of its skin. Aim it downward toward a bowl or towel, unless you enjoy chasing almonds across the room.
Some skins will come off instantly. Others may need a little rub. If several almonds refuse to peel, they may not have been blanched long enough. You can pour hot water over the stubborn ones for another 20 to 30 seconds, then cool and try again.
Step 8: Dry the Almonds Completely
Spread the peeled almonds on a clean kitchen towel or paper towels and pat them dry. If you plan to grind them into almond flour or store them for later, let them air-dry until the surface moisture is gone. For best results, spread them in a single layer on a baking sheet and let them sit for several hours, or dry them gently in a low oven.
This final step matters more than many people realize. Wet almonds can clump when ground, spoil faster in storage, or make baked goods behave strangely. Almonds are wonderful, but they are not above causing texture drama.
How to Use Blanched Almonds
Once your almonds are peeled and dry, they are ready for all kinds of recipes. You can grind them into homemade almond flour, blend them into almond paste, use them for marzipan, slice them for toppings, or chop them for cookies and cakes.
Blanched almonds are also excellent in savory dishes. They can be blended into sauces, sprinkled over rice pilaf, added to salads, or used in stuffing and vegetable dishes. Because the skins are removed, the flavor is cleaner and the texture is smoother.
If you want toasted blanched almonds, dry them first, then toast them in a skillet or oven. Toasting wet almonds is possible, but it takes longer and can lead to uneven browning. Dry almonds toast more evenly and develop that warm, nutty aroma that makes everyone in the kitchen suddenly interested in “helping.”
Common Mistakes to Avoid
Boiling Too Long
The most common mistake is boiling the almonds for too long. More time does not mean easier peeling. It usually means softer almonds. Stick close to one minute for the best texture.
Skipping the Cold Rinse
Cold water stops the cooking process and makes the almonds comfortable to handle. Without it, peeling becomes hotter, messier, and less pleasant. Your fingertips deserve better.
Storing Almonds While Damp
Moisture is not your friend when storing nuts. Always dry blanched almonds before putting them in a jar or bag. If they still feel damp, give them more time.
Using Roasted Almonds
Raw almonds work best. Roasted almonds have a different texture, and their skins may not loosen as easily. Save roasted almonds for snacking and use raw almonds for blanching.
How to Store Blanched Almonds
Once completely dry, blanched almonds can be stored in an airtight container. For short-term use, keep them in a cool, dry pantry. For longer storage, refrigerate or freeze them to help protect their flavor and freshness.
Nuts contain natural oils, which can turn stale over time. A tight container, cool temperature, and protection from light all help preserve quality. If almonds smell sharp, sour, musty, or like old paint, do not use them. Fresh almonds should smell mild, sweet, and nutty.
Can You Make Almond Flour from Blanched Almonds?
Yes. In fact, blanched almonds are often preferred for fine almond flour because they create a lighter color and smoother texture. To make almond flour, dry the blanched almonds completely, then pulse them in a food processor or high-speed blender.
Use short pulses instead of running the machine continuously. If you blend too long, the almonds release oil and turn into almond butter. Almond butter is delicious, but it is not helpful when your cake recipe asked for flour and you accidentally made toast spread.
After grinding, sift the almond flour to remove larger pieces. You can reprocess the bigger bits or save them for oatmeal, muffins, granola, or crusts.
Blanched Almonds vs. Natural Almonds
Natural almonds still have their brown skins. They are flavorful, nutritious, and excellent for snacking. Blanched almonds have a milder appearance and smoother mouthfeel because the skins are removed.
For rustic recipes, natural almonds are perfectly fine. For delicate desserts, pale sauces, fine almond flour, and smooth confections, blanched almonds are usually the better choice. The decision depends on the recipe. Sometimes you want cozy and rustic. Sometimes you want clean and elegant. Almonds can do both. They are versatile like that.
Helpful Experience Notes from the Kitchen
After blanching almonds a few times, you start to notice small details that make the process easier. First, the one-minute rule is real. The first time many home cooks blanch almonds, they think, “Maybe two minutes will make peeling easier.” It does not. It mostly makes the almonds warmer, softer, and slightly less pleasant to handle. One minute is usually enough, and the skins should loosen without turning the almonds limp.
Another useful experience is to peel almonds over a bowl lined with a towel. When almonds pop out of their skins, they sometimes launch with shocking confidence. A towel keeps them from bouncing everywhere. It also absorbs extra moisture while you work. This tiny setup change saves cleanup time and keeps your almonds from performing escape routines under the refrigerator.
If you are blanching a large batch, peel while watching something casual or listening to music. The task is simple but repetitive. It can feel calming, almost like a kitchen craft project. However, do not let the peeled almonds sit in a wet pile for too long. Spread them out as you go so they begin drying immediately.
For homemade almond flour, drying is the difference between success and frustration. Damp almonds do not grind into a fine, fluffy texture. They clump, smear, and move dangerously close to almond butter territory. If you need almond flour, let the blanched almonds dry thoroughly before processing. A few hours at room temperature works for small batches, while a very low oven can help when you need them sooner. Just keep the heat gentle so you dry the almonds rather than toast them.
One practical trick is to blanch more almonds than you need when you already have the pot going. The process is quick, and extra blanched almonds store well once fully dry. Keep them in the refrigerator or freezer, and future-you will feel unusually organized when a recipe calls for peeled almonds.
Blanched almonds also shine in recipes where appearance matters. If you make holiday cookies, almond crescents, white cakes, macarons, or marzipan decorations, the pale color makes the finished result look cleaner. Natural almonds taste good, but their skins create brown specks. Sometimes that looks charming; sometimes it looks like your elegant dessert rolled through a tiny pile of confetti.
Finally, remember that blanching almonds is not about being fancy. It is about choosing the right form of almond for the recipe. Natural almonds bring boldness and texture. Blanched almonds bring smoothness and polish. Once you know how to make them at home, you can move between both worlds easily. That is a small kitchen skill with surprisingly big payoff.
Conclusion
Learning how to blanch almonds is a simple skill that makes your baking and cooking more flexible. With raw almonds, boiling water, a cold rinse, and a little peeling, you can create smooth, skinless almonds for almond flour, almond paste, marzipan, cakes, cookies, sauces, and toppings.
The key is timing: boil for about one minute, cool immediately, peel gently, and dry thoroughly. Once you understand those basics, the process becomes fast, reliable, and maybe even a little fun. It is one of those kitchen techniques that looks impressive but secretly takes less effort than finding the matching lid for your storage container.


