Table of Contents >> Show >> Hide
- Why a File Cabinet Planter Works (Better Than You’d Think)
- Plan First: Pick Your Cabinet Style
- Safety and Sanity Checks (Do This, Future-You Will Thank You)
- Tools and Materials
- Step-by-Step: Build the DIY File Cabinet Planter
- Step 1: Strip It Down
- Step 2: Clean Like You Mean It
- Step 3: Deal With Rust and Prep the Surface
- Step 4: Drill Drainage Holes (The Part Your Plants Care About Most)
- Step 5: Lift It Off the Ground
- Step 6: Prime and Paint (Make It Weather-Ready)
- Step 7: Add a Liner (Strongly Recommended)
- Step 8: Consider a False Bottom (Optional, But Smart)
- Step 9: Fill With the Right Growing Medium
- Step 10: Plant, Water, and Admire Your New “Office Garden”
- Planting Ideas That Actually Work in a Cabinet Planter
- Common Mistakes (And How to Fix Them)
- Maintenance Tips: Keep It Looking Good and Growing Better
- Real-World Lessons and Experiences (The “I’ve Made the Mistakes So You Don’t Have To” Section)
- Wrap-Up
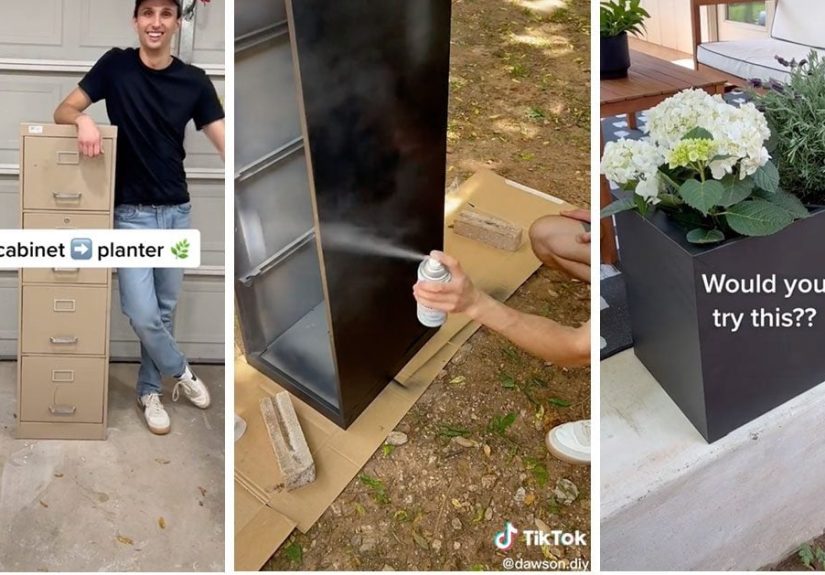
You know that sad old metal filing cabinetthe one that’s seen more sticky notes than sunshine?
Congratulations: it’s about to get promoted from “paperwork prison” to “plant parent palace.”
A DIY file cabinet planter is one of those projects that looks wildly impressive, costs surprisingly little,
and gives you the smug satisfaction of upcycling something that otherwise might’ve ended up as scrap.
In this guide, you’ll learn how to turn a standard metal file cabinet into a durable outdoor planter with proper
drainage, rust protection, and a setup that won’t murder your plants via accidental swamp conditions.
We’ll keep it practical, a little funny, and very much focused on results you’d be proud to park on a patio.
Why a File Cabinet Planter Works (Better Than You’d Think)
Metal file cabinets are basically accidental garden infrastructure. They’re tough, weather-resistant once sealed,
and shaped like a ready-made raised bed. The straight lines look modern, and the height is knee- and back-friendlier
than ground-level gardening. Plus, you can often find cabinets cheap (or free) from office cleanouts, thrift stores,
and online marketplaces.
Best uses for a filing cabinet planter
- Herb bar: basil, thyme, mint (contain mint unless you want it to take over your zip code).
- Flower punch: petunias, marigolds, zinnias, geraniumseasy color, big payoff.
- Salad station: lettuce, arugula, spinachgreat in shallower cabinets or drawers.
- Small-space veggies: peppers, bush beans, compact tomatoes (with support).
Plan First: Pick Your Cabinet Style
Before you grab a drill and start making your filing cabinet look like Swiss cheese, decide which build you want.
Your cabinet’s size, drawer style, and how much soil you want to haul will steer the choice.
Option A: “Open Box” Planter (Easiest)
You remove the drawers and use the cabinet shell as one big planting cavity. This is the simplest build and
the most common look: clean, modern, and easy to fill.
Option B: Drawer Planter (More Fun, More Fussy)
You convert individual drawers into tiered planters (often stacked or pulled out at angles). It’s cute and
Instagram-friendly, but it needs extra support so drawers don’t sag under wet soil.
Option C: “False Bottom” Planter (Lighter + Cheaper to Fill)
You create a raised platform inside the cabinet so you don’t have to fill the entire thing with potting mix.
This is smart if the cabinet is deep or you want to move it later without calling three friends and a chiropractor.
Safety and Sanity Checks (Do This, Future-You Will Thank You)
1) Watch out for sharp metal
File cabinets can have sharp edges where rails and drawer slides were removed. Gloves are not optional here.
If you feel a burr, your skin will find it. Sand or file down sharp spots and consider edge trim (automotive door
edge guard works great).
2) Be cautious with old paint and dust
If your cabinet is older and you plan to sand, scrape, or strip finishes, treat the dust seriously.
Use proper respiratory protection, work outside, and avoid dry sanding unknown coatings. When in doubt,
clean thoroughly, scuff lightly with appropriate precautions, and encapsulate with primer and paint.
3) Decide if you’re growing food
If you want herbs or veggies, line the interior so the soil isn’t in direct contact with the metal and coatings.
A simple liner (pond liner, heavy plastic, or a purpose-made planter liner) adds peace of mind and helps manage
moisture. You’ll still need drainage holeslining isn’t a substitute for drainage.
Tools and Materials
Tools
- Power drill + metal drill bits (3/8″ is a great all-purpose drainage size)
- Driver bit set (to remove hardware)
- Wire brush and/or sanding sponge (for rust and prep)
- Rags + degreaser or mild soap
- Painter’s tape + drop cloth/cardboard
- Gloves and eye protection (seriously)
- Optional: step bit (makes drilling cleaner in thin metal), casters, metal file for sharp edges
Materials
- Rust-inhibiting primer (or self-etching primer for bare metal areas)
- Exterior-grade spray paint or metal paint
- Liner (pond liner, heavy-duty plastic, or landscape fabric + plastic combo)
- Hardware cloth/mesh (to keep soil from washing out of drainage holes)
- Potting mix (not garden soil) + compost (optional)
- Slow-release fertilizer (optional but helpful)
- Bricks/blocks or casters (to lift the cabinet off the ground)
Step-by-Step: Build the DIY File Cabinet Planter
Step 1: Strip It Down
Pull out the drawers, rails, and any removable inner parts. Keep what’s structural; remove what’s floppy, sharp,
or in the way. Save the drawer handles if you like the industrial lookor toss them if you’re going for “modern
garden chic” instead of “office supply aisle.”
Step 2: Clean Like You Mean It
Dirt, grease, and mystery office gunk are the enemies of paint adhesion. Wash the cabinet with soapy water,
rinse, and let it dry completely. Wipe down with a degreaser if needed. Paint sticks to clean surfaces;
it sulks on dirty ones.
Step 3: Deal With Rust and Prep the Surface
If you see rust, scrub it with a wire brush. For flaky areas, remove loose material. You don’t need to grind the
cabinet into shiny perfection, but you do need a stable surface so primer can bond. Lightly scuff glossy paint so
the primer grips.
Step 4: Drill Drainage Holes (The Part Your Plants Care About Most)
Flip the cabinet so you can access the bottom panel (or the panel that will become the “floor” of the planter).
Drill plenty of holesthink 10 to 20 holes spaced evenly for a typical cabinet. If your cabinet is
larger or you live somewhere rainy, add more.
- Hole size: 3/8″ is a solid default. You can mix in a few larger holes if you want.
- Spacing: spread them out; don’t cluster them in one corner.
- Soil loss prevention: cover the inside bottom with mesh or landscape fabric so mix doesn’t escape.
Step 5: Lift It Off the Ground
Metal sitting directly on soil stays damp, and damp metal becomes rusty metal. The fix is simple:
elevate the cabinet on bricks, pavers, pressure-treated runners, or sturdy casters.
Bonus: airflow underneath also helps drainage and makes the planter easier to hose out if needed.
Step 6: Prime and Paint (Make It Weather-Ready)
Use a primer designed for metal, especially if any bare metal is exposed. Apply light, even coats rather than one
heavy coat that drips like a sad candle. Once primed, paint with an exterior product suitable for metal.
Let everything cure fully before adding soilpaint that isn’t cured can stay tacky and smell weird (and your plants
did not ask for that).
Step 7: Add a Liner (Strongly Recommended)
A liner reduces direct soil-metal contact and helps protect the cabinet from constant moisture. Cut your liner to fit
the inside, then poke or cut holes where the drainage holes are. You want water to exit the cabinet, not pool between
the liner and the metal like a hidden bathtub.
- Quick liner win: pond liner is durable and holds up outdoors.
- Budget liner: heavy plastic works, but replace it if it degrades.
Step 8: Consider a False Bottom (Optional, But Smart)
If the cabinet is very deep, you can reduce soil volume without messing up drainage:
- Create an internal “shelf” using treated wood slats or a scrap plywood panel supported by brackets.
- Leave a few inches below the shelf so drained water can move toward the holes.
- Use upside-down nursery pots or sealed plastic jugs beneath the shelf to reduce weight (avoid anything that will rot).
Skip the old myth of “rocks at the bottom for drainage.” What matters is drainage holes and a well-draining potting mix.
Step 9: Fill With the Right Growing Medium
Use potting mix (or a container mix) rather than garden soil. Garden soil compacts in containers and
can hold too much water, which is basically an engraved invitation to root problems. For most plantings, a blend like
two parts potting mix + one part compost works well.
Mix in slow-release fertilizer if you want low-maintenance feeding. Top with mulch to reduce evaporation and keep the
surface from crusting over.
Step 10: Plant, Water, and Admire Your New “Office Garden”
Arrange plants while they’re still in their nursery pots first. This lets you shuffle things around before committing.
Water thoroughly after planting until you see water draining from the holes. That’s your proof the planter is doing its job.
Planting Ideas That Actually Work in a Cabinet Planter
Sunny spot (6+ hours)
- Herbs: basil, rosemary, oregano, sage
- Veggies: peppers, bush beans, compact tomatoes (add a cage or stake)
- Flowers: marigolds and zinnias for color and pollinator traffic
Part shade (3–5 hours)
- Leafy greens: lettuce, arugula, spinach
- Flowering shade lovers: begonias, impatiens (depending on your climate)
Low-water, low-fuss
- Succulents (if the cabinet drains well and you use a gritty mix)
- Lavender (needs sun and excellent drainage)
Common Mistakes (And How to Fix Them)
Mistake: “It doesn’t drain, but it’s fine.”
It’s not fine. If water sits, roots suffocate. Fix it by drilling more holes, ensuring the planter is level,
and switching to a better-draining potting mix.
Mistake: Filling the cabinet in the driveway, then trying to move it
Wet soil is heavy. Like “why is gravity so judgmental” heavy. Place the cabinet in its final location before filling,
or install heavy-duty casters rated for serious weight.
Mistake: Painting without prep
Paint on dirty or glossy metal peels. Clean, scuff, prime, then paint. It’s a few extra steps that save you from a
springtime repainting ritual you did not schedule.
Mistake: Using garden soil
It compacts, drains poorly, and can bring pests. Use a container mix designed to stay airy and drain well.
Maintenance Tips: Keep It Looking Good and Growing Better
- Check drainage monthly: ensure holes aren’t blocked by roots or compacted mix.
- Water smarter: deep watering is better than constant sprinkles. Let the top inch dry for many plants.
- Touch up paint: if you spot rust, sand the area lightly, prime, and repaint before it spreads.
- Winter strategy: in freezing climates, empty and store if possibleor protect with a cover and keep it elevated.
Real-World Lessons and Experiences (The “I’ve Made the Mistakes So You Don’t Have To” Section)
The first time I built a DIY file cabinet planter, I had big dreams and medium patiencean iconic combo.
I found the cabinet cheap, and it looked “pretty clean” in that way that only makes sense in a dimly lit garage.
In daylight, it had a fine coating of office dust, one sticky drawer rail, and the faint scent of 2008 toner.
Still, the bones were good, and that’s what matters (in furniture, gardening, and most reality TV).
Here’s what I learned fast: drainage is not an optional feature you add “if there’s time.” I drilled holes, but I
under-drilled. After the first heavy watering, the soil stayed damp for days, and the planter felt weirdly heavy,
like it was holding a grudge. Adding more holes fixed it immediately. The lesson? When you think you’ve drilled enough,
drill a few more. Your plants will never complain about “too much drainage” if you’re using a proper potting mix.
The second lesson was about elevation. I originally set the cabinet directly on the ground because I was impatient and
the patio looked “close enough.” A few rainy weeks later, I noticed the early signs of rust along the bottom edge.
Lifting it onto pavers stopped the problem in its tracks. Airflow is magical. It’s like your planter can finally breathe,
which is poeticand also extremely literal for preventing wet metal from becoming sad metal.
Painting was its own mini-adventure. I wanted that smooth, modern finish you see online, so I tried to rush prep.
The paint disagreed. It did that thing where it looks okay on day one and then starts peeling like a sunburned tourist.
The redo was simple but annoying: clean, scuff, prime, repaint. The upside is that once I did it properly, the finish
actually held up through sun, rain, and the occasional bump from hauling bags of soil like a proud, dusty pack mule.
The “false bottom” idea also saved my back. File cabinets can be deceptively deep, and filling them entirely with potting
mix is expensive and heavy. When I created an internal shelf and reduced the soil volume, it became easier to move and
easier to manage moisture. Plants still had plenty of root room for most shallow-rooted crops and flowers.
If you’re planting big veggies (like full-size tomatoes), give them the depth they need, but for herbs and annuals,
you don’t need to fill a metal canyon.
My favorite experience, though, was the unexpected attention. Neighbors who have never commented on anything besides
parking suddenly had opinionsin a good way. People love a clever upcycle. It’s a conversation starter that quietly says,
“Yes, I garden, and yes, I also own a drill.” The planter ended up being a surprisingly functional piece of outdoor decor:
tidy edges, modern shape, big planting volume, and zero chance of blowing over in the wind like lightweight plastic pots.
The biggest takeaway: a DIY file cabinet planter is only “easy” if you respect the basicsdrainage, rust protection,
and the right soil. Do those things, and your cabinet will stop filing paperwork and start filing compliments.
Wrap-Up
Building a DIY file cabinet planter is a weekend project with long-term payoff: you get a sturdy raised planter,
a cleaner-looking garden setup, and the bragging rights of turning office furniture into something alive.
Focus on drainage, prep your paint properly, use a good potting mix, and line the interior if you’re growing food.
Then plant it up and enjoy the best kind of “paperless” lifestyle.
![18 Best Types of Charts and Graphs for Data Visualization [+ How to Choose]](https://corkopencoffee.org/wp-content/uploads/2026/05/18-best-types-of-charts-and-graphs-for-data-visualization-how-to-choose-qKM1PBYG-thumb.jpg)


