Table of Contents >> Show >> Hide
- Why Replacing the Water Filter Matters
- Before You Start: Find Your Kenmore Filter Style
- What You Need
- How to Change a Water Filter in a Kenmore Refrigerator
- Model-Specific Tips That Save Time
- Common Mistakes to Avoid
- Troubleshooting After You Change the Filter
- How Often Should You Change a Kenmore Refrigerator Water Filter?
- Final Thoughts
- Experience Notes: What Changing a Kenmore Refrigerator Water Filter Is Really Like
- SEO Tags
If your Kenmore refrigerator has started pouring water at the speed of a tired snail, making ice that tastes a little “mystery freezer,” or flashing a filter light like it wants attention, the water filter is probably due for a change. The good news is that replacing a Kenmore refrigerator water filter is usually a quick, tool-free job. The less-good news is that Kenmore has used several filter designs over the years, so the exact steps can vary depending on your model. In other words, this is one of those delightfully simple projects that becomes slightly less simple the moment your fridge decides it wants to be unique.
This guide walks you through the process in a practical, no-nonsense way. You’ll learn how to identify your filter style, swap in the right replacement, flush the system, reset the indicator light, and avoid the classic mistakes that make homeowners mutter at stainless steel. Whether your filter lives in the bottom grille, the upper-right corner, the top-left wall, or tucked behind a little cover like it’s hiding from responsibility, this article will help you change it with confidence.
Why Replacing the Water Filter Matters
A refrigerator water filter does more than make your drinking water taste better. It also helps reduce sediment and other impurities that can affect flavor, smell, and ice quality. Over time, though, that filter gets clogged. When that happens, the water dispenser may slow down, the ice maker may struggle, and your “filtered” water can become a lot less impressive.
For most Kenmore refrigerators, a good rule of thumb is to replace the water filter about every six months. If your household uses a lot of ice and water, or if your tap water is heavy in sediment, you may need to change it sooner. A drop in water pressure, an odd taste, cloudy ice, or a glowing filter light are all signs that your refrigerator is politely asking for a fresh filter. Or not so politely, depending on the model.
Before You Start: Find Your Kenmore Filter Style
The single biggest reason this job confuses people is that “Kenmore refrigerator” does not describe one universal design. Some models use a push-button eject filter. Others use a twist-to-remove cartridge. Some swing out, some pull down, and some hide behind a tray or cover. So before you do anything, locate the filter and identify how it comes out.
Common Kenmore filter locations
- Inside the refrigerator, usually in the upper-right corner
- Inside the refrigerator, top-left wall on some French-door models
- In the bottom front grille
- At the end of the refrigerator door
- Behind a small tray, flap, or cover
Common Kenmore filter styles
- Push-button eject: Press a button and pull the filter out
- Twist-to-remove: Turn left, remove, then turn right to lock the new one in
- Pull-down: Open the cover, pull the filter down, then remove it
- Swing-out: Open the compartment and pull or twist the filter free
- Eject-and-slide-out: Open the cover and slide the filter straight out
- Remove-cup cover: Twist off the filter cup, replace the cartridge, then reinstall the cup
If you still are not sure which style you have, check the refrigerator model number inside the fridge and match it to the owner’s manual. That tiny step can save you from buying the wrong filter and dramatically improve your mood.
What You Need
- The correct replacement Kenmore refrigerator water filter
- A towel or small container for drips
- Your owner’s manual, if available
That’s usually it. No toolbox. No plumbing heroics. No dramatic soundtrack required.
How to Change a Water Filter in a Kenmore Refrigerator
Step 1: Buy the correct replacement filter
Start with the exact filter that fits your Kenmore model. Kenmore refrigerators use different filters depending on the design, with examples including filters such as 9083, 9085, 9490, 9690, 9913, and others. The model number matters more than the refrigerator’s finish, size, or how emotionally attached you are to it. If the old filter is still installed, remove it only after you’ve noted the part number or confirmed the correct replacement.
Step 2: Prepare the area
Place a towel under the filter area or keep one in your hand. Many Kenmore models release only a small amount of water during replacement, but “small amount” is still enough to drip onto socks, and nobody deserves that. In some models, you may also want to turn off the ice maker before changing the filter. A few manuals instruct you to turn off the household water supply, while others say it is not necessary, so the safest move is to follow your specific manual if you have it.
Step 3: Remove the old filter
The removal method depends on the style:
Push-button eject filter
Press the eject button and pull the filter straight out. If your filter is in the bottom grille, you may need to transfer the decorative cap from the old filter to the new one. If it is inside the refrigerator, the new filter often clicks into place without extra parts.
Twist-to-remove filter
Turn the filter to the left and pull it out. If there is a cap on the end, transfer it to the new filter before installation. Do not yank the filter like you’re starting a lawn mower. A steady twist works better.
Pull-down filter
Open the cover, pull the filter downward until it stops, and then remove it. On some models, you may need to twist the filter slightly to the left before it comes free. If a shelf blocks access, lower or remove the shelf first.
Swing-out filter
Open the compartment, swing the filter out, and pull it straight out. In some versions, especially door-mounted designs, you may also need to twist it to release it.
Eject-and-slide-out filter
Open the filter cover door, then pull the old filter straight out of the housing. These are often easy to remove but still like to surprise you with a drip or two.
Remove-cup cover filter
Twist the filter cover cup to the left, remove it, pull out the old filter, insert the new one, and reinstall the cup.
Step 4: Install the new filter
Unpack the new filter and remove any protective caps or covers from the O-rings. Then install it according to the filter style:
- Push-button models: Push in until it clicks or the eject button pops back out
- Twist models: Insert and turn right until secure
- Slide-out styles: Align the arrows if present and slide the cartridge in until it stops
- Pull-down or swing-out designs: Insert the filter, rotate if needed, then close the cover
Do not force it. If the new filter refuses to seat properly, double-check alignment. A filter installed crooked can cause leaks, poor flow, or a stubborn reminder light that acts like you did nothing at all.
Step 5: Flush the new filter
After the new filter is installed, run water through the dispenser to clear air and loose carbon particles. Many Kenmore instructions recommend flushing about 2 gallons of water. If the water sputters at first, that is normal. Keep dispensing until the flow becomes steady and the water looks clear. This step improves taste and helps the ice maker return to normal operation faster.
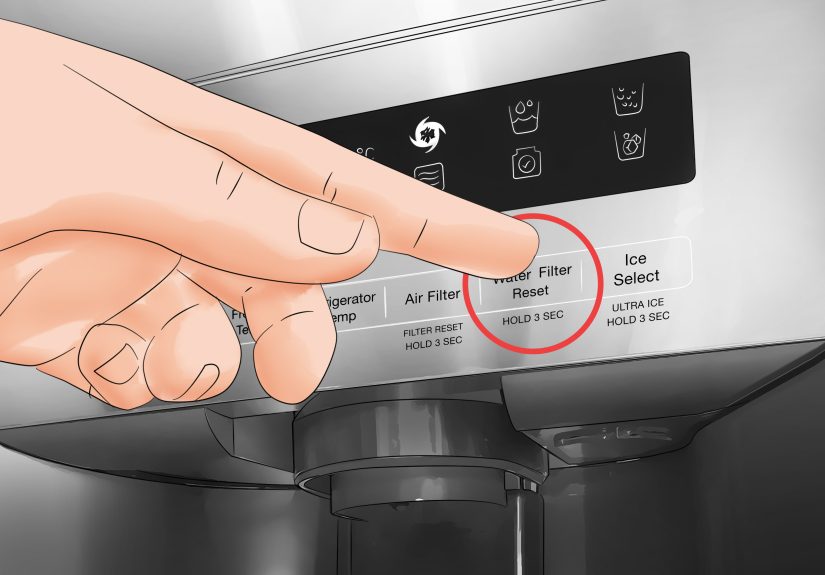
Step 6: Reset the filter light
Now reset the filter indicator. This step varies by model, which is refrigerator-speak for “yes, you really do need to pay attention here.” Common reset methods include pressing and holding one of the following for about 3 seconds:
- Filter Reset
- Water Filter
- Replace Filter
- Water filter icon
- Light button on some models
Some Kenmore models reset through the display icon. Others reset through a labeled button. If the controls are locked, unlock the panel first or the reset won’t register. If the light still stays on, hold the button a little longer and make sure the filter is fully seated.
Model-Specific Tips That Save Time
For bottom-grille filters
Watch for a decorative end cap. Older Kenmore side-by-side models often need that cap transferred from the old cartridge to the new one. Forgetting this is a classic reason a replacement filter suddenly seems “wrong” when the filter is actually fine.
For inside-top filters
Move the shelf below the filter if space is tight. Some pull-down and top-corner filters are easy to remove only after the shelf is lowered. It adds one extra minute and prevents a whole lot of awkward hand gymnastics.
For first-time replacements
Some models ship with a bypass plug or substitute cap instead of a working filter. If you’re replacing the original insert for the first time, remove that cap before installing the new filter.
For every model
Do not run the refrigerator’s water system without the filter or the proper bypass plug installed if your model requires one. That can lead to poor fit, leaks, or dispenser issues.
Common Mistakes to Avoid
- Buying by appearance only: Two filters can look nearly identical and still not fit your Kenmore model.
- Skipping the flush: Carbon residue and trapped air can make the first pours taste odd or sputter loudly.
- Forgetting the reset: The filter light does not magically sense your good intentions.
- Installing the filter crooked: If it doesn’t click, twist, or seat smoothly, stop and realign it.
- Ignoring slow water flow: That is often one of the earliest signs the old filter was overdue.
Troubleshooting After You Change the Filter
The water dispenser is slow
Run more water through the system to purge trapped air. If the flow is still weak, confirm that the filter is fully installed and that you bought the correct replacement.
The filter light will not turn off
Make sure you are pressing the correct reset button for your model and holding it long enough. Also check whether the control lock is on. Some Kenmore models will ignore input until the panel is unlocked.
Water is leaking around the filter
Remove the filter and inspect the O-rings and alignment. Reinstall carefully. If the model uses a decorative cap or cup, confirm that it was attached correctly.
The ice tastes funny right after replacement
That can happen briefly after a new filter is installed. Flush the system thoroughly and discard the first batch or two of ice if needed. Fresh filters usually settle in quickly once enough water passes through them.
How Often Should You Change a Kenmore Refrigerator Water Filter?
For most households, every six months is the sweet spot. Change it sooner if you notice slow dispensing, smaller ice cubes, strange taste, odd odor, or a filter warning light. Homes with hard water, heavy dispenser use, or lots of ice demand may go through filters faster. Your refrigerator is basically keeping score, and the water pressure usually tells the story before the control panel does.
Final Thoughts
Learning how to change a water filter in a Kenmore refrigerator is one of those home-maintenance tasks that sounds annoying but is usually pretty easy once you know your filter style. The trick is understanding that Kenmore uses different filter layouts across different models. Once you identify yours, the job becomes simple: remove the old filter, install the new one, flush the system, and reset the light.
Do it on schedule, and your refrigerator will reward you with better-tasting water, cleaner ice, healthier flow, and fewer mysterious dispenser tantrums. Not bad for a project that usually takes less time than deciding what to watch while standing in front of the open fridge.
Experience Notes: What Changing a Kenmore Refrigerator Water Filter Is Really Like
In real life, changing a Kenmore refrigerator water filter is rarely difficult, but it can be surprisingly specific. That’s the part people do not expect. Many homeowners walk into the job thinking every fridge filter works the same way, only to discover that their neighbor’s Kenmore twists out while theirs pops out with a button, and their cousin’s hides behind a cover near the ceiling like it is avoiding eye contact. Once you accept that the model matters, the whole process becomes much less frustrating.
One of the most common experiences is that the old filter feels stuck. Usually, it is not actually jammed. It is just seated tightly after months of use. A calm press, twist, or pull works better than brute force. The second common surprise is the little burst of water that appears the moment the old filter comes loose. It is not a disaster, but it is enough to make a towel feel like the smartest thing you grabbed.
Another thing people notice is how often water pressure improves immediately after replacement. If the old filter was overdue, the difference can be dramatic. The dispenser may go from slow and moody to fast and confident in a matter of minutes. Ice production can also improve, especially when the previous filter had become restricted. That is why a fresh filter sometimes solves problems that looked like bigger refrigerator issues at first.
The flushing step is also a real experience, not just a technical recommendation. The first few glasses after installation may sputter, hiss, or look cloudy. That can feel alarming if you are not expecting it, but it is usually just trapped air and fine carbon residue working its way out. Once you run enough water through the system, the flow steadies and the water clears up. After that, most people notice the taste improvement pretty quickly.
The reset step is where patience often gets tested. You press a button, nothing happens, and suddenly you are negotiating with a control panel. In many cases, the solution is simple: hold the button longer, unlock the controls first, or use the correct button for that specific model. It feels silly when the answer turns out to be “press it for three seconds instead of one,” but that happens all the time.
Overall, the experience of changing a Kenmore refrigerator water filter is best described as easy once, easier forever after. The first time teaches you where the filter is, how it locks in place, and which button resets the light. After that, it becomes one of those satisfying maintenance habits that makes the appliance work better with very little effort. And honestly, any home task that improves your water, helps your ice maker, and takes less than half an hour deserves a spot on the “worth doing” list.